- Ethics Policy
- Ownership Policy
- Corrections Policy


All Hidden Waddle Dee locations in A Trip to Alivel Mall in Kirby and the Forgotten Land
One of Kirby and the Forgotten Land’s levels sees you explore Alivel Mall, a large, deserted mall that is all too easy to get lost in. Unfortunately, this also means that some of the level’s hidden Waddle Dees are rather easy to miss. This guide will show you where you can find all four hidden Waddle Dees in this level so you can go on to further improve Waddle Dee Town.
Hidden Waddle Dee #1
Early in the level, you’ll walk through a narrow hallway as enemies rain projectiles on you from above.

The main path leads you through a door at the end of the hall, but instead of going through that door, head through a small opening on the left wall that you can access by blowing up a bomb cube. You’ll find a ladder that will take you to the enemies that were initially raining projectiles on top of you.

You’ll come out on the left side, but to get the Waddle Dee, jump over to the right side, and head south past a Gordo. You’ll find the Waddle Dee here.
Hidden Waddle Dee #2
At one point in the level, you’ll be offered the choice to go through one of three paths, each marked by different food items. Head through the path marked by a burger, and you’ll find a bunch of Awoofies eating some food. Inside this room is a chest containing the Waddle Dee.

Hidden Waddle Dee #3
You’ll need to be Ice Kirby to get this Waddle Dee. One part of the level features a room full of conveyor belts with a pit of spikes in the middle. To the left is a stack of burning barrels. Using your ice breathe, cool the barrels and destroy them, which will reveal a ladder.

Hit the switch at the top of the ladder, and the third Waddle Dee will pop out of the door in the center of the room. Catch the bird carrying this Waddle Dee to rescue it.
Hidden Waddle Dee #4
Toward the end of the level, you’ll be tasked with picking a room to enter. All of them lead to the end of the level, but only one contains the Waddle Dee. Here, you’ll want to go into the farthest back room on the left side, which will be marked with a picture of a cake.

Inside, you’ll find a bunch of Awoofies having a nice, peaceful desert. There will also be three chests in the room; open the middle one to find the last Waddle Dee.

- Genshin Impact
- Call of Duty
- Final Fantasy
- Blox Fruits Codes
- Blade Ball Codes
- Fruit Battlegrounds Codes
- Haze Piece Codes
- King Legacy Codes
- Shinobi Life Codes
- Anime Champions Simulator Codes
- Peroxide Codes
- Fortnite Skins List
- Fortnite Item Shop Today
- Tomorrow's Fortnite Item Shop
- Fortnite Rarest Skins
- Fortnite Rarest Emotes
- Privacy Policy

Where to find all hidden Waddle Dees in A Trip to Alivel Mall – Kirby and the Forgotten Land
Finding Waddle Dees to free them while playing levels in Kirby and the Forgotten Land can be quite tricky. Thankfully, it's just a matter of a little creative searching and paying attention to fine details.
On the corner ledge

Right after you find the invincible food and barrel through the corridor, find the secret ladder on the left side to get up on the two platforms. After defeating the enemies and getting over to the far ledge on the right side, you'll find the Waddle Dees.
The hidden treasure in burger spot

Look at the food signs above once you are traveling down the first food court strip with Kirby on a conveyor belt. Stop at the burger sign on the right, the second to last food sign in the row. Enter the hallway to the right of the burger sign and open the treasure to release the Waddle Dees who are trapped inside.
Related: Every Amiibo that works with Kirby and the Forgotten Land and what they do
Over conveyer belts and spikes

Once you get to the conveyor belt and spikes area after you fight the ice boss, clear out the fire barrels in front of the ladder and take down the enemies to release the Waddle Dee from the alcove. To capture them without getting hurt, have Kirby catch the bird carrying the cage.
Cake spot on the left

Finally, get to the second and double-laned food court strip in the mall. Look for the Cake food sign on the left at the very end. Do not go into the area for the cake sign you see further back, as this will set you back. Go into this room at the end and collect cake while defeating enemies. The Waddle Dees will be in the treasure chests.
Want to read more about Kirby and the Forgotten Land? Check out Where to find all hidden Waddle Dees in Rocky Rollin’ Road – Kirby and the Forgotten Land on Pro Game Guides.

Write A Comment
Cancel reply.
Comments are on moderation and will be approved in a timely manner. Please read the following rules before commenting:
- All comments must be on topic and add something of substance to the post
- No swearing or inappropriate words
- No asking or begging for anything free
- Do not attempt to start a poll in the comments
- Comments in all CAPS will be removed
- We reserve the right to remove a comment for any reason
- Do not impersonate a staff member or influencer
Save my nickname and email in this browser for the next time I comment.
This site is protected by reCAPTCHA and the Google Privacy Policy and Terms of Service apply.
A Trip to Alivel Mall
A Trip to Alivel Mall is the fourth stage of Natural Plains in Kirby and the Forgotten Land . In this stage, Kirby wanders through an abandoned shopping mall, making use of the Needle and Ice abilities to help him overcome the various enemies and obstacles within to save the Waddle Dees . He also uncovers hints to help him avoid getting lost by tearing down sets of lockers using Storage Mouth . Along the way, he battles Wild Frosty .
There are three Capsules from Vol. 1 to collect in this stage, and five missions to complete. There are a total of ten Waddle Dees to rescue here, when including the mission objectives.
- 1.1 Differences between difficulties
- 1.2 Missions
- 1.3 Enemies and Abilities
- 3.1 Video walkthrough
- 4 Names in other languages
Stage overview [ edit ]
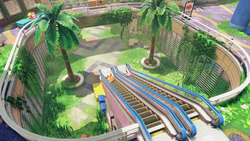
The stage takes place in seven main areas (not counting the introductory room). Kirby starts the stage by landing at the entrance to the giant mall complex and running through the front door.
The first main area starts with Kirby heading up a broken escalator, at the top of which he can grab the Needle ability from a Needlous . From there, the path leads to the right down a long hallway lined with foes, pitfalls, and pit stops to grab recovery items. All the way at the end of the hall, it bends toward the back to reveal an area where a couple Poppy Bros. Jr. rain down bombs from above, but an Invincible Candy can be found tucked away in a corner at this turn to make passing through safer. The door leading forward is just beyond this point.
In the second area, Kirby finds himself in a hall that bends toward the back after passing by a set of lockers. A conveyor belt leads toward the back, with three possible paths to take, marked by signs of food. Only one of these paths will lead Kirby where he wants to be, and a hint to know which one can be found behind the lockers.
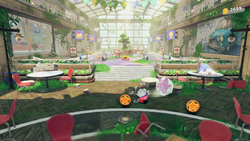
The third area changes depending on which path Kirby took previously. If he took the wrong path, he will find himself in a mostly empty hall save for a treasure chest in the middle. Opening it reveals nothing, however, and instead causes four Awoofies to appear. If Kirby took the correct path, however, he'll find the Awoofies having lunch at tables instead, and can find a lost Waddle Dee and some other goodies in this room.
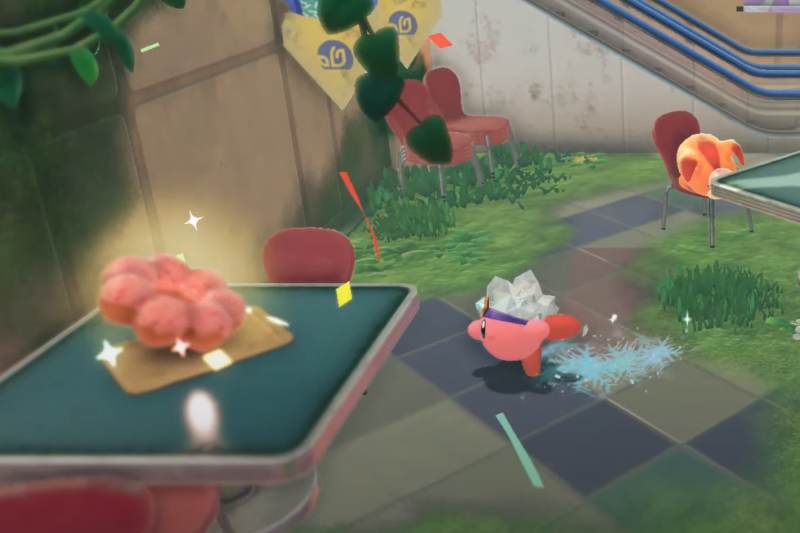
The fourth area is a long winding hallway filled with conveyor belts and various foes. At the first bend, Kirby is forced to fight the Mid-Boss Wild Frosty . Defeating him yields the Ice ability, which Kirby can use to good effect to cool down burning logs and freeze enemies on the way forward. As he progresses down the path, Kirby can intercept boxes that are about to fall off the conveyor belts to recover their items. After passing by once more set of conveyors forming a square around a spike pit, the door to the next area can be found.
The fifth area is a large open room with six possible paths to take, but only one of them is the correct one. To find out which, Kirby will need to uncover two separate hints by pulling down lockers.
The sixth area changes depending on which path Kirby took previously. If he took the wrong path, he will find himself in a mostly empty hall save for a Treasure Chest in the middle. Opening it reveals nothing, however, and instead causes four Awoofies and two Gabons to appear. If Kirby took the correct path, however, he'll find the Awoofies having lunch at tables instead, and can find a lost Waddle Dee and some other goodies in this room.
In the last room, Kirby needs to head up a flight of broken escalators to reach one last set of lockers. These ones, however, are bolted to the wall, so when Kirby attempts to move them out of the way using Storage Mouth , he ends up taking the entire façade down with it, allowing him to escape the mall and rescue the last set of Waddle Dees to clear the stage.
Differences between difficulties [ edit ]
There do not appear to be any differences in the number of enemies in this stage between Spring-Breeze Mode and Wild Mode.
Missions [ edit ]
A Trip to Alivel Mall has five missions to complete, as follows:
- "Clear the stage" - Kirby must complete the stage.
- Waddle Dee 1: This Waddle Dee can be found near the end of the first hall, up where the Poppy Bros. Jr. are raining down bombs. He is located in the lower-right portion of this area, guarded by a Gordo .
- Waddle Dee 2: This Waddle Dee can be found in a treasure chest in the third room, if Kirby took the correct route to get there. Kirby needs to head down the path marked by the hamburger sign in the second room.
- Waddle Dee 3: This Waddle Dee can be found in the fourth area, shortly after defeating Wild Frosty , in the spot with the four conveyor belts moving around a spike pit. Kirby needs to use the Ice ability to cool down some burning logs in the upper-left corner and then hit a switch behind them to open some barrier blocks. This reveals the caged Waddle Dee, who is ferried back and forth across the spike pit until Kirby saves him.
- Waddle Dee 4: This Waddle Dee can be found in a treasure chest in the sixth room, if Kirby took the correct route to get there. Kirby needs to head down the path marked by the second shortcake sign all the way back and to the left in the fifth room.
- Doughnut 1: Can be found in the first area, on a table behind a set of boxes in the way.
- Doughnut 2: Can be found in the fourth area, in the square formation of conveyor belts with the spike pit in the middle. It can be made to appear by touching the glowing spot in the lower-right corner.
- Doughnut 3: Can be found in the sixth area after taking the correct path. Touching the glowing spot on the empty table toward the left end of the room makes it appear on a table further left.
- Doughnut 4: Can be found in the last area on a table above the gold cage, guarded by a Bernard .
- "Eat an Invincible Candy" - Kirby must find and eat the Invincible Candy in the first area of the stage. It can be found off to the right just before the hall with the Poppy Bros. Jr. raining bombs from high up.
- "Navigate the mall without getting lost" - This is awarded if Kirby chooses the correct path in both areas where there are false pathways. Hints to find the correct paths can be uncovered by tipping over lockers using Storage Mouth in their respective areas.
Enemies and Abilities [ edit ]
- Wild Frosty
- Bolted-Storage Mouth
Trivia [ edit ]
- From the beginning of this stage, if Kirby follows the Awoofy walking on the escalator without harming it, it will lead to a hidden blue Star Coin left to the first room's exit.
- Throughout the mall, there are celebratory signs which when decoded read "Anniversary sale", most likely referencing the Kirby 30th Anniversary .
Gallery [ edit ]

Kirby at the entrance to the mall

Using Needle to clear out some foes in the first hallway

Finding the Invincible Candy at the bend

Rescuing the Waddle Dee in the first hall

Finding a conspicuous set of lockers

Traveling down the hall with the first set of possible paths

Finding a treasure chest after taking the correct path

Battling Wild Frosty

Cooling down burning logs in the area with four conveyors around a spike pit

Finding another cryptic clue in a side room

Stealing all of the Awoofies' cakes

Finding one of the hidden doughnuts

Brining down the house in the last area

Nintendo Switch Online profile icon background, depicting A Trip to Alivel Mall
Video walkthrough [ edit ]
Names in other languages [ edit ].
- Stages in Kirby and the Forgotten Land
- Articles which list non-English names
Navigation menu
Page actions, personal tools.
- Not logged in
- Contributions
- Request account
- Current events
- All categories
- Recent changes
- Random page
- Random image
- Maintenance
- Feature an article
- Feature an image
- Make a page Good
- What links here
- Related changes
- Special pages
- Printable version
- Permanent link
- Page information
- Cite this page
- WiKirby Discord
- WiKirby Twitter
- Social media
- Help and policies
- About WiKirby
NIWA (Wikis)
- ARMS Institute
- Dragalia Lost Wiki
- Fire Emblem Wiki
- F-Zero Wiki
- Golden Sun Universe
- Hard Drop Tetris Wiki
- Icaruspedia
- Kingdom Hearts Wiki
- Metroid Wiki
- Mystery Dungeon Franchise Wiki
- Pikmin Fanon
- Rhythm Heaven Wiki
- Starfy Wiki
- StrategyWiki
- Super Mario Wiki
- Xeno Series Wiki
- This page was last edited on 6 April 2024, at 12:19.
- Content is available under GNU Free Documentation License 1.3 or later unless otherwise noted.
- Privacy policy
- Disclaimers
- Cookie policy
- Mobile view
- Skip to primary navigation
- Skip to main content
- Skip to primary sidebar
- Skip to footer
Basically Average
Video Game Reviews & Guides as Basic as They Come
A Trip to Alivel Mall Missions & Capsules | Kirby And the Forgotten Land
Last Updated March 27, 2022 By Johnny Salib / FlamingGaymer Leave a Comment
At this point it’s no secret that I’m a massive Kirby fan who will essentially buy every Kirby game that comes out.
I was pleasantly shocked that I received this game upon release as my preorder from Amazon said that I wouldn’t get it until early next week, so as soon as my doorbell rang I scurried to answer the door and begin prepping for my Twitch stream that day.
I have to say that I am so pleasantly surprised with the gameplay of Kirby and the Forgotten Land as it offers a great variety of gameplay elements that have never been seen before in a Kirby game, including swallowing up large items with the Mouthful Mode mechanic. While players may have thought that this was the most noteworthy mechanic, they are mistaken as players will also have the opportunity to upgrade all of their abilities into stronger ones, both changing the way that they function and dealing some extra damage for those tough battles ahead.
One of the biggest changes to Kirby and the Forgotten Land is that players now have access to Missions that will help them save Waddle Dees that will essentially open up a variety of shops that they can utilize to become more powerful.
Some of these shops also include minigames that the player can access whenever they want to take a break from the main story, adding some extra gameplay and replicability to the game.
The following guide will take you through everything you need to know about A Trip to Alivel Mall, which is the fourth map players can access in Kirby and the Forgotten Land. PLayers can also use this guide to find the multiple Capsules that are available to them.
CLEAR THE STAGE
As is with all other maps in Kirby and the Forgotten Land, players will have the opportunity to score themselves 3 Waddle Dees simply for completing the level.
While 3 Waddle Dees is nothing to scoff at, I strongly recommend that players try to get all the Waddle Dees in the level as 3 will not be nearly enough to unlock the various shops early enough.
Luckily for players, the Alivel Mall Missions are pretty straight forward, for the most part.
SAVE THE HIDDEN WADDLE DEES

WADDLE DEE #1
After players have received the Invincible Candy they must go down the hallway to find a Bomb Block.
Attack this Bomb Block with any ability that you have and go up the pathway.
The Waddle Dee is located on the right hand side beyond a spike enemy.

WADDLE DEE #2
The second Waddle Dee is extremely easy to find and is hidden in a chest on a platform in the center of the first main cafeteria players go through.
If only looking for all Waddle Dees was this easy, we wouldn’t need guides!

WADDLE DEE #3
When players are at the square conveyer belt they will find some crates that need to be destroyed by using an ability.
Upon breaking those crates players will find a blue button with a star in it that will open a hidden area that a Waddle Dee comes out of.
Players do not need to be quick about getting this Waddle Dee as it will come back and forth until the player rescues it.

WADDLE DEE #4
When players reach the cafeteria with the rainbow stage they will be met with three chests.
The final Waddle Dee is located in the center chest.
EAT 4 DOUGHNUTS

DOUGHNUT #1
Above the area where players can collect the first Capsule, players can locate a table with a doughnut sitting on top of it.
This is above the section with a metal platform and boxes covering an entrance.
Players can take the escalator up to get here.

DOUGHNUT #2
When players reach the square conveyer belts they will have to find a glowing orb on the bottom right of the the square.
Players will need to be close enough to this area to see the orb appear.
As soon as players interact with it they will receive a bunch of coins as well as a Doughnut.
DOUGHNUT #3
Shortly after players locate the fourth Waddle Dee they will need to jump on a table with glowing sparkles.
Similar to all glowing sparkles, players will have to be close enough to it for it to appear.
Interacting with it will provide players with the third Doughnut.
DOUGHNUT #4
Doughnut four is quite easy to miss as it is located right at the very end of the level.
Players will become excited that it is the end of their journey, however, players should head to the right of this area to climb a ladder that will take them to the final doughnut.

EAT AN INVINCIBLE CANDY
When players have moved beyond the first capsule and doughnut they will be met with a barricade where they will see a Lollipop which they can interact with in order to become Invincible.
Most players will immediately grab this thinking that it is a regular food, but to their surprise they will be able to kill all enemies simply by touching them.
NAVIGATE THE MALL WITHOUT GETTING LOST
While getting around the mall isn’t the toughest thing to do, players will have to be aware of what clues they can receive.
Essentially, players will have to use their Mouthful Mode in order to locate two three lockers that state the paths to take.
The following are the solutions:
After finding the first Waddle Dee there is a locker that reveals a map that tells you to travel to the Burger Shop.
Players will have to locate two lockers after they finish the part with the square conveyer belts. One is pink and one is green. Both are incomplete maps which will essentially tell you to travel through the top left cake shop. For clarities sake, this is the cake shop closest to the windows.
CAPSULE LOCATIONS

Fairly early on players will locate a ledge with a few metal looking boxes on it. Players will be able to break these boxes with any ability and will locate a Capsule behind them.

After players have passed the Frosty boss they will be met with multiple conveyer belts.
On the biggest one there will be 3 boxes that appear. The capsule is in the final box that comes down that line.
Beyond the square conveyer belt are two lockers. Players must interact with both lockers (one being pink and one being green).
The green locker will reveal a secret room which gives an ice cream cone as a clue for travel.
In a box to the bottom right is a hidden capsule. Break the box with an ability.

About Johnny Salib / FlamingGaymer
Johnny is a 30-something year old average gamer and Twitch Streamer . His favourite games include Resident Evil, Donkey Kong 64, Little Big Planet, Don't Starve Together, FFXIV, New World, Punball and League of Legends.
Johnny is also a sound designer/composer , writing for theatre and film and recently becoming interested in video game soundtracks , and is a big animal enthusiast . All of his music is DMCA-Free making it available for use for other streamers or content creators.
Reader Interactions
Leave a reply cancel reply.
Your email address will not be published. Required fields are marked *
Save my name, email, and website in this browser for the next time I comment.
Notify me of follow-up comments by email.
Notify me of new posts by email.
This site uses Akismet to reduce spam. Learn how your comment data is processed .
Games I Play
- Bloons Adventure Time TD (BATTD)
- Bloons TD 6 (BTD6)
- Don’t Starve (Together)
- Final Fantasy XIV (FFXIV)
- League of Legends (LOL)
- Minecraft (MC)
- Minecraft Dungeons (MCD)
- PewDiePie’s Pixelings
- Planet Coaster
- Plants Vs Zombies (PvZ)
- Shoppe Keep 2 (SK2)
- Genshin Impact
- Stardew Valley
- Two Point Hospital
- Orcs Must Die 3 (OMD3)
Games by Genre
- Free To Play (FTP)
- Multiplayer
- Real Time Strategy (RTS)
- Side Scroller
- Singleplayer
- Subscription
- Tower Defense

Kirby and the Forgotten Land Walkthrough & Guides Wiki
- Waddle Dee Town
- Copy Abilities
- Mouthful Mode
- Treasure Road
- Originull Wasteland
Alivel Mall (Staff Side) Waddle Dee Locations and Missions Walkthrough
Kirby and the Forgotten Land is out now on Nintendo Switch! ★ All Present Codes ☆ Blueprint Locations ★ Post Game Content and 100% Guide ☆ Best Copy Abilities ★ Star Coin Farming / How to Get Rare Stones

This is a walkthrough for the Alivel Mall (Staff Side) stage in Kirby and the Forgotten Land. Read on to learn how to clear all Alivel Mall (Staff Side) stage missions, see Waddle Dee and Figure locations, Enemy Information, and more!
List of Contents
- Walkthrough Video
- Missions and Abilities
- Walkthrough Progression
- Hidden Waddle Dee Locations
- Ice Cream Locations
How to Defeat Wild Bonkers With the Cutter Ability
- Mouthful Mode Holes
- Blueprint Location
- Figure Locations
- Related Guides
Alivel Mall (Staff Side) Walkthrough Video
Alivel Mall (Staff Side) Missions and Abilities
Missions list, alivel mall (staff side) mission completion order, alivel mall (staff side) hidden waddle dee locations, 1: use ring mouth kirby to break the wall.
After defeating the two sword enemies in the room below, destroy the bomb block to reveal a metal ring. Return to the previous room and open the hole as Ring Mouth Kirby to find the Waddle Dee.
How to Break the Wall
2: use vending mouth kirby to reveal the secret room.

Use Vending Mouth Kirby to fit through the rectangular hole. This will break the wall and reveal the hidden Waddle Dee.
3: Rescue after Defeating Wild Bonkers

Defeating the Mid-Boss Wild Bonkers will lower the cage holding the Waddle Dee, allowing you to rescue it.
4: Use Ring Mouth to Blow Away the Dirt

Blow away the dirt covering the Treasure chest as Ring Mouth Kirby to save the Waddle Dee inside.
5: Break Through the Hole in the Ground with Water-Balloon Mouth

Breaking through the hole in the ground with Water-Balloon Mouth Kirby will reveal an underground cafe where the last hidden Waddle Dee is located.
Alivel Mall (Staff Side) Ice Cream Locations
1: on the table next to the giant ice cream cone (white).

Proceeding along the main path in the first area will lead you to a giant ice cream cone. The ice cream will be on top of the table.
2: Inside the Room Near the Broken Clock (Blue)

Enter the room near the broken clock to find the ice cream on the table. Be sure to hit the knob (1) before leaving to knock down the clock to use as a metal ring.
3: Inside the Boxes by Giant Ice Cream Cone (Ice Cream Sandwich)

The last ice cream can be found inside some boxes next to the giant ice cream cone in the final area. It looks different from the previous ones, so be sure not to miss it.
Pile on Damage with Charge Shots

Alivel Mall (Staff Side) Mouthful Mode Holes
1: fit in the triangular hole with cone mouth kirby.

Swallow the Giant ice cream cone to use Cone Mouth. Then head right and jump into the triangular space to open the new area.
2: Fit in the Circular Hole with Ring Mouth

3: Fit in the Rectangular Hole with Vending Mouth
After getting Vending Mouth Kirby, head to the warp pad on the left to make it back to the top level. Proceed carefully across the platforms and go inside the rectangular hole.
4: Use Ring Mouth for the Circular Hole Near the Platforms

Avoid the large hole in the ground and head towards the hole in the wall near the platforms. Kirby's mobility is limited in Ring Mouth mode, so watch your footing in this area.
5: Use Water-Balloon Mouth for the Hole in the Ground

6: Cone Mouth will Break the Final Hole

The Hole leading to the final area requires Cone Mouth Kirby. Swallow the ice cream cone nearby and enter the hole.
Alivel Mall (Staff Side) Blueprint Location
Hammer the two posts to get the wild hammer blueprint.

Alivel Mall (Staff Side) Figure Locations
1: destroy the boxes after defeating the sword enemies.

After defeating the sword enemies in the new area, destroy the boxes on the left side to find the first figure.
2: Use Vending Mouth Kirby to Destroy the Boxes

Destroy the boxes behind the vending machine with the Soda Shot ability to get the next Figure.
3: Blow Away the Dust Using the Ring Mouth

After defeating Wild Bonkers, use the Hammer copy ability on the next area to hit the nail in the room with the large yellow enemy.
Inhale the ring and use it to blow away the dust from the previous area to find the third figure underneath it.
4: On the Far Platform in the Final Area

Before finishing the level, be sure to pick up the last figurine on the rotating platforms.
Kirby and the Forgotten Land Related Guides

Originull Wasteland Walkthrough and Stage List
We at Game8 thank you for your support.
In order for us to make the best articles possible, share your corrections, opinions, and thoughts about 「Alivel Mall (Staff Side) Waddle Dee Locations and Missions Walkthrough | Kirby and the Forgotten Land」 with us!
When reporting a problem, please be as specific as possible in providing details such as what conditions the problem occurred under and what kind of effects it had.
Do you want to send this information?
Walkthrough Menu
- Kirby and the Forgotten Land Wiki Top
- List of Stages
Stages By Area
- Natural Plains
- Everbay Coast
- Wondaria Remains
- Winter Horns
- Redgar Forbidden Lands
- Lab Discovera
- Isolated Isles
Treasure Roads
- List of Treasure Roads
- Tips and Tricks
Beginner's Tips and Guides
- Demo Present Codes
- What are Sparkling Areas?
- Multiplayer Guide
- Star Coin Farming Guide
- Play Time: How Long to Beat
- Post Game Contents and 100% Guide
- Best Copy Abilities
- How to Use Copy Ability Mix
- How to Upgrade Abilities
- How to Find the Hal Room
- How to Unlock the True Ending
- Online Features
- Secrets and Easter Eggs
Systems, Settings, and Controls
- amiibo Compatibility
- List of Controls
- Difficulty Differences
- How to Dodge
- How to Slide
- How to Drop Abilities
- How to Heal
- How to Save
Collectible and Item Locations
- Blueprint Locations
- How to Get Rare Stones
- List of all Blue Coin Locations
- How to Get All Photos
- List of Copy Abilities
- List of Evolved Abilities
- Gigant Sword
- Meta Knight Sword
- Morpho Knight Sword
- Homing Bomb
- Chakram Cutter
- Buzz-Saw Cutter
- Blizzard Ice
- Volcano Fire
- Dragon Fire
- Noble Ranger
- Space Ranger
- Fleur Tornado
- Storm Tornado
- Wild Hammer
- Masked Hammer
- Clutter Needle
- Crystal Needle
- Pencil Drill
- Mouthful Mode Transformations
- Vending Mouth
- Water-Balloon Mouth
- Storage Mouth
- Coaster Mouth
- Stairs Mouth
- Light-Bulb Mouth
- Scissor-Lift Mouth
- Waddle Dee Cafe
- Waddle Dee's Item Shop
- Waddle Dee's Weapon Shop
- Waddle Dee Cinema
- Wise Waddle Dee
- Kirby's House
- Waddle Dee-liveries
- Waddle Live! Corner Stage
- Trader Waddle Dee
- List of Minigames
- Tilt-and-Roll Kirby
- Waddle Dee Cafe: Help Wanted!
- Fishing Pond
- Meta Knight Cup
- The Ultimate Cup
- The Ultimate Cup Z
- List of All Bosses
- Enemies List
- List of Missions
- List of Figures
- List of Characters
- Latest News and Updates
- Preload Guide
- Is Forgotten Land Open World?
- Gameplay and New Features
- List of All Trailers
- Release Date
- Pre-Order Bonus Guide
- Will There Be DLC?
- Review and Rating
Japanese Wiki (日本語版)
- カービィディスカバリー攻略サイト
- 1 Toy Hammer Ability Attacks, Evol...
- 2 Crash Ability Attacks, Evolution...
- 3 Multiplayer Guide: How to Unlock...
- 4 All Copy Abilities
- We could not find the message board you were looking for.
Gaming News

Game8's Indie Spotlight

RAID Shadow Legends Promo Codes Give $100 Worth of Bonuse...

Hades 2 Review (Technical Test)

No Rest for The Wicked Review (Early Access)
More Gaming News
Popular Games

Honkai: Star Rail Walkthrough & Guides Wiki

Genshin Impact Walkthrough & Guides Wiki

FF7 Rebirth Walkthrough & Guides Wiki

Pokemon Scarlet and Violet (SV) Walkthrough & Guides Wiki

Palworld Walkthrough & Guides Wiki

Dragon's Dogma 2 (DD2) Walkthrough & Guides Wiki

Persona 3 Reload Walkthrough & Guides Wiki

Monster Hunter Rise: Sunbreak Walkthrough & Guides Wiki

Pokemon UNITE Walkthrough & Guides Wiki

Fire Emblem Heroes (FEH) Walkthrough & Guides Wiki
Recommended Games

Elden Ring Walkthrough & Guides Wiki

Hyrule Warriors: Age of Calamity Walkthrough & Guides Wiki

New Pokemon Snap Walkthrough & Guides Wiki

Pokemon Legends: Arceus Walkthrough & Guides Wiki

Super Smash Bros. Ultimate Walkthrough & Guides Wiki

FF7 Remake Walkthrough & Guides Wiki

The Legend of Zelda: Breath of the Wild Walkthrough & Guides Wiki
All rights reserved
© HAL Laboratory, Inc. / Nintendo The copyrights of videos of games used in our content and other intellectual property rights belong to the provider of the game. The contents we provide on this site were created personally by members of the Game8 editorial department. We refuse the right to reuse or repost content taken without our permission such as data or images to other sites.
- Popular Articles
- Privacy Policy

Kirby and the Forgotten Land: All Hidden Waddle Dees in Natural Plains
There are a few hidden Waddle Dees to find in the Natural Plains in Kirby and the Forgotten Land . Some locations are relatively easy to find, while other locations can be harder to uncover.
Each of the six main worlds in Kirby and the Forgotten Land has four levels apiece with three to five specific Hidden Waddle Dees to find. Rescuing these captured friends is often the reward for solving optional puzzles and finding secret areas.
Finding them is the easiest way to increase your total count and unlock everything that Waddle Dee Town has to offer. The more you collect, the more stores and mini-games unlock in the hub.
Where to Find All Hidden Waddle Dees in Natural Plains
There are 15 Waddle Dees hiding in the four non-boss stages in Natural Plains . For clarity’s sake, we have separated these out from the 16 you find by completing the Hidden Missions in Kirby and the Forgotten Land . Our Hidden Mission guide for Natural Plains can be found here .
Use the links below to jump to each level:
- Downtown Grassland
- Through the Tunnel
- Rocky Rollin’ Road
- Trip to Alivel Mall
All Hidden Waddle Dees in Natural Plains’ Downtown Grassland

There are three Waddle Dees to find in Natural Plains’ Downtown Grassland level.
Downtown Grassland Waddle Dee 1
The very one in Kirby and the Forgotten Land is hard to miss. After you defeat the very first required Wild Edge boss, this Waddle Dee will appear as your reward.
Downtown Grassland Waddle Dee 2
When you enter the next area, look to your right and you’ll see a ladder that leads to the roof of a building. Go up the ladder. you’ll see a dome on the roof that requires Mouthful Mode to open. Do so to free another hidden Waddle Dee.
Downtown Grassland Waddle Dee 3
The third and final hidden Waddle Dee in Downtown Grassland comes later in this same area. Ahead and to the left of the rooftop dome is another ladder that leads to a different rooftop. Here you’ll find a traffic cone suspended by vines. Release the cone by using the Sword or Cutter ability. Once the cone is free, return to the surface level to inhale it. Use Cone Mouth to break the concrete back of the Tortorner roaming this area.
Go back to level list .
All Hidden Waddle Dees in Natural Plains’ Through the Tunnel

There are four Hidden Waddle Dees to find in Natural Plains’ Through the Tunnel level.
Through the Tunnel Waddle Dee 1
The first Waddle Dee is in the tunnel’s secret room. To access the room, you must be in the cavern with a dome and steel boxes in the wall. you’ll have to use Mouthful Mode on the dome to reveal a switch that destroys the boxes. This reveals an entrance, and this one is in a chest in the room beyond.
Through the Tunnel Waddle Dee 2
Later in the level, you’ll find more steel boxes in a room with a three-star door that will not allow you to come back. Follow the coin path and platform up to a secret passage that will lead you to a bomb block above the boxes. Attack the bomb block and the boxes will reveal another Waddle Dee below.
Through the Tunnel Waddle Dee 3
In the next room, there will be a fuse puzzle on the floor. Light the fuse and follow the rope to a canon that will launch you up to where the next Waddle Dee is hidden.
Through the Tunnel Waddle Dee 4
The final Waddle Dee in Through the Tunnel is another but more complex fuse puzzle, requiring you to use stairs to reach the canon. To avoid putting the stairs on the fuse, use Mouthful Mode to move them to the right of the canon. Here you should be able to climb up and reach the platform to get the last one in Through the Tunnel.
All Hidden Waddle Dees in Natural Plains’ Rocky Rollin’ Road

There are four Hidden Waddle Dees to find in Natural Plains’ Rocky Rollin’ Road level.
Rocky Rollin’ Road Waddle Dee 1
The first hidden Waddle Dee in Rocky Rollin’ Road is a reward for completing the Ranger tutorial. you’ll see a gun-touting Ranger near a floating target early in the stage. Inhale him and hold the attack button while aiming to shoot the target. Destroy the nearby blocks to reveal this one.
Rocky Rollin’ Road Waddle Dee 2
The next Waddle Dee will be found in a similar fashion. When crossing a bridge, you’ll see a Ranger in front of you and a target in the background. Inhale for the Copy Ability and shoot the target to spawn a cloud bridge to the room where your captured friend is. There is a target practice mini-game in this room you must complete.
Rocky Rollin’ Road Waddle Dee 3
The third Waddle Dee is a bit tricky compared to what’s come so far. you’ll see a blue switch at the end of the section where Kirby is running from a boulder. You must hit the switch before the boulder destroys it, or you’ll not be able to get this hidden one. If done in time, he will be on the bench near a hot dog after the sequence.
Rocky Rollin’ Road Waddle Dee 4
The final hidden Waddle Dee in Rocky Rollin’ Road is pretty simple to find. Once you get the ability to Mouthful Mode copy the car, just follow the elevated ramps, boosting and jumping in order to crash into the weak side of the building.
All Hidden Waddle Dees in Natural Plains’ Trip to Alivel Mall

There are four Hidden Waddle Dees to find in Natural Plains’ Trip to Alivel Mall level.
Trip to Alivel Mall Waddle Dee 1
The first hidden Waddle Dee in Alivel Mall is found right after you get the Invincible Candy. Move your invincible little self through the corridor ahead to hit the bomb block on your left. This will reveal a ladder to the second floor where this one is being held. The faster you go, the less you have to worry about all the enemies due to the invincible power-up.
Trip to Alivel Mall Waddle Dee 2
In the next room, you should swallow a storage locker using Mouthful Mode to reveal a map showing the solution to the puzzle ahead. The trap room ahead has three exits, but two lead to enemy rooms. The map shows you that the path under the burger sign is safe. The next Waddle Dee is another reward for solving this riddle.
Trip to Alivel Mall Waddle Dee 3
The next hidden Waddle Dee is in the conveyor belt room with the spikes in the center. There are barrels on fire in the upper left-hand corner. you’ll need to have the Ice Copy Ability or inhale a nearby Frosty to destroy the barrels and reveal a ladder leading to a blue switch. Hit the switch for this one.
Trip to Alivel Mall Waddle Dee 4
The final hidden Waddle Dee in Natural Plains is in the next trap room. Here you have to enable Mouthful Mode on the lockers again to reveal a map, but this time, it has a piece missing. It shows an arrow to the left under a cake.
The catch is there are multiple cake signs on this floor. Go all the way to the right-hand side of the area to find another locker blocking a door to a room. The final piece of the puzzle is inside the room, showing you the exit is across from the ice cream shop.
And those are all of the hidden Waddle Dee locations in Natural Plains. For more on Kirby and the Forgotten Land , like a comprehensive list of every Present Code we know so far, check out our other Kirby and the Forgotten Land guides .

Kirby and the Forgotten Land: How to Find Every Waddle Dee in Alivel Mall Staff Side
Players visit a new side of the Alivel Mall in the Originull Wasteland. Here's how to find all Waddle Dees in this Kirby and the Forgotten Land level.
Players can collect Waddle Dees in Kirby and the Forgotten Land by completing special mission objectives in each level. Once freed, they will return to Waddle Dee Town and begin rebuilding the area. New buildings will appear in town as players progress through the game, such as the colosseum, where players can earn one of the best copy abilities in the game, and the fishing pond, where players can play a mini-game.
The fifth world area in Forgotten Land is the Originull Wasteland, located on a separate island from the rest of the world areas. Players can get 11 Waddle Dees from this area's third level, Alivel Mall Staff Side. This level calls back to the Alivel Mall section from the first world, Natural Plains, where players fought Gorimondo . Here's how to get all Waddle Dees in this new view of Alivel Mall, other than the three earned for clearing the stage.
Related: Kirby and the Forgotten Land: How to Find Every Waddle Dee in Searching the Oasis
Where to Find the Ice Cream
Players can find three types of ice cream scattered throughout the level, and doing so earns players a Waddle Dee. The first type is by the traffic cone dressed up as an ice cream cone. Players must use Cone Mouth to progress, so this treat is hard to miss.
The second type is found by destroying the boxes by the clock players pass shortly after the Wild Bonkers fight. The third type is again hidden by a box, this time near the end of the level. Players will find another traffic cone beneath a rainbow sign as they cross the plus-shaped rotating platforms.
Related: Kirby and the Forgotten Land: How to Find Every Waddle Dee in An Unexpected Beast King
How to Find the Hidden Waddle Dees
The first hidden Waddle Dee is through the hole in the wall players find when passing the rotating circular pathway. Players will need to backtrack to get this Waddle Dee. After progressing to the next room, they will find a wall with a bomb block. Destroy the bomb block to find a ring, then return to the hole using Ring Mouth and jump into it. The hole will burst apart, allowing players to rescue a Waddle Dee.
The second hidden Waddle Dee is past a rectangular-shaped hole in the wall. After passing over a glass floor that reveals a vending machine below, players will find a platform held up by a rope. Cut the rope to acquire Vending Mouth so that Kirby can then destroy the wall.
The third hidden Waddle Dee is received after defeating Wild Bonkers. The secret door leading to this optional mini-boss is not much of a secret since it's by an exit, but while the door appears inaccessible, players can access it by using a small crawl-space to the side.
Related: Kirby and the Forgotten Land: How to Find Every Waddle Dee in The Wastes Where Life Began
The fourth hidden Waddle Dee is in a chest buried by sand. After defeating Wild Bonkers, players can use the Hammer to pound a post that knocks a distinguished clock off a wall. Kirby can use the clock's frame for Ring Mouth in order to unearth the treasure chest.
The final hidden Waddle Dee is near the end of the level, by the rotating plus-shaped platforms. Players can acquire Water-Balloon Mouth to destroy the large hole in the ground.
How To Get The Final Waddle Dees
The last two Waddle Dees are earned by completing the level a certain way. The first task requires players to destroy each Mouthful hole in the level, and the second requires players to defeat Wild Bonkers using the Cutter ability.
We're currently experiencing technical difficulties. Please bear with us!
Hey Poor Player
- Write For Us
- Privacy Policy
- Cookie Settings
- Search for:

- ATLUS Announces Upcoming Metaphor: ReFantazio Live Showcase
- Sail The Rusty Seas This August in SteamWorld Heist II
- Get Creative Today In Sticky Business
- WayForward and Atari Bring Yars Rising Later This Year
- Team Up With Friends This July in TMNT: Splintered Fate
- Explore a Metropolis This May in Little Kitty, Big City
Kirby and the Forgotten Land: Natural Plains Waddle Dee Guide
Hpp helps you find all the waddle dees in natural plains in kirby and the forgotten land.

As I played through the latest Kirby and the Forgotten Land , I realized folks might appreciate a helping hand locating the many kidnapped Waddle Dees. So I’m gonna make a guide for each world, starting with World 1, Natural Plains. This guide will not only have images of the hidden Waddle Dees in each stage of Natural Plains, but will also showcase the locations of key items or landmarks necessary to unlock the other Waddle Dees. The only Waddle Dees I won’t bother showing are the ones you’re guaranteed to rescue at the end of each stage. With that said, here’s my Natural Plains Waddle Dee Guide to help you find all those little buggers.
Natural Plains Stage 1: Downtown Grassland
Missions – Clear the stage; Save the hidden Waddle Dees; Make 5 tulips bloom; Break the building’s shutter; Ride the spewing water up to the balcony
As Downtown Grassland is the first stage, it’s not too hard to find all the Waddle Dees. I’m not saying it’s impossible to miss some, but it takes real effort. That said, below, you’ll find the locations of all 5 tulips you need to make bloom. All it requires is touching them.

The first one is immediately visible after you start the stage.

The second is a bit farther in the same area. All you need to do is hit the switch, grab the cake and then run to the left, where you’ll find the hidden flower.

The third tulip is in the area with the Cone Mouth transformation after the first Warp Star. Just check the left corner before proceeding too far between the dueling cannons.

The fourth tulip is in the area after the second Warp Star. Ignore the turtle and look over to the right by the tree.

And the final one is in the derelict building. Just defeat the bull there and search behind where it was for the last one.

To get the “Break the building’s shutter” mission, you honestly can’t miss it. Once you get the Vending Machine transformation, you have to break the shutter to get to the rest of the stage. Just do so, and voila.

As for the spewing water Waddle Dee, it’s in the area after the dueling cannons, a bit to the right. You’ll find a cracked pipe. All you have to do is Cone Mouth smash it, then ride it up to the balcony. Easy peasy.

For the hidden Waddle Dees, the first one is unmissable. You’ll get him right after the mini-boss fight.

The second one is in the area right after riding the 2nd Warp Star. Just get past the bull and friends, climb up the ladder, and Mouthful Mode to rip the top off the circular contraption.

As for the last one, it’s hidden under a turtle. Just climb up the ladder, slash the entangled cone down to earth, and then smash the turtle with Cone Mouth, and you’ve gotten them all.
Natural Plains Stage 2: Through the Tunnel
Missions – Clear the stage; Save the hidden Waddle Dees; Find the secret room; Light 4 lantern switches; Remove the wanted poster
I’m just gonna say this – there’s a reason one of the first copy abilities you find in Through the Tunnel is Fire. You’ll need that for the Lantern Switch achievement, as well as accessing some hidden rooms via cannon.

The first lantern switch is in the opening area, right before the doorway to the right. Just light it up, and if you want, you can follow the coin trail to the bomb block to get some star coins.

The second lantern switch is in the 2nd area to the left. Once activated, it’ll make a neat arrow out of star coins.

The third one is a bit farther in the same area, to the right of a locked gate.

The 4th lantern switch is a bit farther, still in the same area. It’s surrounded by flying Gordos.

Past the first checkpoint, find the Mouthful Mode transformation, rip off the top and activate the switch. Then follow it to achieve the secret room achievement as well as discovering the first hidden Waddle Dee. Just deal with the Awoofies, then claim your prize.

The second Waddle Dee can only be found once you activate the 4th lantern switch. Follow the trail up and around, hit the star switch, and the blocks will reveal the little guy.

Waddle Dee Number Three is in the area with the first cannon. Light the fuse and run to the cannon, then once you shoot upwards through some blocks, he’ll be in the background.

To find the fourth and final hidden Waddle Dee, just light the fuse and use the staircase to reach the second cannon. Then open the middle chest at the top to find him.

As for the wanted poster, it’s in the area with the Mouthful Mode Staircase transformation. Keep shuffling towards the end, and before the 2nd cannon, you’ll find a poster with an X. Spit out the stairs, climb up and smash it.
Natural Plains Stage 3: Rocky Rollin’ Road
Missions – Clear the stage; Save the hidden Waddle Dees; Find the side road while going uphill; Eat snacks off 3 tree stumps; Drive without falling off the edge.
The missions in this stage are pretty easy, I only missed one my first time through. That said, you’ll have to pay attention and not go too fast if you want to find all the Waddle Dees.

For the first snack, it’s right there in the opening area, past the Ranger enemy. You’ll probably want to gobble up his power if you don’t already have Ranger equipped.

The second snack is right up the ladder from the first one, almost impossible to miss.

The third snack is the tricky one. After going uphill and before going downhill, you’ll find a stump but no snacks. If you pay attention, right before it is a glowing spot. Touch it, and the snack will appear.

To find the side road, first head left as you run uphill. You’ll find a glowing spot. Touch it and then just follow the coins, keep walking right and climb the ladder.

The first hidden Waddle Dee requires the Ranger to find him. Run past the boulders and shoot the target to explode the blocks hiding him.

Number two is in a hidden challenge room. Once you’re uphill, head left. In the area with a ranger and a floating target, first hit the target to reveal the door. Inside, you’ll have to shoot several targets before they fly away. Once you’re successful, Waddle Dee will show up.

As you race downhill with boulders chasing you, don’t forget to hit the star switch. Doing so will reveal a Waddle Dee by a bench in front of you.

For this stage’s final Waddle Dee, as you race around as a car, keep your eyes peeled for a crack in the wall. Smash through, and you’ve got the last Waddle Dee. And for the final mission, just don’t fall into any holes as a car, and it’s fulfilled.
Natural Plains Stage 4: A Trip to Alivel Mall
Missions – Clear the stage; Save the hidden Waddle Dees; Eat 4 doughnuts; Eat an Invincible Candy; Navigate the mall without getting lost.
By far, the hardest missions in Alivel Mall are eating all the doughnuts and navigating the mall without issue. One of the doughnuts is well hidden. As for the navigation, it’s actually a fun little puzzle of sorts. But first, Kirby is hungry!

The very first doughnut is just sitting there, floating on a table past the bomber and bone tosser duo. Just remove the cardboard boxes to find it.

The second doughnut is in the area with a series of conveyor belts moving in a square after the mini-boss. On the far right corner, there’s a glowing spot. Touch it, and the doughnut will start floating around, so just grab it.

To get the next doughnut, you have to be successfully navigating the mall with the clues provided. Once you reach the second area with Awoofies eating, look for the glowing spot and touch it to reveal the doughnut.

The final doughnut is in the area right near the stage exit. Ignore the exit, and climb the ladder to the right. Up top is a Ranger and a lonely doughnut. You know what to do.

The Invincible Candy is really obvious. It’s just a bit to the right of the place you found the first doughnut, and you can use it to wipe the floor with all the enemies in that large room.

To navigate the mall without getting lost, you’ll have to use clues hidden behind lockers. Not doing so will result in pointless battles against rooms full of foes, and no treasure. Use Mouthful Mode to rip the lockers down, and then you’ll find the clues. The first one shows a right arrow in front of a burger. In the food court immediately after that clue, just exit the area to the right in front of the burger sign.

For the second navigation, it’s a two-part clue. The first one shows a lefthand arrow in front of a cake, but there’s a tear in the diagram. Head a bit to the right to find a hidden area with more lockers. Rip them both off to find the missing clue, which is a picture of green ice cream. In the food court right nearby, just find the cake that’s to the left of ice cream, and exit left in front of it.

Hidden Waddle No. 1 is in the upper area right by the Invincible Candy. Just climb the ladder and walk towards the bottom right to find his cage.

The second Waddle Dee can’t be missed if you’re navigating the mall properly. It’s in the side room in a chest in front of a ton of burgers.

The third one is in the section past the mini-boss. You’ll need Ice to get to him, so either eat the walrus or chow down on the snowman. Then follow the conveyor to the burning cubes, and freeze them so you can reach the ladder behind them. Climb up, hit the switch, and grab the Waddle Dee as he floats back and forth over the spike pit.

The final Waddle Dee also can’t be missed if you’re navigating properly. It’s in the second hidden room in a trio of chests. Open it up to safely rescue the little guy.
Natural Plains Boss Stage: The Brawl at the Mall
Missions – Clear the stage; Slip through Gorimondo’s legs; Defeat Gorimondo with the Sword ability; Clear within 2:00; Clear without taking any damage

Now, the boss missions are a bit different. You won’t find any hidden Waddle Dees in their lair, but you can rescue a bunch by fulfilling really crazy requirements. For Gorimondo, those aren’t too bad, other than beating him in under two minutes or doing so without taking any damage. To slip through his legs, just wait until he lifts one up and start dashing.
I wouldn’t try and get all these missions in one go, though if you’re so inclined, you’ll need to equip the Sword first and be fast as lightning. If you want to go the safe route, I strongly recommend equipping Fire and using it to reduce the ape to ash in a very short amount of time. Just make sure to dodge carefully, and he won’t give you too much trouble.
And there you have it! HPP’s Natural Plains Waddle Dee guide. Check back in the coming days and weeks for more Kirby and the Forgotten Land guides .

Related Articles

Nintendo Brings Back Live World Championships

Princess Peach: Showtime! Reveals 4 Stunning New Transformations

Nintendo Download for 4/18/24
April 18th, 2024
Written by: Josh Speer
Explosive Indie Gaming It's a proven fact that any Nintendo Download which takes plac [...]

Nintendo Download for 4/11/24
April 11th, 2024
Spring Flowers April keeps things fresh today with another great selection of games. [...]

Reigns Beyond Review (Switch)
April 17th, 2024
Reigns Beyond Review: Where No Redshirt Has Gone Before At this point, I've played en [...]

Dream Tactics Review (PC)
April 16th, 2024
Dream Tactics Review: Minimal Slumber, All Party It's been a hot minute since I last [...]

MechWarrior 5: Clans Preview - Piloting A 10-Ton Walking Tank Has Never Been More Accessible
Written by: Francis DiPersio
MechWarrior 5: Clans brings accessibility, ambitious five-player co-op, and an engaging narrative to [...]

Top 10 Superhero Video Games of The 2000s
Now, The Real Game Begins! It’s never good to start with a quote from Batman Forever, but just like how difficult it is to reasonably squeeze Batman Forever in…
Beacon Pines Review (Switch)
Beacon Pines Review: Spooky Cute Time Loop Luka hasn’t had the easiest life. First his father died when he was very young; then his mother mysteriously vanished. Seemingly orphaned…

Virology Book Review
When Frank put a copy of Virology (written by Ren Warom) in my hands and asked me for a review, I jumped. Despite not having read Virology's predecessor, Escapeology,…
Join Our Discord!
Click the icon above to join our Discord! Ask a Mod or staff member to make you a member to see all the channels.
Metacritic Partner

VR GAME CRITIC AFFILIATE

Open Critic Partner

Screen Rant
Kirby & the forgotten land: natural plains hidden waddle dee guide.
Natural Plains is the first world of Kirby & The Forgotten Land, and there are captured Waddle Dees hidden in each stage that need Kirby's help.
Natural Plains is the first world of Kirby & The Forgotten Land , and there are Waddle Dees hidden in each stage that Kirby must rescue. After being whisked far from Planet Popstar and kidnapped by the Beast Pack, the Waddle Dees have been locked away in cages that Kirby will have to find as he makes his way through this overgrown city. Players need to rescue at least 17 Waddle Dees to advance to the boss of Natural Plains.
As Kirby rescues Waddle Dees and sends them back to Kirby & The Forgotten Land’s Waddle Dee Town, they’ll begin to rebuild their village with homes and facilities. Not only will they build Kirby a house of his own to rest in, but shops like the Waddle Dee Weapons Shop and Waddle Dee Café will begin to open as well. New minigames like the Fishing minigame and Tilt & Roll Kirby will also become available, giving Kirby a way to take a break from his adventure and earn some extra Star Coins.
Related: Every Copy Ability In Kirby & The Forgotten Land
There are a total of 46 Waddle Dees in Kirby & The Forgotten Land’s Natural Plains, but Kirby will rescue some of them by completing each stage and unlocking trophies. The rest can be found hidden throughout each level of the world, and while some are hiding in plain sight, others can be a bit trickier to track down. There are no hidden Waddle Dees in the final boss level, “The Brawl at the Mall,” but players will have to unlock all of the trophies in this level to rescue all 7 Waddle Dees from Gorimondo.
Kirby & The Forgotten Land - All Downtown Grassland Waddle Dees
- The first hidden Waddle Dee in Kirby & The Forgotten Land’s Natural Plains can be found after Kirby reaches the end of the first Traffic Cone Mouthful Mode area. After climbing the ladder and defeating Kirby's Wild Edge mini-boss , players will be able to rescue the Waddle Dee on the far platform.
- The second Waddle Dee can be rescued right after players take the Warp Star to the third part of the stage. There’s a ladder guarded by a Blade Knight and a Buffolant to the right of where Kirby lands, and players can climb up and use Dome Mouthful Mode on the dome to rescue the Waddle Dee.
- The third Waddle Dee is trapped inside the turtle’s stone shell just past the second Waddle Dee location. Kirby can climb the ladder to the left and swallow the Blade Knight to get the Sword Copy Ability, then cut the traffic cone from the vine. Using Traffic Cone Mouthful Mode will allow Kirby to crush the turtle, releasing the final Waddle Dee in the stage.
Kirby & The Forgotten Land - All Through the Tunnel Waddle Dees
- Kirby can use Kirby & The Forgotten Land’s Mouthful Mode on the first dome in the stage to reveal a button that unlocks a secret room to the left. The Waddle Dee is hidden in the chest in the back of the room.
- The second Waddle Dee is trapped behind the stacked metal boxes in the second part of the stage. Kirby can scale the wall to the right of the door to get to the platform on top of the boxes and use the bomb box on the corner to detonate them, revealing the hidden Waddle Dee inside.
Related: Kirby And The Forgotten Land Should've Used Two Kirbies For Co-Op
- Kirby will come across a large fuse on the ground that lights a cannon further down the path. The fuse will run down pretty fast, so Kirby will have to jump in the cannon before the fuse ignites it to reach the third hidden Waddle Dee. However, if Kirby doesn’t make it in time , the fuse will reset so he can try again.
- There’s a second fuse in the Stair Mouthful Mode section of the level. To reach the cannon it leads to, players will have to move the stairs to the edge of the platform before igniting the fuse. After reaching the upper platform with the cannon, Kirby will find the final hidden Waddle Dee on the stage between two treasure chests.
Kirby & The Forgotten Land - All Rocky Rollin’ Road Waddle Dees
- The first hidden Waddle Dee in the third stage of Kirby & The Forgotten Land’s Natural Plains is hidden behind some metal crates in the section with the large rolling stones. Kirby can inhale the enemy near the first floating target in this section to get the new Ranger Copy Ability , which he can use to shoot the target. This will destroy the crates, revealing the hidden Waddle Dee.
- After reaching the top of the hill with the rolling boulders, Kirby will cross a metal bridge with a floating target near the side of the cliff. Shooting this target will reveal a secret bridge with a red door on the other side that leads to a small minigame. Kirby will have to shoot all five floating targets before they fall behind the fence to rescue the second hidden Waddle Dee.
- The third Waddle Dee will appear after players hit the button at the bottom of the Indiana Jones -esque chase section where Kirby must escape the massive boulder that chases him down the hill.
- In the "Karby" Car Mouthful Mode part of the level, there are ramps that Kirby can speed across to jump high in the air. At the end of the final ramp, Kirby can break through a wall to reach the Waddle Dee hidden in the building to the left of the main path.
Kirby & The Forgotten Land - All A Trip to Alivel Mall Waddle Dees
- The first hidden Waddle Dee in the Alivel Mall level of Kirby & The Forgotten Land’s Natural Plains is on the upper level of the hallway guarded by bomb-throwing enemies. To reach it, players will need to detonate the bomb box on the left side of the hallway and climb the ladder on the other side of the wall. The Waddle Dee is on the right-hand side near the stairs where Kirby entered the hallway.
- After Kirby enters the door at the end of the previous hallway, there will be a locker that he can use Storage Mouthful Mode on to reveal a map with a burger symbol on it. The second Waddle Dee can be found in the burger restaurant in the next hallway.
- At the end of the section with all the conveyor belts, Kirby will find four conveyor belts with a spike trap in the center. After freezing the burning boxes in the left corner with the Ice Copy Ability, Kirby can climb the ladder and hit the switch at the top to release the third hidden Waddle Dee.
- Once players reach the next floor of the mall, there will be a large atrium with more restaurants on either side. The final Waddle Dee is in the cake restaurant on the left side of the atrium.
Next: Every Evolved Ability In Kirby and the Forgotten Land
Kirby & The Forgotten Land is available on Nintendo Switch.
Kirby and the Forgotten Land: Alivel Mall (Staff Side) Missions and Waddle Dee Locations
Kirby fans can use this guide to find all of the collectibles in Forgotten Land's Alivel Mall (Staff Side) stage.
Quick Links
Alivel mall (staff side) missions, ice cream 1 / hole 1, hole 2 / waddle dee 1, capsule 2 / hole 3 / waddle dee 2, beat bonkers with cutter / waddle dee 3 / blueprint, ice cream 2 / capsule 3 / waddle dee 4, waddle dee 5 / hole 4 - 5, ice cream 3 / hole 6.
This Kirby and the Forgotten Land guide will walk players through the Alivel Mall (Staff Side) stage in one of the later worlds. Fans can see all the missions for the level down below, as well as how to collect everything there is to get to work towards 100%ing the game.
- Clear the Stage
- Save the Hidden Waddle Dees
- Taste test 3 kinds of ice cream
- Defeat Wild Bonkers with the Cutter ability
- Fit through all holes using Mouthful Modes
When Kirby and the Forgotten Land players go to the backside of the mall and fight the ghost enemies for the first time, they'll reach a door that takes them back to the brighter side of the mall.
RELATED: Kirby: 8 Times Meta Knight Acted Like A Hero
Instead of going off to the right, head to the left to find the first ice cream, and a cone to inhale to become Cone Mouth. Walk to the right, and jump into the triangle-shaped hole in the wall to reveal a new area.
After breaking the wall using Cone Mouth, jump across a moving platform, and then go through the door to the opposite side of the mall. Hit some boxes on the left to find a capsule.
To the right of the capsule location, break the bomb block to find a ring that Kirby can inhale using Mouthful Mode .
Some coins will pop out, leading players to the previous section. Jump into the circular cutout in the wall with Ring Mouth to find the first hidden Waddle Dee.
After going back to the main path and proceeding right, players will see a rope that can be cut with a sword to drop Kirby into the lower level.
Use Mouthful Mode on the vending machine, and destroy the boxes that were behind it to find a capsule.
Now, step onto the blue warp panel with Vending Mouth still in use to teleport to the main level. Go left and jump into the rectangular hole in the wall to uncover a Waddle Dee.
Proceed forward, following the arrows on the signs. Defeat a frosty snowman enemy, and then climb a ladder. Go to the door on the right that's behind a gate. Make sure to inhale the nearby Cutter enemy to get its copy abilit y, because as soon as players walk through the door, a fight with Wild Bonkers will happen.
Beat him with the Cutter ability equipped, and players will be rewarded with a Waddle Dee. Suck up the hammer that the boss dropped and make sure to hit the two switches in the boss room to find the Wild Hammer Blueprint in a chest .
RELATED: Kirby and the Forgotten Land: Windy, Freezing Seas - Waddle Dee Locations and Missions Guide
In the next area of this Kirby and the Forgotten Land stage, players will see a treasure chest stuck in some dirt. Skip it for now, and break the stack of boxes on the right near the clock on the wall.
Enter the room, and hit the switch on the wall with the hammer to knock the clock down. Make sure to grab the ice cream on the desk before leaving.
Now, inhale the clock to turn into Ring Mouth, and press B to shoot wind at the two piles of dirt to the left to find a capsule and Waddle Dee .
In the next area, there will be two large spinning platforms that are in the shape of Xs. Move to the platform on the right with the porcupine enemy and jump into the wall while equipped with Ring Mouth.
Now, use Kirby's Mouthful Mode to suck the water and become Water-Balloon Mouth. Carefully walk south on the moving platform and fall into the cracked hole in the ground to reveal an underground room with a Waddle Dee and some sweets.
Move north on the spinning platforms and the fourth capsule will be floating in plain sight.
To the left of the previous capsule, players will see an ice cream cone that can be sucked up. While using Cone Mouth , break the cardboard boxes in this corner to find the last ice cream item.
Now, waddle over to the end of the stage with the Cone Mouth and fit into the triangle-shaped hole in the wall.
Kirby and the Forgotten Land is out for the Nintendo Switch.
IMAGES
VIDEO
COMMENTS
Hidden Waddle Dee 3. The next Waddle Dee is found in the area with four conveyor belts running in a circle around a center of spikes. Suck up the frosty to get the Ice Copy Ability and freeze the ...
A Trip to Alivel Mall Hidden Waddle Dee Locations 1: On the Right Ledge Above the Invincible Candy. The ledge right above the Invincible Candy is the location of the first hidden Waddle Dee. Destroying the bomb block in the following area reveals a ladder that allows you to climb up to reach it.
A Trip to Alivel Mall has four hidden Waddle Dees. The first can be found after getting the Invincible Candy and heading up the stairs. Players will immediately come across enemies lobbing bombs off a rooftop. A bomb block is nearby that players should destroy, as it reveals a ladder leading up to the roof.
Hidden Waddle Dee #3. Toy Capsule #3. Hidden Waddle Dee #4. Doughnut #3. Doughnut #4. Navigate the Mall Without Getting Lost. Kirby and the Forgotten Land may not be fully open-world, but it ...
All Hidden Waddle Dee locations in A Trip to Alivel Mall in Kirby and the Forgotten Land . Don't get lost in the mall. Jon Yelenic | Published: Mar 25, 2022 02:39 pm . Image via Nintendo .
#KirbyandtheForgottenland #Nintendo #KirbyThis 100% walkthrough will show you how to get all the waddle dees on the A trip to Alivel Mall level in Kirby and ...
Finally, get to the second and double-laned food court strip in the mall. Look for the Cake food sign on the left at the very end. Do not go into the area for the cake sign you see further back, as this will set you back. Go into this room at the end and collect cake while defeating enemies. The Waddle Dees will be in the treasure chests.
1-4 A Trip To Alivel Mall (4) Climb the ladder to the left side of the corridor after you've eaten the invincible candy In the square conveyored area, smash the barrels in the top left corner and ...
Kirby and the Forgotten World - A Trip to Alivel Mall - All Waddle Dees 100% - Gameplay Walkthrough Part 5All Waddle Dees & Missions on Wild ModeA Trip to Al...
A Trip to Alivel Mall: Total: 10 Waddle Dee ・Clear the Stage (3) ・Save the hidden Waddle Dees (4) ・Eat 4 Doughnuts (1) ・Eat an Invincible Candy (1) ・Navigate the mall without getting lost (1) The Brawl at the Mall: Total: 7 Waddle Dee ・Clear the Stage (3) ・Slip through Gorimondo's legs (1)
A Trip to Alivel Mall is the fourth stage of Natural Plains in Kirby and the Forgotten Land. ... Waddle Dee 3: This Waddle Dee can be found in the fourth area, shortly after defeating Wild Frosty, in the spot with the four conveyor belts moving around a spike pit. Kirby needs to use the Ice ability to cool down some burning logs in the upper ...
Kirby And The Forgotten Land A Trip to Alivel Mall 100% Gameplay Walkthrough Part 4, completing all PERFECT Missions and finding all Waddle Dees, with Abdall...
While 3 Waddle Dees is nothing to scoff at, I strongly recommend that players try to get all the Waddle Dees in the level as 3 will not be nearly enough to unlock the various shops early enough. Luckily for players, the Alivel Mall Missions are pretty straight forward, for the most part. SAVE THE HIDDEN WADDLE DEES. WADDLE DEE #1
This will break the wall and reveal the hidden Waddle Dee. 3: Rescue after Defeating Wild Bonkers. Defeating the Mid-Boss Wild Bonkers will lower the cage holding the Waddle Dee, allowing you to rescue it. 4: Use Ring Mouth to Blow Away the Dirt. Blow away the dirt covering the Treasure chest as Ring Mouth Kirby to save the Waddle Dee inside.
Trip to Alivel Mall Waddle Dee 3. The next hidden Waddle Dee is in the conveyor belt room with the spikes in the center. There are barrels on fire in the upper left-hand corner. you'll need to have the Ice Copy Ability or inhale a nearby Frosty to destroy the barrels and reveal a ladder leading to a blue switch. Hit the switch for this one.
The fourth hidden Waddle Dee is in a chest buried by sand. After defeating Wild Bonkers, players can use the Hammer to pound a post that knocks a distinguished clock off a wall. Kirby can use the clock's frame for Ring Mouth in order to unearth the treasure chest. The final hidden Waddle Dee is near the end of the level, by the rotating plus ...
Natural Plains Stage 4: A Trip to Alivel Mall. Missions - Clear the stage; Save the hidden Waddle Dees; Eat 4 doughnuts; Eat an Invincible Candy; Navigate the mall without getting lost. By far, the hardest missions in Alivel Mall are eating all the doughnuts and navigating the mall without issue. One of the doughnuts is well hidden.
A Trip to Alivel Mall Hidden Waddle Dee #3 - The third hidden Waddle Dee can be found in the area with the conveyor belts moving in a square with spikes in the center. Swallow the nearby snowman for the ice ability and use it on the flames blocking the ladder. Climb the ladder to find an item that will reveal a raven that will fly the caged ...
The first hidden Waddle Dee in the Alivel Mall level of Kirby & The Forgotten Land's Natural Plains is on the upper level of the hallway guarded by bomb-throwing enemies. To reach it, players will need to detonate the bomb box on the left side of the hallway and climb the ladder on the other side of the wall. The Waddle Dee is on the right ...
Waddle Dee 5 / Hole 4 - 5. Capsule 4. Ice Cream 3 / Hole 6. This Kirby and the Forgotten Land guide will walk players through the Alivel Mall (Staff Side) stage in one of the later worlds. Fans ...
This is a walkthrough for the A Trip to Alivel Mall stage in Kirby and the Forgotten Land. Read on to learn how to clear all A Trip to Alivel Mall stage missions, see Waddle Dee, Figure, and Doughnut locations, Enemy Information, and more! Kirby and the Forgotten Land Walkthrough & Guides Wiki. Top; Stages;