
Full Screen Safari iPhone: How to Maximize Your Browsing Experience

Enabling Full Screen Mode in Safari
When using Safari on your iPhone or iPad, full screen mode lets you enjoy more screen real estate, offering an uninterrupted and immersive browsing experience. Here’s how you can maximize content viewing on your devices.
Access Full Screen on iPhone
On an iPhone, Safari provides a straightforward way to enter full screen mode. While browsing a web page, simply change your iPhone’s orientation to landscape. You’ll see a button with two diagonal arrows in the bottom right corner of the screen. Tap this button to switch to full screen mode, which hides the address bar and tabs, giving you a wider view of the content you’re exploring.
Full Screen Mode on iPad
For iPad users, the process is slightly different due to the larger screen. Safari on iPad doesn’t offer a dedicated full screen button like on the iPhone. However, you can achieve a full screen experience by hiding the toolbar. Swipe up on any web page to hide the toolbar and enjoy a more expansive browsing interface. Swipe down to bring the toolbar back into view when needed.
Navigating the Full Screen Safari Interface
Experience the web on your iPhone like never before by learning how to browse in full-screen mode on Safari. This section will teach you about Safari’s interface and how to make the most out of its full-screen capabilities.
Understanding Safari’s Interface
Apple’s Safari browser on iOS provides a clean and user-friendly interface. It has an address bar at the top where you can type in URLs or search queries, and a toolbar at the bottom containing navigation buttons and tools for managing tabs. When you switch to landscape mode on your iPhone, the option to enter full-screen mode appears, represented by two diagonal arrows, allowing for a more immersive browsing experience. In full-screen, Safari hides distractions such as the address bar and toolbar, so you can focus on the content.
Utilizing Safari’s Full Screen Features
To activate full-screen mode in Safari:
- Open Safari from your iPhone’s Home screen.
- Navigate to your desired website.
- Rotate your iPhone to landscape mode.
- Tap the full-screen icon (two diagonal arrows) in the bottom right corner.
While in full screen:
- Swipe down at the top edge of the screen to access the address bar and search functionality.
- Access open tabs by tapping the tabs icon, which minimizes the full-screen view and shows your open pages.
Exiting full-screen is just as simple; rotate your iPhone back to portrait mode, or tap the full-screen icon again. Full-screen browsing effectively utilizes the entire display of your iPhone, eliminating borders and other on-screen elements that could compete with the web content you’re viewing. This mode is perfect for reading articles, watching videos, or examining images without extraneous distractions.
Advanced Full Screen Safari Tips
Exploring beyond basic navigation in Safari on an iPhone opens up a host of options for savvy users. This section highlights techniques for viewing web pages in full screen and customizing the browsing experience on small screens.
Requesting Desktop Sites
In Safari, the demand for viewing full websites as on a Mac rather than their mobile versions continues to grow. Desktop Site functionality enables this, and Safari has made it increasingly straightforward. To request the desktop version of a website on an iPhone:
- Open Safari and navigate to the desired website.
- Press the Share Button at the bottom of the screen.
- Scroll down the list and tap Request Desktop Site .
Since iOS 13 , this feature has been optimized for users, ensuring that websites are scaled correctly for touch interactions on smaller screens. The pages sync seamlessly with iCloud across devices, so changes reflect on Safari on Mac too.
Creating Web App Shortcuts
With Safari on iPhone, users have the ability to create shortcuts on their home screen for quick access to their favorite websites. This simulates the experience of using a native app, all without the need to download anything from the App Store. To set up a web shortcut:
- Navigate to the desired webpage in Safari.
- Tap the Share Button .
- Select Add to Home Screen and name the shortcut.
The meta tag apple-mobile-web-app-capable in a webpage’s code indicates that the site is optimized for full screen. This tag tells Safari that the site is prepared to function as an application, making the user experience smoother and more integrated for iOS users. Starting from iOS 6 , this has become a commonly used feature, allowing for chrome-less browsing where the browser UI elements are not displayed, spotlighting the content itself.
Frequently Asked Questions
This section addresses some common questions about using full-screen mode in Safari on the iPhone to enhance your browsing experience.
How can I enable full-screen mode in Safari on my iPhone?
To enter full-screen mode in Safari, simply rotate your iPhone to the landscape orientation and tap the full-screen icon in the bottom right corner. If this option isn’t visible, ensure that screen rotation isn’t locked in your device’s Control Center.
Why isn’t Safari on my iPhone switching to full-screen mode?
If Safari isn’t switching to full-screen, first check that your iPhone’s orientation lock is turned off. Then, ensure you’re using a website that supports full-screen viewing as some websites might restrict this feature.
How do I hide the address bar in Safari on my iPhone to view websites in full screen?
Hide the address bar in Safari by scrolling up on a webpage, which allows you to view content in full-screen. The bar will reappear when you scroll back down.
What steps should I follow to view web pages in full-screen on Safari for iOS 15?
In iOS 15, full-screen mode is achieved by scrolling up on any webpage, which will hide the address and tab bars. To bring them back, simply tap the bottom of the screen or scroll down.
How can I use JavaScript to create full-screen experiences in Safari on iOS?
Full-screen experiences on Safari can be programmed using JavaScript by employing the Fullscreen API. However, this often requires user interaction – like a button press – to activate full-screen mode due to browser security settings.
What is the method to exit full-screen mode in Safari on an iPhone?
To exit full-screen mode, tap the screen to bring up the address and navigation bars, then tap the full-screen icon in the bottom right corner again. Rotating your iPhone back to portrait orientation will also exit full-screen mode.
Similar Posts
 2")
The Best Guide For Fixing An iPhone That Won’t Charge (2024)
If your iPhone is no longer charging you might only have a short amount of time to…

How To Fix An iPhone 13 Pro Max That Is Overheating
The iPhone 13 Pro Max is prone to overheating issues (an issue also shared with the 12…

How To Fix A Cell Phone Vibrating Motor
Is your smartphone’s vibrating motor giving you the silent treatment? Vibrations in a phone are more than…

How To Fix The iPhone Camera Black Screen Issue
Ever grabbed your iPhone to capture a moment, only to find your camera screen as black as…

How To Repair Cracked Back Glass On An iPhone: DIY Guide
Options To Repair Cracked Back Glass (iPhone) Option Pros Cons Apple Repair Professional job, warranty on repair,…

iPhone Unknown Part Message: What Does It Mean?
Have you ever encountered an “Unknown Part” message on your iPhone? This notification, typically following an iOS…

How To Make Safari Full Screen On iPhone
If you’re a fan of the Safari web browser, you know that it’s one of the most popular options for surfing the web. And if you’re an iPhone user, you’ll be happy to know that it’s now possible to make Safari full-screen on your device. This gives you a more immersive browsing experience and provides more space for viewing websites, videos, and other content.
To make Safari full-screen on your iPhone, simply open the app and then tap the Full-Screen button located in the bottom right-hand corner of the screen. It looks like two diagonal arrows. Tapping this will instantly activate the full-screen mode and expand the viewable area of your browser window. You can tell when it’s active because all of the toolbars and tabs will disappear from view.
If you want to exit out of Safari full-screen mode at any time, just click anywhere on your screen or press the Home button at the bottom of your device. This will return all of your toolbars and tabs back into view so that you can quickly navigate to other websites or switch back to regular mode.
Overall, making Safari full-screen on your iPhone is a great way to maximize available space and get more out of your browsing experience. Plus, it makes it easier to watch videos or look through images without having any distractions getting in the way. So if you want to make sure that you’re getting everything that Safari has to offer, give this feature a try today!

Using Full-Screen Mode in Safari on an iPhone
Yes, you can go full screen on Safari for iPhone. To do so, simply tap the full-screen button in the bottom right-hand corner of the Safari window. The full-screen button looks like two diagonal arrows pointing away from each other. When you tap it, the Safari window will expand to fill your entire iPhone screen, giving you a more immersive viewing experience.
The Impact of Small Safari on iPhone
There are a few possible reasons why Safari on your iPhone may be small. Firstly, make sure you have the latest version of Safari installed. If you’re using an older version, it may not be optimized for your device’s screen size or resolution. You should also check the settings in Safari to make sure the page zoom is set to an appropriate level. Additionally, if you’ve enabled “Display Zoom” in Settings > Display & Brightness, the text and images in Safari will appear smaller than usual. Finally, if you’re using an iPhone Plus model that has a 5.5-inch display, double-tapping on the home button will switch between standard and zoomed modes, which may affect how large text and images appear in Safari.
Safari is a powerful and user-friendly web browser for Mac and iPhone users. It offers a wide variety of features, from tabbed browsing to private browsing, to help make the web experience more pleasant. Additionally, Safari makes it easy to switch into full-screen mode with just a few clicks or keystrokes, giving you an immersive experience and freeing up valuable screen real estate. With its intuitive design and robust feature set, Safari is an excellent choice for Mac users looking for a reliable web browser.
Related posts:

James Walker
Download Free
How to Go Full Screen on Safari
It's free and super easy to set up
If you're a frequent user of Safari, you now have the option to go full screen while browsing the web. Full screen mode can help eliminate distractions so that you can focus solely on the content on your screen. In this article, we'll explore the benefits of full screen mode, how to enable it, and how to customize it to fit your preferences.
Understanding Full Screen Mode in Safari
Full screen mode provides a clean and clutter-free browsing experience by hiding the menu bar, address bar, and tabs. This allows the content you're viewing to take center stage, maximizing screen real estate while minimizing distractions.
When using full screen mode, it's important to note that you can still access the menu bar and address bar by moving your cursor to the top of the screen. This will temporarily display the bars, allowing you to navigate to a different webpage or access a specific menu option. Once you move your cursor away, the bars will disappear again, providing an uninterrupted viewing experience.
Benefits of Using Full Screen Mode
One of the primary benefits of using full screen mode is that it makes webpages feel more immersive. Whether you're browsing an article, video, or image gallery, you can enjoy the experience without any distractions. Additionally, full screen mode can help reduce eye strain by providing a larger viewing area.
Another benefit of full screen mode is that it can be particularly useful when giving presentations or demonstrations. By hiding the menu bar, address bar, and tabs, you can ensure that your audience is focused solely on the content you're presenting. This can help to keep them engaged and attentive throughout your presentation.
Full Screen Mode vs. Regular Mode
Regular mode displays the menu bar, address bar, and tabs at all times. This can be helpful when you need to quickly navigate between multiple pages or tabs. However, it can also be distracting, taking up valuable screen real estate. In contrast, full screen mode allows you to focus on the content, eliminating distractions and providing a cleaner browsing experience.
It's worth noting that some websites may not display correctly in full screen mode. This is because some websites are designed to be viewed in a specific resolution or aspect ratio. If you encounter any issues while using full screen mode, you can always switch back to regular mode by moving your cursor to the top of the screen and clicking the green full screen button again.
In conclusion, full screen mode in Safari can provide a more immersive and focused browsing experience, allowing you to enjoy content without any distractions. Whether you're reading an article, watching a video, or giving a presentation, full screen mode can help you to stay engaged and focused on the task at hand.
Enabling Full Screen Mode on Safari
Enabling full screen mode on Safari is easy and can be done in several ways, including using the green button, a keyboard shortcut, or the menu bar.
Using the Green Button
One way to enable full screen mode is by clicking on the green button in the top left corner of the Safari window. This will maximize the Safari window, hiding the menu bar, address bar, and tabs.
Keyboard Shortcut for Full Screen Mode
Another way to enable full screen mode is by using a keyboard shortcut. Simply press the "control" key + "command" key + "F" key simultaneously to toggle between full screen mode and regular mode.
Menu Bar Option for Full Screen Mode
A third way to enable full screen mode is through the menu bar. Click on "View" in the top menu bar, then select "Enter Full Screen" to activate full screen mode.
Navigating Full Screen Mode in Safari
Once you've enabled full screen mode, you may wonder how to navigate around the browser. Here are a few tips:
Accessing the Address Bar and Tabs
While full screen mode hides the address bar and tabs, you can access them by moving your mouse to the top of the screen. The address bar and tabs will appear momentarily, allowing you to type in a new URL or switch to a different tab.
Using Gestures for Navigation
If your Mac supports gestures, you can use them to navigate while in full screen mode. Swiping left or right with three fingers will allow you to switch between tabs, while swiping up with three fingers will reveal all open tabs in a grid view.
Keyboard Shortcuts for Navigating Full Screen Mode
If you prefer to use keyboard shortcuts, there are several available for navigating in full screen mode. For example, pressing "control" + "tab" will switch to the next tab, while pressing "option" + "command" + "right arrow" will switch to the next tab to the right.
Customizing Full Screen Mode in Safari
Full screen mode in Safari is highly customizable. Here are a few ways you can adjust it to fit your preferences:
Adjusting Toolbar Visibility
You can choose to hide or show the toolbar in full screen mode. To do this, go to "View" in the top menu bar, then select "Hide Toolbar" or "Show Toolbar." This can be especially helpful if you want to reduce distractions further while still having access to the address bar and tabs.
Changing the Appearance of Tabs
If you don't like the default appearance of tabs in full screen mode, you can customize them. Go to "Safari" in the top menu bar, then select "Preferences." Click on the "Tabs" tab, then select your preferred option for tab appearance.
Enabling Split View for Multitasking
If you frequently multi-task, you can enable split view in full screen mode. With split view, you can have two windows open side-by-side, allowing you to work on multiple tasks at once. To enable split view, click and hold on the green button in the top left corner of the Safari window. A menu will appear, allowing you to select a second window to open alongside Safari.
Full screen mode in Safari can help enhance your browsing experience by providing a clean, immersive environment for viewing content. Whether you choose to use keyboard shortcuts, gestures, or the menu bar to navigate, customizing the appearance of tabs or enabling split view for multitasking, there are several ways to tailor full screen mode to your preferences. Try it out and see how it can help boost your productivity and increase your enjoyment of browsing the web.
Let's set you up !
Working on the web!
Student Tips
Startup Tools
Browser Glossary
Browser Tips
Tips & Tricks
Troubleshooting, go full screen with safari on iphone & ipod touch to see more while browsing the web.

One of the many subtle additions in the iOS 6 update is the new ability to go into Full Screen Mode with Safari on iPhone and iPod touch. With just a tap you can boost the viewable size of web pages while you’re in landscape (horizontal) orientation, making the most of web browsing on the smaller screens:
- Open any website in Safari on iPhone or iPod touch, and tilt the device into landscape orientation
- Tap the little opposite arrow icons in the lower right corner to enter into full screen view
The area visible on web pages is increased dramatically, making reading and browsing on the smaller screened iPhone and iPod much more pleasant. To escape out of full screen mode in Safari, either re-orientate the device vertical (portrait) or just tap the arrow buttons again in the corner to go back to the normal Safari view.

For Mac users, you’ll find Safari’s full screen mode is a lot like taking apps full screen in OS X Lion onward, which can be a great way to maximize the screen real estate on portable Macs with limited screen space. It makes perfect sense to bring such a feature to the iOS world, but curiously this great feature is unavailable on the iPad, perhaps a future iOS update will add it there too.
Enjoy this tip? Subscribe to our newsletter!
Get more of our great Apple tips, tricks, and important news delivered to your inbox with the OSXDaily newsletter.
You have successfully joined our subscriber list.
Related articles:
- How to Turn Off Split Screen in Safari for iPad? Exiting Safari Split Screen in iPadOS
- Download iPod Touch Firmware / IPSW Files
- Safari Web Content “Not Responding” on Mac? Fix the Beach Ball with These Tips
- How to Recover Deleted Safari History on Mac
Leave a Reply
Name (required)
Mail (will not be published) (required)
Subscribe to OSXDaily
- - How to Check Disk Health on Mac with smartctl
- - How to Enable Do Not Disturb on Apple Watch
- - 3 Mac Tips for Working with International Teams
- - How to Disable ChatGPT Chat History & Training Data Usage
- - What Does the Bell with Line Through It Mean in Messages? Bell Icon on iPhone, iPad, & Mac Explained
- - Opinion: Shiny Keys on MacBook Air & Pro Are Ugly and Shouldn’t Happen
- - MacOS Ventura 13.6.6 & Safari 17.4.1 Update Available
- - Using M3 MacBook Air in Clamshell Mode May Reduce Performance
- - First Beta of iOS 17.5, macOS Sonoma 14.5, iPadOS 17.5 Released for Testing
- - iOS 16.7.7 & iPadOS 16.7.7 Released for Older iPhone & iPad Models
iPhone / iPad
- - Fix a Repeating “Trust This Computer” Alert on iPhone & iPad
- - Create a Resume with Pages on Mac, iPhone, iPad
- - How Secure are Personal Hotspot Connections from iPhone?
- - You Can Play Flappy Bird in the Mac Finder
- - Fix “warning: unable to access /Users/Name/.config/git/attributes Permission Denied” Errors
- - How to Fix the Apple Watch Squiggly Charging Cable Screen
- - NewsToday2: What it is & How to Disable NewsToday2 on Mac
- - Why Did My iPhone Alarm Stop Automatically & Turn Itself Off?

About OSXDaily | Contact Us | Privacy Policy | Sitemap
This website is unrelated to Apple Inc
All trademarks and copyrights on this website are property of their respective owners.
© 2024 OS X Daily. All Rights Reserved. Reproduction without explicit permission is prohibited.
How to use Safari's full-screen mode on iOS 6
iOS 6 brings a full-screen mode to Mobile Safari on the iPhone and iPod Touch. Here's how it works.

Browsing the Internet on your iPhone or iPod Touch is super convenient, but at times it can be a bit frustrating. The screen size isn't ideal for consuming large amounts of information on some Web sites. Even if you turned your iPhone on its side to view it in landscape mode, the top address bar and bottom controls took up much of the screen.
With iOS 6 , Apple has addressed this problem by introducing a full-screen mode for browsing the Web in landscape mode on the iPhone and iPod Touch.
When using Safari, assuming you don't have the autorotate lock enabled, turn your iPhone on its side to rotate the screen into landscape mode.

In the lower-right corner you will see a button consisting of two arrows pointing in opposite directions. Tap on the button to enable full-screen mode.

The address bar and the bottom buttons will disappear, leaving a transparent arrow in one corner acting as the back button while you browse. In the other corner there will be a transparent button with two arrows pointing at each other. Touching it will disable full-screen browsing.


How To : Turn Any Website into a Full-Screen App on Your iPhone
Not all websites need a dedicated mobile app, which is why so many don't. Web apps are now designed to scale to whatever the size of your screen is, so the mobile versions of desktop sites in your web browser are easy enough to navigate and utilize. Still, there's just something about an app on your home screen that makes it all so much easier.
If you have an iPhone, you can bookmark the web app on your home screen from Safari . In the browser, tap the Share button on a webpage, hit " Add to Home Screen ," then select "Add." That gives you a home screen icon that looks just like other app icons but is merely a shortcut to the webpage chosen.
Site developers can even configure these types of shortcuts to look and behave like native iOS apps; they can give their site a unique app icon, change the status bar's appearance, and hide Safari interface components. However, many sites do not provide an optimized standalone-like experience for their home screen icons. Home screen bookmarks for unconfigured web apps just open the sites in Safari and look like regular tabs. It's quicker than typing a URL or search term in Safari, but it's the same old Safari experience.
- Don't Miss: The Easiest Way to Place Apps, Folders & Widgets Anywhere on Your iPhone's Home Screen
To make every site bookmark on your home screen look and feel like a standalone app, we can turn to Shortcuts . The shortcut we'll be using creates a WebClip device management profile you'll install on your iPhone. With the profile, whatever site you set will open the URL as a web app in full-screen view — without any browser — so there's no URL or search bar and no toolbar at the bottom.
It's technically still a bookmark but won't open as a tab in your regular Safari session. Best of all, it showcases the website in full-screen, taking advantage of your entire display and getting rid of the distractions that normally appear in Safari and other web browsers.
- iOS 14 : The shortcut is optimized for iOS 14. It may work on iOS 13 but has not been tested on older systems.
- Shortcuts : Apple's app comes pre-installed on your iPhone, but if you've deleted it, you can re-install it from the App Store.
- Allow untrusted shortcuts : Go to Settings –> Shortcuts and toggle on "Allow Untrusted Shortcuts" to allow third-party shortcuts.
Step 1: Add the 'URL App' Shortcut
The " URL App " shortcut, from RoutineHub user Changmeister, creates a web clip of any site you want. Simple copy a URL to your clipboard, paste it into the shortcut, name your app, choose an icon, and add the web clip as an app to your home screen. Unlike a regular bookmark, the website won't open in Safari but will appear in its own full-screen window like regular native standalone apps.
- Original iCloud Link: Make app from URL (free)
- Updated iCloud Link: Make app from URL (free)
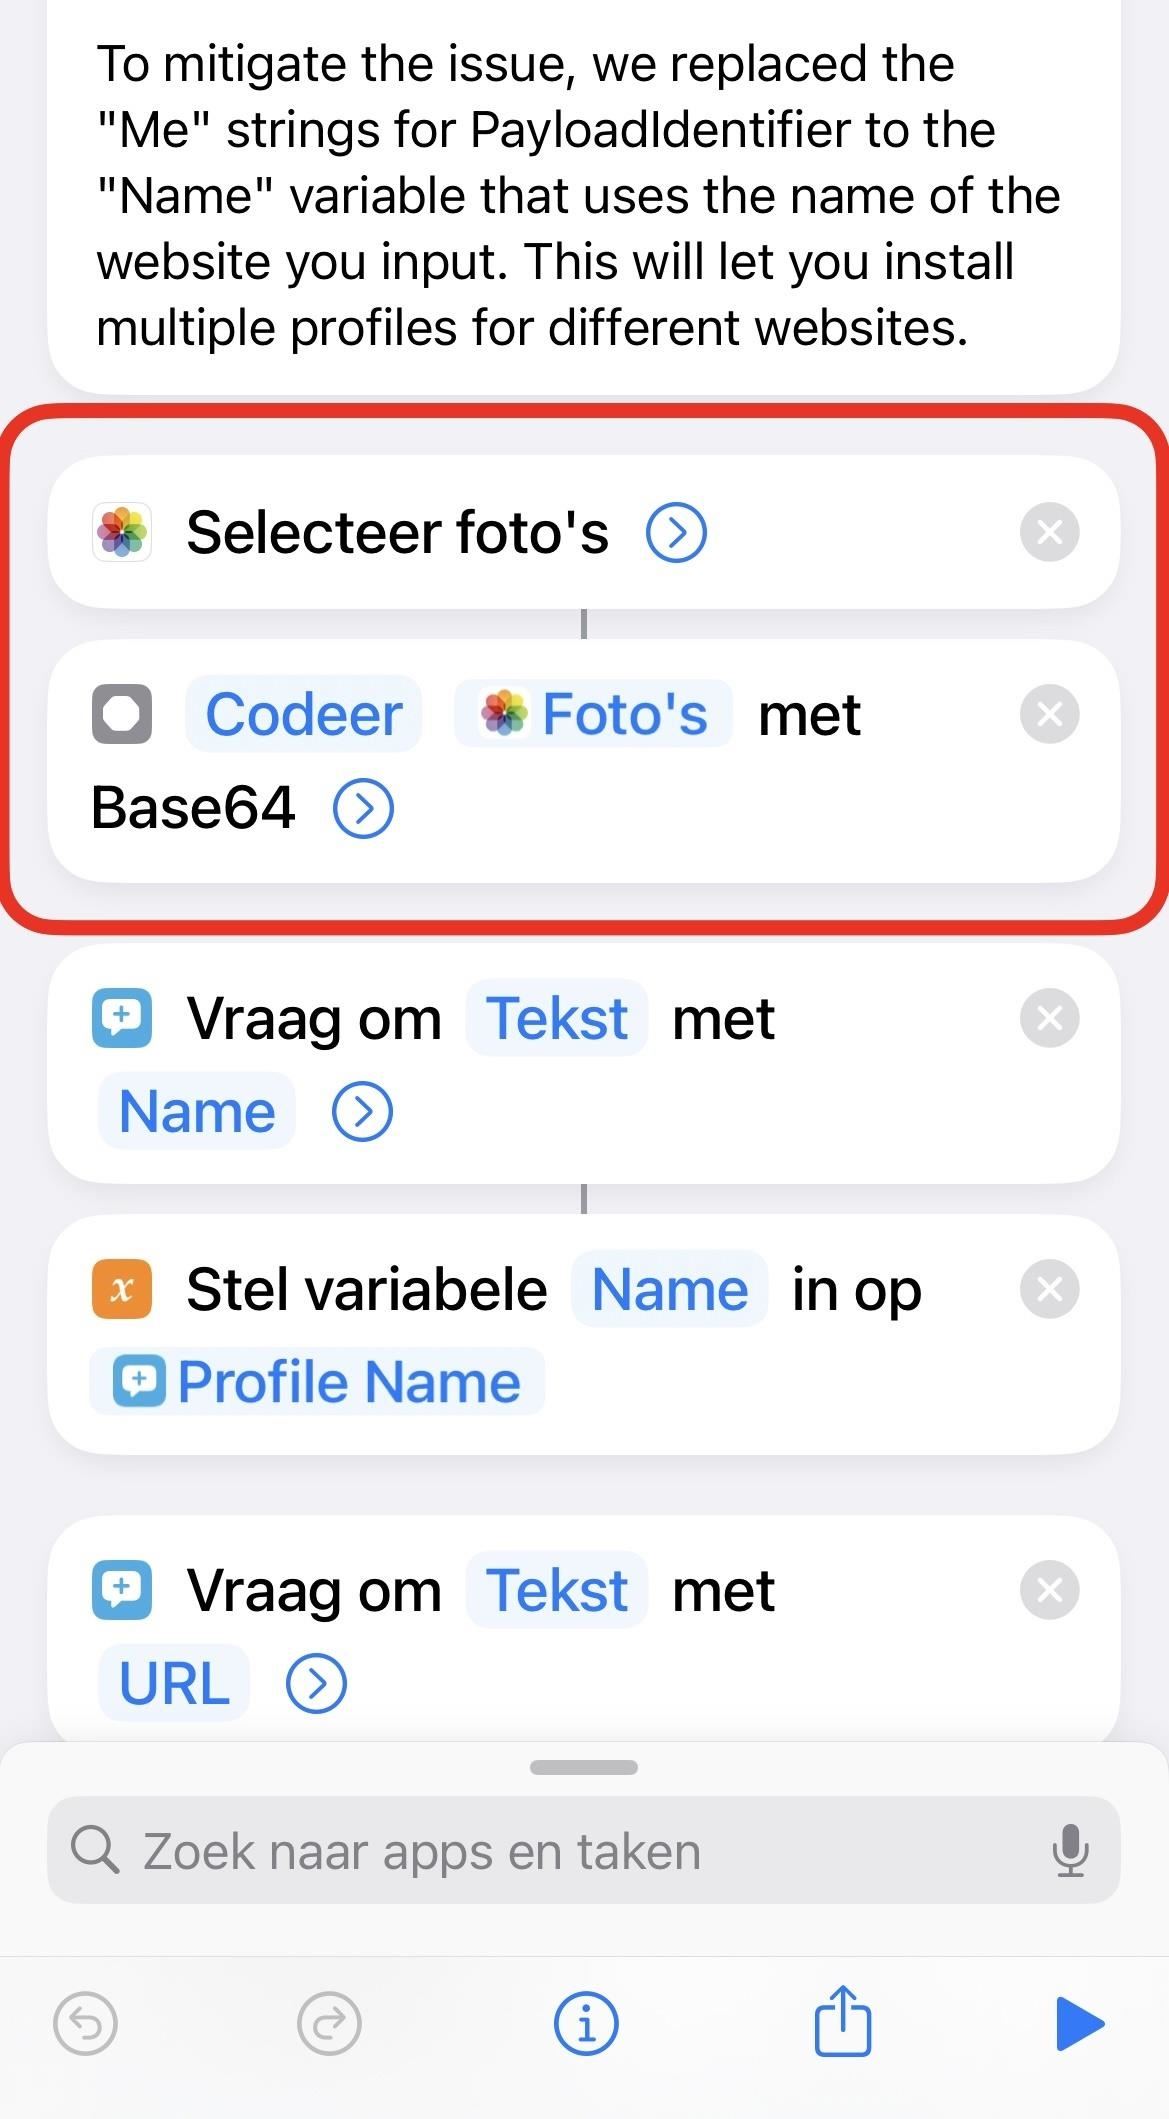
Use the updated iCloud link above to download the shortcut. The update fixes an issue that made it impossible to install multiple profiles for different websites. It simply switches out the PayloadIdentifier strings with the "Name" variable.
You should be automatically redirected to Shortcuts, but if you're not, tap "Get Shortcut." To add the shortcut to your library, scroll through the preview and tap "Add Untrusted Shortcut."

Step 2: Get the URL of the Webpage
Before you run the shortcut, go to Safari or your preferred web browser and copy the URL of the website you want to turn into a web clip. If you know the URL by heart, you can obviously skip this step. It's good to only do this for sites you often use that don't already have a native iOS app or an optimized interface for "Add to Home Screen" bookmarks.
As an example, I'll create an app for the Gadget Hacks website.

Step 3: Get an Image for the App Icon
While Safari can generate an app icon for websites via the "Add to Home Screen" action, the shortcut we're using here will not, so you'll need an image to use for the icon.
In the shortcut, you can choose any image in the Photos app, so you can either download a photo from the web or use an existing picture. A square-sized image works best to fit perfectly, but the shortcut will automatically crop any longer-shaped images down.
I'll use the official Gadget Hacks logo for my web clip's app icon.

Step 4: Run 'URL App' to Build the Profile
Now, head over to "My Shortcuts" in Shortcuts and run the "URL App" shortcut; it's the card called "Make app from URL." First, enter the name you'll see underneath the app icon on your home screen, then hit "Done."

Second, type in or paste the website URL you copied earlier and hit "Done" again.
Third, the shortcut will ask you for access to your Photos app. Grant it permission, then choose the image you want to upload as your app icon from the photo picker that appears.

Step 5: Download the Configuration Profile
Developers use configuration profiles so that iOS users install and test apps that are not ready or won't ever appear in the App Store. The "URL App" shortcut uses this same method to turn your URL into a web clip without a browser, as described earlier. If you're wary about installing profiles on your iPhone, you can review the WebClip payload XML that our updated shortcut uses below:
After you upload the app icon, you'll be redirected to Safari, where you'll be asked to allow a configuration profile to be downloaded to your iPhone. Hit "Allow," then tap "Close" when prompted.

Step 6: Install the Configuration Profile
The final step is to install the config profile you just downloaded. To do so, open Settings, and you should see a "Profile Downloaded" option near the top (it only appears when a profile needs to be installed). Tap that, and you can then preview the config profile. If you other Settings notifications, you will see "More for Your iPhone" instead. Tap that, and you'll see "Profile Downloaded."
If you don't see this quick link, go to "General," then "Profile" or "Profiles" to find and open the profile you downloaded.
You can see that it contains a web clip on the profile's description, just as we discussed earlier. Tap on "Install" in the top right, then enter your passcode when prompted.

The next page will show a message from the developer, which simply lays out the last few steps you took. Hit "Next" to continue, then tap "Install" in the top right, and then again at the bottom. Your profile is now installed.

Step 7: Open Your New Web Clip Self-Contained App
Your new web clip app will appear on your home screen. If you have iOS set to push new app installs to your App Library without touching the home screen, you'll still see this web clip app on your home screen since it's not a native app. However, you can still access the web clip from App Library.
Find and tap on the newly created web clip app icon, and the website will open up in full-screen, with no navigation bars or other features obstructing your view.

However, if you tap around to go to other pages in the web clip, you'll see in-app nav bars on the top and bottom to access reader view, request desktop sites, view website settings, share the website, and open the page in Safari, just like you would in other in-app web browsers. If you swipe up or down, the nav bars will disappear. This is a limitation of web clips for iOS, as any external links will be opened in a Safari view.

Removing the Web Clip & Profile
Let's say you no longer want the web clip app and want to remove it. Simply deleting the app icon from your home screen is not enough because the configuration profile will continue to exist in your settings. To get rid of both the app and profile , go into Settings –> General –> Profiles (or Profile).

Next, tap the profile and tap "Remove Profile." You'll be prompted to enter your passcode. Finally, tap "Remove" when it appears, and the profile, along with the web clip, will be deleted from your iPhone.

Just updated your iPhone? You'll find new emoji, enhanced security, podcast transcripts, Apple Cash virtual numbers, and other useful features. There are even new additions hidden within Safari. Find out what's new and changed on your iPhone with the iOS 17.4 update.
13 Comments
Very useful. However, I can only create one profile on my iOS device. If you created another profile for another web app, it will replace the first one. How to have multiple profiles so you can have different web as an iOS app on your home screen?
You're right. The original shortcut seems just to replace each profile you install for different sites. You can get around this by replacing the two "Me" strings for PayloadIdentifier with the "Name" variable. That should do the trick. We've updated the guide with a link to an updated shortcut you can download. Thanks for bringing this up!
Hi, Thank you! So glad with the solution! This becomes a very useful and neat tools!
I am seeing an error: Bad Profile This profile is corrupted and cannot be read
Is this something I am doing wrong on my end? Thanks!
I had the same error, but found that if I pasted in the WebClip payload XML myself, I needed to re-link the template variables before it would work. I edited the XML as Text in the Shortcuts app, deleted the places it said "Name", "URL", or "Base64 Encoded" (for the image), and replaced them with the corresponding Shortcuts variable from the accessory above the keyboard.
Thanks for this post, it's a great Shortcut!
Is there a way to create more than 1 shortcut at a time and possibly share the profiles to others? I'm wanting to create multiple App Clips but not download and install 13 profiles etc?
Does this still work in iOS 15.1? Feels just the same as adding a page to the homescreen.
My problem is that adding to the home screen opens the page perfectly in full screen, but as soon as I click an internal link a Safari header is shown.
I've been using this method to create various apps for certain websites. This morning I noticed every time I open any of the apps made this way that my camera is being activated. The little green dot appears at the top of my phone when I open one of these apps and disappears when I close it. I'm guessing this isn't normal behaviour? Is it something I should be concerned about? I should note I've been using them without concern for about a year.
Yep works fine but would like to know how to share without rebuilding on each phone.
What if I want to do the reverse, turn a website that has been pre-configured by it's makers to only display a link from the home page as full screen without controls into a regular website with controls, so that I get the ability to turn reader mode on?
This doesn't seem to work anymore on iOS 17.1.2. Please make an update. Thanks!
Hi Justin! I wanted to thank you for this very useful feature. However, since the iOS 17.2 update it seems that the shortcut is no longer functional Unfortunately. could you do an update to make it work again? Thank you very much in advance ??
"It's quite simple and you can easily solve it yourself. Edit the Shortcut and move the picture selector upwards so that it's the first call. The Shortcut will then work again in iOS 17.x.
Success, Patrick
Share Your Thoughts
How to : 10 features coming to apple news on your iphone with ios 17.5 — including some big ones, how to : reset your iphone's home screen layout, how to : make siri say whatever you want every time you connect your iphone to a charger, how to : update your iphone's lock screen with an attention-grabbing note, reminder, warning, or other custom message, how to : make your iphone automatically download & install new ios updates, how to : clear your frequently used and recent emoji from your iphone's keyboard, how to : resize widgets on your iphone's home screen in ios 14, warning : sensitive info you black out in images can be revealed with a few quick edits on your iphone, how to : dial these secret codes to see if someone is hijacking calls & texts on your iphone, how to : the easiest way to secretly record someone's conversation with your iphone, how to : turn gifs into live photos on your iphone, how to : the simple way to stop your iphone from sending unwanted audio messages, how to : ios 16 has a hidden unit converter for temperatures, time zones, distance, and other measurements, how to : you're taking screenshots wrong — here are better ways to capture your iphone's screen and why you should be using them, how to : trigger imessage effects with just a keyword, how to : your iphone's status bar can actually be customized — here's how, how to : permanently delete text messages on your iphone, how to : unlock the secret emoticon keyboard on your iphone, how to : keep your night vision sharp with the iphone's hidden red screen.
- All Features
- All Hot Posts
How To Make Safari Always Open In Full Screen

- Software & Applications
- Browsers & Extensions

Introduction
Safari, Apple's sleek and efficient web browser, offers a seamless browsing experience for Mac users. However, some individuals prefer to have Safari always open in full screen mode to maximize their viewing area and immerse themselves in their online activities. This preference is particularly common among users who frequently engage in multimedia content, presentations, or simply desire an uncluttered browsing environment.
In this guide, we will explore the simple yet effective steps to ensure that Safari consistently opens in full screen mode. By following these straightforward instructions, you can streamline your browsing experience and enjoy the benefits of a clutter-free, immersive view each time you launch Safari. Whether you are a casual user seeking a more expansive browsing canvas or a professional aiming to optimize your workflow, this guide will empower you to customize Safari to suit your preferences seamlessly.
Let's delve into the step-by-step process of configuring Safari to always open in full screen mode, allowing you to make the most of your browsing sessions and enhance your overall digital experience.
Step 1: Open Safari
To initiate the process of configuring Safari to consistently open in full screen mode, the first step is to launch the Safari browser on your Mac. You can easily do this by locating the Safari icon in your applications folder or by utilizing the convenient search feature on your Mac. Once you have located the Safari icon, simply click on it to open the browser.
Upon launching Safari, you will be greeted by the familiar interface, featuring the address bar, bookmarks, and various other navigation tools. This step marks the beginning of the journey to customize your browsing experience and ensure that Safari seamlessly opens in full screen mode, providing you with an expansive and immersive view of the web content.
As Safari opens, take a moment to familiarize yourself with the browser's layout and features. Whether you are a seasoned Safari user or exploring the browser for the first time, this initial step sets the stage for the subsequent actions that will enable you to optimize your browsing environment.
With Safari now open, you are ready to proceed to the next step in the process of configuring the browser to consistently open in full screen mode. This simple yet essential first step lays the foundation for the seamless customization of Safari, empowering you to tailor your browsing experience to align with your preferences and workflow.
By following these instructions, you are taking the initial stride towards enhancing your digital experience and maximizing the potential of Safari as your preferred web browser on your Mac. With Safari now launched, let's move on to the subsequent steps that will lead you to the desired outcome of having Safari always open in full screen mode.
Step 2: Click on the "View" menu
After successfully launching Safari, the next pivotal step in the process of configuring the browser to consistently open in full screen mode involves accessing the "View" menu. The "View" menu serves as a gateway to a plethora of customization options within Safari, allowing users to tailor their browsing experience to align with their preferences and optimize their workflow.
To access the "View" menu, direct your attention to the top of the screen, where you will find the menu bar. The menu bar is a fundamental navigation element in macOS, providing access to various functions and settings within applications. Within the Safari browser, the "View" menu is strategically positioned in the menu bar, easily accessible for users seeking to customize their viewing options.
Upon locating the "View" menu in the menu bar, simply click on it to reveal a dropdown menu containing a range of viewing-related options. This action prompts the menu to expand, presenting you with a selection of features designed to enhance your browsing experience. Among the options available within the "View" menu, you will find a diverse array of tools and settings that enable you to adjust the display, customize the layout, and optimize the visual presentation of web content.
By clicking on the "View" menu, you gain access to a host of valuable features that empower you to personalize your browsing environment. Whether you are seeking to maximize your viewing area, fine-tune the display of web elements, or explore innovative viewing modes, the "View" menu serves as a gateway to a realm of customization possibilities within Safari.
As you click on the "View" menu and explore its contents, you are embarking on a journey of discovery and customization, unlocking the potential to tailor Safari to suit your unique preferences and requirements. This pivotal step sets the stage for the subsequent actions that will lead you closer to the desired outcome of having Safari consistently open in full screen mode, providing you with an immersive and uncluttered browsing experience each time you launch the browser.
With the "View" menu now at your disposal, you are poised to delve into the next phase of the process, where you will select the specific option that will enable Safari to seamlessly open in full screen mode by default. This step marks a significant progression in the journey towards customizing Safari to align with your preferences, ultimately enhancing your digital experience and optimizing your browsing environment.
Step 3: Select "Enter Full Screen" option
Having accessed the "View" menu within Safari, you are now poised to embark on the pivotal step of selecting the "Enter Full Screen" option. This action is instrumental in configuring Safari to consistently open in full screen mode, providing you with an expansive and immersive viewing experience each time you launch the browser.
Upon clicking on the "View" menu, a dropdown menu unfurls, presenting you with an array of viewing-related options. Among these options, you will find the transformative "Enter Full Screen" feature, which holds the key to optimizing your browsing environment. By selecting this option, you will initiate the process of configuring Safari to seamlessly open in full screen mode, ensuring that you are greeted by an uncluttered and expansive view of web content upon launching the browser.
The "Enter Full Screen" option is designed to maximize your viewing area, eliminating distractions and immersing you in a visually unobstructed browsing experience. By activating this feature, you can savor the benefits of a streamlined and spacious display, allowing you to focus on the web content without the encumbrance of extraneous elements.
To select the "Enter Full Screen" option, simply navigate your cursor to this feature within the "View" menu and click on it. As you execute this action, Safari seamlessly transitions into full screen mode, enveloping you in a visually encompassing canvas that accentuates the web content and minimizes peripheral distractions.
By selecting the "Enter Full Screen" option, you are taking a definitive stride towards customizing Safari to align with your preferences and workflow. This action empowers you to curate your browsing environment, ensuring that each browsing session commences with an immersive and uncluttered view, setting the stage for a seamless and focused online experience.
With the "Enter Full Screen" option now activated, you have successfully navigated through a pivotal phase of the customization process, edging closer to the desired outcome of having Safari consistently open in full screen mode. This transformative action sets the stage for the subsequent steps that will culminate in the seamless and automatic launch of Safari in full screen mode, enhancing your digital experience and elevating your browsing environment to new heights.
Step 4: Adjust Safari settings to always open in full screen
After successfully enabling full screen mode in Safari, the next crucial step involves adjusting the browser's settings to ensure that it consistently opens in full screen mode. By configuring Safari to automatically launch in full screen mode, you can streamline your browsing experience and eliminate the need to manually activate this immersive viewing option each time you open the browser.
To adjust Safari settings for automatic full screen mode, begin by navigating to the "Safari" menu located in the top-left corner of the screen. Upon clicking on the "Safari" menu, a dropdown list of options will appear, providing access to various settings and preferences within the browser.
Within the "Safari" menu, locate and click on the "Preferences" option. This action will open a dedicated window containing an extensive array of customizable settings that empower you to tailor Safari to align with your unique preferences and requirements.
Once the "Preferences" window is displayed, direct your attention to the "General" tab, which serves as a central hub for fundamental browser settings. Within the "General" tab, you will find an assortment of options related to Safari's behavior and appearance, including the ability to customize the browser's startup and homepage settings.
To configure Safari to always open in full screen mode, navigate to the "General" tab and locate the "Safari opens with" dropdown menu. Within this dropdown menu, you will encounter several options for defining Safari's startup behavior, such as "A new window," "A new private window," and "All windows from last session."
Select the "All windows from last session" option from the dropdown menu. By choosing this setting, Safari will consistently open with all previously open windows and tabs restored, including the full screen mode if it was active during the last browsing session.
After selecting the desired startup behavior, proceed to close the "Preferences" window to save your settings. With this adjustment in place, Safari is now configured to always open in full screen mode, providing you with a seamless and immersive browsing experience each time you launch the browser.
By adjusting Safari settings to ensure automatic full screen mode, you have effectively personalized the browser to align with your preferences, streamlining your digital experience and optimizing your browsing environment. This simple yet impactful customization empowers you to seamlessly immerse yourself in web content without the need for manual intervention, enhancing your productivity and enjoyment during online activities.
With Safari now primed to consistently open in full screen mode, you have successfully navigated through the essential steps of customizing the browser to suit your unique requirements. This culmination of actions culminates in a tailored browsing experience that seamlessly aligns with your preferences, empowering you to make the most of Safari as your preferred web browser on your Mac.
In conclusion, the process of configuring Safari to always open in full screen mode represents a transformative journey towards personalizing your browsing environment and optimizing your digital experience. By following the step-by-step instructions outlined in this guide, you have gained the knowledge and empowerment to seamlessly immerse yourself in web content without the encumbrance of peripheral distractions, ensuring that each browsing session commences with an expansive and uncluttered view.
The journey commenced with the simple yet essential step of launching Safari, setting the stage for the subsequent actions that would lead you towards the desired outcome of having Safari consistently open in full screen mode. Navigating through the "View" menu and selecting the "Enter Full Screen" option marked pivotal strides in the customization process, empowering you to curate your browsing environment and optimize your viewing experience.
The culmination of these actions led to the pivotal step of adjusting Safari settings to ensure automatic full screen mode, streamlining your browsing experience and eliminating the need for manual intervention. By configuring Safari to always open in full screen mode, you have personalized the browser to seamlessly align with your preferences, enhancing your productivity and enjoyment during online activities.
The seamless and immersive browsing experience facilitated by Safari's full screen mode empowers you to focus on web content, presentations, or multimedia activities without the encumbrance of extraneous elements, ultimately elevating your digital experience to new heights. Whether you are a casual user seeking a more expansive browsing canvas or a professional aiming to optimize your workflow, the ability to consistently open Safari in full screen mode enhances your overall browsing environment.
In essence, the journey of configuring Safari to always open in full screen mode embodies the spirit of customization and personalization, empowering you to tailor your browsing experience to suit your unique requirements. By seamlessly immersing yourself in web content and eliminating distractions, you can savor the benefits of an uncluttered and expansive view, setting the stage for a seamless and focused online experience.
With Safari now primed to consistently open in full screen mode, you have harnessed the power to optimize your browsing environment, ensuring that each browsing session commences with an immersive and uncluttered view. This transformative customization empowers you to make the most of Safari as your preferred web browser on your Mac, enhancing your digital experience and elevating your browsing environment to new heights.
Leave a Reply Cancel reply
Your email address will not be published. Required fields are marked *
Save my name, email, and website in this browser for the next time I comment.
- Crowdfunding
- Cryptocurrency
- Digital Banking
- Digital Payments
- Investments
- Console Gaming
- Mobile Gaming
- VR/AR Gaming
- Gadget Usage
- Gaming Tips
- Online Safety
- Software Tutorials
- Tech Setup & Troubleshooting
- Buyer’s Guides
- Comparative Analysis
- Gadget Reviews
- Service Reviews
- Software Reviews
- Mobile Devices
- PCs & Laptops
- Smart Home Gadgets
- Content Creation Tools
- Digital Photography
- Video & Music Streaming
- Online Security
- Online Services
- Web Hosting
- WiFi & Ethernet
- Browsers & Extensions
- Communication Platforms
- Operating Systems
- Productivity Tools
- AI & Machine Learning
- Cybersecurity
- Emerging Tech
- IoT & Smart Devices
- Virtual & Augmented Reality
- Latest News
- AI Developments
- Fintech Updates
- Gaming News
- New Product Launches
- AI Writing How Its Changing the Way We Create Content
- How to Find the Best Midjourney Alternative in 2024 A Guide to AI Anime Generators
Related Post
Ai writing: how it’s changing the way we create content, unleashing young geniuses: how lingokids makes learning a blast, 10 best ai math solvers for instant homework solutions, 10 best ai homework helper tools to get instant homework help, 10 best ai humanizers to humanize ai text with ease, sla network: benefits, advantages, satisfaction of both parties to the contract, related posts.

How To Make Safari Screen Smaller On Mac

How Do I Open Safari On My IPhone

How To Add Safari To Always Allowed In Screen Time

What Safari Version Do I Have On IPhone

How To Pin Tabs On Safari IPhone

How To Update Apple Safari

How To Allow Safari During Downtime

How To Save Safari Bookmarks
Recent stories.

How to Find the Best Midjourney Alternative in 2024: A Guide to AI Anime Generators

How to Know When it’s the Right Time to Buy Bitcoin

How to Sell Counter-Strike 2 Skins Instantly? A Comprehensive Guide

10 Proven Ways For Online Gamers To Avoid Cyber Attacks And Scams

- Privacy Overview
- Strictly Necessary Cookies
This website uses cookies so that we can provide you with the best user experience possible. Cookie information is stored in your browser and performs functions such as recognising you when you return to our website and helping our team to understand which sections of the website you find most interesting and useful.
Strictly Necessary Cookie should be enabled at all times so that we can save your preferences for cookie settings.
If you disable this cookie, we will not be able to save your preferences. This means that every time you visit this website you will need to enable or disable cookies again.
- PRO Courses Guides New Tech Help Pro Expert Videos About wikiHow Pro Upgrade Sign In
- EDIT Edit this Article
- EXPLORE Tech Help Pro About Us Random Article Quizzes Request a New Article Community Dashboard This Or That Game Popular Categories Arts and Entertainment Artwork Books Movies Computers and Electronics Computers Phone Skills Technology Hacks Health Men's Health Mental Health Women's Health Relationships Dating Love Relationship Issues Hobbies and Crafts Crafts Drawing Games Education & Communication Communication Skills Personal Development Studying Personal Care and Style Fashion Hair Care Personal Hygiene Youth Personal Care School Stuff Dating All Categories Arts and Entertainment Finance and Business Home and Garden Relationship Quizzes Cars & Other Vehicles Food and Entertaining Personal Care and Style Sports and Fitness Computers and Electronics Health Pets and Animals Travel Education & Communication Hobbies and Crafts Philosophy and Religion Work World Family Life Holidays and Traditions Relationships Youth
- Browse Articles
- Learn Something New
- Quizzes Hot
- This Or That Game New
- Train Your Brain
- Explore More
- Support wikiHow
- About wikiHow
- Log in / Sign up
- Computers and Electronics
- Internet Browsers
- Safari Browser
Simple Ways to Open Safari in Full-Screen Every Time on Mac
Last Updated: September 5, 2023 Fact Checked
Making Safari Full-Screen
Changing settings.
This article was co-authored by wikiHow staff writer, Darlene Antonelli, MA . Darlene Antonelli is a Technology Writer and Editor for wikiHow. Darlene has experience teaching college courses, writing technology-related articles, and working hands-on in the technology field. She earned an MA in Writing from Rowan University in 2012 and wrote her thesis on online communities and the personalities curated in such communities. This article has been fact-checked, ensuring the accuracy of any cited facts and confirming the authority of its sources. This article has been viewed 13,879 times. Learn more...
Do you want Safari to fill the screen instead of looking like a window every time you open it? Fortunately, you're just a few menu clicks away from that! By default, Safari will open as a window, but this wikiHow article teaches how to have Safari on your Mac open in full-screen all the time!
Things You Should Know
- Maximize Safari by clicking the green icon and selecting "Enter Full Screen."
- Alternatively, use keyboard shortcuts like "Cmd + Ctrl + F" to make Safari full-screen.
- Once Safari is in full-screen mode, go to "System Settings > General" and uncheck the box next to "Close windows…"

- Alternatively, press a keyboard shortcut to enter Full Screen without using your mouse. For macOS Big Sur and earlier, press Cmd + Ctrl + F . For macOS Monterey and later, press Fn + F . [2] X Research source Press those shortcut buttons again or Esc to close full-screen.
- Move your mouse over areas to reveal hidden objects when Safari is full screen. For example, the Dock is hidden when you use Safari in full screen. Simply make it appear again by moving your mouse to wherever your Dock is.

- If you're using an older version of macOS, "System Settings" will instead be "System Preferences."

- If you're using an older macOS version, this is a checkbox in "General" instead. Make sure it's unchecked so your Safari windows will not be closed when you quit the application.
- Press Cmd + Q to quit Safari without closing any windows. If you go to your open windows and close them with "Cmd + W," then you won't be able to restore that window by opening Safari again. Instead, press Cmd + Q to be able to re-open that window in full-screen mode whenever you open Safari.
Expert Q&A
- If you're using an iPad and split-screen is causing your Safari to take up only half the screen, disable it by dragging the grey line. Thanks Helpful 0 Not Helpful 0
- If you're using an iPhone, use desktop mode for Safari to access options you don't have using mobile-mode. Thanks Helpful 0 Not Helpful 0

You Might Also Like

- ↑ https://support.apple.com/guide/mac-help/use-apps-in-full-screen-mchl9c21d2be/mac
- ↑ https://support.apple.com/en-us/HT201236
About This Article

- Send fan mail to authors
Is this article up to date?

Featured Articles

Trending Articles

Watch Articles

- Terms of Use
- Privacy Policy
- Do Not Sell or Share My Info
- Not Selling Info
wikiHow Tech Help:
Tech troubles got you down? We've got the tips you need
iPhone User Guide
- iPhone models compatible with iOS 17
- R ' class='toc-item' data-ss-analytics-link-url='https://support.apple.com/guide/iphone/iphone-xr-iph017302841/ios' data-ajax-endpoint='https://support.apple.com/guide/iphone/iphone-xr-iph017302841/ios' data-ss-analytics-event="acs.link_click" href='https://support.apple.com/guide/iphone/iphone-xr-iph017302841/ios' id='toc-item-IPH017302841' data-tocid='IPH017302841' > iPhone X R
- S ' class='toc-item' data-ss-analytics-link-url='https://support.apple.com/guide/iphone/iphone-xs-iphc00446242/ios' data-ajax-endpoint='https://support.apple.com/guide/iphone/iphone-xs-iphc00446242/ios' data-ss-analytics-event="acs.link_click" href='https://support.apple.com/guide/iphone/iphone-xs-iphc00446242/ios' id='toc-item-IPHC00446242' data-tocid='IPHC00446242' > iPhone X S
- S Max' class='toc-item' data-ss-analytics-link-url='https://support.apple.com/guide/iphone/iphone-xs-max-iphcd2066870/ios' data-ajax-endpoint='https://support.apple.com/guide/iphone/iphone-xs-max-iphcd2066870/ios' data-ss-analytics-event="acs.link_click" href='https://support.apple.com/guide/iphone/iphone-xs-max-iphcd2066870/ios' id='toc-item-IPHCD2066870' data-tocid='IPHCD2066870' > iPhone X S Max
- iPhone 11 Pro
- iPhone 11 Pro Max
- iPhone SE (2nd generation)
- iPhone 12 mini
- iPhone 12 Pro
- iPhone 12 Pro Max
- iPhone 13 mini
- iPhone 13 Pro
- iPhone 13 Pro Max
- iPhone SE (3rd generation)
- iPhone 14 Plus
- iPhone 14 Pro
- iPhone 14 Pro Max
- iPhone 15 Plus
- iPhone 15 Pro
- iPhone 15 Pro Max
- Setup basics
- Make your iPhone your own
- Take great photos and videos
- Keep in touch with friends and family
- Share features with your family
- Use iPhone for your daily routines
- Expert advice from Apple Support
- What’s new in iOS 17
- Turn on and set up iPhone
- Wake and unlock
- Set up cellular service
- Use Dual SIM
- Connect to the internet
- Sign in with Apple ID
- Subscribe to iCloud+
- Find settings
- Set up mail, contacts, and calendar accounts
- Learn the meaning of the status icons
- Charge the battery
- Charge with cleaner energy sources
- Show the battery percentage
- Check battery health and usage
- Use Low Power Mode
- Read and bookmark the user guide
- Learn basic gestures
- Learn gestures for iPhone models with Face ID
- Adjust the volume
- Find your apps in App Library
- Switch between open apps
- Quit and reopen an app
- Multitask with Picture in Picture
- Access features from the Lock Screen
- View Live Activities in the Dynamic Island
- Perform quick actions
- Search on iPhone
- Get information about your iPhone
- View or change cellular data settings
- Travel with iPhone
- Change sounds and vibrations
- Use the Action button on iPhone 15 Pro and iPhone 15 Pro Max
- Create a custom Lock Screen
- Change the wallpaper
- Adjust the screen brightness and color balance
- Keep the iPhone display on longer
- Use StandBy
- Customize the text size and zoom setting
- Change the name of your iPhone
- Change the date and time
- Change the language and region
- Organize your apps in folders
- Add, edit, and remove widgets
- Move apps and widgets on the Home Screen
- Remove apps
- Use and customize Control Center
- Change or lock the screen orientation
- View and respond to notifications
- Change notification settings
- Set up a Focus
- Allow or silence notifications for a Focus
- Turn a Focus on or off
- Stay focused while driving
- Customize sharing options
- Type with the onscreen keyboard
- Dictate text
- Select and edit text
- Use predictive text
- Use text replacements
- Add or change keyboards
- Add emoji and stickers
- Take a screenshot
- Take a screen recording
- Draw in documents
- Add text, shapes, signatures, and more
- Fill out forms and sign documents
- Use Live Text to interact with content in a photo or video
- Use Visual Look Up to identify objects in your photos and videos
- Lift a subject from the photo background
- Subscribe to Apple Arcade
- Play with friends in Game Center
- Connect a game controller
- Use App Clips
- Update apps
- View or cancel subscriptions
- Manage purchases, settings, and restrictions
- Install and manage fonts
- Buy books and audiobooks
- Annotate books
- Access books on other Apple devices
- Listen to audiobooks
- Set reading goals
- Organize books
- Create and edit events in Calendar
- Send invitations
- Reply to invitations
- Change how you view events
- Search for events
- Change calendar and event settings
- Schedule or display events in a different time zone
- Keep track of events
- Use multiple calendars
- Use the Holidays calendar
- Share iCloud calendars
- Camera basics
- Set up your shot
- Apply Photographic Styles
- Take Live Photos
- Take Burst mode shots
- Take a selfie
- Take panoramic photos
- Take macro photos and videos
- Take portraits
- Take Night mode photos
- Take Apple ProRAW photos
- Adjust the shutter volume
- Adjust HDR camera settings
- Record videos
- Record spatial videos for Apple Vision Pro
- Record ProRes videos
- Record videos in Cinematic mode
- Change video recording settings
- Save camera settings
- Customize the Main camera lens
- Change advanced camera settings
- View, share, and print photos
- Use Live Text
- Scan a QR code
- See the world clock
- Set an alarm
- Change the next wake up alarm
- Use the stopwatch
- Use multiple timers
- Add and use contact information
- Edit contacts
- Add your contact info
- Use NameDrop on iPhone to share your contact info
- Use other contact accounts
- Use Contacts from the Phone app
- Merge or hide duplicate contacts
- Export contacts
- Get started with FaceTime
- Make FaceTime calls
- Receive FaceTime calls
- Create a FaceTime link
- Take a Live Photo
- Turn on Live Captions in a FaceTime call
- Use other apps during a call
- Make a Group FaceTime call
- View participants in a grid
- Use SharePlay to watch, listen, and play together
- Share your screen in a FaceTime call
- Collaborate on a document in FaceTime
- Use video conferencing features
- Hand off a FaceTime call to another Apple device
- Change the FaceTime video settings
- Change the FaceTime audio settings
- Change your appearance
- Leave a call or switch to Messages
- Block unwanted callers
- Report a call as spam
- Connect external devices or servers
- Modify files, folders, and downloads
- Search for files and folders
- Organize files and folders
- Set up iCloud Drive
- Share files and folders in iCloud Drive
- Share your location
- Meet up with a friend
- Send your location via satellite
- Add or remove a friend
- Locate a friend
- Get notified when friends change their location
- Notify a friend when your location changes
- Add your iPhone
- Add your iPhone Wallet with MagSafe
- Get notified if you leave a device behind
- Locate a device
- Mark a device as lost
- Erase a device
- Remove a device
- Add an AirTag
- Share an AirTag or other item in Find My on iPhone
- Add a third-party item
- Get notified if you leave an item behind
- Locate an item
- Mark an item as lost
- Remove an item
- Adjust map settings
- Get started with Fitness
- Track daily activity and change your move goal
- See your activity summary
- Sync a third-party workout app
- Change fitness notifications
- Share your activity
- Subscribe to Apple Fitness+
- Find Apple Fitness+ workouts and meditations
- Start an Apple Fitness+ workout or meditation
- Create a Custom Plan in Apple Fitness+
- Work out together using SharePlay
- Change what’s on the screen during an Apple Fitness+ workout or meditation
- Download an Apple Fitness+ workout or meditation
- Get started with Freeform
- Create a Freeform board
- Draw or handwrite
- Apply consistent styles
- Position items on a board
- Search Freeform boards
- Share and collaborate
- Delete and recover boards
- Get started with Health
- Fill out your Health Details
- Intro to Health data
- View your health data
- Share your health data
- View health data shared by others
- Download health records
- View health records
- Monitor your walking steadiness
- Log menstrual cycle information
- View menstrual cycle predictions and history
- Track your medications
- Learn more about your medications
- Log your state of mind
- Take a mental health assessment
- Set up a schedule for a Sleep Focus
- Turn off alarms and delete sleep schedules
- Add or change sleep schedules
- Turn Sleep Focus on or off
- Change your wind down period, sleep goal, and more
- View your sleep history
- Check your headphone levels
- Use audiogram data
- Register as an organ donor
- Back up your Health data
- Intro to Home
- Upgrade to the new Home architecture
- Set up accessories
- Control accessories
- Control your home using Siri
- Use Grid Forecast to plan your energy usage
- Set up HomePod
- Control your home remotely
- Create and use scenes
- Use automations
- Set up security cameras
- Use Face Recognition
- Unlock your door with a home key
- Configure a router
- Invite others to control accessories
- Add more homes
- Get music, movies, and TV shows
- Get ringtones
- Manage purchases and settings
- Get started with Journal
- Write in your journal
- Review your past journal entries
- Change Journal settings
- Magnify nearby objects
- Change settings
- Detect people around you
- Detect doors around you
- Receive image descriptions of your surroundings
- Read aloud text and labels around you
- Set up shortcuts for Detection Mode
- Add and remove email accounts
- Set up a custom email domain
- Check your email
- Unsend email with Undo Send
- Reply to and forward emails
- Save an email draft
- Add email attachments
- Download email attachments
- Annotate email attachments
- Set email notifications
- Search for email
- Organize email in mailboxes
- Flag or block emails
- Filter emails
- Use Hide My Email
- Use Mail Privacy Protection
- Change email settings
- Delete and recover emails
- Add a Mail widget to your Home Screen
- Print emails
- Get travel directions
- Select other route options
- Find stops along your route
- View a route overview or a list of turns
- Change settings for spoken directions
- Get driving directions
- Get directions to your parked car
- Set up electric vehicle routing
- Report traffic incidents
- Get cycling directions
- Get walking directions
- Get transit directions
- Delete recent directions
- Get traffic and weather info
- Estimate travel time and ETA
- Download offline maps
- Search for places
- Find nearby attractions, restaurants, and services
- Get information about places
- Mark places
- Share places
- Rate places
- Save favorite places
- Explore new places with Guides
- Organize places in My Guides
- Delete significant locations
- Look around places
- Take Flyover tours
- Find your Maps settings
- Measure dimensions
- View and save measurements
- Measure a person’s height
- Use the level
- Set up Messages
- About iMessage
- Send and reply to messages
- Unsend and edit messages
- Keep track of messages
- Forward and share messages
- Group conversations
- Watch, listen, or play together using SharePlay
- Collaborate on projects
- Use iMessage apps
- Take and edit photos or videos
- Share photos, links, and more
- Send stickers
- Request, send, and receive payments
- Send and receive audio messages
- Animate messages
- Change notifications
- Block, filter, and report messages
- Delete messages and attachments
- Recover deleted messages
- View albums, playlists, and more
- Show song credits and lyrics
- Queue up your music
- Listen to broadcast radio
- Subscribe to Apple Music
- Play music together in the car with iPhone
- Listen to lossless music
- Listen to Dolby Atmos music
- Apple Music Sing
- Find new music
- Add music and listen offline
- Get personalized recommendations
- Listen to radio
- Search for music
- Create playlists
- See what your friends are listening to
- Use Siri to play music
- Change the way music sounds
- Get started with News
- Use News widgets
- See news stories chosen just for you
- Read stories
- Follow your favorite teams with My Sports
- Listen to Apple News Today
- Subscribe to Apple News+
- Browse and read Apple News+ stories and issues
- Download Apple News+ issues
- Listen to audio stories
- Solve crossword puzzles
- Search for news stories
- Save stories in News for later
- Subscribe to individual news channels
- Get started with Notes
- Add or remove accounts
- Create and format notes
- Draw or write
- Add photos, videos, and more
- Scan text and documents
- Work with PDFs
- Create Quick Notes
- Search notes
- Organize in folders
- Organize with tags
- Use Smart Folders
- Export or print notes
- Change Notes settings
- Make a call
- Answer or decline incoming calls
- While on a call
- Set up voicemail
- Check voicemail
- Change voicemail greeting and settings
- Select ringtones and vibrations
- Make calls using Wi-Fi
- Set up call forwarding and call waiting
- Avoid unwanted calls
- View photos and videos
- Play videos and slideshows
- Delete or hide photos and videos
- Edit photos and videos
- Trim video length and adjust slow motion
- Edit Cinematic mode videos
- Edit Live Photos
- Edit portraits
- Use photo albums
- Edit, share, and organize albums
- Filter and sort photos and videos in albums
- Make stickers from your photos
- Duplicate and copy photos and videos
- Merge duplicate photos and videos
- Search for photos
- Identify people and pets
- Browse photos by location
- Share photos and videos
- Share long videos
- View photos and videos shared with you
- Watch memories
- Personalize your memories
- Manage memories and featured photos
- Use iCloud Photos
- Create shared albums
- Add and remove people in a shared album
- Add and delete photos and videos in a shared album
- Set up or join an iCloud Shared Photo Library
- Add content to an iCloud Shared Photo Library
- Use iCloud Shared Photo Library
- Import and export photos and videos
- Print photos
- Find podcasts
- Listen to podcasts
- Follow your favorite podcasts
- Use the Podcasts widget
- Organize your podcast library
- Download, save, or share podcasts
- Subscribe to podcasts
- Listen to subscriber-only content
- Change download settings
- Make a grocery list
- Add items to a list
- Edit and manage a list
- Search and organize lists
- Work with templates
- Use Smart Lists
- Print reminders
- Use the Reminders widget
- Change Reminders settings
- Browse the web
- Search for websites
- Customize your Safari settings
- Change the layout
- Use Safari profiles
- Open and close tabs
- Organize your tabs
- View your Safari tabs from another Apple device
- Share Tab Groups
- Use Siri to listen to a webpage
- Bookmark favorite webpages
- Save pages to a Reading List
- Find links shared with you
- Annotate and save a webpage as a PDF
- Automatically fill in forms
- Get extensions
- Hide ads and distractions
- Clear your cache
- Browse the web privately
- Use passkeys in Safari
- Check stocks
- Manage multiple watchlists
- Read business news
- Add earnings reports to your calendar
- Use a Stocks widget
- Translate text, voice, and conversations
- Translate text in apps
- Translate with the camera view
- Subscribe to Apple TV+, MLS Season Pass, or an Apple TV channel
- Add your TV provider
- Get shows, movies, and more
- Watch sports
- Watch Major League Soccer with MLS Season Pass
- Control playback
- Manage your library
- Change the settings
- Make a recording
- Play it back
- Edit or delete a recording
- Keep recordings up to date
- Organize recordings
- Search for or rename a recording
- Share a recording
- Duplicate a recording
- Keep cards and passes in Wallet
- Set up Apple Pay
- Use Apple Pay for contactless payments
- Use Apple Pay in apps and on the web
- Track your orders
- Use Apple Cash
- Use Apple Card
- Use Savings
- Pay for transit
- Access your home, hotel room, and vehicle
- Add identity cards
- Use COVID-19 vaccination cards
- Check your Apple Account balance
- Use Express Mode
- Organize your Wallet
- Remove cards or passes
- Check the weather
- Check the weather in other locations
- View weather maps
- Manage weather notifications
- Use Weather widgets
- Learn the weather icons
- Find out what Siri can do
- Tell Siri about yourself
- Have Siri announce calls and notifications
- Add Siri Shortcuts
- About Siri Suggestions
- Use Siri in your car
- Change Siri settings
- Contact emergency services
- Use Emergency SOS via satellite
- Request Roadside Assistance via satellite
- Set up and view your Medical ID
- Use Check In
- Manage Crash Detection
- Reset privacy and security settings in an emergency
- Set up Family Sharing
- Add Family Sharing members
- Remove Family Sharing members
- Share subscriptions
- Share purchases
- Share locations with family and locate lost devices
- Set up Apple Cash Family and Apple Card Family
- Set up parental controls
- Set up a child’s device
- Get started with Screen Time
- Protect your vision health with Screen Distance
- Set up Screen Time
- Set communication and safety limits and block inappropriate content
- Charging cable
- Power adapters
- MagSafe chargers and battery packs
- MagSafe cases and sleeves
- Qi-certified wireless chargers
- Use AirPods
- Use EarPods
- Apple Watch
- Wirelessly stream videos and photos to Apple TV or a smart TV
- Connect to a display with a cable
- HomePod and other wireless speakers
- Pair Magic Keyboard
- Enter characters with diacritical marks
- Switch between keyboards
- Use shortcuts
- Choose an alternative keyboard layout
- Change typing assistance options
- External storage devices
- Bluetooth accessories
- Share your internet connection
- Allow phone calls on your iPad and Mac
- Use iPhone as a webcam
- Hand off tasks between devices
- Cut, copy, and paste between iPhone and other devices
- Stream video or mirror the screen of your iPhone
- Start SharePlay instantly
- Use AirDrop to send items
- Connect iPhone and your computer with a cable
- Transfer files between devices
- Transfer files with email, messages, or AirDrop
- Transfer files or sync content with the Finder or iTunes
- Automatically keep files up to date with iCloud
- Use an external storage device, a file server, or a cloud storage service
- Intro to CarPlay
- Connect to CarPlay
- Use your vehicle’s built-in controls
- Get turn-by-turn directions
- Change the map view
- Make phone calls
- View your calendar
- Send and receive text messages
- Announce incoming text messages
- Play podcasts
- Play audiobooks
- Listen to news stories
- Control your home
- Use other apps with CarPlay
- Rearrange icons on CarPlay Home
- Change settings in CarPlay
- Get started with accessibility features
- Turn on accessibility features for setup
- Change Siri accessibility settings
- Open features with Accessibility Shortcut
- Change color and brightness
- Make text easier to read
- Reduce onscreen motion
- Customize per-app visual settings
- Hear what’s on the screen or typed
- Hear audio descriptions
- Turn on and practice VoiceOver
- Change your VoiceOver settings
- Use VoiceOver gestures
- Operate iPhone when VoiceOver is on
- Control VoiceOver using the rotor
- Use the onscreen keyboard
- Write with your finger
- Use VoiceOver with an Apple external keyboard
- Use a braille display
- Type braille on the screen
- Customize gestures and keyboard shortcuts
- Use VoiceOver with a pointer device
- Use VoiceOver for images and videos
- Use VoiceOver in apps
- Use AssistiveTouch
- Adjust how iPhone responds to your touch
- Use Reachability
- Auto-answer calls
- Turn off vibration
- Change Face ID and attention settings
- Use Voice Control
- Adjust the side or Home button
- Use Apple TV Remote buttons
- Adjust pointer settings
- Adjust keyboard settings
- Adjust AirPods settings
- Turn on Apple Watch Mirroring
- Control a nearby Apple device
- Intro to Switch Control
- Set up and turn on Switch Control
- Select items, perform actions, and more
- Control several devices with one switch
- Use hearing devices
- Use Live Listen
- Use sound recognition
- Set up and use RTT and TTY
- Flash the LED for alerts
- Adjust audio settings
- Play background sounds
- Display subtitles and captions
- Show transcriptions for Intercom messages
- Get Live Captions (beta)
- Type to speak
- Record a Personal Voice
- Use Guided Access
- Use built-in privacy and security protections
- Set a passcode
- Set up Face ID
- Set up Touch ID
- Control access to information on the Lock Screen
- Keep your Apple ID secure
- Use passkeys to sign in to apps and websites
- Sign in with Apple
- Share passwords
- Automatically fill in strong passwords
- Change weak or compromised passwords
- View your passwords and related information
- Share passkeys and passwords securely with AirDrop
- Make your passkeys and passwords available on all your devices
- Automatically fill in verification codes
- Automatically fill in SMS passcodes
- Sign in with fewer CAPTCHA challenges
- Use two-factor authentication
- Use security keys
- Manage information sharing with Safety Check
- Control app tracking permissions
- Control the location information you share
- Control access to information in apps
- Control how Apple delivers advertising to you
- Control access to hardware features
- Create and manage Hide My Email addresses
- Protect your web browsing with iCloud Private Relay
- Use a private network address
- Use Advanced Data Protection
- Use Lockdown Mode
- Use Stolen Device Protection
- Receive warnings about sensitive content
- Use Contact Key Verification
- Turn iPhone on or off
- Force restart iPhone
- Back up iPhone
- Return iPhone settings to their defaults
- Restore all content from a backup
- Restore purchased and deleted items
- Sell, give away, or trade in your iPhone
- Erase iPhone
- Install or remove configuration profiles
- Important safety information
- Important handling information
- Find more resources for software and service
- FCC compliance statement
- ISED Canada compliance statement
- Ultra Wideband information
- Class 1 Laser information
- Apple and the environment
- Disposal and recycling information
- Unauthorized modification of iOS
Browse the web using Safari on iPhone
View websites with Safari
You can easily navigate a webpage with a few taps.
Get back to the top: Double-tap the top edge of the screen to quickly return to the top of a long page.
See more of the page: Turn iPhone to landscape orientation.
Refresh the page: Pull down from the top of the page.
Preview website links
Touch and hold a link in Safari to see a preview of the link without opening the page. To open the link, tap the preview, or choose Open.
To close the preview and stay on the current page, tap anywhere outside the preview.

Translate a webpage or image
When you view a webpage or image that’s in another language, you can use Safari to translate the text (not available in all languages or regions).
Add Safari back to your Home Screen
If you don’t see Safari on your Home Screen, you can find it in App Library and add it back.
On the Home Screen, swipe left until you see the App Library.
Enter “Safari” in the search field.
'ZDNET Recommends': What exactly does it mean?
ZDNET's recommendations are based on many hours of testing, research, and comparison shopping. We gather data from the best available sources, including vendor and retailer listings as well as other relevant and independent reviews sites. And we pore over customer reviews to find out what matters to real people who already own and use the products and services we’re assessing.
When you click through from our site to a retailer and buy a product or service, we may earn affiliate commissions. This helps support our work, but does not affect what we cover or how, and it does not affect the price you pay. Neither ZDNET nor the author are compensated for these independent reviews. Indeed, we follow strict guidelines that ensure our editorial content is never influenced by advertisers.
ZDNET's editorial team writes on behalf of you, our reader. Our goal is to deliver the most accurate information and the most knowledgeable advice possible in order to help you make smarter buying decisions on tech gear and a wide array of products and services. Our editors thoroughly review and fact-check every article to ensure that our content meets the highest standards. If we have made an error or published misleading information, we will correct or clarify the article. If you see inaccuracies in our content, please report the mistake via this form .
How to use StandBy Mode on iOS 17 (and which iPhone models support it)

When Apple first unveiled iOS 17 and all the new features coming with the latest iPhone software, all eyes were reasonably drawn to StandBy mode, which transforms the smartphone, when docked, into a smart display.
Also: Apple's mysterious iOS 17.4.1 and iPad OS 17.4.1 updates are actually very important
With the latest version of iOS officially released, setting your iPhone horizontally (or in landscape orientation) on a MagSafe , Qi-based wireless , or wired charger activates StandBy mode, turning what would typically be a blank lock screen into an interactive, glanceable window of widgets.
Here's how you can start using the feature.
How to use StandBy mode on iOS 17
What you'll need : StandBy mode is available now on the most recent iPhone models . You'll also need to have iOS 17 downloaded . Any software after iOS 17.0 will work.
1. Turning on StandBy mode
By default, StandBy mode is turned on in iOS 17.
If it's not, or should you want to turn off the feature, open up Settings > scroll down to StandBy > and switch the activation toggle.
Also: Let the iPhone sideloading begin! iOS 17.5 lets EU users download apps from the web
There are two other settings within this page for turning on Night Mode, which shifts the color tint from vibrant to red when the environment is darker, and notifications.
With the latter setting, you can have critical notifications displayed in StandBy mode, and you can also tap on them to expand to the preview, similar to the iPhone's lock screen behavior.
2. Charging your iPhone
StandBy mode works with any compatible iPhone that's charging and rotated to a horizontal orientation. You can power the iPhone with a MagSafe charging dock, a standard Qi-enabled wireless charging pad, or even a standard lightning cable.
Also: This $20 wireless charger is so useful I bought two of them for my iPhone
StandBy mode will automatically turn on when both requirements are met, and your iPhone lock screen will change into a widescreen status hub with the time, date, and temperature.
One notable advantage when using a MagSafe-certified charging dock is location awareness. If you plan on docking your iPhone on multiple MagSafe accessories -- say you have one for your work desk, one by your bedside, and another for the kitchen -- the iPhone will automatically display the StandBy mode configuration you set for each.
StandBy Mode has different display options, including a quick view of HomeKit devices in use.
3. Customizing StandBy mode
Swiping sideways on a docked iPhone cycles between three StandBy mode panels:
- The first panel displays two columns of interactive widgets, similar to those on the iPhone home screen. A tap and hold on this panel allows you to add or remove widgets, move them around, and turn on Smart Rotate and Widget Suggestions for a more personalized experience.
- The second panel is a photo clock, displaying the time and your choice of existing photo albums or photo categories (i.e., pets, nature, people). A tap and hold on this panel allows you to select the pictures you want to display.
- The third panel shows a larger clock with different styles to choose from.
4. Notifications and alerts
If Show Notifications is turned on in the iPhone's StandBy settings, incoming messages and alerts will appear when the device is docked.
Also: Siri's finally reading my messages in the right language thanks to iOS 17.4
For more privacy, you can toggle on Show Preview on Tap Only, so that you have to unlock the device via Touch ID or Face ID to view the notification in full.
What iPhone models support StandBy mode?
All iPhones that are upgradeable to iOS 17 will support StandBy mode. That level of support spans from the most recent models to the iPhone XR. Here's the full list of compatible devices .
Will StandBy mode always stay on?
StandBy mode will only stay on for iPhone models that support always-on display, meaning at the time of writing, the iPhone 14 Pro and iPhone 15 Pro series. For older models, StandBy mode will automatically turn off after 30 seconds of inactivity.
What charging dock is compatible with StandBy mode?
StandBy mode works with MagSafe-certified chargers , traditional Qi-enabled wireless chargers , and wired chargers -- the iPhone just needs to be horizontal and propped up on a stand or against something to trigger StandBy mode. If you want to take advantage of MagSafe location awareness, you'll need MagSafe chargers.
8 Apple Watch settings I changed to dramatically improve battery life
Ios 18 wishlist: 5 features i'd like to see apple bring to the iphone, i've tested every apple watch model. these are my favorites.
Apple details how superfast Safari upgrades help developers make web apps bigger and faster than ever before
Safari is now faster than ever.

Apple might have finally agreed to allow things like game streaming apps into the App Store but there are still plenty of apps that are only available via web-based alternatives in Safari. Those apps need to be bigger and faster than ever before and making that possible means being at the forefront of web-based technology and performance. Safari has historically been pretty quick, especially on the iPhone, and now the team behind it has detailed some recent speed improvements.
Safari is based on the WebKit web browser engine and it's the WebKit team that has detailed some changes that have been made to the underlying technology to enable web developers to build the kinds of experiences that they wouldn't normally be able to do.
Specifically, the Apple WebKit team says that it has been able to improve performance by around 60% of late, although it did take multiple different updates to the Safari app over the course of months in order to make that happen. Regardless, the upshot is the same — Safari is now faster than ever, and that's good news for developers and users alike.
Faster than fast
According to the blog post on the WebKit website, the speed improvements were made thanks to the introduction of the Speedometer 3.0 benchmarking system which in turn allowed WebKit developers to get a better understanding of how its software performs.
Discussing the tool, the WebKit team said that "these tooling improvements allowed us to quickly identify bottlenecks" with those bottlenecks then giving the team something to aim for.
The blog post then continued to detail what Apple was able to do including building a "shared understanding of web performance so that improvements can be made to enhance the user experience."
So how successful was it? As it turns out, pretty successful. "With all these optimizations and dozens more, we were able to improve the overall Speedometer 3.0 score by ~60% between Safari 17.0 and Safari 17.4," the post explains. "Even though individual progressions were often less than 1%, over time, they all stacked up together to make a big difference." The post continued, adding that the team is " thrilled to deliver these performance improvements to our users allowing web developers to build websites and web apps that are more responsive and snappier than ever."
Master your iPhone in minutes
iMore offers spot-on advice and guidance from our team of experts, with decades of Apple device experience to lean on. Learn more with iMore!
It's important to note that the improvements to performance when using Speedometer 3.0 don't just mean a better score for those running the tests, but rather real-world improvements that users of web apps across the world — and across Apple's platforms — can expect to be of benefit when running real apps.
It's also worth noting that outside the EU, all web browsers available for download via the best iPhone and iPad App Stores use the same WebKit browser engine at their core. That should ensure that these speed improvements will also benefit those who use other browsers on their devices, no matter which company makes them.
More from iMore
- How to manage privacy and security settings in Safari on iPhone and iPad
- This quick iPhone Safari trick will help you close all tabs and master Apple's mobile browser
- How to use tabs and private browsing in Safari for iPhone and iPad

Oliver Haslam has written about Apple and the wider technology business for more than a decade with bylines on How-To Geek, PC Mag, iDownloadBlog, and many more. He has also been published in print for Macworld, including cover stories. At iMore, Oliver is involved in daily news coverage and, not being short of opinions, has been known to 'explain' those thoughts in more detail, too. Having grown up using PCs and spending far too much money on graphics card and flashy RAM, Oliver switched to the Mac with a G5 iMac and hasn't looked back. Since then he's seen the growth of the smartphone world, backed by iPhone, and new product categories come and go. Current expertise includes iOS, macOS, streaming services, and pretty much anything that has a battery or plugs into a wall. Oliver also covers mobile gaming for iMore, with Apple Arcade a particular focus. He's been gaming since the Atari 2600 days and still struggles to comprehend the fact he can play console quality titles on his pocket computer.
Sick of sending "Sent from my iPhone"? Here's how to remove the annoying email signature for good
A major iPhone spyware attack hits users in 92 countries — find out if you've been affected
Severance season 2 filming has finished for one of its main stars as release date draws closer
Most Popular
By Joe Wituschek April 10, 2024
By Oliver Haslam April 10, 2024
By Daryl Baxter April 10, 2024
By Callum Booth April 10, 2024
By Stephen Warwick April 10, 2024
By James Bentley April 10, 2024
By Gerald Lynch April 10, 2024
- 2 A major iPhone spyware attack hits users in 92 countries
- 3 Apple's next major chip upgrade looks on track for iPhone 17 series next year
- 4 Apple unveils its answer to Wordle, but you'll need to be an Apple News Plus subscriber
- 5 Does Apple keep your data as private as it says? A new study suggests it might not
Want to highlight a helpful answer? Upvote!
Did someone help you, or did an answer or User Tip resolve your issue? Upvote by selecting the upvote arrow. Your feedback helps others! Learn more about when to upvote >
Safari not opening in full screen mode
Unsure why Safari stopped opening automatically in full screen mode but I would like to correct this please.
MacBook Pro 15″, macOS 13.4
Posted on Apr 10, 2024 5:46 AM
Loading page content
Page content loaded
There are no replies.
Watch CBS News
Experts warn not to look at solar eclipse with your phone camera — but share tricks for safely taking pictures
Updated on: April 8, 2024 / 12:12 PM EDT / CBS News
Millions of Americans will be able to see the solar eclipse on April 8, 2024, and chances are many will want to grab their phone and take pictures to document the rare event.
Experts warn that it's essential not only to protect your eyes from the sun, but also to be cautious when using your phone to view or take photos of the solar eclipse.
A partial solar eclipse, when the moon blocks some of the sun, will occur from coast to coast, while a total solar eclipse —when the moon lines up with the sun, blocking all of its light — will be visible in the "path of totality," stretching across more than a dozen states , from Texas to Maine.
"There is no safe time to look at the sun without protection, period," Dr. Christopher Starr, director of the fellowship program in cornea, cataract and laser vision correction surgery at NewYork-Presbyterian and Weill Cornell Medicine, said in an interview with Health Matters, NewYork-Presbyterian's online journal. "Not a split second, not a half a second, not a quarter of a second. At no time should a kid, or an adult, be looking at the sun even as the sun is partially eclipsed. It's still unsafe."
The safest way to look at a partially eclipsed sun is with eclipse glasses that meet an international standard, ISO 12312-2, according to the American Optometric Association.
Can I take pictures of the solar eclipse with my cellphone?
Cellphone cameras should not be pointed directly at the sun, as it may damage the phone's sensor, experts say.
Smartphones were never designed for taking photos of the sun or the moon, according to NASA. Because standard lenses are very small, they aren't equipped with the resolution needed for the largest objects in the sky like the sun and moon.

"Cellphone cameras do not have the kind of protective filters needed for safe or successful solar photography," Dr. Geoff Bradford, professor of ophthalmology at West Virginia University, told CBS News.
Photographing the partial eclipse with a smartphone will likely not only damage the camera sensor but also result in an overexposed photo, Bradford said.
Douglas Goodwin, professor of media studies at Scripps College and an expert in computational photography, agreed.
"Smartphone cameras in 2024 have small sensors and lenses, making it challenging to capture detailed images of the eclipse itself," Goodwin said in an interview. "Taking photos of an eclipse is even harder than taking photos of the moon — it's small and dazzling!"
Can I look at the sun on my cellphone screen?
Pointing your cellphone at the sun is bad for the phone, but it also could be dangerous for your eyes if you look at the sun on your cellphone screen, experts say.
Except for the few moments of total eclipse , when the sun is completely obstructed, "viewing the sun with your unprotected eyes or through a cellphone screen is extremely dangerous," Bradford said, advising that all visual contact with the sun take place only through special solar eclipse glasses that meet international standards.
That international safety standard, which is set by the International Organization for Standardization , means the glasses reduce visible sunlight to a safe level and block ultraviolet and infrared radiation, according to the American Astronomical Society website.
Ultraviolet radiation can damage the eyes's cells, while heat from infrared radiation can cause thermal damage, according to the National Eye Institute .
What's the safest way of taking pictures of the eclipse?
The solar eclipse has various stages and effects, and some are safer to photograph than others.
"Smartphones will be great for capturing the experience of the eclipse," Goodwin said. This includes the effects of the altered lighting around us.
"Keep your head down and look under leafy trees for crescent-shaped projections of the eclipsed sun on the ground," Goodwin said. "Plus, you will observe how the strange light affects people and animals."

Goodwin also recommended that people in the eclipse's path look for shadow bands, which are mysterious gray ripples that snake over the ground just before and after the total eclipse.
If you really want to photograph the sun as it becomes partially covered, take an extra pair of solar eclipse glasses, cut them and tape one of the filters over your phone's camera lens, Bradford said. If your smartphone has several lenses, make sure all are covered.
If you're using an iPhone, you should turn off the camera's macro mode when putting a filter in front of the camera.
"Do not look at the sun, even briefly, while pointing your camera skyward," Bradford said. "To enlarge the eclipse further than your camera zoom will allow, you can purchase a clip-on zoom lens for your smartphone for more dramatic photos."
Can I take photos of the sun when it's fully obstructed?
If you're in the path of totality , during the few minutes of total eclipse, you can look up without eye protection and take unfiltered photographs with a smartphone, Bradford said.
But it's important to be mindful that the total eclipse is a fleeting occurrence. As soon as the moon begins to move away from the sun and sunlight reappears, make sure your eclipse glasses and camera filter are back on, Bradford advised.
Some experts warn against looking up at the sun even when it's fully obstructed because of how suddenly sunlight can reappear.
"Totality of the eclipse lasts only about 1 to 3 minutes based on geographic location, and bright sunlight suddenly can appear as the moon continues to move," an eclipse viewing guide published in JAMA noted, adding that "even a few seconds of viewing the sun during an eclipse" can temporarily or permanently damage your vision.
Looking at a partial eclipse without the protection of filters can cause permanent and irreversible eye damage, including blind spots, distorted vision and decreased color vision, Bradford said.
During the darkened few moments of the total eclipse, Goodwin recommends using your smartphone's HDR (High Dynamic Range) and Night modes to enhance photographs. HDR mixes exposures to capture a range of brightness levels, while Night mode uses image stacking to create well-lit photos in low-light conditions, Goodwin said.
You can use the iPhone's Wide and Ultra Wide cameras during near-total darkness.
S. Dev is a news editor for CBSNews.com.
More from CBS News

Couple gets engaged on flight to see total solar eclipse

3 investments to consider with inflation rising

How to find the best tax relief company

Iowa governor signs bill that allows for arrest of some migrants
- a. Send us an email
- b. Anonymous form
- Buyer's Guide
- Upcoming Products
- Tips / Contact Us
- Podcast Instagram Facebook Twitter Mastodon YouTube Notifications RSS Newsletter
Apple to Allow Used Parts for Repairs, Starting With iPhone 15 Lineup
Apple today announced that customers and independent repair shops will be able to utilize used genuine Apple parts in repairs starting later this year.

In the fall, Apple says calibration for both new and used genuine Apple parts will happen on device after the part is installed. If an iPhone has been repaired, a "Parts and Service History" section appears in the Settings app under General → About, and Apple says it will be expanding this section to show whether a genuine part is new or used.
Apple also announced that customers and service providers will no longer need to provide a device's serial number when ordering parts from its self-service repair store for repairs not involving replacement of the logic board.
To deter stolen iPhones from being disassembled for parts, Apple said it will be extending its Activation Lock security feature to iPhone parts:
Apple will also extend its popular Activation Lock feature to iPhone parts in order to deter stolen iPhones from being disassembled for parts. Requested by customers and law enforcement officials, the feature was designed to limit iPhone theft by blocking a lost or stolen iPhone from being reactivated. If a device under repair detects that a supported part was obtained from another device with Activation Lock or Lost Mode enabled, calibration capabilities for that part will be restricted.
Apple's hardware engineering chief John Ternus said the new policy will be more environmentally friendly by extending the lifespan of parts:
For the last two years, teams across Apple have been innovating on product design and manufacturing to support repairs with used Apple parts that won't compromise users' safety, security, or privacy. With this latest expansion to our repair program, we're excited to be adding even more choice and convenience for our customers, while helping to extend the life of our products and their parts.
Apple said the policy will apply to future iPhone models.
Get weekly top MacRumors stories in your inbox.
Top Rated Comments

To make sure an owner with two broken iPhone can't end up with a working iPhone... FTFY
Because the parts are still LOCKED. Apple's not going through the trouble of determining WHO owns the lock.
If you own both phones, then why would activation lock have any impact on you?
I love Activation Lock on paper, but in practice it seems like would-be thieves haven't gotten the memo yet.
Making iphones stolen or maybe simply lost, unusable, will be more environmentally friendly ? Truth is icloud block is only apple's another greedy way to make money, masked by the best antitheft system ever. A thief will get a sitting phone on a table regardless if its an cheap android or an iphone 15. It's an occasion to get it so he will get it! What then? He will sell it anyway, even for few bucks. BUT when it will realize that its worth 0, he will throw it. No money for thief, no phone for the victim, who will buy another one. One iphone stolen = one more iphone sold by apple. Yeahthe victim may have the satisfaction that damn thief doesnt earned a buck, however another big thief earned a lot more... Another example not involving thiefs. My friend works in a big company, where workers are given phones, some iphones some androids. When they stops working there, they obviously return those phones. Well, no one checks the state of those phones and most of them are given back locked. While u can unlock androids, iphones are unusable. My friend sent my once a photo of a box full of locked iphones... Again apple earns, my friend's company loses...

Popular Stories

When to Expect a New Apple TV to Launch

iPhone 16 Plus Rumored to Come in These 7 Colors

Alleged iPhone 16 Battery Details Show Smaller Capacity for One Model

Macs to Get AI-Focused M4 Chips Starting in Late 2024

Apple Event for New iPads Still Considered 'Unlikely' Following Delays

iOS 18 May Feature All-New 'Safari Browsing Assistant'
Next article.

Our comprehensive guide highlighting every major new addition in iOS 17, plus how-tos that walk you through using the new features.

App Store changes for the EU, new emoji, Podcasts transcripts, and more.

Get the most out your iPhone 15 with our complete guide to all the new features.
A deep dive into new features in macOS Sonoma, big and small.

Revamped models with OLED displays, M3 chip, and redesigned Magic Keyboard accessory.

Updated 10.9-inch model and new 12.9-inch model, M2 chip expected.

Apple's annual Worldwide Developers Conference will kick off with a keynote on June 10.

Expected to see new AI-focused features and more. Preview coming at WWDC in June with public release in September.
Other Stories

2 hours ago by Joe Rossignol

2 hours ago by Tim Hardwick

19 hours ago by MacRumors Staff

1 day ago by Tim Hardwick

Viture One glasses now support Vision Pro-like multiple Mac monitors in VR [Video]
One of Vision Pro’s most exciting capabilities, to me personally , is the ability to display multiple Mac monitors in virtual form. Viture One XR glasses have now gained that same capability.
When I first tested the glasses , I noted that while they could act as a Mac monitor, they were limited to a single monitor – this this has now changed …
Vision Pro versus Viture One XR
As I outlined previously, the two devices are very different beasts. Vision Pro is a spatial computer, capable of running its own apps; Viture is an external monitor in glasses format. Vision Pro has a resolution of more than 4K per eye, and a wide field of view; Viture is 1080p per eye, and a much narrower FOV.
On the other hand, Vision Pro costs upwards of $3,500, while Viture comes in at $439 – and still manages to (now) tick five of the same boxes:
- Viewing movies
- Playing games
- Viewing 3D video
- Viewing Spatial Video
- Using multiple Mac monitors in virtual form
It’s also massively lighter and more comfortable, and is powered by the connected device (iPhone or Mac), so has much longer effective battery life.
Multiple Mac monitors
Creating virtualized multiple Mac monitors on Viture requires running a Mac app called SpaceWalker. This is effectively just a utility for launching and managing the monitors.
You can choose between a variety of layouts – single screen, dual screen, ultrawide screen, and Horizon mode. The latter allows three side-by-side monitors (or you can stack them vertically, if you prefer).
This would, in principle, allow me to replicate the three-screen mobile office setup I use when working away from home. That relies on three physical screens: my 16-inch MacBook Pro, an external 15-inch portable monitor, and my 12.9-inch iPad.
The physical setup works well, but has a couple of drawbacks. First, the external monitor is an extra device to carry – and a fragile one, which is always something of a concern when travelling. Additionally, when I’m sharing a holiday apartment, I need to set it up and put it away each day to avoid permanently commandeering a dining table.
In theory, a three-monitor setup in my Viture glasses would give me the same screen layout using nothing more than my Mac and the glasses.
This is something my Meta Quest can do too , but that’s just too uncomfortable to use for work.
The good news
Setup is very easy. Open the SpaceWalker app on the Mac, connect the glasses, select the Horizon view – then open your apps and assign them to the virtual monitors as desired.
Switching view is as easy as turning your head to the left or right. You can also zoom in and out, using key combinations.
As a bonus, the MacBook screen remains blank by default, so you could even use the glasses to have a three-screen setup on a train or plane, without anyone being able to see your work.
Everything can still be controlled using the MacBook keyboard and trackpad, so it doesn’t require any additional hardware – though using a Magic Keyboard and Magic Trackpad while leaving the Mac off to one side would make for a neater setup.
The bad news
This is a first-gen feature, and the biggest issue I’ve found is that the positions of the monitors wander a little. Not apart from each other – they remain side by side – but within your field of view.
There’s a single keyboard shortcut for re-centering them, so just look forward, hit Shift-Option-CMD-R, and everything neatly centers itself. However, it does become a pain when you need to do this very frequently. I’d expect this to be improved in future software updates.
The other bad news for me personally – and maybe for some of you – is that while I can use the built-in diopter adjustment to use the glasses without contact lenses, my short-sightedness means I can’t quite properly see the physical keyboard of my Mac. (This is visible beneath the displays of the glasses when looking down.)
If I wear contact lenses, then the opposite problem arises: my long -sightedness means that the screen isn’t 100% clear! The joys of getting old …
Enough to intrigue me; not yet to convince
So far, then, I’ve been able to play with the system – including writing part of this piece on it, relying on what passes for my touch-typing – but not really get a full sense of how realistic it would be to use it as a serious mobile office setup.
However, I’m intrigued enough to want to find out!
My plan is to get some contact lenses with the same prescription as my reading glasses, which are designed for near vision at the expense of far. That would, I think, allow me to see both virtual displays and keyboard clearly. If that solves my vision problem, I can then give the setup a full-on test.
Video capture from the glasses is currently pretty tricky, so this is just a very rough look at the main options – and a demo of the zoom feature – created by the company. (I’m hoping they will offer an easier way to capture video in a future update.)
FTC: We use income earning auto affiliate links. More.
Check out 9to5Mac on YouTube for more Apple news:

Apple’s Mac lineup consists of MacBook, MacBoo…

Ben Lovejoy is a British technology writer and EU Editor for 9to5Mac. He’s known for his op-eds and diary pieces, exploring his experience of Apple products over time, for a more rounded review. He also writes fiction, with two technothriller novels, a couple of SF shorts and a rom-com!
Ben Lovejoy's favorite gear

Dell 49-inch curved monitor
How-To Geek
4 ways to take a scrolling screenshot on a mac.
Grab a screenshot of a full web page or document even when it doesn't fit on your screen.
Quick Links
Take full-page screenshots in safari with the develop menu, take a scrolling screenshot with the fireshot safari extension, take screenshots in an online tool, take scrolling screenshots in any app with shottr.
macOS has a built-in tool for taking screenshots, but it can only capture what's actually visible on the screen at any time. What if you need to take a screenshot of an entire web page or lengthy document? Here are the best ways to take scrolling screenshots on a Mac.
Safari has a hidden screen capture tool that you might not know about. It's a bit technical, but is accessible to everyone, and if you only need it for occasional use, this is the simplest option to try.
To access the feature, you first need to enable the Developer Settings in Safari. Go to Safari > Settings > Advanced and click "Show Features for Web Developers".
Exit the settings, and you should see that a "Develop" option has appeared in the Safari menu bar. Now load up the web page you want to screenshot and go to Develop > Show Web Inspector. A panel will open at the bottom of the screen. It looks pretty complicated if you aren't used to it, but don't be put off—you don't need to know what any of it means.
To take your screenshot, make sure the Elements tab is selected at the top of the panel. In the code in the left-hand pane, scroll to the top and right-click on the line that begins "html"—it'll normally be the second line. From the dialog box that opens, click "Capture Screenshot."
You'll now be prompted to choose where to save your image. Click "Save" and you're done.
If you take screenshots of websites regularly, then you'll be better off using an app to handle it. For Safari, you can install an extension to capture scrolling screenshots. The one we like is FireShot, which is free and is also available as an extension for Chrome and other third-party browsers.
Head to FireShot on the Mac App Store and download it by clicking "Get" followed by "Install."
Now open Safari and go to Safari > Settings > Extensions and locate FireShot in the Installed pane. Check the box alongside the name to activate the extension. In the right-hand pane, you can click "Always Allow on Every Website" if you plan to use it a lot. For security reasons, it's better not to do this. You can simply grant permission for the extension to work as and when you need it instead.
Now load up the page you want to screenshot in Safari. You'll see that a FireShot icon has been added to the toolbar alongside the address bar. It'll be grayed out at first, so click the icon and select "Allow for One Day" to give it permission to run.
Click the icon again, followed by "Capture Entire Page." The screenshot will open in a new tab, and you can choose to save it as an image (in the PNG format) or PDF, email it, copy it to your clipboard, or print it.
The other good option for taking full-page screenshots of websites is by using an online tool. This is less convenient in some cases, but it comes with the benefit of being able to share your screenshots between your Mac and another device more easily.
There are many web services that can capture full-screen screenshots of websites. FullPageScreenCapture.com is as good as any. It's free to use and fast, and it assigns a unique URL to every screenshot it saves, so you can access it through any browser on any device.
Simply head to fullpagescreencapture.com and type or paste the URL of the web page you want to save into the box, then click "Capture Now."
It takes a few seconds to process. Once it's done, you'll see the image displayed on the site. Click it to open the image in a new browser tab, then right-click on the image and select either "Save to Desktop" or "Save As."
You can also click in the address bar in Safari and hit Command+C to copy the unique URL for the image and share it with other devices.
Finally, if you need to take a full-page or scrolling screenshot from within any app, not just of a website, you can do this with the third-party app Shottr. You can use it to capture screenshots of PDF files, spreadsheets, documents, large photos, or anything else.
You can use the app for free for as long as you like. After 30 days, it will occasionally ask you if you want to pay for it. You're not obligated to do so, but it only costs $8 and is great value if you use it a lot.
The app isn't available through the Mac App Store. Instead, download it from the official Shottr website and install it to get started .
Launch Shottr, and its icon will appear in your menu bar at the top of the screen where it's always easily accessible. Open the app and content you want to screenshot, then click the Shottr icon and select "Scrolling Capture."
Your mouse pointer will turn into a crosshair. Click in the top-left corner of the area you want to screenshot, then drag to the bottom-right. When you let go of the mouse button, the screen will begin to scroll up. Everything within the width of the rectangle you drew will be captured, right down to the bottom of the page.
Your screenshot will open in a preview window. You can annotate or crop it, or click the Save icon to save it. If you close the preview accidentally, click the Shottr icon and select "Reopen Shottr."
It's easy to take scrolling screenshots on a Mac. Whether you just need a quick tool or a more professional solution, choose the method that's best for you, and you can grab full-page screenshots in any app.
IMAGES
VIDEO
COMMENTS
Navigate to your desired website. Rotate your iPhone to landscape mode. Tap the full-screen icon (two diagonal arrows) in the bottom right corner. While in full screen: Swipe down at the top edge of the screen to access the address bar and search functionality. Access open tabs by tapping the tabs icon, which minimizes the full-screen view and ...
Method 1: Using the Full Screen Button. One of the most straightforward methods to go full screen on iPhone Safari is by utilizing the built-in full screen button. This feature allows you to maximize your viewing area with a single tap, providing a seamless transition into an immersive browsing experience. To initiate full screen mode using the ...
Here's how it works. Launch the Safari app from the Home screen of your iPhone. Navigate to the page you'd like to view in full screen mode. Rotate your iPhone or iPod touch so it's in landscape mode if you haven't already. Tap the Full Screen button in the bottom right hand corner. (it looks like two diagonal arrows.)
Using Full-Screen Mode in Safari on an iPhone Yes, you can go full screen on Safari for iPhone. To do so, simply tap the full-screen button in the bottom right-hand corner of the Safari window.
You can hide the search field, switch to Reader, and more. Open the Safari app on your iPhone.. Tap , then do any of the following:. Hide the search field: Tap Hide Toolbar (tap the bottom of the screen to get it back). See a streamlined view of the webpage: Tap Show Reader (if available). To return to the normal view, tap Hide Reader.
This lesson will show you how to make Safari full screen on iPhone. Follow along with the steps we show in the guide and you will be able to change Safari to...
Utilizing full-screen mode in Safari on your iPhone offers a captivating and immersive browsing experience, allowing you to maximize the visibility of web content and eliminate distractions. Whether you're viewing images, reading articles, or engaging with multimedia, activating full-screen mode enhances the visual impact of the content and ...
Customizing Full Screen Mode in Safari. Full screen mode in Safari is highly customizable. Here are a few ways you can adjust it to fit your preferences: Adjusting Toolbar Visibility. You can choose to hide or show the toolbar in full screen mode. To do this, go to "View" in the top menu bar, then select "Hide Toolbar" or "Show Toolbar."
Tap the little opposite arrow icons in the lower right corner to enter into full screen view. The area visible on web pages is increased dramatically, making reading and browsing on the smaller screened iPhone and iPod much more pleasant. To escape out of full screen mode in Safari, either re-orientate the device vertical (portrait) or just tap ...
Rotate the screen on an iPhone without a Home button. Swipe down from the top-right corner of your screen to open Control Center. Tap the Portrait Orientation Lock button to make sure that it's off. Turn your iPhone sideways. If the screen still doesn't rotate, try a different app, like Safari or Messages, that is known to work in landscape mode.
Tap on the button to enable full-screen mode. The address bar and the bottom buttons will disappear, leaving a transparent arrow in one corner acting as the back button while you browse. In the ...
Step 1: Add the 'URL App' Shortcut. The "URL App" shortcut, from RoutineHub user Changmeister, creates a web clip of any site you want. Simple copy a URL to your clipboard, paste it into the shortcut, name your app, choose an icon, and add the web clip as an app to your home screen. Unlike a regular bookmark, the website won't open in Safari ...
Step 2: Click on the "View" menu. After successfully launching Safari, the next pivotal step in the process of configuring the browser to consistently open in full screen mode involves accessing the "View" menu. The "View" menu serves as a gateway to a plethora of customization options within Safari, allowing users to tailor their browsing ...
I hope you will like this video #safari #fullScreenMode #hideToolbar Thanks for watching Follow me on Instagram @Josha_07
My iPhone 11 won't full screen pics or videos from all sources I've tried. I've tried on: Safari; Youtube; Chrome; ... I've updated iOS to 15.2.1 I've done all the memory management suggestions. Symptoms Include: *Safari always defaults back to the same page I left off at months ago so if I were to go to my springboard right now and try to ...
If you click on AA button on Safari address bar you get a menu. In that you have the option called "Hide Toolbar". Which hide the tool bar. In portrait mode if I hide the tool bar the screen looks right. When I rotate to landscape mode the tool bar comes back.
Download Article. 1. Click the green "Expand" icon. It's in the top left corner of the app's window. 2. Click Enter Full Screen. This is usually the first item on the menu and will enlarge Safari to fill your entire screen. [1] Alternatively, press a keyboard shortcut to enter Full Screen without using your mouse.
If you don't see Safari on your Home Screen, you can find it in App Library and add it back. On the Home Screen, swipe left until you see the App Library. Enter "Safari" in the search field. Press and hold , then tap Add to Home Screen. See also Search for websites Change the layout in Safari Clear your cache.
How to make a webpage open in fullscreen mode in Safari on iOS devices? This question has been asked and answered by many developers on Stack Overflow, the largest online community for programmers. Learn from the best practices and solutions shared by experts and peers, and discover how to use meta tags, JavaScript, and other techniques to achieve your desired effect.
By default, StandBy mode is turned on in iOS 17. If it's not, or should you want to turn off the feature, open up Settings > scroll down to StandBy > and switch the activation toggle.. Also: Let ...
Apple might have finally agreed to allow things like game streaming apps into the App Store but there are still plenty of apps that are only available via web-based alternatives in Safari. Those apps need to be bigger and faster than ever before and making that possible means being at the forefront of web-based technology and performance.
Here's how to turn 5G on/off on iPhone for better battery or faster speeds. ... And the opposite, Low Data Mode for when you want to conserve. ... iPhone Screen Distance in iOS 17 protects your ...
Unsure why Safari stopped opening automatically in full screen mode but I would like to correct this please. Show more Less MacBook Pro 15″, macOS 13.4
If you're using an iPhone, you should turn off the camera's macro mode when putting a filter in front of the camera. "Do not look at the sun, even briefly, while pointing your camera skyward ...
Sponsored by Ulysses: The ultimate writing app for iPhone, iPad, and Mac. Learn more and get started today for free. New episodes of 9to5Mac Daily are recorded every weekday.
Apple's iPhone 16 Plus may come in seven colors that either build upon the existing five colors in the standard iPhone 15 lineup or recast them in a new finish, based on a new rumor out of China.
You can choose between a variety of layouts - single screen, dual screen, ultrawide screen, and Horizon mode. The latter allows three side-by-side monitors (or you can stack them vertically, if ...
Take Full-Page Screenshots in Safari With the Develop Menu Safari has a hidden screen capture tool that you might not know about. It's a bit technical, but is accessible to everyone, and if you only need it for occasional use, this is the simplest option to try. ... and has covered everything from the old Palm Pilots to the original iPhone and ...