

RCA RCT6773W22
Device repair and troubleshooting for the 7" RCA tablet released in 2014, identified by model number RCT6773W22.
Zahra Hoda @zahrahoda
Posted: Feb 4, 2017
- Unsubscribe
cannot reset my tablet to factory default
I forgot my pin and even after resetting the tablet to factory default, the system is still asking for my email and password. It will not take my credential, even though it is correct.
Is this a good question?
Last step : set up as new device. Do not restore from saved info. I just did all of your steps and was a complete success. Thank you!!!
Sep 11, 2017 by Andrea Williams
I have done this like 6 times and it still won't work
Oct 5, 2017 by Robert
My daughter put an emoji pattern on hers and can't remember it
Oct 20, 2017 by Jessica B Lashus
Am same issues can't reset mine
Nov 30, 2017 by Amador-P Aida
Ok ive tried to reset and it's not working my son a password but he forgot it now we can't even get in we've tried to reset password but can't. It's asking for a usb I but my usb but it's saying there's an error. Can anyone help me ?
Dec 1, 2017 by Amador-P Aida
Show 40 more comments
L Pfaff @lpfaff1
Rep: 101.2k
Posted: Feb 5, 2017
@zahrahoda , Zahra Hoda , Make sure your device is charged before attempting reset and then powered off. Here are the instructions from the 1st link at the bottom, telling how to factory reset your device properly, link #2 is a video showing procedure. You can try this, hopefully it will solve your issue. Good luck.
I hope this helped you out, if so let me know by pressing the helpful button.
Follow the detailed instructions below on how to completely reset your RCA Android 7 Voyager (RCT6773W22) tablet.
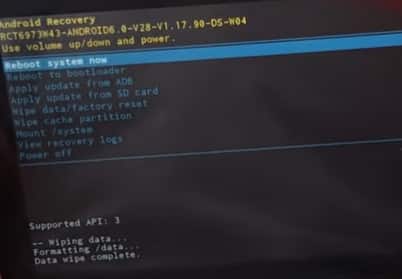
Step 1. With your tablet off, press and hold the volume up (+) button and power button until you see the RCA splash screen with Nipper and Chipper. Release both buttons to reveal the Android bot on his back with a caution symbol above him.
Step 2. A new screen will appear asking you to use your volume up/down keys to move and the power button to select.
Step 3. Use the volume down (-) button to highlight "wipe data/factory reset." Once highlighted, select using the power button.
Step 4. A new screen will appear asking you to confirm your selection. Use your volume down (-) button to highlight "Yes -- delete all user data." Press the power button to select once highlighted.
Step 5. Once the tablet is finished wiping data, you may press the power button to select "reboot system now." This will restart your tablet.
Step 6. The system will begin to reboot and once again display the RCA logo with Nipper and Chipper. The next "Welcome" screen will prompt you to select your language of choice. Scroll through the options using your finger and press start when finished. Congratulations, you have successfully reset your RCA 7 Voyager tablet.
http://wmp3.xyz/mp3/how-to-access-your-r...
https://www.youtube.com/watch?v=cp4IvkIA...
Was this answer helpful?
59 Comments:
Ive got throught the steps now lets see if these instructions have been a success. So far so good.
Jun 30, 2017 by ambercut
I've done everything you said and my tablet still won't reset! It keeps asking me for my previous emails and passwords. The reason I want to reset is because I cannot remember my passwords! I want to use new passwords...UGH! I.ve done the steps you outline at least 6+X and nothing!!
Jul 1, 2017 by r.maria89
same here ugh.............!!!! what now?
Aug 23, 2017 by tarter_w
thank u soooooo much
Aug 23, 2017 by Atou Ngoh
If you don't remember your password, create a new Gmail account on a different device. Sign in with the new account.
Sep 17, 2017 by Kieran Dozeman
Show 54 more comments

Century Garage @centurygarage
Posted: Dec 29, 2017
I learned from googling google that the gmail.com sign on will be removed if not used in the last nine months. The device may recognize the e-mail address but the server side of account is no longer there. I have a device that recognizes the email but won't sync with the server. The server side being deleted after nine months of not being used is deleted.
5 Comments:
Now what can I do, locked out email it was very odd account.
Jan 10, 2018 by Sherlene
I tried the power and volume button up and I did not see any icon the only thing that popped up was Viking 2 then it went to the login screen and and ask for a password to open it up I need help please
Feb 8, 2018 by Dennis Drechsler
I just tried it to and it did nonthin
Jun 7, 2019 by poorelorie
I just followed the instructions and it did not work
Jul 6, 2019 by Jessica Maurer
i also tried to reset my mecer tablet, and i click on reset but it does nothing. and i cant remove the family link parental controls crap i put on when i got it for my son and since then i have removed deleted the family link app from my end, so its not linked on my side bu tshows linked on his side
Aug 4, 2023 by Sade Stanley

Mary Jane Puente @maryjanepuente
Posted: Dec 16, 2017
If you don't remember your google password, the issue is not with your tablet. If you followed the steps above, your tablet is reset. You have to go to google.com & click forgot password. Once youve gotten your new password, then you can continue on with your tablet set up.
6 Comments:
No it still would not let me log on with the new password. It said that there was an unknown error.
Dec 25, 2017 by Jae'sha Dean
Nevermind I got a notification when trying to sign in after I had changed my password to wait 24 hours from last password change. I waited, logged in and it worked!!!
Dec 27, 2017 by Jae'sha Dean
ok ive been trying to reset my password but google wont do it
Jan 9, 2018 by nick
Thanks it actually works
Jul 13, 2018 by Lowkey John
it didn´t work for me
Apr 17, 2019 by Natalie Shrum
Show 1 more comment
Dianne @diannelovesluis
Posted: Dec 20, 2018
I found the solution under a different question.
Thank you wrightbethany18!! (I changed it a bit to explain clearer)
After doing the above factory reset, it wants you to sign in as the original owner. This is a workaround. Go to settings and add user. Here's how:
When it asks for Google email:
type a bunch of letters, press and hold to copy> choose assist> type or say settings> (in the settings menu) select add user> add YOUR Google email info.
It will take a few minutes to set up your new profile.
The original owner's profile is still there, but the tablet is completely usable. I haven't figured out how to remove it yet.
I hope this works for you too!!
There is a good thing but I don't even have that option
Dec 20, 2018 by Sally Hart
I did the factory reset and i typed in a bunch of letters held down the copy i clicked assist but where im confused at is after i press assist how do i get to setting? I dont have no voice command is that what you used was voice command? I still do not know how to get passed the original owners account? If anyone can help me please email me at [email protected] thanks!
Dec 27, 2018 by Valerie snyder
I am in same boat please email me how if u figure it out [email protected]
Feb 12, 2019 by Dawn
Can some one email me on what to do I factory reset my RCA tablet because it was my moms she passed on so I knew the original email but not password so once I reset it it says cannot sign in on your accounts.google.com - I even changed the passwords to both google account so I’m stuck on the page can’t sign in and how do I get off that page I even did another factory reset- now what ?? HELP
Mar 3, 2019 by Sharyn White
I tried to add a new user but it kept switching back to owner. does anyone know how to fix that?
Sep 3, 2019 by Bob Bobbington

Buford Upperman @bufordupperman
Posted: Dec 30, 2018
None of these ideas work my tablet does not
Cory @jcjzj51980
Posted: May 20, 2019
I tried the add user but it says switching to new user and then it says switching to owner and it goes back and I'm stuck again… please someone help! Email me @jcjzj51980 @gmail.com
Try adding new user but " don't click setup account" and then go back to the lock screen / start screen and press the user icon in the top right corner and switch to the new user and setup from there, should work, I bypassed the Gmail login!
Jan 21, 2021 by Sync U
konopkajennifer2 @konopkajen62563
Posted: Dec 13, 2018
What do you do if you got a tablet from a yard sale and had to factory reset it? I don't have the previous owners Gmail info. Can I use my own Gmail info?
Did you ever figure out how to get around owner info? I have the same problem
Feb 11, 2019 by nasirkhaleel.jr
Me too need help
If u figured it out please email [email protected] thank u in advance
How do I get pass the page I’m stuck on saying that ,can’t sign in to accounts.google.com-I even factory reset 3 times and changed my passwords and still can’t get off that page I’m just stuck there with that darn message when I know my info is correct
I have a Maven pro tablet rct6213w87m bought this off swap in sell no the original owner will not text me back her email and I can't get into it does anybody know how
Dec 8, 2019 by May Natoli
Sherlene @nga
Nothing worked sorry.
Just in case it's not obvious, there is nothing wrong with your tablets. There's a pattern here. Not the best of tablets,but when they work they work %#*@ well. This applies to most android tablets and phones. The tablet KNOWS is being reset. Its assuming it was lifted from its previous master. It was stolen. Since it knows you'll try all the things listed here, and there are no thieves here are they ? Try this, if you connected to the web assume your time is set. If you didn't the internal clock will go from where it stopped. Leave the %#*@ machine alone, but on for 3 days or so. If you didn't at 1st use the correctassumes grabber and shuts down its higher functions. It will reset but as I've said it will take a few days and basically give up do as its told. Two things never open the case. The safeguards will disable the device permanently. Never try and be clever by cutting or unplugging the battery. It can tell a suddenly missing B+ from a gradually dying Vcc
Feb 20, 2021 by The Pricil Love

Tommy Dyer @tommydyer
Posted: Dec 21, 2018
I just bought my tablet and it wont go pass the voyager 3 loading screen. What do i do?
Hello. Who sold you this tablet? If it isn't going pass the Voyager screen, ask for a refund and buy a new one.
Dec 19, 2019 by R3tr0Zane
Rose @vrl14darray
Posted: Jan 3, 2019
I got problem with my polaroid tab ptab7xc got it in yard sale forgot the passcode.. it will not do a hard reset. Please help Thanks
I factory reset my tablet and put my email in and now it's saying can't connect to Google.. please help
Jan 10, 2019 by Felicia maner

Sandi Huk @sandihuk
Posted: Jan 25, 2019
I want to reset completely and asks for last email synced to device but I want to change settings for my daughter so she isn't stuck with YouTube kids and I cant figure it

brie bodie @briebodie
Posted: Feb 25, 2019
I need to reset my tablet but it won’t let me and I’ve done everything it said to do and it still asked for the email n password that was used for this Device
Natalie Shrum @cashandmaverick
Posted: Apr 17, 2019
What do i do it says there is no command and i don´t have a sd card what should i do
Add your answer
Past 24 Hours: 1
Past 7 Days: 10
Past 30 Days: 72
All Time: 245,466
- Skip to main content
- Skip to primary sidebar
Additional menu

Tablet Expert
Unbiased Tablet Reviews

We’ll earn a small referral fee, if you make a purchase using our affiliate links. Learn more .
How to Factory Reset an RCA Tablet? [4 Working Methods]
posted on January 11, 2022
Resetting your RCA tablet makes sense if you have been facing numerous issues with the device. Be it ruminating over a hard-to-recall password or responding to the tablet that has been acting up recently, resetting is probably the best option to get it back to the original internal state.
You can consider the Soft Reset if the issues are only limited to speed and performance. However, I would recommend a Hard Reset or rather a Factory Reset if you want to get rid of all the problems, like app freezing, slow internet, overheating, and more, once and for all.
But then, you must remember that a hard or factory reset wipes out every bit of on-device data, without giving any chance to recover the same. Therefore, it is advisable to get a backup at the earliest.
Factory Reset Methods
Before you move ahead with the reset, you need to understand a few aspects. Firstly, RCA offers an exciting range of tablets, including Android and Windows-powered devices. Therefore, resetting the device while it’s turned on, depends on the type of operating system that the tablet boots.
I’ve written two methods for Android RCA Tablets and two methods for windows-based RCA devices. You can navigate using the below options:
- Android RCA Tablet (Powered Off)
- Android RCA Tablet (From Settings, when powered on)
- Windows RCA Tablet (Powered Off)
- Windows RCA tablet (Powered on)
Method 1: Android Tablet: Powered-Off
Prerequisite : Ensure that the RCA tablet is switched off and every accessory is unplugged or taken out, including the SD card.
Step 1: Switch off the tablet
If you find it hard to switch the tablet off via the conventional, on-screen instructions, there is a reset button at the back to do exactly the same. Remember that thhis button is only meant for the Soft Reset.

Step 2: Boot into recovery mode
Once the tablet is off, wait for a few seconds and then hold the power button and the Volume Up (+) key, simultaneously.
While you can find the power key adhered to the top rim of the tablet, the Volume keys can either be at the back or on the edge, depending on the RCA tablet model.

Keep holding the mentioned buttons till the time the RCA logo is visible. Within a second or two, you would be redirected to the Android Bot interface that comes with the caution symbol and takes you to the recovery menu.
The recovery menu looks more like a standard BIOS interface with several options available for booting, updating, or managing cache partition.

Once you get to the recovery menu, release the buttons immediately.
Step 3: Choose Wipe Data / Factory Reset in recovery mode
Once the command prompt lookalike interface is in front, you can scroll down to the wipe data/ factory reset version by scrolling up and down using the volume up and down keys.

You can select the command by pressing the power button once, which then asks for a ‘Yes’ or ‘No’ prompt. Choose ‘Yes’.

Once the confirmation page is taken care of, you will see a ‘Wiping data’ notification at the lower end of the screen. This process might take 5 to 8 seconds, depending on the data housed by the RCA tablet.
Step 4: Reboot your Device from Recovery Mode
Once you see an intimation that says ‘Data Wiped’, you will be automatically redirected to the recovery page again, with the ‘Reboot System Now’ command at the top. You need to select the same to restart the device, by clicking on the power button.
After a few seconds, you will see the startup screen pop-up and you will have the old device in front of you with the software as good as new.
Method 2: Android Tablet: Powered-On
You can consider resetting the device even with the tablet turned on if you have minor technical glitches and cache build-up to take care of. Here are the steps that can help:
Step 1: Go to Settings and Find “Backup & Reset” tab
Unlock the device and access the settings tab, just like you would on any other android tablet. Once you scroll down the settings menu, you will find the ‘Backup & Reset’ tab.

Step 2: Click on “Reset Tablet” option.
Upon selecting the ‘Reset Tablet’ option, you would need to restart the RCA tablet, in case auto-restart isn’t turned on.

Method 3: Windows Tablet: Powered-Off
If you own a Windows-powered RCA tablet, you are in some elite company. While the Voyager series is basically meant for the Android ecosystem, you are most likely to own the Cambio 10.1. This means, it is expected that the tablet might be connected to an external keyboard, which then makes it easier to reset.
Step 1: Use the “Reset” rear panel to start soft reset.
You can simply press the ‘Reset’ button at the rear panel to simply initiate a Soft Reset of sorts, provided you can get hold of a pin to access the same.
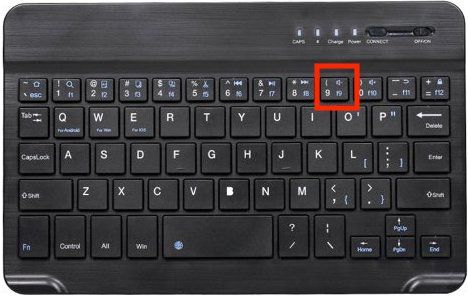
Step 2: Turn it on using Power button + Function Key + F9
Now, you need to turn it on by clicking on the power on button and press the Function key and the F9 simultaneously and repeatedly, till you get a ‘Please Wait’ notification.
Step 3: Go to Troubleshoot & find “Reset your PC”
You would then see the ‘Troubleshoot’ menu where you need to select the ‘Reset your PC’ as the preferred command.

Note: You can either clean a particular drive or simply remove certain files, depending on the preferences. Depending on the available data, the system might take 15 to even 60 minutes for getting the job done.
Also, the device might flash at times during the process but you need not worry and must not press any other key in the process.
Method 4: Windows Tablet: Powered-On
Once the tablet powers on, connect the same to the keyboard for accessing the controls better and faster.
Step 1: Go to Settings > Update & Security
Click on the Windows start menu and reach out to the settings. Then click on the ‘Update and Security’ option.

Step 2: Find the “Recovery” section to get the “Reset your PC” option.
Eventually, click on the ‘Recovery’ and you would be directed to the ‘Reset your PC’ option or the ‘Advanced Startup’ button for booting the software differently or restoring the Windows OS to its system image.

Step 3: Reset your PC and choose the reset option according to your needs
Once you click on ‘Reset your PC’, you will be prompted to choose an option, with one asking you to keep the files upon removing apps and saved settings and the other option prompting you to cleanse the entire system at once.

You can select as per preference and the device will then restart multiple times to finally bring you the original version of the OS, which came with the device.
Frequently Asked Questons
As RCA tablets are extremely affordable devices, you can expect the software to get obsolete pretty quickly. Plus, the new-age apps and programs are expected to add to the Bloatware, which in turn slows down the tablet, significantly, a problem that only Factory reset can solve.
Factory reset or hard reset doesn’t only delete the apps, files, and programs. Instead, it also cleanses the tablet of the wireless settings, Google accounts, saved formats, alarms, and wipes out every memory that device has of prior correspondence.
While a soft reset is a glorified version of a simple restart, especially for refreshing the cache memory and speeding up certain tasks, a hard reset refers to a factory reset, which wipes out every data set, housed by the RCA tablet.
Yes, factory reset is a completely safe technique to make your RCA tablet feel like its older self. However, you need to carefully follow the instructions and should not press any other key while the tablet is getting fixed.
As seen, resetting an RCA tablet to its factory settings isn’t difficult but detail-intensive. Also, once you restore the same to the factory format, you can also get hold of the apps and programs that originally came as a part of the tablet.
Regardless, you need to look at the steps carefully, depending on the state of the device and the concerned operating platform.

About Joseph Edwin
Despite spending the majority of my professional career in the US, I am well-versed with tablets and smartphones launched across the globe.
I ensure that every new tablet is reviewed in the most detailed manner.
It is my belief that it is important to explain each complex tablet-related concept as clearly as possible and I always try to avoid heavy, technical jargon.
Please email me directly at [email protected] if you have any questions about an article!
Reader Interactions
December 26, 2021 at 2:54 pm
Hi Joseph, Quick question of you would. I am performing the fully clean the drive reset on RCA model W101SA23T1. After several reboots I get message that it failed. Is there a site where I can d/l a new image of Windows 10 for my tablet?
June 27, 2022 at 12:43 am
HOW TO GOOGLE BYPASS ON RCA
Leave a Reply Cancel reply
Your email address will not be published. Required fields are marked *
Save my name, email, and website in this browser for the next time I comment.
RCA Voyager manual

manual RCA Voyager

User Manual
View the manual for the RCA Voyager here, for free. This manual comes under the category tablets and has been rated by 7 people with an average of a 8.2. This manual is available in the following languages: English. Do you have a question about the RCA Voyager or do you need help? Ask your question here
Do you have a question about the RCA and is the answer not in the manual?
- Receive updates on solutions
- Get answers to your question
Question and answer
Tablet preowned factory reset but no keyboard or the email linked to the table what can I do

If the preowned RCA Voyager tablet has been factory reset but there is no keyboard or the email linked to the tablet, you can try the following steps: 1. Connect an external keyboard: If the tablet does not have a built-in keyboard, you can connect an external keyboard using the USB port or Bluetooth. This will allow you to input text and navigate the tablet. 2. Reset the tablet again: If the factory reset did not remove the email linked to the tablet, you can try performing another factory reset. This will erase all data on the tablet and restore it to its original settings.
Help,I have forgotten my pattern that unlocks my tablet . I can't get into it. How can I get it fixed.
Voyager 111 will come on but only thing it does is show the word voyager 111 on the screen, will not do anything else
voyager 11 comes on , sits on opening screen - will not do anything else
My tablet won't go past voyager screen and when I try to hard factory reset or wipe cache or any option from the hard rest menu it says failed or denied. How do I fix it
Take a toothpick to the reset button on the back
Wife lost the activation code. Can I get a new one? RCA Voyager III S/N: J2HDDZ0200L0 DISa:1000319109
I do house demolition and recovered a voyager 111 tablet. However it is locked by previous owner who is deceased. Is there any way to unlock or reset this tablet.
Touch screen doesn't work on voyager. this is an older one. any ideas?
How do I change my key pad that's on the screen to my other plastic keyboard that's connected
I bought a rca voyager tablet and the person had factory reset it now when I cut it on it stops at Google verification page and we have no way to get it Google verification please help
I'm using Google Go to do web searches on my VOYAGER III and when I try to access xvideos, sex-z pictures, sunnylanelive.com, etc., I get Amazon, Pinterest, LinkedIn, etc., instead of the sites themselves.

The RCA Voyager is a compact tablet with a 7.1-inch display diagonal and a resolution of 1024 x 600 pixels. Equipped with LED backlighting, it offers a clear and vibrant visual experience. The device features a capacitive touchscreen, allowing for precise and responsive touch input. With a native aspect ratio of 16:9, the tablet provides widescreen viewing for multimedia content. Powered by an Intel Atom® processor with a frequency of 1.2 GHz, the RCA Voyager delivers smooth performance for everyday tasks. Its quad-core configuration ensures efficient multitasking capabilities. The tablet comes with 1 GB of internal memory, allowing users to run multiple applications simultaneously without experiencing lag. Furthermore, it offers 16 GB of internal storage capacity, providing ample space for storing files, photos, videos, and apps. The RCA Voyager is designed to be lightweight and portable, making it easy to carry and use on the go. Its compact size ensures comfortable handling and enables users to easily slip it into a bag or pocket. The tablet's sleek and modern design adds to its aesthetic appeal. Overall, the RCA Voyager offers a reliable and versatile tablet experience. With its powerful processor, sufficient memory, and decent storage capacity, it is suitable for various tasks such as web browsing, media consumption, and basic productivity. Its compact size, along with its responsive touchscreen, makes it a convenient choice for users seeking a portable device for entertainment and productivity purposes.

Performance
Ports & interfaces, packaging content, weight & dimensions.
Can't find the answer to your question in the manual? You may find the answer to your question in the FAQs about the RCA Voyager below.
What operating system does the RCA Voyager use?
The RCA Voyager uses Android as the operating system.
What does the download speed on the internet depend on?
The download speed on the internet depends on the type of connection you have. If you have a 25 Mb/s connection this means that theoretically you should be able to download 25 MB per second.
What screen dimensions does my tablet have?
The size of your tablet is usually expressed in inches, 1 inch is 2.54 centimetres. The size is the diagonal size of your tablet, so you measure the screen from bottom left to top right.
What is the weight of the RCA Voyager?
The RCA Voyager has a weight of - g.
What is the screen size of the RCA Voyager?
The screen size of the RCA Voyager is 7.1 ".
What is the height of the RCA Voyager?
The RCA Voyager has a height of - mm.
What is the screen resolution of the display of the RCA Voyager?
The screen resolution of the RCA Voyager is 1024 x 600 pixels.
What is the width of the RCA Voyager?
The RCA Voyager has a width of - mm.
What is the depth of the RCA Voyager?
The RCA Voyager has a depth of - mm.
How much storage capacity does the RCA Voyager have?
The RCA Voyager has 16 GB storage capacity.
How can I connect my RCA Voyager tablet to a Wi-Fi network?
To connect your RCA Voyager tablet to a Wi-Fi network, go to the "Settings" menu, then tap on "Wi-Fi." Ensure that the Wi-Fi toggle switch is turned on, and select the desired network from the available options. Enter the network password if required, and you should be connected to Wi-Fi.
How do I increase the storage capacity on my RCA Voyager tablet?
The storage capacity of the RCA Voyager tablet can be expanded by using a microSD card. To do so, locate the microSD card slot on your tablet (usually on the side or back), gently insert the card until it clicks into place, and your tablet will recognize the additional storage space. You can then move apps, photos, videos, or other files to the microSD card to free up internal storage.
How do I take a screenshot with my RCA Voyager tablet?
Capturing a screenshot on the RCA Voyager tablet is simple. Press and hold the Power and Volume Down buttons simultaneously for a few seconds until you see a quick animation or hear a camera shutter sound. The screenshot will be saved in the "Screenshots" folder in your gallery app, where you can easily access and share it.
How can I change the screen brightness on my RCA Voyager tablet?
Adjusting the screen brightness on your RCA Voyager tablet is straightforward. Swipe down from the top of the screen to access the notification panel and locate the brightness slider. Move the slider left or right to decrease or increase the brightness level according to your preference. You can also find the brightness option in the "Settings" menu, under the "Display" or "Brightness" section.
How do I factory reset my RCA Voyager tablet if I encounter software issues?
Performing a factory reset on your RCA Voyager tablet can help resolve software issues or return it to its original settings. To do this, navigate to the "Settings" menu, select "System," then "Reset" or "Backup & reset." Choose the option for factory data reset and follow the on-screen instructions. Keep in mind that a factory reset will erase all data on your tablet, so it's crucial to back up any important files before proceeding.
Does the RCA Voyager have a LED backlight?
Yes, the RCA Voyager has a LED backlight. This means that the display will have better brightness and energy efficiency compared to other types of backlighting.
What is the processor frequency of the RCA Voyager?
The processor frequency of the RCA Voyager is 1.2 GHz. This is a moderate speed that should be sufficient for basic tasks and applications.
How much internal memory does the RCA Voyager have?
The RCA Voyager has 1 GB of internal memory. This is a relatively low amount of memory and may limit the device's ability to handle multiple tasks or run resource-intensive apps smoothly.
Can the RCA Voyager support external memory cards?
Yes, the RCA Voyager has a card reader and is compatible with MicroSD, MicroSDHC, and MicroSDXC memory cards. This allows users to expand the storage capacity of the device up to a maximum of 128 GB.
Does the RCA Voyager have built-in speakers?
Yes, the RCA Voyager has built-in speakers. This means that users can enjoy audio playback without the need for external speakers or headphones. However, the audio quality may not be as high as dedicated speakers.
Is the manual of the RCA Voyager available in English?
Yes, the manual of the RCA Voyager is available in English .
Is your question not listed? Ask your question here
Lenovo ThinkPad 2 N3S25MH

Sony Xperia Z Wifi

Huawei Mediapad

Viewsonic ViewPad V10s

Samsung Galaxy Tab 7.0 Plus

Yarvik Gotab Zetta

Yarvik GoTab Velocity 7

Hamlet Zelig Pad 700

How do I Reset My RCA Tablet: A Step-by-Step Guide
If you’re experiencing issues with your RCA tablet and find yourself wondering how to reset it, you’ve come to the right place. Resetting your tablet can be an effective solution for a variety of problems, such as unresponsive apps, freezing screens, or software glitches. In this step-by-step guide, we will walk you through the process of resetting your RCA tablet, ensuring that you can get your device back up and running smoothly in no time.
Resetting your RCA tablet is a fairly straightforward process that involves restoring the device to its original factory settings. This means that all data and settings saved on your tablet will be erased, so it’s essential to back up any important files before proceeding. Whether you’re facing technical difficulties or simply want to give your tablet a fresh start, read on for a comprehensive guide on how to reset your RCA tablet, ensuring a hassle-free and successful reset process.
Table of Contents
Check For Hardware Issues: Troubleshooting Common Problems
This section will guide users on how to identify and resolve common hardware issues before proceeding with a tablet reset. It emphasizes the importance of checking for physical defects or malfunctions that may be causing the problems one is experiencing with their RCA tablet. The subheading aids users in diagnosing issues related to low battery power, faulty charging cables, unresponsive buttons, or damaged screens.
The 150-word brief for this subheading could be as follows:
“Before attempting to reset your RCA tablet, it is essential to rule out any potential hardware issues that may be causing the problems you are facing. In this section, we will walk you through some troubleshooting steps to help identify and resolve common hardware problems. From checking the battery power and charger to ensuring the buttons are responsive and the screen is not damaged, these steps will help determine if a hardware-related issue is causing the tablet’s malfunction. By thoroughly examining these aspects, you can avoid a factory reset if the issue isn’t software-related. Troubleshooting hardware problems beforehand can save you time and effort and ensure that resetting your RCA tablet is the appropriate solution.”
Backup Your Data: Saving Important Files And Information
Backing up your data is an essential step before resetting your RCA tablet. Losing valuable files and information can be frustrating and even devastating, so it is crucial to take precautions. In this section, we will explore various ways to back up your data.
One option is to use cloud storage services such as Google Drive, Dropbox, or OneDrive. These platforms allow you to store your files securely in the cloud, accessible from any device with an internet connection. Simply upload your important documents, photos, videos, and other files to the cloud before resetting your tablet.
If you prefer a more traditional method, you can manually transfer your files to an external storage device, such as a USB flash drive or an external hard drive. Connect the storage device to your tablet and copy the files you want to keep.
Remember to also backup any app data, such as contacts, calendars, or app settings. Some apps offer built-in backup options, while others may require you to manually export and save your data.
By backing up your data, you can reset your RCA tablet without worrying about losing important files or information. It provides peace of mind and makes the entire reset process smoother and more efficient.
Factory Reset: Performing A Complete Reset Of The RCA Tablet
A factory reset is a drastic step that erases all data and settings on your RCA tablet, essentially returning it to its original state. It can be beneficial when facing persistent issues or when you plan to sell or give away the device. Here’s a step-by-step guide to help you perform a factory reset on your RCA tablet:
1. Start by navigating to the Settings app on your tablet. You can usually find it in the app drawer or by swiping down from the top of the screen and tapping the gear icon. 2. Once in the Settings menu, scroll down and look for the “Backup & Reset” option. Tap on it to proceed. 3. In the Backup & Reset menu, you should see a “Factory Data Reset” option. It may be named differently depending on the tablet model or Android version. Tap on it to enter the factory reset screen. 4. On the factory reset screen, you’ll see a warning about erasing all data. Make sure to back up any important files or information before proceeding. If you’re certain about the reset, tap on the “Reset tablet” or “Erase everything” button. 5. After confirming your selection, the tablet will begin the factory reset process. It may take a few minutes to complete, and the device may restart multiple times during this process. Follow any on-screen instructions that appear. 6. Once the factory reset is finished, your RCA tablet will be restored to its original state. You’ll need to go through the initial setup process again, including signing in with your Google account.
Remember, performing a factory reset is irreversible, so ensure that you have backed up all important data before proceeding.
Soft Reset: Restarting The Tablet To Resolve Minor Issues
A soft reset is a simple and effective way to resolve minor issues on your RCA tablet. It works by restarting the device, which can help in clearing temporary glitches and restoring normal functionality. Here’s how you can perform a soft reset on your RCA tablet:
1. Press and hold the power button: Locate the power button on your tablet and press it down and hold it for about 10 seconds. This will initiate the shutdown process.
2. Wait for the tablet to turn off: Keep holding the power button until your tablet completely shuts down. The screen should go blank, and you might feel a slight vibration.
3. Release the power button: After the tablet turns off, release the power button.
4. Power on the tablet: Press and hold the power button again for a few seconds until the RCA logo appears on the screen. This indicates that the tablet is restarting.
5. Test the tablet: Once the device boots up, check if the issues you were experiencing have been resolved. If not, you may need to consider performing a factory reset or seeking further assistance.
Performing a soft reset regularly can help maintain the smooth functioning of your RCA tablet and resolve minor software-related problems.
Recovery Mode: Using Specific Key Combinations To Access Recovery Mode
Recovery mode is a powerful tool that allows users to troubleshoot and resolve more complex issues with their RCA tablet. Accessing recovery mode requires specific key combinations and can be a little tricky, but it is highly effective in solving software-related problems.
To access recovery mode on your RCA tablet, start by turning off the device completely. Once it’s completely powered off, hold down the volume up button and simultaneously press the power button. Keep holding both buttons until the RCA logo appears on the screen.
Release both buttons and you will see the Android system recovery options. You will be able to navigate through the options using the volume up and down buttons, and select an option using the power button.
Within recovery mode, you will find several options such as wiping cache partition, applying updates from external storage, or performing a factory reset. Use these options wisely and if you’re unsure, it’s best to refer to the device’s user manual or seek help from RCA’s customer support. Recovery mode can be a powerful tool, but it should be used with caution.
Tips And Tricks: Additional Advice For Resetting RCA Tablets Efficiently
In this section, we will provide you with some valuable tips and tricks to reset your RCA tablet efficiently. These suggestions will help you navigate through the process smoothly and avoid any potential pitfalls.
1. Charge your tablet: Before performing a reset, ensure that your RCA tablet has sufficient battery power. A low battery may interrupt the reset process and lead to further complications.
2. Disconnect any external devices: Remove any external devices or peripherals, such as USB drives or headphones, from your tablet. These devices can sometimes interfere with the reset process.
3. Backup important data: Make sure to back up all essential files and data before initiating the reset. This will prevent any data loss that may occur during the reset process.
4. Use a stable internet connection: If you choose to reset your RCA tablet through the settings menu, ensure that you have a stable internet connection. This will help download and install any necessary updates during the reset process.
5. Follow the manufacturer’s instructions: RCA tablets may have specific instructions or key combinations for resetting. Refer to the user manual or RCA’s official website for detailed instructions on your specific tablet model.
By following these tips and tricks, you can reset your RCA tablet efficiently, ensuring a smooth and hassle-free process.
1. How do I reset my RCA tablet if it freezes or becomes unresponsive?
To reset a frozen or unresponsive RCA tablet, press and hold the power button for about 10 seconds until the device powers off. Once it shuts down, you can turn it back on to see if the issue has been resolved.
2. Can I reset my RCA tablet without losing my data?
Unfortunately, resetting your RCA tablet will erase all the data and settings on the device. It is highly recommended to back up any important files or data before proceeding with the reset process to avoid data loss.
3. What is the factory reset option, and how do I use it on my RCA tablet?
The factory reset option restores your RCA tablet to its original factory settings. To perform a factory reset, go to the Settings menu, select “Backup & Reset,” and then choose “Factory Data Reset.” Follow the on-screen prompts to initiate the process. It may take a few minutes for the tablet to complete the reset.
4. I forgot my lock screen password/pattern on my RCA tablet. How can I reset it?
If you forget your lock screen password or pattern on your RCA tablet, you can reset it by performing a factory reset. Keep in mind that this will erase all data on the device. To do so, power off the tablet, then press and hold the volume up button and the power button simultaneously until the recovery menu appears. Use the volume buttons to navigate and select the “Factory Data Reset” option. Confirm your choice and wait for the tablet to reset.
5. Will resetting my RCA tablet fix software issues or slow performance?
Yes, resetting your RCA tablet can often help in resolving software issues and improving overall performance. However, it is always recommended to try other troubleshooting steps, such as clearing cache or updating software, before resorting to a reset.
Final Thoughts
In conclusion, resetting an RCA tablet is a relatively simple process that can usually be done within a few minutes. This step-by-step guide has provided clear instructions on how to reset an RCA tablet, ensuring that users can troubleshoot any issues they may be facing with their device. Whether it is a frozen screen, app malfunction, or forgotten password, resetting the tablet can often resolve these problems and restore it to its original settings. It is important to note, however, that resetting a device will erase all data, so it is crucial to back up any important information before proceeding with the reset.
Overall, knowing how to reset an RCA tablet is a valuable skill that can save users time and frustration. With the detailed instructions provided in this guide, users can confidently reset their devices and solve various issues that may arise. By following these steps, individuals can easily bring their RCA tablets back to a functional state, allowing them to continue using their device without any hindrances.
Leave a Comment Cancel reply
Save my name, email, and website in this browser for the next time I comment.
How to Reset RCA Tablet
Posted on Last updated: March 14, 2023
Categories Computers , Electronics , RCA Tablet , Tablet
RCA has a long history of producing top quality and highly reliable electrical products, including TVs and Tablets. RCA Tablets are very fast and contain the very well-regarded Lollipop Google Software. Most RCA Tablets have Media Tek Processors, High-Definition LCD Display Screens, and at the very least 1 GB of RAM. If you are encountering a problem with your RCA Tablet such as seeing a frozen screen for hours and hours, luckily, there is a reset button on all RCA Tablets and there are also numerous other ways to reset your RCA Tablet.
If you want to know how to Reset your RCA Tablet open the Settings and then go to System. Then, Select Reset Options. Now Select Erase All Data. Now, select Tablet which is at the bottom of the screen. Finally, confirm Erase Everything and the reset process should be completed.

How to Reset RCA Tablet Touch Screen

If your RCA Tablet Touch Screen is not working, it is not only confusing but utterly inconvenient. Follow the steps as outlined below to reset your RCA Tablet Touch Screen.
If you want to know how to Reset your RCA Tablet and want to know how to reset your RCA Tablet Touch Screen, find the Reset Button on the back of the RCA Tablet. Then, press it once but do not hold it in place. Now, hold down the Volume Down Button in the middle part of that button.
Continue pressing on Volume Up and Volume Down at the same time. Hold it down until you see the Blue Recovery Screen.
How to Reset RCA Tablet When Locked Out

It is super frustrating to have important work to do or to have an important program to watch on your RCA Tablet and then to find out that you are locked out. If this occurs, you can follow the following troubleshooting steps to address and solve the problem.
If you want to know how to Reset your RCA Tablet and you need to reset your RCA Tablet when it is locked out, turn your tablet off. Press the Volume Up Key and the Power Key together. In approximately fifteen seconds, the screen will turn on.
At this point, you will see a No Command message with the Android logo. Now, press the Power Button and then you will see some options listed.
Click on Format and then delete all data. Go ahead and Reboot your RCA Tablet and then complete the Tablet profile information. Be sure to enter the same email address that was entered when you initially set the tablet up.
How to Reset RCA Tablet Password

If you have an RCA Tablet and you need to reset the password, it can easily be accomplished in a few quick steps. This will involve a factory reset and then the establishment of a new password.
If you want to know how to Reset your RCA Tablet and want to know how to reset your RCA Tablet password, go ahead and power down your RCA Tablet. Then, hold down on the Power Button and the Volume Up Buttons simultaneously. Now, you should see the RCA logo on the tablet’s screen.
When you can see the Android Bot symbol on the tablet screen, press and hold the Power Button and the Volume Up Button again. Now, you will see the Android System Recovery Screen, which will exhibit an entire screen of different options.
Navigate through this screen using the Volume Up or Volume Down Buttons. Scroll down until you see Wipe Data/ Factory Reset and then press the Power Button.
Continue to scroll down until you see the Yes selection and then go ahead and press the Power Button.
How to Reset RCA Tablet With Keyboard

You can reset your RCA Tablet using the keyboard by using certain keys. Follow the steps as outlined below to reset your RCA Tablet.
If you want to know how to Reset your RCA Tablet and Reset your RCA Tablet using your keyboard, turn your RCA Tablet on by pressing the Power Key and the Function Key and Fg at the same time. Now, the dialog box will appear showing the message Please Wait.
Now select the option for Reset Your PC and the resetting process will start. This process should take from fifteen to sixty minutes to complete.
How to Reset RCA Tablet Without Google Account

If you don’t have a Google Account and need to reset your RCA Tablet, you should not panic. You can easily and quickly take the following troubleshooting steps to both diagnose and rectify the issue causing this dilemma.
If you want to know how to Reset your RCA Tablet and want to know how to reset your RCA Tablet without A Google Account and your RCA Tablet is using the Android Operating System, be sure to check that your RCA Tablet has at least a fifty per cent charge in the battery.
You can now download what is known as FRP Unlock APK, which allows you to bypass the Android System Lock function. From this point, you can now install the FRP Unlock APK and then bypass the Google Account requirement.
Now you can perform a factory reset of your RCA Tablet.
How to Reset RCA Tablet Won’t Charge

It is extremely annoying to not be able to charge your RCA Tablet. This problem has unfortunately become quite common among RCA Tablet owners. If this is happening, careful troubleshooting can quickly determine what is causing this issue and how to resolve it.
If you want to reset your RCA Tablet and your RCA Tablet won’t charge, first check the power cord to make sure it is fully functional. Also, be sure to examine the Power Button to ensure that it is not stuck in position. Go ahead and press the Power Button for about twenty to thirty seconds.
You can also use the RCA Tablet Reset Button, which is located on the back of the tablet. Turn your RCA Tablet over and look for the Reset Button, which looks like a small recess or small hole with the words Reset next to it.
Use either a small, pointed tool or a paperclip which you have straightened out to press the Button in the hole. Hold this button down for twenty seconds or for a period which allows for your RCA Tablet to begin to light up with all green lights as the tablet begins to power on.
Press on the Power Button of the RCA Tablet for from thirty seconds to sixty seconds. This should power on most RCA Tablets. Be sure to press down the Power Key instead of the Windows Key on Windows 10 RCA Tablets.
Open the tablet and disconnect the battery and leave it disconnected for several minutes. Then , reconnect the battery and reassemble the Tablet and check to see that your RCA Tablet is working normally again.
How to Reset RCA Tablet Without Password

Embarrassing as it may be, all of us, at one time or another, have forgotten our passwords. Carefully follow the steps below to reset your RCA Tablet whether you have Windows on your RCA tablet or are using a RCA Android Tablet.
If you want to know how to Reset your RCA Tablet and want to reset your RCA Tablet without a password, on Windows, first make sure to fully turn off your RCA Tablet. Then, turn the tablet back on again. Now, press and hold the function Fn Button and then press F9 on your keyboard.
Continue pressing F9 on your keyboard repeatedly until you see the message saying Please Wait on your RCA Tablet Screen. When you see this message, go ahead, and release the F9 Button.
Now, wait for several seconds and then select the option for Troubleshoot. Now, select Reset your PC.
At this point, you can choose to only Remove Files or you can Clean the Drive, which will totally erase all the data that is stored on your RCA Tablet. It will also reset all settings to the default settings installed at the factory when the tablet is manufactured.
After you make these selections, you should see the RCA logo with the loading animation.
The Factory Resetting process should take about thirty to sixty minutes. It is normal during the duration of this procedure for your RCA Tablet to turn on and off continually.
After the process has finished, all settings will be returned to the original factory settings.
For an Android RCA Tablet, first turn the tablet off. Then, press and hold Power and Volume Up together. At the point where you see the RCA logo appear, let both buttons go.
Press and hold the Power and Volume Up Buttons together again. While pressing the Volume Up Button, continue to press the Power Button until you see the RCA Logo appear on the Start Screen.
Now, you will see a screen with command prompts. Navigate through the screen using the Volume Up and Down buttons.
Press on Wipe Data/Factory Reset and select this option using the Power Button to navigate. At this point, you should be able to see a Confirmation Page. There, again, use the Power Button to navigate and then select the option for Delete All User Data.
Now go to the Command Screen. Select Reboot System Now. Your RCA Tablet should now Restart and then you will be prompted to select a Language just as you did when you first set the RCA Tablet up. This method will work for both RCA Viking Pro as well as the RCA Voyager Tablet.
How to Reset RCA Tablet to Factory Settings

If you are experiencing slow performance or problems with apps on your RCA Tablet, the answer may be to do a Factory Reset. Be aware though that Factory Resets do lead to the loss of any stored personal data that is on your RCA Tablet and will restore all settings to a default status.
Copyright protected content owner: ReadyToDIY.com and was initially posted on February 2, 2022.
If you want to know how to Reset your RCA Tablet and you want to reset your RCA Tablet to factory settings, first Unlock your RCA Tablet and then open Settings. Scroll down to Backup and Reset. If you do not see this setting, go to Privacy and then to Backup and Reset.
Now, you will see Reset Tablet or in the alternative, you will see Factory Data Reset. Allow your RCA Tablet to fully reset. Then, restart your RCA Tablet.
How to Reset RCA Tablet Without Keyboard

If you don’t have a keyboard to accompany your RCA Tablet, you can still reset your tablet by adhering to the following steps.
If you want to know how to reset your RCA Tablet and how to reset your RCA Tablet without a Keyboard, press on the Power Button and on the Volume Up Buttons at the same time. When the RCA logo is seen, release both buttons.
How to Reset RCA Tablet Without Volume Button

If you don’t have a Volume Button to accompany your RCA Tablet, you can still reset your tablet.
Copyright article owner is ReadyToDiy.com for this article. This post was first published on February 2, 2022.
If you want to reset your RCA Tablet and want to reset your RCA Tablet without a Volume Button, press the Power Button to get access to the Options Menu. Hold down on the Power Button and on the Home Button. This will allow you to reboot your RCA Tablet in Safe Mode.
Related Articles
RCA Tablet Keyboard Not Working (How to Fix)
RCA Tablet Won’t Turn On
How to Fix RCA Tablet Not Connecting to Wi-Fi
How to Fix RCA Tablet Not Charging
ReadyToDIY is the owner of this article. This post was published on February 2, 2022.
RCA Tablet Not Responding to Touch (How To Fix)
- Forums New posts Trending Search forums
- What's new New posts Latest activity
- Members Current visitors Billboard Trophies
iPhone 16: All the rumors so far!
Solved! i tried hard reset on my rca voyager 111 tablet but after the initial logo it goes back to the screen that says voyager 111 a
- Thread starter olivercoffin64
- Start date Jan 10, 2019
- Tags RCA Tablets Voyager
- Android Tablets
olivercoffin64
- Jan 10, 2019
pretty much just what I described. Thanks for any help you can provide folks.
webworkings
I am including the steps to "Hard Reset" below, just in case they are not the ones you tried to use. Should it still not work (or if this is what you already tried) then the problem is likely going to need to be looked at by a tech. I would contact the manufacturer if it is under warranty, or try a local tech if it isn't. NOTE: Doing this will clear 'all' the data on your tablet, so it is suggested you not choose this option unless you have to, or aren't worried about losing anything on the device. Be sure you back up any data you want to keep, to a computer or cloud account, before doing the reset. To "Hard Reset" the tablet... 1. Make sure that the tablet is actually powered off. 2. Remove your SD card, if there is one in the...
I am including the steps to "Hard Reset" below, just in case they are not the ones you tried to use. Should it still not work (or if this is what you already tried) then the problem is likely going to need to be looked at by a tech. I would contact the manufacturer if it is under warranty, or try a local tech if it isn't. NOTE: Doing this will clear 'all' the data on your tablet, so it is suggested you not choose this option unless you have to, or aren't worried about losing anything on the device. Be sure you back up any data you want to keep, to a computer or cloud account, before doing the reset. To "Hard Reset" the tablet... 1. Make sure that the tablet is actually powered off. 2. Remove your SD card, if there is one in the device. 3. Press the "Power" and the "Volume Up" buttons, together, until you see the start-up logo on the screen. 4. Once you can see the logo, release the buttons and allow the device to enter the "System Recovery Mode". 5. Next use "Volume Down" button to get to the "wipe data/factory reset" option. 6. When in recovery mode the "Volume Up" and "Volume Down" buttons are how to can navigate and highlight what option you need. 7. Once you have selected the "wipe data/factory reset", press the "Power" button to select that option. 8. On the following screen, repeatedly press the "Volume Down" button until the "Yes - delete all user data" option is what is selected. 9. Then press the "Power" button to hard reset the tablet. 10. If you took your SD card out in step 2, when the device is up and running again, reinsert the SD card.
- Mar 28, 2019
what if you do these steps and it still doesn't work. I have reset my tablet using this method, and it will open as far as the voyager 3 screen then just stay there. I don't know what to do.
Similar threads
- May 10, 2021
- shannontmbg
- Jun 13, 2021
- May 17, 2020
- Jan 6, 2020
- campbellrussell37
- Dec 25, 2018
TRENDING THREADS
- Started by Ha0nt
- Today at 8:16 AM
- Started by szcad
- Wednesday at 6:19 PM
- Started by cstarker
- Wednesday at 8:12 PM
- Started by Aurelea
- Monday at 10:10 AM
- Started by Reese Miller
- Mar 22, 2024
- Started by corvairbob
- Wednesday at 8:35 AM
- Started by autozonejawana
- Sunday at 10:22 PM
Moderators online
Share this page
- Advertising
- Cookies Policies
- Term & Conditions
How To Bypass Google Verification On RCA Tablet

- How-To Guides
- Software Tutorials

Introduction
Welcome to this guide on how to bypass Google verification on RCA Tablet. If you own an RCA Tablet and have encountered the Google verification screen after a factory reset or a software update, you’re not alone. This security feature, also known as Factory Reset Protection (FRP), is designed to protect your device from unauthorized access in case it gets lost or stolen.
While Google verification is a useful security measure, it can be frustrating if you forget your Google account credentials or encounter any issues during the verification process. Fortunately, there are methods available to bypass Google verification on RCA Tablet , allowing you to regain access to your device.
In this guide, we will explore various methods to help you bypass Google verification on your RCA Tablet. These methods involve using third-party applications, an OTG cable, performing a factory reset, or using a custom recovery like TWRP. We will walk you through each of these methods step by step, ensuring that you can successfully bypass the Google verification screen and regain access to your RCA Tablet.
However, please note that bypassing Google verification may void your device’s warranty, and it is important to proceed with caution and at your own risk. It’s always recommended to try other methods, such as contacting the device manufacturer or seeking professional assistance, before resorting to bypassing Google verification.
Now, let’s dive into the various methods that can help you bypass Google verification on your RCA Tablet and regain control of your device.
What is Google Verification?
Google verification, also known as Factory Reset Protection (FRP), is a security feature implemented by Google to protect your device from unauthorized access. It is primarily designed to prevent thieves from gaining access to a stolen or lost device. When Google verification is enabled, it requires you to sign in with the Google account previously synced to the device after a factory reset or software update.
The purpose of Google verification is to ensure that only the original owner can access the device, adding an extra layer of security to personal information stored on the device. By linking the device to your Google account, it becomes difficult for unauthorized individuals to use or sell the device without the account credentials.
When you perform a factory reset on your RCA Tablet or update the software, the device will prompt you to enter the Google account credentials that were last used on the device. This makes it essential to remember your Google account username and password. If you forget or can’t provide the required account information, you will be unable to access your device.
In addition to requiring your Google account credentials, Google verification also prevents unauthorized users from bypassing the screen lock by using physical methods like a USB cable or computer software. It ensures that only the legitimate owner, who has the associated Google account, can access the device and its data.
While Google verification is an important security measure, there may be situations where you need to bypass it. For instance, if you purchased a used RCA Tablet and the previous owner didn’t remove their Google account from the device, you won’t be able to set up the tablet without bypassing the verification screen. Similarly, if you forgot your Google account details, you will need to find a way to bypass the verification process.
In the following sections, we will explore different methods to bypass Google verification on your RCA Tablet, allowing you to regain access to your device even if you don’t have the required Google account credentials.
Reasons to Bypass Google Verification on RCA Tablet
There are several reasons why you may need to bypass Google verification on your RCA Tablet. Let’s explore a few common scenarios where bypassing Google verification becomes necessary:
- Purchased a used device: If you bought a pre-owned RCA Tablet, the previous owner’s Google account may still be linked to the device. In order to set up your own Google account and use the tablet as your own, you will need to bypass the Google verification screen.
- Forgot Google account details: It’s common to forget the Google account username and password, particularly if you have multiple accounts or haven’t used the device for a while. If you can’t remember your Google account credentials, bypassing Google verification is the only way to regain access to your RCA Tablet.
- Device malfunction: In some cases, a device malfunction or software update issue can trigger the Google verification screen, even if you haven’t performed a factory reset. This can be frustrating, as you may not have the necessary Google account details readily available. By bypassing Google verification, you can overcome this obstacle and continue using your RCA Tablet.
- Locked out after factory reset: Performing a factory reset is often a recommended troubleshooting step when dealing with software issues. However, if you forget to remove the Google account from your RCA Tablet before the reset, you will be locked out of the device. Bypassing Google verification is essential in such cases to regain access to your tablet.
By understanding the reasons why you may need to bypass Google verification, you can determine if it is the appropriate solution for your specific situation. It’s important to remember that bypassing Google verification should only be done if you are the rightful owner of the RCA Tablet or have obtained the necessary consent from the original owner.
Now that we have explored the reasons behind bypassing Google verification, let’s move on to the precautions you should take before attempting any of the bypass methods.
Precautions Before Bypassing Google Verification
Before attempting to bypass Google verification on your RCA Tablet, it’s important to take certain precautions to ensure a smooth and successful process. Here are some precautionary steps to consider:
- Backup your data: Bypassing Google verification often involves performing a factory reset or using third-party applications. Both methods can lead to data loss. Therefore, it’s crucial to backup any important data, files, or media from your RCA Tablet to prevent permanent loss.
- Charge your device: Ensure that your RCA Tablet has enough battery power before attempting any bypass method. A low battery level can interrupt the process and potentially cause issues. It’s recommended to charge your device to at least 50% or connect it to a power source during the bypass process.
- Research and understand the method: Familiarize yourself with the selected method to bypass Google verification before proceeding. Read user reviews, forums, and tutorials to gain insights from others who have attempted the bypass process. Understanding the steps involved will minimize the risk of mistakes or complications.
- Follow instructions carefully: Whether you’re using a third-party application, an OTG cable, performing a factory reset, or using a custom recovery like TWRP, it’s crucial to follow the instructions carefully. Missing or incorrectly executing a step can lead to undesirable outcomes, including device malfunction or permanent data loss.
- Consider professional assistance: If you’re unsure or uncomfortable with bypassing Google verification on your own, it’s wise to seek professional assistance. Reach out to an authorized service center or a knowledgeable technician who can provide reliable guidance and perform the bypass process safely.
Taking these precautions will help minimize any potential risks and ensure a smoother bypass process. It’s important to note that bypassing Google verification may void your device’s warranty, and any damage caused during the process may not be covered by the manufacturer. Exercise caution and proceed at your own responsibility.
Now that you’re aware of the precautions to take, let’s move on to the various methods available to bypass Google verification on your RCA Tablet.
Method 1: Bypassing Google Verification On RCA Tablet Using FRP Bypass APK
One of the common methods to bypass Google verification on your RCA Tablet is by using an FRP Bypass APK. FRP Bypass APK is a third-party application that helps you bypass the Google verification screen by temporarily disabling the FRP lock on your device. Here’s how you can use this method:
- First, you’ll need to download the FRP Bypass APK file from a trusted source. You can do this by searching for “FRP Bypass APK” on your web browser.
- Once you’ve downloaded the APK file, transfer it to a USB drive using a computer.
- Next, power on your RCA Tablet and connect it to the USB drive using an OTG cable. Make sure the USB drive is formatted in FAT32 file format.
- A pop-up message may appear on your tablet asking to open the file manager. Choose the one that opens the APK file.
- Enable the option to install apps from unknown sources if prompted.
- Navigate to the location where you transferred the FRP Bypass APK file and select it to begin the installation process.
- Once the installation is complete, open the FRP Bypass app on your RCA Tablet.
- In the app, you will find a “Bypass FRP” button. Tap on it to initiate the Google verification bypass process.
- Wait for the app to complete the bypass process. This may take a few minutes.
- Once the process is finished, your RCA Tablet should no longer prompt you for Google account verification.
It’s important to note that the effectiveness of the FRP Bypass APK method can vary depending on the device model and Android version. Additionally, the availability and functionality of FRP Bypass APK may change over time, so it’s always a good idea to search for the latest version and ensure its compatibility with your RCA Tablet.
In the next section, we will look at another method that involves using an OTG cable to bypass Google verification on your RCA Tablet.
Method 2: Bypassing Google Verification On RCA Tablet Using OTG Cable
Another method to bypass Google verification on your RCA Tablet is by using an OTG cable. This method allows you to connect a USB drive or a keyboard to your tablet, enabling you to bypass the Google verification screen. Here’s how you can do it:
- First, you’ll need an OTG cable, which is a special cable that allows you to connect USB devices to your RCA Tablet.
- Download a compatible FRP bypass application, such as “Google Account Manager” and “FRP Bypass” APK, on a USB drive or an SD card using a computer.
- Turn on your RCA Tablet and connect the OTG cable to the micro USB port of your tablet.
- Connect the USB drive or SD card containing the APK files to the OTG cable.
- A file manager app may open automatically on your tablet. If not, you can open it manually.
- Browse the file manager and locate the APK files you downloaded.
- Install the “Google Account Manager” APK file first, and then install the “FRP Bypass” APK file.
- Once the installation is complete, open the “FRP Bypass” app on your RCA Tablet.
- In the app, you will find an option to add a Google account. Tap on it and select “Browser Sign-in”.
- Enter your Google account credentials or create a new account to proceed with the bypass process.
- After successfully signing in, restart your RCA Tablet.
By following these steps and using an OTG cable to connect the USB drive or SD card, you can effectively bypass the Google verification screen on your RCA Tablet. However, please note that the effectiveness of this method may depend on the specific device model and Android version you are using.
In the next section, we will explore another method to bypass Google verification on your RCA Tablet, which involves performing a factory reset.
Method 3: Bypassing Google Verification On RCA Tablet Using Factory Reset
One of the simplest and most common methods to bypass Google verification on your RCA Tablet is by performing a factory reset. This method erases all data from your device, including the Google account that was previously linked to it, allowing you to set up a new Google account without encountering the verification screen. Here’s how you can do it:
- Start by turning off your RCA Tablet.
- Press and hold the Power button and the Volume Up button simultaneously until the RCA logo appears on the screen.
- Release both buttons and wait for the Android system recovery menu to appear.
- Use the Volume Up and Volume Down buttons to navigate through the menu options and select “Wipe data/factory reset”.
- Press the Power button to confirm the selection.
- Scroll down to “Yes – delete all user data” using the Volume Down button and press the Power button to confirm.
- Wait for the factory reset process to complete. This may take a few minutes.
- Once the process is finished, select “Reboot system now” and press the Power button to restart your RCA Tablet.
After the device restarts, you will be greeted with the initial setup screen, allowing you to set up a new Google account on your RCA Tablet without encountering the Google verification screen. This method is effective in bypassing the verification process, but please note that all data on your device will be erased, so make sure to back up any important files beforehand.
In the next section, we will discuss another method to bypass Google verification on your RCA Tablet, which involves using a custom recovery like TWRP.
Method 4: Bypassing Google Verification On RCA Tablet Using Custom Recovery (TWRP)
If you have installed a custom recovery like TWRP (Team Win Recovery Project) on your RCA Tablet, you can utilize it to bypass Google verification. This method involves performing a series of steps within the custom recovery to remove the Google account lock and gain access to your device. Here’s how it can be done:
- Use the Volume Up and Volume Down buttons to navigate through the menu options until you find “Install” or “Install zip” option.
- Select the option and choose the custom recovery file (TWRP) that you previously downloaded and transferred to your device’s internal storage.
- Swipe to confirm the installation and wait for TWRP to be installed on your RCA Tablet.
- Once TWRP is successfully installed, reboot your device into recovery mode again by selecting “Reboot” or “Reboot recovery”.
- In TWRP recovery, select “Wipe” and then choose “Format Data”. Confirm the data format process.
- After formatting the data, go back to the main menu and select “Reboot” or “Reboot system” to restart your device.
- Now, during the initial setup, you will not be prompted for the Google account verification, and you can proceed to set up a new Google account on your RCA Tablet.
Using a custom recovery like TWRP can be an effective method to bypass Google verification on your RCA Tablet. However, please note that this method requires advanced technical knowledge and can potentially void your warranty. Additionally, the availability and functionality of custom recoveries may vary for different device models.
In the next section, we will share some tips to help ensure a successful Google verification bypass on your RCA Tablet.
Tips for Successful Google Verification Bypass
Bypassing Google verification on your RCA Tablet can be a challenging process, but with the following tips, you can increase your chances of successfully bypassing the verification screen:
- Research and choose the right method: Understand the different bypass methods available and choose the one that suits your device model and Android version. Each method may have specific requirements and limitations, so it’s essential to select the most appropriate one for your RCA Tablet.
- Ensure compatibility: Confirm that the bypass method you choose is compatible with your device’s specifications and software version. Using incompatible methods may result in issues or ineffectiveness.
- Follow instructions carefully: Whether you’re using an APK file, an OTG cable, performing a factory reset, or using a custom recovery, it’s important to carefully read and follow the instructions provided. Accurately executing each step will help minimize errors and ensure a smooth bypass process.
- Backup your data: Before attempting any bypass method that involves data deletion or potential risks, it’s crucial to back up any important data, files, or media from your RCA Tablet. This way, you can avoid permanent loss in case of any unforeseen issues or complications.
- Stay updated: Keep up to date with the latest resources, tools, and methods for bypassing Google verification on your RCA Tablet. Remember that technology evolves, and new solutions or updates may become available over time.
- Exercise caution: Bypassing Google verification may void your device’s warranty and can potentially lead to unforeseen consequences. Approach the process with caution, and if you’re unsure or uncomfortable, it’s advisable to seek professional assistance from authorized service centers or technicians.
By following these tips, you can increase your chances of successfully bypassing Google verification on your RCA Tablet. Remember that each device and situation may vary, so be patient and persistent in your attempts.
Now that we have explored various methods and tips for bypassing Google verification, you can choose the approach that best suits your needs and regain access to your RCA Tablet without encountering the verification screen.
Bypassing Google verification on your RCA Tablet can be a frustrating experience, especially if you forget your Google account credentials or encounter issues during the verification process. However, with the methods discussed in this guide, you can regain access to your device and set up a new Google account without being hindered by the verification screen.
We explored four different methods for bypassing Google verification on your RCA Tablet: using an FRP Bypass APK, utilizing an OTG cable, performing a factory reset, and employing a custom recovery like TWRP. Each method offers its own advantages and considerations, and it’s important to choose the method that best suits your device and requirements.
Before attempting any bypass method, it’s crucial to take precautions such as backing up your data, ensuring device compatibility, following instructions carefully, and exercising caution. These steps will help minimize risks and increase the likelihood of a successful bypass process.
It’s important to note that bypassing Google verification may void your device’s warranty, and any damage caused during the process may not be covered by the manufacturer. Therefore, it’s recommended to exhaust other options, such as contacting the device manufacturer or seeking professional assistance, before resorting to bypassing Google verification.
Remember, bypassing Google verification should only be done if you are the rightful owner of the RCA Tablet or have obtained the necessary consent from the original owner. Proceeding with caution and using these methods responsibly will help you regain access to your device and continue using it without any hindrances.
We hope that this guide has provided you with valuable insights and solutions to bypass Google verification on your RCA Tablet. Now, it’s time for you to choose the method that suits your needs and regain control of your device. Best of luck!
Leave a Reply Cancel reply
Your email address will not be published. Required fields are marked *
Save my name, email, and website in this browser for the next time I comment.
- Crowdfunding
- Cryptocurrency
- Digital Banking
- Digital Payments
- Investments
- Console Gaming
- Mobile Gaming
- VR/AR Gaming
- Gadget Usage
- Gaming Tips
- Online Safety
- Tech Setup & Troubleshooting
- Buyer’s Guides
- Comparative Analysis
- Gadget Reviews
- Service Reviews
- Software Reviews
- Mobile Devices
- PCs & Laptops
- Smart Home Gadgets
- Content Creation Tools
- Digital Photography
- Video & Music Streaming
- Online Security
- Online Services
- Web Hosting
- WiFi & Ethernet
- Browsers & Extensions
- Communication Platforms
- Operating Systems
- Productivity Tools
- AI & Machine Learning
- Cybersecurity
- Emerging Tech
- IoT & Smart Devices
- Virtual & Augmented Reality
- Latest News
- AI Developments
- Fintech Updates
- Gaming News
- New Product Launches
- AI Writing How Its Changing the Way We Create Content
- How to Find the Best Midjourney Alternative in 2024 A Guide to AI Anime Generators
Related Post
Ai writing: how it’s changing the way we create content, unleashing young geniuses: how lingokids makes learning a blast, 10 best ai math solvers for instant homework solutions, 10 best ai homework helper tools to get instant homework help, 10 best ai humanizers to humanize ai text with ease, sla network: benefits, advantages, satisfaction of both parties to the contract, related posts.

How To Bypass Google Account On RCA Voyager Tablet

How To Get Past Google Lock On RCA Tablet

How To Bypass Activation Code On RCA Tablet

How To Bypass Google Account On Samsung Tablet

How Do I Root My RCA Tablet

How To Reset A RCA Tablet Without Password

How To Bypass Google Verification On Samsung Tablet

How To Get Into A Tablet Without The Password
Recent stories.

How to Find the Best Midjourney Alternative in 2024: A Guide to AI Anime Generators

How to Know When it’s the Right Time to Buy Bitcoin

How to Sell Counter-Strike 2 Skins Instantly? A Comprehensive Guide

10 Proven Ways For Online Gamers To Avoid Cyber Attacks And Scams

- Privacy Overview
- Strictly Necessary Cookies
This website uses cookies so that we can provide you with the best user experience possible. Cookie information is stored in your browser and performs functions such as recognising you when you return to our website and helping our team to understand which sections of the website you find most interesting and useful.
Strictly Necessary Cookie should be enabled at all times so that we can save your preferences for cookie settings.
If you disable this cookie, we will not be able to save your preferences. This means that every time you visit this website you will need to enable or disable cookies again.
IMAGES
VIDEO
COMMENTS
Follow the detailed instructions below on how to completely reset your RCA Android 7 Voyager (RCT6773W22) tablet.Step 1. With your tablet off, press and hold...
Lost password? Tablet freezing up? Errors? A hard reset may fix these problems. This tutorial will show you how to hard reset the tablet quick and easy!Buy i...
Follow the detailed instructions below on how to completely reset your RCA Android 7 Voyager (RCT6773W22) tablet. Step 1. With your tablet off, press and hold the volume up (+) button and power button until you see the RCA splash screen with Nipper and Chipper. Release both buttons to reveal the Android bot on his back with a caution symbol ...
Step 2: Boot into recovery mode. Once the tablet is off, wait for a few seconds and then hold the power button and the Volume Up (+) key, simultaneously. While you can find the power key adhered to the top rim of the tablet, the Volume keys can either be at the back or on the edge, depending on the RCA tablet model.
Performing a factory reset on your RCA Voyager tablet can help resolve software issues or return it to its original settings. To do this, navigate to the "Settings" menu, select "System," then "Reset" or "Backup & reset." Choose the option for factory data reset and follow the on-screen instructions. Keep in mind that a factory reset will erase ...
Hard factory reset.Disclaimer - A factory data reset both hard or soft will erase all o... This is a video on how to perform a factory reset on a RCA Voyager 3.
Here's a step-by-step guide to help you perform a factory reset on your RCA tablet: 1. Start by navigating to the Settings app on your tablet. You can usually find it in the app drawer or by swiping down from the top of the screen and tapping the gear icon. 2. Once in the Settings menu, scroll down and look for the "Backup & Reset" option.
Continue pressing F9 on your keyboard repeatedly until you see the message saying Please Wait on your RCA Tablet Screen. When you see this message, go ahead, and release the F9 Button. Now, wait for several seconds and then select the option for Troubleshoot. Now, select Reset your PC.
To hard reset an RCA Android tablet, you need to navigate to Settings > Backup and Reset. Here you have an option to factory reset your device. If you can't get past the lock screen, you can power off the device and then enter Android recovery mode by keeping both the Power and Volume Up keys pressed simultaneously.
Alternative methods to factory reset an RCA tablet. While the standard factory reset method outlined in the previous section is the most common and recommended approach, there are alternative methods you can explore if the traditional method is not viable. Here are a few alternative methods to factory reset an RCA tablet:
Follow these steps to perform a factory reset: Open the "Settings" app on your RCA tablet. You can usually find the app icon in the app drawer or on the home screen. Scroll down and select the "Backup & Reset" or "System" option. Tap on "Factory Data Reset" or a similar option, depending on your device model.
I recently bought the RCA Voyager 7" tablet from Walmart. I opened the settings app and added a slide password to my device. When I was finished I clicked 'OK' and the settings app closed and a message popped up saying . Settings has unexpectedly closed. I was unable to open the application until I rebooted my tablet.
Turn the tablet on, hold down the function button identified by the legend, 'fn', and continuously press the 'F9' key. Keep mashing that 'F9' key until a dialog box appears that says 'Please Wait'. Now you can let go of the function button. After a moment or two, a 'Troubleshoot' option will appear.
HARD FACTORY RESET OF RCA VOYAGER TABLET - FACTORY RESET - BUTTON COMBINATION FACTORY RESET - HARD RESET OF RCA VOYAGER TABLET WITH BUTTON COMBINATION TO D...
7. Once you have selected the "wipe data/factory reset", press the "Power" button to select that option. 8. On the following screen, repeatedly press the "Volume Down" button until the "Yes - delete all user data" option is what is selected. 9. Then press the "Power" button to hard reset the tablet. 10.
Reset RCA Voyager Pro tablet tutorial.Buy it here: https://ebay.us/WSDutj
11 2. You should be able force a reboot by holding the power button for up to 10 seconds. If the first-time wizard comes again try to skip network set-up (no network no Google account set-up). If the Wifi is still saved shut down your Wifi router for that time. - Robert.
Press and hold the Power button and the Volume Up button simultaneously until the RCA logo appears on the screen. Release both buttons and wait for the Android system recovery menu to appear. Use the Volume Up and Volume Down buttons to navigate through the menu options and select "Wipe data/factory reset".
Saludos colegas, hoy les voy a enseñar como como hacer factory reset rca Voyager tablet, vamos a resetear tablet rca Voyager de forma fácil, sólo usando las...