
The Legend of Zelda: Tears of the Kingdom Walkthrough & Guides Wiki
- Main Quests
- Side Quests
- Side Adventures
- Tips & Tricks
- Interactive Map
Presenting: The Travel Medallion Walkthrough and How to Unlock
▲ Get Pristine Weapons from the depths or an amiibo ! △ All 1000 Koroks | All 4 Great Fairies ▲ All 81 Addison Signs | All 147 Caves | All 58 Wells △ Starter Tips: Farm Rupees | Starting Armor ▲ Advanced Tips: Best Weapons | Best Armor | Best Food

List of Contents
- How to Unlock
- Location and Rewards
- How to Complete

What is the Travel Medallion For?
- Related Guides
How to Unlock Presenting: The Travel Medallion
Complete hateno village research lab.

Complete Hateno Village Research Lab side adventure. Talk to Robbie again and choose the Travel Medallion when he asks which upgrade you want.
Hateno Village Research Lab Walkthrough
Part of Robbie Side Adventure Arc
Presenting: The Travel Medallion is a part of Robbie Side Adventure Arc. It's one of the Side Adventures that gets unlocked after finishing the Hateno Village Research Lab ! Robbie Side Adventures
Presenting: The Travel Medallion Location and Rewards
East necluda - hateno ancient tech lab.

The exact coordinates for this quest on the map are 3780, -2123, 0251 .
East Necluda Region Map
How to Complete Presenting: The Travel Medallion
Proceed to the area marked by robbie.

Robbie will mark a location in the northeastern part of Akkala Highlands. Proceed there to find the Akkala Ancient Tech Lab.
Defeat the Enemies Occupying the Akkala Ancient Tech Lab

Upon arriving, if you try to open the door, you will be greeted by enemies occupying the Ancient Tech Lab. Defeat them to get access inside.
Get the Travel Medallion Prototype

Open the chest found on the first floor of the Ancient Tech Lab to get the Travel Medallion Prototype.
Travel back to Hateno Ancient Tech Lab

Once you get the Travel Medallion Prototype, travel back to Hateno Ancient Tech Lab. Make sure to use the travel gate set by Robbie to make the journey faster.
Speak with Robbie to get the Travel Medallion

You'll be able to get the first Travel Medallion after talking with Robbie. Next, he will ask you to map 10 and then 15 regions in total to get the second and third Travel Medallion, respectively. If you have already mapped the 15 regions prior to this, simply talk to Robbie once again to get the last two Travel Medallions.
Get the Second and Third Travel Medallions

Once you have accomplished the tasks, return back to Robbie. It is recommended to map 15 regions before returning to save time going back and forth.
Setting up Fast Travel Gates

The Travel Medallion allows you to set up a travel gate at your current location. This is useful to quickly travel to your favorite place or a location you constantly return to.
You can access the Travel Medallion through your inventory under the Key Items tab.
The Legend of Zelda: Tears of the Kingdom Related Guides

List of All Walkthroughs
List of all side adventures.
We at Game8 thank you for your support.
In order for us to make the best articles possible, share your corrections, opinions, and thoughts about 「Presenting: The Travel Medallion Walkthrough and How to Unlock | Zelda: Tears of the Kingdom (TotK)」 with us!
When reporting a problem, please be as specific as possible in providing details such as what conditions the problem occurred under and what kind of effects it had.
Do you want to send this information?
Walkthrough Menu
- TotK Wiki Top
Walkthroughs
Tips and tricks.
- Beginner's Guide
New Features
- How to Confuse Enemies
- How to Cure Gloom
- How to Blind Enemies
Combat Guides
- Flurry Rush, Sneakstrike, and Deal Critical Damage
- Weapon Modifiers Explained
- How to Raise Defense
- Passive Abilities for Weapons Explained
- How to Upgrade Armor
- How to Defeat Shielded Enemies
- How to Throw Items and Materials
- How to Repair Weapons
- How to Get Earthwake Technique
- How to Increase Weapon Durability
- How to Parry
- How to Sneakstrike
- How to Perfect Dodge and Flurry Rush
- Stealth Mechanics Explained
Exploration Guides
- How to Get Cold Resistance
- How to Dive
- How to Shield Surf
- How to Break Cracked Rocks
- How to Use Minecarts
- How to Chop Down and Use Fallen Trees
- How to Cross the Freezing Water
- Fast Travel Guide: How to Warp
- Weather Effects and How to Change the Weather
- How to Get Heat Resistance
- How to Make an Axe
- How to Tame Wild Horses
- What to Do During a Thunderstorm
- How to Pass Time
- How to Light Up Dark Areas
- How to Get Epona
- How to Check Coordinates
- How to Climb Efficiently
- How to Break Wooden Boxes
- How to Make a Fire
- How to Make a Raft
- How to Make a Hover Bike
- How to Use Rocket Shields
General Tips and Tricks
- Zonai Dispenser Guide
- How to Get the Paraglider and All Paraglider Designs
- How to Expand Inventory
- Pony Points Guide
- How to Increase Health and Stamina
- Best Settings to Use
- How to Swap Hearts for Stamina
- amiibo Unlocks and List of Compatible amiibo
- Blood Moon Explained
- Missables and One-Time Events Guide
- Where to Find Wild Greens
- Whistle Effects and How to Use
- How to Farm Crops
- How to Heal
- Post Game Content Guide
- Kochi Dye Shop Guide: How to Recolor Armor
- Ending Explained: How to Watch the True Ending
- List of Unlockables
- How to Get Ganon's Horse
Farming Guides
- How to Farm Arrows
- Bubbul Gem Guide
- How to Get More Energy Cells
- Early Game Rupee Farming
- How to Farm Weapons
- Dragon Part Farming Guide
- How to Get Pristine Weapons
Notable Item Location Guides
- How to Get the Travel Medallion
- How to Get the Champion's Leathers Early
- How to Get the Hylian Shield Early
- How to Restore the Master Sword
- How to Get the Classic Green Tunic
- How to Get Ring Garland
- Misko's Treasure Locations
- How to Get Monster Medals
Puzzle Solution Guides
- How to Solve the Water Temple Spinning Tower
- Where to Find King Dorephan
- How to Solve the Gerudo Light Puzzle
- Voe and You Class Solutions
Map Location Guides
- All Stable Locations
- All Sage's Will Locations
- How to Get to Hyrule Castle
- How to Get to Lost Woods and Enter Korok Forest
- Great Fairy Locations and How to Unlock
- How to Find the Light Dragon: Location and Drops
- How to Find Farosh: Location and Drops
- How to Find Naydra: Location and Drops
- How to Find Dinraal: Location and Drops
- Satori Cherry Blossom Tree Locations and Guide
- How to Reach Abandoned Hebra Mine
- How to Unlock Royal Hidden Passage
- All Addison Sign Locations
- How to Get into Gerudo Secret Club
- All Coliseum Locations and Rewards
- Koltin Locations and List of Rewards
- Satori (King of the Mountain) Locations
- Where to Find Dondons
- All Forge Construct Locations
- How to Get to Toto Lake
- All Goddess Statue Locations
Tier List Guides
- Best Early Game Armor
- Best Armor Sets (Equipment)
- Best Weapons and Shields
- Best Horses
- Best Equipment for Exploration
- Best Fuse Materials and Weapon Combinations
- Best Modes of Travel
Glitches and Exploits
- List of Glitches and Exploits
- How to Duplicate Weapons, Bows, and Shields
- How to Duplicate Materials
- Can You Pet the Dogs?
- What Transfers Over From Breath of the Wild?
- Should You Play BotW First?
- What Happens When You Die?
- How Does Autosave Work?
- What Happened to Link's House?
- Do Materials Respawn?
- How to Change the Difficulty
- How to Lower and Raise Hylian Hood
- When Do Shops Restock?
- Is There a Master Mode?
- All Abilities and How to Unlock
Zonai Arm Abilities
Purah pad abilities.
- Travel Medallion
- Shrine Sensor
- Hero's Path Mode
Sage's Abilities
- Vow of Tulin
- Vow of Riju
- Vow of Sidon
- Vow of Yunobo
- Interactive Map of Hyrule and All Locations
- Hyrule Surface Map and Regions
- Hyrule Sky Map and Regions
- Hyrule Depths Map and Regions
- Korok Seed Map and How to Use
- All 147 Caves
- All 58 Wells
- All Lightroot Locations and Maps
- All Chasm Locations and Maps
- List of Towns and Settlements
- All Tower Locations
- Lookout Landing Tower
- Hyrule Field Tower
- Gerudo Highlands Tower
- Lindor's Brow Tower
- Rospro Pass Tower
- Pikida Stonegrove Tower
- Thyphlo Ruins Tower
- Eldin Canyon Tower
- Ulri Mountain Tower
- Rabella Wetlands Tower
- Sahasra Slope Tower
- Popla Foothills Tower
- Gerudo Canyon Tower
- Upland Zorana Tower
- Mount Lanayru Tower
- List of All Shrines
- All 31 Shrine Quests
Great Sky Island Shrines
- Ukouh Shrine
- In-isa Shrine
- Gutanbac Shrine
- Nachoyah Shrine
Hyrule Field Shrines
- Ren-Iz Shrine
- Tsutsu-um Shrine
- Riogok Shrine
- Kamizun Shrine
- Sepapa Shrine
- Taki-Ihaban Shrine
- Ishodag Shrine
- Teniten Shrine
- Tajikats Shrine
- Yamiyo Shrine
- Kyononis Shrine
- Jiosin Shrine
- Jojon Shrine
- Serutabomac Shrine
- Tenmaten Shrine
- Sonapan Shrine
- Usazum Shrine
- Kyokugon Shrine
- Tadarok Shrine
- En-oma Shrine
- Susuyai Shrine
- Mayachin Shrine
- Makurukis Shrine
- Runakit Shrine
- Sinakawak Shrine
- Jinodok Shrine
Tabantha Shrines
- Oromuwak Shrine
- Gatakis Shrine
- Nouda Shrine
- Wao-os Shrine
- Iun-orok Shrine
- Turakawak Shrine
- Gasas Shrine
- Mayausiy Shrine
- Ikatak Shrine
- Ga-ahisas Shrine
- Ganos Shrine
- Taunhiy Shrine
Hebra Shrines
- Sahirow Shrine
- Rutafu-um Shrine
- Otak Shrine
- Eutoum Shrine
- Sisuran Shrine
- Oshozan-u Shrine
- Mayaotaki Shrine
- Tauyosipun Shrine
- Orochium Shrine
- Ijo-o Shrine
- Tenbez Shrine
- Taninoud Shrine
- Mayaumekis Shrine
- Kahatanaum Shrine
Great Hyrule Forest Shrines
- Sakunbomar Shrine
- Pupunke Shrine
- Ninjis Shrine
- Musanokir Shrine
- Kikakin Shrine
- Kiuyoyou Shrine
- Ekochiu Shrine
- Mayam Shrine
- Simosiwak Shrine
Akkala Shrines
- Rasiwak Shrine
- Jochi-iu Shrine
- Igashuk Shrine
- Sinatanika Shrine
- Rasitakiwak Shrine
- Jochi-ihiga Shrine
- Gatanisis Shrine
- Domizuin Shrine
- Kamatukis Shrine
- Gemimik Shrine
- Gikaku Shrine
- Mogisari Shrine
- Natak Shrine
Eldin Shrines
- Kisinona Shrine
- Minetak Shrine
- Mayak Shrine
- Sibajitak Shrine
- Sikukuu Shrine
- Timawak Shrine
- Mayachideg Shrine
- Sitsum Shrine
- Marakuguc Shrine
- Kadaunar Shrine
- Moshapin Shrine
- Jiotak Shrine
- Kimayat Shrine
- Isisim Shrine
- Momosik Shrine
Lanayru Shrines
- Ihen-a Shrine
- Mogawak Shrine
- Jonsau Shrine
- Maoikes Shrine
- Joniu Shrine
- Apogek Shrine
- Yomizuk Shrine
- Kurakat Shrine
- Morok Shrine
- O-ogim Shrine
- Jikais Shrine
- Tukarok Shrine
- Zakusu Shrine
- Igoshon Shrine
- Mayanas Shrine
- Jirutagumac Shrine
- Sihajog Shrine
Necluda Shrines
- Susub Shrine
- Zanmik Shrine
- Jochisiu Shrine
- Jogou Shrine
- Anedamimik Shrine
- Tokiy Shrine
- Utojis Shrine
- Sifumim Shrine
- Bamitok Shrine
- Marari-in Shrine
- Eshos Shrine
- Makasura Shrine
- Mayahisik Shrine
- Joju-u-u Shrine
- Josiu Shrine
- Ukoojisi Shrine
- Kumamayn Shrine
- Yansamin Shrine
Faron Shrines
- Jiukoum Shrine
- Ishokin Shrine
- Utsushok Shrine
- Joku-u Shrine
- Joku-usin Shrine
Gerudo Shrines
- Soryotanog Shrine
- Mayatat Shrine
- Miryotanog Shrine
- Suariwak Shrine
- Otutsum Shrine
- Mayamats Shrine
- Rakakudaj Shrine
- Irasak Shrine
- Karahatag Shrine
- Chichim Shrine
- Siwakama Shrine
- Motsusis Shrine
- Kitawak Shrine
- Turakamik Shrine
- Rotsumamu Shrine
- Siyamotsus Shrine
- Mayasiar Shrine
- Rakashog Shrine
- Kudanisar Shrine
- List of All Bosses and Minibosses
- Master Kohga
- Marbled Gohma
- Sludge Like
- Queen Gibdo
- Seized Construct
- Phantom Ganon
- Demon King Ganondorf and Demon Dragon
- Obsidian Frox
- Flame Gleeok
- Thunder Gleeok
- Frost Gleeok
- King Gleeok
- Flux Construct
- Flux Construct II
- Flux Construct III
- Stone Talus
- Stone Talus (Luminous)
- Battle Talus
- All Weapons and Equipment
- List of All One-Handed Weapons
- List of All Two-Handed Weapons
- List of All Spears
- List of All Bows
- List of All Shields
- All Champion Weapons
- List of amiibo Weapons
- List of All Armor
- List of All Headgear
- List of All Body Armor
- List of All Legwear
Temples and Dungeons
- All Temple Locations and Dungeon Guides
- Wind Temple
- Lightning Temple
- Fire Temple
- Water Temple
- Fifth Temple
- List of All Items
- List of All Materials
- List of All Zonai Devices
- List of All Key Items
- Basic Cooking Guide
- Advanced Cooking: Adding Buffs
- List of Cooked Dishes and Recipes
- List of Roasted Dishes and Recipes
- List of Frozen Dishes and Recipes
- List of Elixirs and Recipes
- All Monsters and Enemies
- Gloom Hands
- All Yiga Schematics and Schema Stones
- New and Returning Characters
- Latest News and Updates
- Ver. 1.2.0 Update Patch Notes
- New Zelda and Ganondorf amiibo
- Ver. 1.1.2 Update Patch Notes
- Release Date Guide
- Pre-Order Bonuses
- Will There Be DLC?
- Story Summary and Timeline
- Easter Eggs and Secrets
- New Features & Gameplay
- Will the Champions Appear?
- Is the Hookshot a Useable Item?
- Will There Be a Demo?
- Multiplayer Features
- List of Official Trailers
- Why Is the Master Sword Broken?
- How Long to Beat
- 3/28 Gameplay Trailer Analysis
- TOTK Edition Switch OLED
- Four New Abilities Introduced
- Sky Islands Explored
- Who are the Zonai?
- 4/13 Final Trailer Analysis
- Where is Daruk's Successor?
- Is Demise Returning?
- All Voice Actors Cast
- Is TOTK the Last Zelda Game?
- Preload Date and Guide
- Collector's Edition Differences
- How to Get TOTK Cheaper
- Hands-On Previews: Everything We Learned
- Where to Pre-Order Guidebook
- Tears of the Kingdom 1.1 Patch Notes
- Are Hearty Durians Still in the Game?
- What Happened to the Divine Beasts?
- Where is Kass?
- Message Boards
- Game Help & Questions (9)
- Discussion & Review Board (6)
- Fan Theory Sharing Board (7)
Other Zelda Wikis
- Breath of the Wild
- Link's Awakening
- Hyrule Warriors: Age of Calamity
- Skyward Sword HD
Japanese Wiki (日本語版)
- ティアーズオブザキングダム攻略
- 1 All 58 Well Locations and Reward
- 2 Korok Seeds Map: All 1000 Korok ...
- 3 Interactive Map of Hyrule and Al...
- 4 Aerial Cannon Schematic: Locatio...
- 5 Cece's Secret Walkthrough and Ho...
- We could not find the message board you were looking for.
Gaming News

Persona 5: The Phantom X Global Release Being Considered ...

Seablip Review (Early Access)

FF14 Dawntrail Brings New Mount Mountain Zu, a Collab fro...

Read Only Memories: Neurodiver Review
More Gaming News
Popular Games

Genshin Impact Walkthrough & Guides Wiki

Honkai: Star Rail Walkthrough & Guides Wiki

Pokemon Scarlet and Violet (SV) Walkthrough & Guides Wiki

FF7 Rebirth Walkthrough & Guides Wiki

Stellar Blade Walkthrough & Guides Wiki

Monster Hunter Rise: Sunbreak Walkthrough & Guides Wiki

Persona 3 Reload Walkthrough & Guides Wiki

Palworld Walkthrough & Guides Wiki

Pokemon UNITE Walkthrough & Guides Wiki

Call of Duty Modern Warfare 3 (MW3) Walkthrough & Guides Wiki
Recommended Games

Elden Ring Walkthrough & Guides Wiki

Super Smash Bros. Ultimate Walkthrough & Guides Wiki

Pokemon Legends: Arceus Walkthrough & Guides Wiki

FF7 Remake Walkthrough & Guides Wiki

New Pokemon Snap Walkthrough & Guides Wiki

Hyrule Warriors: Age of Calamity Walkthrough & Guides Wiki

The Legend of Zelda: Breath of the Wild Walkthrough & Guides Wiki
All rights reserved
© Nintendo. The Legend of Zelda and Nintendo Switch are trademarks of Nintendo. The copyrights of videos of games used in our content and other intellectual property rights belong to the provider of the game. The contents we provide on this site were created personally by members of the Game8 editorial department. We refuse the right to reuse or repost content taken without our permission such as data or images to other sites.
- Popular Articles
Follow Polygon online:
- Follow Polygon on Facebook
- Follow Polygon on Youtube
- Follow Polygon on Instagram
Site search
- Dragon’s Dogma 2
- Ghost of Tsushima
- Zelda: Tears of the Kingdom
- Baldur’s Gate 3
- GTA 5 cheats
- PlayStation
- Dungeons & Dragons
- Magic: The Gathering
- Board Games
- All Tabletop
- All Entertainment
- What to Watch
- What to Play
- Buyer’s Guides
- Really Bad Chess
- All Puzzles
Filed under:
- Zelda: Tears of the Kingdom guide
How to get the Travel Medallion, Hero’s Path, and Shrine Sensor in Zelda: Tears of the Kingdom
Upgrade your Purah Pad for essential perks
Share this story
- Share this on Facebook
- Share this on Reddit
- Share All sharing options
Share All sharing options for: How to get the Travel Medallion, Hero’s Path, and Shrine Sensor in Zelda: Tears of the Kingdom
/cdn.vox-cdn.com/uploads/chorus_image/image/72273018/Tears_of_the_Kingdom_Robbie.0.png "set travel gate")
In The Legend of Zelda: Tears of the Kingdom , the Purah Pad replaces the Sheikah Slate from The Legend of Zelda: Breath of the Wild — a key tool with several upgrades helpful for your journey through Hyrule.
To start upgrading the Purah Pad — which includes the Travel Medallion , Hero’s Path , and Shrine Sensor — you need to complete the “ A Mystery in the Depths ” questline. This will unlock the Hateno Village Research Lab, which is where the (upgrade) magic happens. This quest begins and ends in Hyrule Field’s Lookout Landing with researcher Josha.
How to start the Hateno Village Research Lab quest
Once you’ve finished up with Josha in Lookout Landing during the “ A Mystery in the Depths ” quest, Robbie will appear near the balloon you just fixed and instruct you to head over to East Necluda, where the Hateno Ancient Tech Lab is located. You can teleport to Zanmik Shrine to reach the village quickly. The lab is just east of Hateno Village .
:no_upscale()/cdn.vox-cdn.com/uploads/chorus_asset/file/24645793/Zmap_Shrines_CROPPED_copy__1_.png "set travel gate")
How to get the Shrine Sensor
The Shrine Sensor is a tool used to find Shrines of Light in Hyrule. The sensor will react with beeping noise when you’re heading toward a shrine — following that means locating a shrine. The Sensor emblem is located on the right-hand side of the Tears of the Kingdom user interface. It’ll blink (and make the sound) more rapidly as you approach a shrine. It can be toggled on through the map screen with the Y button .
Robbie will have you test out the Sensor by running around in his home and, later, outside in Hateno Village. Follow the Sensor to get a feel for how it works.
It’ll lead you to the Mayahisik Shrine , which is hidden inside a cave with its entrance blocked. You’ll need to blow up the rocks to get in. The entrance to the cave is at coordinates (3741, -2085, 0208) . We used a bomb flower to get it — stand back!
:no_upscale()/cdn.vox-cdn.com/uploads/chorus_asset/file/24645768/shrinebehindrocks.png "set travel gate")
Head into the cave and glide down the hole to the right, then follow the cave system to reach the Mayahisik Shrine at coordinates (3730, -2058, 0189) . Head back to Robbie and the Hateno Ancient Tech Lab .
How to get the Travel Medallion
Once you’ve got the Sensor installed, Robbie will offer to help with another upgrade for the Purah Pad; you can choose the order, but for ease of explanation, we’ll go in order they’re listed.
Robbie will send you off to the Akkala Ancient Tech Lab in Akkala to seek out prototypes for the Travel Medallion , which lets you set up fast travel gates anywhere. Using it is as easy as opening your inventory and marking the current location to place the medallion and make a gate. In total, the Travel Medallion can make three gates, but it needs to be upgraded to max it out. Let’s start, first, with just unlocking the feature.
:no_upscale()/cdn.vox-cdn.com/uploads/chorus_asset/file/24645787/Zmap_Shrines_CROPPED_copy.png "set travel gate")
The Akkala Ancient Tech Lab is located at the top right-hand side of Hyrule. You’ll probably want to fast travel as close as you can get before making your way from there. The Ulri Mountain Skyview Tower is a good spot, and you can cover a lot of distance with your paraglider from there. Though it’s a long journey, you can use that travel time to seek out shrines or monsters to meet Robbie’s other upgrade requirements.
Once you find the Akkala Ancient Tech Lab , located at coordinates (4510, 3153, 0247) , be ready for battle. Trying to enter through the door will kick off a fight against Yiga Clan enemies who shoot red projectiles, which you’ll need to dodge, then hit away with a sword.
Once you’ve dispatched them, enter the lab to meet Konba , a fashion designer, who will give you Yiga Armor . He’ll leave, then search for a chest that holds the Travel Medallion prototype.
:no_upscale()/cdn.vox-cdn.com/uploads/chorus_asset/file/24645769/Screenshot__318_.png "set travel gate")
If you’re up for exploring, the Rasiwak Shrine is nearby. Once you’re ready, head back to Robbie at the Hateno Ancient Tech Lab . He’ll unlock the medallion and start offering you upgrades — 10 map-data locations for a second gate and 15 for a third. Now you’ll be able to drop three gates, and delete and reuse the medallions as needed.
How to get the Hero’s Path
:no_upscale()/cdn.vox-cdn.com/uploads/chorus_asset/file/24645770/Screenshot__316_.png "set travel gate")
The Hero’s Path gives the ability to see the exact path of your journey through Hyrule, up to 256 hours of gameplay. On the map screen, push the X button to switch on Hero’s Path mode. Do the same to switch it off. The button on the bottom of the screen lets you simple toggle Hero’s Path on and off, but also lets you watch the path unravel from the start — it’s a very cool feature, and it tracks deaths, too.
Robbie will ask you for data from 15 shrines. If you’ve already got that, you’re all set — he’ll immediately take the Purah Pad and start setting things up. Otherwise, head out and find more shrines before proceeding. Our list of shrine locations can help point you toward some shrines close by.
How to get Sensor +
Sensor + is like an upgraded version of the Shrine Sensor you unlocked earlier — it can detect more than just shrines.
To unlock it, Robbie wants you to fill the compendium with five different types of monsters. You add monsters to the compendium by grabbing their attention and taking a photo. Once you’ve got five different monsters in there, head back to Robbie in the Hateno Ancient Tech Lab.
You can set the Sensor + to search for anything available in the Hyrule Compendium .
Filling out the Compendium quest
:no_upscale()/cdn.vox-cdn.com/uploads/chorus_asset/file/24645774/Screenshot__323_.png "set travel gate")
After finishing with Purah Pad upgrades, Robbie will brag about his own completed compendium. He’s willing to sell pictures from his to help fill out yours — you can choose a category (Fauna, Enemy, Material, Weapon, or Other) for 100 rupees, and he’ll choose what specific photo to give you.
- TOTK guides
- Interactive map
- Beginner’s guide
- Great Sky Island Walkthrough
Zelda: Tears of the Kingdom walkthrough and guides
- Beginner’s guide to what you should do first
- 10 tips to know before starting
- Where to find Goddess Statues for Lights of Blessing
- Hearts or Stamina: What to upgrade first?
- How to get the paraglider
- How to get gloom resistance
- How to get cold resistance
- How to get heat resistance
- How to become fireproof
- How to make stamina food and elixirs
- How to upgrade armor
- How to increase weapon durability
- How to increase your inventory
- How to Fuse and Unfuse gear
- Amiibo rewards and unlocks
- How to parry, dodge, and Flurry Rush
- What to sell to make easy money
- Regional Phenomena best order
- Camerawork in the Depths quest steps
- Where to find Captain Hoz’s location
- Sidon of the Zora walkthrough
- Where to find ancient arowana
- Where to find Toto Lake for ‘The Broken Slate’
- Where to find King Dorephan for the ‘Clues to the Sky’ quest
- How to use the ‘watery bridge’ to find the Land of the Sky Fish
- How to beat the Sludge Like boss
- Ancient Zora Waterworks walkthrough
- Wellspring Island walkthrough
- Tulin of Rito Village quest steps
- Yunobo of Goron City walkthrough
- Riju of Gerudo Town walkthrough
- How to get through the Lost Woods
- How to get rid of the gloom in Korok Forest
- Find the Fifth Sage at Ring Ruins walkthrough
- How to beat Demon King Ganondorf, Demon Dragon
- ‘Hornist’s Dramatic Escape’ quest
- ‘Gloom-borne Illness’ quest
- ‘A Trip Through History’ quest
- ‘A New Signature Food’ quest
- ‘Team Cece or Team Reede?’ quest steps
- ‘The Beast and the Princess’ quest
- ‘Out of the Inn’ quest steps
- ‘Potential Princess Sightings!’ quest steps
- ‘White Goats Gone Missing’ quest
- ‘A Call From the Depths’ quest steps
- ‘Princess Zelda Kidnapped?!’ quest steps
- ‘Ruffian-infested Village’ quest steps
- ‘Lurelin Village Restoration Project’ quest steps
- ‘Messages from an Ancient Era’ stone tablet locations
- Great Sky Island walkthrough
- Water Temple walkthrough
- Wind Temple walkthrough
- Lightning Temple walkthrough
- Fire Temple walkthrough
- Crisis at Hyrule Castle walkthrough
- Guidance of Ages Past, Spirit Temple walkthrough
- How to get to Ganondorf
- Tears of the Kingdom interactive Hyrule map
- Shrine locations and shrine map
- Skyview Tower locations
- Great Fairy Fountain locations
- Stable locations
- Dragon locations and routes
- Dragon Tear memory locations
- Bargainer statue locations, rewards list
- Where to find diamonds
- Where to find Hestu
- Where to find the Light Dragon
- Where to find Tarrey Town and Koltin’s Shop
- How to reach the Sky Islands
- How to glide to the Temple of Time
- How to get to Gerudo Town
- How to get to Hateno Village
- How to get to Kakariko Village
- How to get to Rito Village
- How to get into the Forgotten Temple
- How to unlock the Royal Hidden Passage
- How to find the Apapes Lightroot
- How to unlock all abilities
- How to get your BOTW horses in TOTK
- How to unlock Autobuild
- How to unlock fast travel
- How to tame a horse
- How to get Zelda’s golden horse
- How to find the Great White Stallion
- How to find Ganon’s Horse
- What to do with Bubbul gems
- How to use Sage’s Will, locations
- How to increase max energy cell capacity
- How to light up the Depths
- How to make a campfire
- How to use (and find) star fragments
- How to solve Hudson Construction puzzles
- How to respec at the cursed statue
- How to use rockets creatively
- How to shield surf
- How to beat Gloom Hands
- How to beat Phantom Ganon
- How to beat Flux Construct 1
- How to defeat Hinox
- How to defeat Frox
- How to defeat Lynel
- How to defeat Gleeok
- How to defeat King Gleeok
- How to defeat the Stone Talus and use the Stone Talus Heart
- How to defeat the Battle Talus
- How to use the duplication glitch
- What is the Ring Garland?
- How does the Blood Moon work?
- How to get sunset fireflies
- How to get ancient blades
- How to earn and use Pony Points
- How to farm dragon materials
- Where to get bomb flowers
- Full armor set and set bonus list
- Best weapons
- Best early shield location
- Hylian Shield location
- How to get Majora’s Mask
- Best early Fuse combinations
- Champion’s Leathers location
- How to get the Master Sword
- How to get Misko’s Treasure
- Archaic Tunic location
- Miner’s Armor set location
- Zora Armor set location
- Barbarian Armor set location
- Climbing Armor set location
- Fierce Deity Armor, Sword location
- Glide Armor set location
- Time Armor set location
- Frostbite Armor set location
- Ember Armor set location
- Rubber Armor set location
- Yiga Armor set location
- Soldier’s Armor set location
- Tingle “Armor” set location
- Royal Guard Armor set location
- Snowquill Armor set location
- Radiant Armor set location
- Stealth Armor set location
- Froggy Armor set location
- Hylian Armor set location
- Flamebreaker Armor set location
- Zonaite Armor set location
- Charged Armor set location
- Dark Armor set location
- Depths Armor set location
- Awakening Armor set location
- Desert Voe Armor set location
- Twilight Armor set location
- Phantom Armor set location
- Wind Armor set location
- Hero Armor set location
- Wild Armor set location
- Mystic Armor set location
- Evil Spirit Armor set location
- Sky Armor set location
The next level of puzzles.
Take a break from your day by playing a puzzle or two! We’ve got SpellTower, Typeshift, crosswords, and more.
Sign up for the newsletter Patch Notes
A weekly roundup of the best things from Polygon
Just one more thing!
Please check your email to find a confirmation email, and follow the steps to confirm your humanity.
Oops. Something went wrong. Please enter a valid email and try again.
Loading comments...
- Patch Notes
- Hardware and Tech
- PC Invasion Staff
- Terms of Use
- Privacy Policy

How to get and use the Travel Medallion in Tears of the Kingdom (TotK)
Hyrule as seen in The Legend of Zelda: Tears of the Kingdom is an enormous place. Often, you can warp quickly around it by using activated shrines and towers to fast travel. However, there sometimes are remote locations you have reason to visit regularly. That’s when a particular upgrade comes in handy. Here is our guide explaining how to get and use the Travel Medallion in The Legend of Zelda: Tears of the Kingdom .
Tears of the Kingdom – how to get and use the Travel Medallion
The Travel Medallion is a handy item you can use to warp directly to the location of your choosing, even if you haven’t found a nearby shrine or skytower to activate. Normally, you might have to hike a long distance, which can be tedious or dangerous. If you have the medallion, however, you can save yourself that hassle. To get the Travel Medallion, complete a task for Robbie at the Hateno Research Lab.
To use the Travel Medallion, access it from the Key Items menu and place one at your current location. You can then warp to that point whenever you like.

Screenshot by PC Invasion
When you first meet Robbie , he shares a room with Josha in Lookout Landing . The two researchers present quests early in the game, as you discover how to get the Autobuild ability . After you complete that objective and deal with Robbie a bit more, he takes off to his research center.
Find Robbie at the Hateno Ancient Tech Lab on the hill outside Hateno Village , which is north of the Necluda Sea in the southeast (check our guide telling where to find Hateno Village if you need further assistance).
When you talk to Robbie at the Hateno Ancient Tech Lab, ask him about the Travel Medallion. He sends you to clear out the Ancient Tech Lab in the Deep Akkala region (it’s located a short distance south of the world map’s northeastern corner). Once you defeat the Yiga Clan members that have taken over the lab, open the treasure chest they guarded to find the Travel Medallion Prototype . Take it back to Robbie, who gets it working for you.

By default, you can use the Travel Medallion to set one convenient fast travel point. As you activate skytowers and review more of the world map, Robbie upgrades the Travel Medallion. This grants you as many as three uses. By the time I met him, I had already activated every skytower, so I didn’t have to wait.
I suggest placing a Travel Medallion north of Death Mountain , near where you can find four Rock Octoroks . They offer you a way to repair weapons and shields . Once you venture into the Depths to meet Ganondorf , you might also set a medallion near the point of no return, so you can conveniently return once you have supplies. A third use might be to set one somewhere near a remote location where you like to farm rare items. If you ever decide you don’t like where one is placed, visit its location and retrieve it to use it elsewhere. Travel Medallions can prove quite handy.
The Legend of Zelda: Tears of the Kingdom is available on the Nintendo Switch.

- Call of Duty
- Apex Legends
- Dead By Daylight
- Attachments
- Field Upgrades
- Killstreaks
- Action and Adventure Games
- Battle Royale
- Gangs of Sherwood
- Indie Games
- Like a Dragon Gaiden: The Man Who Erased His Name
- Only Mobile Gaming
- Role Playing Games
- Shooter Games
- Sports Games
- Strategy and Simulation Games
- The Day Before
- The Legend of Zelda: Tears of the Kingdom
How to make custom fast travel points in Tears of the Kingdom
The Travel Medallion Prototype makes fast travel easier than ever before

Published: 13 May 2023 11:55 AM +00:00 Updated: 13 May 2023 11:59 AM +00:00
With a game as large as Zelda: Tears of the Kingdom , you’re going to use fast traveling a lot. However, sometimes the closest teleport point is just not close enough. That’s where the Travel Medallion Prototype comes in. You'll have to go on a little trip to obtain it, but come out of the resulting scuffle alive and you'll unlock a time saver.
Learn everything you need about the Travel Medallion Prototype and how to make fast travel points. Whether you’re in the skies, underground, or deep in enemy territory, the Travel Medallion Prototype will let you set up multiple waypoints.
How to unlock custom fast travel points in Zelda Tears of the Kingdom
The Travel Medallion Prototype is an upgrade to the Purah Pad once you get the Sensor upgrade.
Unlocking the quest for the Travel Medallion Prototype can take a bit and requires that you complete one of the four main story quests. Plus, you’ll also have to deal with some quests for Robbie and Josha. However, the reward at the end is worth the time investment.
- Check out: How to get the Bokoblin Mask in Tears of the Kingdom
Once you’ve completed the “A Mystery in the Depths” quest from Robbie at Lookout Landing, he'll set you on the path for another Purah Pad upgrade that helps you track down hidden shrines. Once that's out the way, his next quest will offer to unlock custom fast travel points.

Now that we have the quest unlocked, Robbie will send you off to the Akkala Ancient Tech Lab, where you can find the Travel Medallion Prototypes to unlock the fast travel upgrade. The Akkala Ancient Tech Lab is located near the top right side of the map.
Take out the Yiga enemies that appear when you attempt to enter, and head back inside once the commotion is over. Talk to the NPC inside to get some new armor, and then open the nearby chest for the Travel Medallion Prototype.
- Check out: How to recover gloom hearts
Once you return to Robbie, he will add the Travel Medallion Prototype upgrade to your Purah Pad which allows you to place a fast travel waypoint anywhere in Hyrule. Just open your inventory and mark the location to place a fast travel gate there.
It's a little limited to start, but subsequent quests reward upgrades by unlocking new map areas. Robbie offers you a second gate slot for finding ten map-data locations, and a third for finding 15 map-data locations. This allows you to place and manipulate three different fast travel gates freely instead of just one.
While you’re here, check out our guides on how to get more bombs and how to get the Yiga armor .
Explore new topics and discover content that's right for you!
- International edition
- Australia edition
- Europe edition

Travelgate to Furnituregate: a guide to the Clinton scandals of the 90s
Donald Trump is already delivering on threats to resurrect the scandals of Bill Clinton’s presidency against Hillary, and they go way beyond Monica Lewinsky
Donald Trump has promised to resurrect the scandals (and pseudo-scandals) of Bill Clinton’s presidency in his battle with the likely Democratic nominee, Hillary Clinton, this year.
And he has already begun, this week releasing an attack ad that raised allegations of sexual harassment or assault by the former president. Some of those accusations may be familiar to readers, as might Clinton’s impeachment and his affair with Monica Lewinsky. But only Washington insiders will recall the ins-and-outs of Travelgate and Furnituregate , while Trump’s reference to Vince Foster conspiracy theories this week may have had many scratching their heads. If that was you, allow us to refresh your memory.
Gennifer Flowers

Former Arkansas state employee and longtime Clinton friend Gennifer Flowers told the supermarket tabloid the Star in January 1992 that she’d had a 12-year affair with Bill Clinton, then the governor of Arkansas and running for the Democratic presidential nomination. The Clintons appeared together on 60 Minutes and Bill copped to causing “pain” in his marriage but denied the affair; Flowers held a press conference to play audio tapes she said would confirm it did happen.
They didn’t and, since Flowers was reportedly paid to share her story , the scandal failed to sink the Clinton candidacy. Flowers went on to pose for Penthouse, release a tell-all biography, become a cabaret singer and sex advice columnist and, in 2012, told a New Orleans television station that she was developing a reality TV show.
But in 1998, Clinton did admit in a deposition with Paula Jones’s lawyers (more on that later) that he had had a one-night stand with Flowers in 1977 .

The fact that firing people who worked at the White House – for whatever reason – became a political scandal fanned by Republicans necessitating investigations by Congress and an independent counsel should have been an indication to the Clintons that Washington DC was not welcoming to outsiders.
In 1993, Bill Clinton – and, by extension, Hillary Clinton – inherited what could charitably be called a mess in the White House travel office, which was in charge of booking travel and accommodations for the White House press corps and charging media outlets for the trips.
Billy Dale had led the office since 1982 and used a handwritten ledger to record his estimates of the cost of travel and telecommunications services used by the traveling press corps as well as payments, credits and refunds from providers. He did not use a competitive bidding process when choosing providers and, most problematically, he started depositing refunds issued by service providers – intended for disbursement to the media companies – into his own personal account in 1988 to cover the cost of what are euphemistically called facilitation payments to foreign airport and hotel employees.
The full extent of the problems was not known when Clinton took office; however, the press corps had been complaining about the soaring costs of covering the president.
Just before Clinton took office, Catherine Cornelius, a distant cousin of Clinton’s who had arranged travel during the 1992 campaign, proposed outsourcing the White House travel office to World Wide Travel Inc, the Little Rock firm with which she had worked during the campaign. David Watkins, the campaign staffer who took charge of such matters in the administration, attended some meetings and eventually hired Cornelius, who wrote memos suggesting they could save more than $200,000 by outsourcing.
Meanwhile, Hollywood producer Harry Thomason, a longtime Clinton friend who had a financial interest in an air consulting firm (which had worked with the Clinton campaign), a White House pass and an office in the White House’s East Wing, offered his advice on events. He and his business partner in the airline firm, Darnell Martens, soon discovered that Dale did not use a competitive bidding process to book flights, and let Hillary Clinton and others in the White House know.
Lawyers, including William Kennedy and Vince Foster, were called in, an audit recommended and the lawyers went to the FBI to request an investigation. The FBI hesitated; at that point, the White House counsel threatened to call in the IRS to investigate and Cornelius, who had been furtively copying Dale’s records and bringing them home, told the FBI that she suspected financial improprieties beyond the non-competitive bidding process.
After KPMG conducted an audit and found discrepancies – including $18,200 in petty cash unaccounted for – the staff of the travel office was fired by Watkins and the White House announced that the FBI was investigating.
Eventually, Dale was charged with embezzlement, tried and acquitted . Claims were made that the FBI investigation was instigated in bad faith to justify the firings (which came after), Watkins himself was fired (in 1994) for misusing a chartered helicopter for a golf trip and a memo he wrote blaming Hillary Clinton for demanding the firings surfaced during the Whitewater investigation (because everything surfaced during the Whitewater investigation).
But the third Whitewater investigator – yes, there were three – looking into whether the staffers were fired so they could be replaced with employees the Clintons preferred found no evidence that proved beyond a doubt that Hillary Clinton had any direct role in the firings or that anything had been covered up, long after the Clintons found five of the fired staffers other government jobs and a sixth was allowed to retire.
The office’s functions, in the end, were put out for a competitive bidding process; costs continued to go up.
Vince Foster’s suicide
Vince Foster served as deputy counsel to the president in 1993, and was seeking a private attorney at the time of his death because of his involvement in the Travelgate scandal. His sister, breaking more than 20 years of silence, wrote this week in the Washington Post that her brother had called her shortly before his death to tell her that he was severely depressed but concerned that seeking help would affect his security clearance. (Until changes in 1995 , 2008 and 2013 , it was believed, not without reason, that acknowledging treatment for mental health could affect one’s ability to get or maintain a security clearance.)
Foster killed himself in a park in McLean, Virginia, just days later. Within weeks, conspiracy theorists suggested that the Clintons had been involved in his death because of what he might have known about Whitewater or worse.
The conspiracy theories were all thoroughly investigated, despite little evidence suggesting anything other than suicide at the scene. Over the course of three years, two separate Whitewater independent counsels and two bipartisan congressional panels conducted separate investigations and concluded, again and again, that Foster took his own life.
In 1996, while investigating Travelgate, congressional investigators discovered that, starting in 1993, the White House had improperly obtained access to hundreds of FBI files on former White House employees, including some fairly senior Republicans and Billy Dale, the fired travel office employee.
Though the staffers who requested the files – Craig Livingstone and Anthony Marceca – said that they had requested the files because they were on an outdated list of employees provided by the secret service , no one believed them. Both resigned.
Undeterred, congressional investigators and the independent counsels looked into whether Livingstone had been hired because of a special familial connection to Hillary Clinton, whether the Clintons themselves (particularly Hillary) or very senior staffers had reviewed the files, and whether anybody had lied about anything.
A fingerprint analysis completed in 1996 backed up Hillary Clinton’s statements that she had not reviewed the files.
Still, it took four years until the third independent counsel appointed to investigate the Clintons exonerated them and senior White House officials and found that no one had lied about anything . It took another 10 years for a federal judge to dismiss the final civil lawsuit against the FBI and the Clintons in the affair .
The furthest-reaching scandal of the Clinton era – and the only one to result in successful criminal charges against anyone – was named after a 1978 partnership between Bill (then the Arkansas attorney general) and Hillary Clinton and James and Susan McDougal to buy 220 acres of land in the Ozarks and develop it as vacation properties – which they named Whitewater Development Corp.
The Clintons remained, by their account and that of the McDougals, passive investors, and their partnership eventually went bust in 1992. The Clintons lost about $40,000 on the deal ; the McDougals lost more, despite a 50-50 split at the beginning of the partnership.
This became a scandal because, after forming the partnership, James McDougal bought an Arkansas savings and loan in 1982, renaming the financial institution Madison Guaranty; Clinton became Arkansas governor for the second time later that same year.
By 1985, Bill Clinton had been re-elected twice, federal regulators were looking into the finances at Madison, and McDougal hired Hillary Clinton’s law firm, Rose, to represent them.

In 1986, Susan McDougal took out a loan for $300,000 from former judge Bill Hale, backed by the Small Business Administration and intended for minority business owners, eventually funnelling it to her husband and through Whitewater. (After his indictment in 1996, Hale claimed that Bill Clinton had pressured him to make the loan; Clinton denied the allegations.)
In 1989, Madison – like many other poorly managed savings and loans of the era – went under and was bailed out by the federal government. James McDougal was tried and acquitted on federal fraud charges related to management of a Madison real estate subsidiary.
Then, in June 1993, Vince Foster, acting as the Clintons’ lawyer, filed late tax returns for Whitewater; he killed himself in July and, after his death, some of the files related to Whitewater were removed from his office .
And in October 1993, the Resolution Trust Company, established to clean up after the savings and loan defaults across the country, recommended further criminal charges be brought in the Madison case and noted that Clinton, as governor, both oversaw Madison and might have benefited from some of its dealings.
Eventually, both McDougals, Hale and Clinton’s successor as governor, Jim Guy Tucker, were all convicted of various fraud charges related to Madison . Walter Hubbell, a partner in Hillary Clinton’s law firm and a Bill Clinton appointee, was additionally convicted of fraud committed against the firm . Hillary Clinton, who had done 60 hours of legal work for Madison, was not found to have broken any laws.
The second independent counsel, Kenneth Starr, eventually admitted that they did not have enough evidence to prosecute Bill Clinton for perjury in the case , let alone anything else.
The investigations cost in total nearly $80m .
Paula Jones, Monica Lewinsky and the impeachment

In May 1994, Paula Jones, a former Arkansas state employee, filed a sexual harassment suit against Bill Clinton in which she alleged that in 1991 he had her escorted to a hotel room, ran his hand up her leg, attempted to kiss her neck and finally sat on a sofa, exposed himself and invited her to “kiss it”. She further alleged that his denials amounted to defamation, and asked for $750,000 in damages.
Clinton’s lawyers argued that any trial should be postponed until after the president left office; in May 1997, the US supreme court disagreed.
In August, the judge in the case set a May 1998 trial date and dismissed the defamation charges. Jones’s original lawyers then withdrew from the case over her refusal to accept a settlement , and lawyers from the conservative Rutherford Institute took over her case in September 1997.
While the case was winding its way through the courts, Bill Clinton began a consensual sexual relationship with a then 22-year-old White House intern, Monica Lewinsky. Though the pair exchanged gifts, their access to one another was limited to time at the White House and their intimate relationship – this becomes relevant – was limited to oral and digital stimulation. Bill Clinton allegedly ended that part of their relationship in May 1997; Lewinsky had been telling a friend, Linda Tripp, about their relationship, not suspecting that Tripp was taping their conversations.
In October 1997, an anonymous source tipped off the Rutherford lawyers to the affair between Monica Lewinsky and Bill Clinton ; the lawyers subpoenaed Tripp on 24 November and listed Lewinsky as a potential trial witness on 5 December. Lewinsky signed an affidavit that she had never had a sexual relationship with Clinton and submitted it to Jones’s lawyers on 12 January 1998 – the same day Tripp took her infamously taped conversations with Lewinsky to independent counsel Starr.
Starr then requested and received permission to investigate Lewinsky and possible perjury in the Jones case on 16 January, after which they had Tripp lure Lewinsky to a meeting for the FBI to intercept her. They questioned her, and threatened her with criminal charges unless she agreed to cooperate with the investigation.
Clinton, then, denied having sexual relations – as strictly, but strangely, defined by Jones’s lawyers – with Lewinsky in a deposition on 17 January 1998, setting the stage for the perjury charge underlying his eventual impeachment.
By 21 January, every major news outlet was reporting on Starr’s investigation into the affair with Lewinsky; before the end of the month, the judge in the Jones case barred all evidence related to Lewinsky from the trial, ruling that it could disrupt the larger investigation.
In March 1993, Jones’s lawyers, in an effort to fight dismissal of the case, filed depositions from Kathleen Willey, several Arkansas state troopers, Gennifer Flowers and Dolly Kyle Browning, alleging that Clinton’s actions amounted to a pattern of behavior towards women relevant to the suit.
They later filed a 1992 letter in which Phillip Yaokum addressed a woman – now known to be Juanita Broaddrick – and asked her to come forward about being allegedly raped by Clinton in the late 1970s. (In 1999 Clinton’s attorney denied the allegations on his behalf.)
Still, on 1 April 1998, the judge threw out Jones’s case and, in late July, Jones appealed – just after Lewinsky submitted to her first extensive interview with Starr’s office and received immunity from prosecution.
On 17 August 1998, Clinton testified before the grand jury that his deposition in the Jones case had been accurate because of what he had thought the definition of “sexual relations” had been in the case, and that Lewinsky’s affidavit had been accurate because a sexual relationship includes intercourse and they had not had it. He did admit to “inappropriate intimate contact” that had ended “in early 1997”.
In the end, the only recommended charges in the Whitewater investigation were listed in Ken Starr’s September 1998 report and pertained exclusively to Clinton’s alleged dishonesty under oath about his conduct with Monica Lewinsky. Clinton ended up settling out of court with Jones to the tune of $850,000 on 13 November 1998.
On the first day of Clinton’s impeachment hearings – 17 November 1998 – Starr exonerated the Clintons in the Travelgate and Filegate scandals and admitted there wasn’t enough evidence to support charges in the Whitewater investigation.
Clinton was impeached on 11 December 1998 on the basis of the Starr report ; after a trial in the Senate, he was acquitted in February 1999.
Furnituregate
In one final scandal, the Clintons left office in 2001 with $190,000 worth of personal gifts , including furniture and mementoes. When the list was published, some donors said they had thought their gifts were intended for the White House as an institution, not the Clintons as individuals; the Clintons agreed to return $48,000 in furniture and reimburse the government for another $89,000 in items possibly intended for the government’s use.
The House committee on government reform, led by Republican congressman Dan Burton, issued a report in 2002 that elucidated the many faults with the record-keeping processes for gifts and recommended reforms – and two items the Clintons turned in were actually returned to them in the end.
- Hillary Clinton
- Bill Clinton
- US politics
Comments (…)
Most viewed.

White House Travel Office Investigation 1
Committee members heard testimony on the so-called “Travelgate” scandal in the first six months of President Bill Clinton ’s first term. The … read more
Committee members heard testimony on the so-called “Travelgate” scandal in the first six months of President Bill Clinton ’s first term. The entire staff of the White House Travel Office was dismissed in May 1995 for various episodes of ethical misconduct such as using White House helicopters for personal travel. In this portion, committee members heard testimony from persons who investigated these incidents. close
Javascript must be enabled in order to access C-SPAN videos.
- Text type Federal News Service Transcript Text People Graphical Timeline
- Filter by Speaker All Speakers Nancy Kingsbury John D. Podesta Margaret Richardson Michael Shaheen
- Search this text
*This text was compiled from uncorrected Closed Captioning.
People in this video
- Michael Shaheen Official Department of Justice
Hosting Organization
- House Government Reform and Oversight Committee House Government Reform and Oversight Committee
Airing Details
- Oct 24, 1995 | 9:14am EDT | C-SPAN 1
- Oct 25, 1995 | 1:04am EDT | C-SPAN 2
- Oct 28, 1995 | 11:00am EDT | C-SPAN 2
MyC-SPAN users can download four Congressional hearings and proceedings under four hours for free each month.
Related Video
White House Travel Office Investigation 2
Committee members heard testimony on the so-called “Travelgate” scandal in the first six months of President Clinton’s f…
White House Travel Office Markup
Members of the House Government Reform & Oversight Committee and Representative Bill Clinger, R-Pennsylvania, Committee …
White House Perspective on Nuclear Secrecy
Symposium on United States Nuclear Energy Policy During the Cold War and discussion on the consequences of nuclear testi…
House Finance Office Investigation
Paul Rodriguez spoke about the investigation into the House Finance Office in light of the accused improprieties of Repr…
Essential Tech Requirements Before Connecting with TravelgateX as a Seller
Welcome aboard to TravelgateX!
We're beyond excited that you've chosen to partner with us for expanding your hotel inventory. Starting out on a new venture can be challenging, but fear not! Our team is dedicated to walking alongside you throughout the onboarding process.
Whether you have technical questions or need some guidance, we've got you covered. Just head over to TGX Community , where you can connect with other developers, or get ready to dig into our Knowledge Base , packed with awesome articles and FAQs! And for a deeper dive, our comprehensive Documentation is at your fingertips.
- Hotel Pull Sellers API Documentation .
- Hotel Push Sellers API Documentation .
What do I need to have in place before joining TravelgateX?💡
TravelgateX is purely focused on connectivity so to be able to work with us via API and make the most of our Platform, you should ensure the following solutions are set up, whether in-house or outsourced:
- API: It will be necessary to integrate with our Hotel Pull Sellers API or Hotel Push Sellers API and interact with your Buyers.
- Booking engine: It will be necessary to manage the reservations of your Partners.
- Mapping (Hotel Pull Sellers Generic API): TravelgateX works with your native codes for transparency, allowing the mapping between Buyers and Sellers to be easily optimized without interference from TravelgateX. Our Buyers work with a variety of mapping providers and they can choose to load their mapping file to our system in order to receive their own codes in the response.
When a Seller returns the same hotel id for different properties , we concatenate those hotel ids with their destination code in order to make them unique. That will be the only exception where we modify the Seller information. In that case, the hotelCode will be the one returned through our API (concatenated if needed) and the hotelCodeSupplier will be the native code of the supplier.
- What do I need to have in place before joining TravelgateX?💡
- Build a System
- Automatic Gate Openers
- Accessories
- Legacy Gate Openers
- Merchandise
- Chicken Door Openers
- All Products
- DEALER NEAR YOU
- APPLICATION FOR BEING A DEALER
- PRO DEALER WEBSITE
- Choosing Solar
- Solar Tips & Chart
- Partymode® and Special Features
- SafeForce Technology
- Ghost Controls Benefits
- Main Support Page
- Solid Panel Gate
- Installation Video
- Storm Proofing Your Gate and Gate Opener
- Product Brochures
- Register Product
- Military and ID.ME Discount
- Show us your Gates
- Sales Promo Policy
- Corporate Video
- Vendor of the Year 2021
- Schedule a Call
- About Ghost Controls®
- GHOST Blogs
Setting Operator Arm Open Limits
Can i set both the extended and retracted points of the operator arm, no. only the extended arm limit can be set digitally using the jog buttons and the 1st set or 2nd set button on the system control board . the arm must fully retract into the housing in order to reset the counter that is inside of the operator arm. rotating the front of the operator arm in and/or out to fine tune your fully retracted position will cause an error., this means that the only way to set the retracted position of the operator arm (gate is open in a pull-to-open installation and gate is closed in push-to-open installation) is by adjusting either or both the geometry of the rear mount and/or the mounting position of the front bracket on the gate itself. , a quick checklist and troubleshooting process that you should try if you are having issues with your system is the following:.
- In a pull-to-open installation, close the gate using the remote so that the arm is fully extended to your set position.
- Pull the front CLEVIS PIN, SPACER, and HAIRPIN from the Front mount of the operator so it comes loose from the gate.
- Swing the arm away from the gate.
- Hold the front of the gate operator so that it does not spin, and use your remote transmitter button to trigger the operator to move to the fully retracted position.
- Swing your gate to the fully open position and reattach the CLEVIS PIN, SPACER, and HAIRPIN. This pin should drop right into place without any effort at all. If you cannot drop this CLEVIS PIN right back into the front mount on the gate, then you must mechanically adjust something on your installation. Most people start by adjusting the front mounting point on the gate itself.
- If you cannot adjust the front mount, the you can try adjusting the rear mount. Note that you typically must readjust the front mount after moving the rear and you still must maintain at least 4 inches of clearance between the rear of the housing and the fully open gate.
IMPORTANT NOTE-You CANNOT spin the front of the operator arm out or in to make your installation work because this is changing the fully retracted limit that you established in STEP #4 above.
- Skip to right header navigation
- Skip to main content
Parent, Child and Baby Travel Accessories
- Days out with the Kids
- Parental Advice
- Travelling with Kids

Best Travel Stair Gate 2023
When travelling with your children , you still want to make sure they are safe and that is why finding the best travel stair gate is so important. You don’t want your child falling down stairs or getting into rooms that might be dangerous such as the kitchen or bathroom when you are away on holiday or visiting family. The best travel stair is definitely out there for 2023.
Travel stair gates come in two different types: either safety barriers that can be configured however you need them to block doorways or make into playpens, or push fit safety gates that can be fitted across a doorway or stair way. Both versions can easily be used in your own house and so make a good investment. Read on to find out our suggestions and find gates that are available in the UK.
If you want to look at all types of stair gates then head over to our child safety gate guide .
Safety Barrier Stair Gates/ Room Dividers
A safety barrier travel stair gate is a useful option if you have an awkward room layout, open plan rooms, or a fireplace that you want to make safe. They are made up of a number of barriers that can be placed in different configurations depending on what your needs are. They can also be used as a travel playpen so you can keep your baby or toddler safe while you go to the bathroom or make some food.
Safetots Wooden Multi Panel Safety Barrier
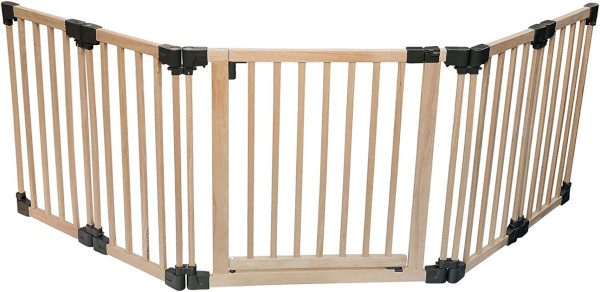
This safety barrier from Safetots is a great multi-use option that you can take with you as a travel stair gate. The barrier consists of 5 panels, one of which is a gate making it even more flexible. The barrier can be used as a room divided, gate for doors or stairs and a fireguard depending on what you need.
The travel barrier is made from premium wood so will last well and offer good resale value. Each of the panels can be angled discreetly so will be able to fit most room layouts- a must for travelling. The door section is wide for easy access and has a two-step opening mechanism for extra safety.

Some reviews from Amazon:
“Overall I am really happy with the feel and look of this and I hope to get some years use from it.”
bimiti Metal Foldable Safety Barrier

Pressure Fit Travel Stair Gates
Pressure fit stair gates are a good option to take with you when going on holiday. They are less versatile than the barrier safety gates but are smaller being only a gate so are easier to take with you. Because of their method of attachment which doesn’t require tools, they are easy to move from your home to a different house. The pressure fit element gives some flexibility so should fit a variety of different door sizes.
Below are some of the best ones available in 2023 that are also easy to take with you as a travel stair gate.
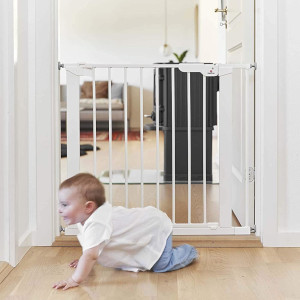
Lindam by Munchkin Sure Shut Pressure Fit Safety Gate
The Lindam Sure Shut Axis Pressure Fit Safety Gate is a really affordable option for a travel stair gate. The pressure fit mechanism on the stair gate makes it an ideal choice for travelling and can be used at home as well.

These safety gates make use of pressure and wall pads to fit snugly in doorways or narrow hallways, with no need to screw into the wall or doorframe, they can be taken with you when stopping at relatives or going on holiday. Each gate comes with full instructions to help you reposition the gate when needed and you can find a how to video (linked below) to make the task even more straightforward.
Since this type of stair gate has a supportive U-shaped frame for stability, you should never install it at the top of a stairway as the bottom bar might pose a trip hazard . The quick, one-handed release makes it suitable for busy areas as it only takes a quick press on the release button to open the gate. You can also set the gate to either swing both ways or to only open one way- useful for the bottom on the stairs.

The child safety gate is made of strong steel and fits standard gate fits openings of 76-82 cm with the option of extending it to 117 cm with the optional extensions that come in various sizes so should be perfect for all manor of doorways and openings.
BabyDan Pressure Fit Stair Gate- wide fitting
If you know you need a wider fitting safety gate to take with you on your travels, this one from BabyDan is a really good option. The travel gate is wider than standard models and can be adjusted from 79.5 to 93.3 cm to fit into wider doorways or hallways.
Like all pressure fit stair gates, it can be fitted straight from the box with no need for any extra tools or fittings to complete the job. Just remove it easily from wherever you have it in your house and pack it into the car. The baby gate has easy one handed opening and can be fixed to open one way or two way depending on your needs.
This video from the Danish makers BabyDan shows the testing that their products undertake before being sold to parents.
Here’s some reviews from Amazon customers to help you decide:
“Easy to install , solid materials and easy to use , worth to buy”
“Once fitted, to stop our baby grandson entering, the kitchen it felt very secure. It has been in place about 4 months and works well. “
“Does not budge. Gave us peace of mind knowing our little one cannot get up or down the stairs.”
Stair railing safety net for toddlers

So this product obviously isn’t a safety gate, but it is something that will come in really useful when you’re staying in a different house. It’s also really portable so a good purchase for those ‘just in case’ occasions. Basically the net can be used to make gaps between railings safe for your baby or toddler.
In some houses (particularly older ones built before more stringent building control), the gaps between stair rods will be wide enough for a baby or toddler to fall through. This could lead to an awful accident if your child happens to slip through when not closely attended. A good solution is to buy this mesh net which can be fixed using ties to the banisters. The mesh is strong enough to stop your child from falling through the gaps.
Customers on Amazon have said:
” This product is easy to fit and covers the landing banister struts easily. It is a bit long but double it up and it still works. “
” Pretty sturdy for a net, exactly what we needed to keep our little one from falling through the banisters. It comes with strings and cable ties and is a good size “
Why do you need a travel stair gate?
Even if you don’t use safety gates when you’re at home, there are still lots of good reasons to invest in a travel stair gate, especially if you’re away from home with your mobile baby or toddler quite often.
Even going to visit friends or family could pose problems if you’re not able to stop access to certain rooms such as the bathroom or kitchen. If you’re child is still in a cot at home but will be sleeping in a bed when you travel then you need to consider getting a travel stair gate so they can’t go wandering out of their room overnight.
If you’re staying in a holiday cottage or villa, you can’t be sure of knowing what the layout is or how safe rooms will be. To give you peace of mind, a travel stair gate will fit easily into a suitcase and should block off access to most dangers.
As the safety gate can be easily moved, you can have it blocking the kitchen during the day and then switch it to their room for overnight.
Best Travel Stair Gate Round-Up
Even when travelling you have no excuse not to have a baby gate with you. Pick the best travel stair gate for your needs- whether you want a barrier so you can use it as a playpen or fireguard as well as a stair gate or if you need a pressure fit safety gate to fit stairs or doorways.
Packing a stair safety net is also a good option- really light and small to fit in your luggage but gives you a number of options in keeping your baby or toddler safe if banisters or balcony spindles are wider spaced than you would be comfortable with.

Reader Interactions

16th May 2024 at 4:06 am
Leave a Reply
Your email address will not be published. Required fields are marked *
This site uses Akismet to reduce spam. Learn how your comment data is processed .
Woman » Man » Kids »
MID SALE
up to -70%
Your basket is empty
Recently searched
- last ? 'last-row'"> (217)
Výber krajiny doručenia a jazyka:
- Accessories

Product code: 224-1767/20
Material: 90% polyester, 10% plastic
Measurements:
Height: 34 cm, Width: 27 cm
Discover more:
You might also like it, cosmetic bag, sleeping mask, suitcase travel tag, cosmetic kit for skincare, cosmetic kit, travel pillow.
9,98 € 5,98 €
100% of customers recommend this product
Average rating based on 1 review
To ensure the quality of reviews, only logged-in customers who have purchased the product can rate products.
Size evaluation
How well did the product fit the customers?
It was smaller
It was bigger
szuper strapabíró anyagnak tűnik. még nem használtam őket
I recommend the product
Subscribe to our newsletter
Real ID deadline is rapidly approaching, what to know about the new flight requirement

The really real deadline to make your state-issued identified card, or driver’s license Real ID compliant will be here before you know it.
And you won’t be fly domestically after 2025 without it. The government has been trying to make Real IDs a thing for a while, initially passing The Real ID act in 2005 in an attempt to set “minimum security standards” for state-issued identification documents.
The law was set to take effect in 2020 but was pushed back by the Department of Homeland Security over “backlogged transactions” at MVD offices nationwide as a result of the COVID-19 pandemic, according to USA TODAY reporting .
The May 2025 extension was necessary, DHS says, as state driver’s licensing agencies worked to address the mountains of paperwork, which in turn impacted the MVD’s ability to make any real progress on the Real ID rollout.
“Following the enforcement deadline, federal agencies, including the Transportation Security Administration, will be prohibited from accepting driver’s licenses and identification cards that do not meet these federal standards,” DHS said in 2022.
Learn more: Best travel insurance
That means every every traveler, 18 or older, must have a compliant form of identification in order to travel.
Here’s what to know.
When does Real ID go into effect?
The Real ID “full enforcement date” is Wednesday, May 7, 2025, according to DHS.
When will a Real ID be required to fly?
You or your loved ones need to have a Real ID compliant document, driver’s license or identification card, by May 7, 2025.
If you have another form of identification that is TSA-approved, like an up to date passport or a permanent resident card then you probably don’t need a Real ID compliant document.
Here are a couple TSA-approved alternatives, if you’re on the fence about getting a Real ID.
- State issued enhanced driver’s license
- DHS trusted traveler cards (Global Entry, NEXUS, SENTRI, FAST)
- U.S. Department of Defense ID, including IDs issued to dependents
- Border crossing card
- An acceptable photo ID issued by a federally recognized Tribal Nation/Indian Tribe
- HSPD-12 PIV card
- Foreign government-issued passport
- Canadian provincial driver's license or Indian and Northern Affairs Canada card
- Transportation worker identification credential
- U.S. Citizenship and Immigration Services Employment Authorization Card (I-766)
- U.S. Merchant Mariner Credential
- Veteran Health Identification Card (VHIC)
How long does it take to get a Real ID?
It will take about two weeks , or 15 business days to get your Real ID or Enhanced Driver’s License from your state's Motor Vehicle Department.
Enhanced driver’s licenses, which are only issued in a couple of states, including Washington, Michigan, Minnesota, New York and Vermont, are considered acceptable alternatives to REAL ID-compliant cards, DHS says.
How do I know if I have a Real ID?
All Real IDs will have a stamp on the right hand corner to show that the identification document meets federal standards set forth by The Real ID Act of 2005.
The symbol stamped on your Real ID card will vary, depending on which state you obtain your new identification card from.
What does a Real ID look like?
Your Real ID will have most, if not all of the information that’s included on your driver’s license.
The only difference is the seal included in the right-hand corner.
About eSIM on iPad
Learn what an eSIM is, which iPad models support eSIM, and how to set up an eSIM on your iPad.
What is eSIM
An eSIM is an industry-standard digital SIM that allows you to activate a cellular plan from your carrier without having to use a physical SIM. You can set up a cellular data plan on some iPad models using an eSIM. An eSIM is a convenient and secure way to connect to cellular data on your iPad when you're away from Wi-Fi.
On your iPad, you can store eight or more eSIMs, which can be used as needed. When traveling internationally, you can roam with your existing carrier or purchase an eSIM from a local carrier that supports eSIM in the country or region you are visiting .
Learn more about cellular data on iPad
What you need
An iPad that supports eSIM:
iPad Pro 13-inch (M4) Wi-Fi + Cellular *
iPad Pro 12.9-inch (3rd through 6th generation) Wi-Fi + Cellular
iPad Pro 11-inch (M4) Wi-Fi + Cellular*
iPad Pro 11-inch (1st through 4th generation) Wi-Fi + Cellular
iPad Air 13-inch (M2) Wi-Fi + Cellular *
iPad Air 11-inch (M2) Wi-Fi + Cellular *
iPad Air (3rd through 5th generation) Wi-Fi + Cellular
iPad mini (5th and 6th generation) Wi-Fi + Cellular
iPad (7th through 10th generation) Wi-Fi + Cellular
A wireless carrier or worldwide service provider that supports eSIM
Activating a cellular data plan with eSIM in China mainland is only available with iPad models that support eSIM in China mainland . Contact China Unicom for more details .
Find out which iPad model you have
* iPad Pro (M4) Wi-Fi + Cellular and iPad Air (M2) Wi-Fi + Cellular models are activated with an eSIM and do not have a physical SIM card.
Use an eSIM
There are multiple ways to activate cellular data on iPad using eSIM. To set up a cellular data plan using an eSIM on your iPad, use eSIM Carrier Activation, transfer your plan from another iPad, join an existing iPhone cellular plan, find a new plan, use a QR code, or use your carrier's iPad app.
Use eSIM Carrier Activation
If your provider supports eSIM Carrier Activation, they can assign a new eSIM to your iPad. If an eSIM was assigned to your iPad when you bought it, turn on your iPad and follow the onscreen instructions. Your eSIM will be installed through setup.
If you contacted your carrier for an eSIM after you set up your iPad, and they set up eSIM Carrier Activation:
When a Carrier Cellular Plan Ready to Be Installed notification appears, tap it.
In the Settings app, tap Carrier Cellular Plan Ready to Be Installed.
Tap Continue.
If the plan you activated replaces the plan on your physical SIM card, remove your SIM card, then restart your iPad.
Transfer your plan from another iPad
Some carriers support eSIM Quick Transfer, which transfers your SIM from your previous iPad to your new iPad without needing to contact your carrier. If you're asked to transfer your cellular plan during setup, follow the onscreen instructions.
You can also transfer your eSIM from another iPad after setup:
Make sure your iPad is using the latest version of iPadOS .
Go to Settings > Cellular Data > Transfer iPad Plan.
If you see a Transfer button next to the line you want, tap it.
Follow the onscreen instructions to transfer service. You might need to wait a few minutes for activation to complete.
If you don't see a Transfer button, or if you can't transfer a plan, you might need to contact your carrier. 1
Join an existing iPhone plan
If supported by your carrier, you can set up a cellular data plan by adding your iPad to an existing iPhone cellular plan.
Go to Settings > Cellular Data > Join iPhone Plan, then follow the onscreen instructions.
If you can't select Join iPhone Plan, make sure that you enabled Wi-Fi on the iPad, and that you're signed in with the same Apple ID on both your iPhone and iPad.
Find and setup a new plan
Some carriers support purchasing and setting up a cellular data plan directly on your iPad. To see a list of local carriers available, make sure location services are on. Go to Settings > Privacy & Security > Location Services and turn on Location Services.
Go to Settings > Cellular Data > Find a New Plan.
Select a carrier from the list of local carriers.
Follow the onscreen instructions to set up and activate your new cellular data plan on your iPad.
Use a QR code
You can use a QR code from your carrier to activate an eSIM on your iPad.
Activate an eSIM using a QR code while setting up your iPad for the first time:
When you get to the Set Up Cellular screen, tap Use QR code.
Follow the onscreen instructions.
Activate an eSIM using a QR code after setting up your iPad:
Contact your carrier to get a QR code.
Open the Camera app and scan your QR code. When the Cellular Plan Detected notification appears, tap it.
If you're using an iPad with iPadOS 17.4 or later, and you get a QR from your carrier in an email or from the carrier's webpage, touch and hold the QR code, then tap Add eSIM.
Tap Add Cellular Plan.
Your carrier may require the use of a confirmation code for additional authentication. Enter the confirmation code provided by the carrier when prompted.
Other eSIM activation methods
Some carriers may support other eSIM activation methods to help you to set up a cellular data plan on your iPad.
If your carrier sends you a link to download and activate your eSIM:
On your iPad with iPadOS 17.4 or later, tap the link.
When the Activate New eSIM notification appears, tap Allow.
Use a carrier app
If your carrier supports activating eSIM using an app, download your carrier's app from the App Store and follow the onscreen instructions.
Use eSIM while traveling internationally with your iPad
Learn about the options and benefits of using eSIM while traveling abroad.
Your existing carrier might include international roaming on select data plans without additional fees. Alternatively, your carrier might offer affordable travel passes or plans that you can purchase ahead of time to use at your destination. International roaming with an eSIM works the same as roaming with a physical SIM.
Many carriers offer data plan options that you can purchase directly on your iPad while traveling . To do this, go to Settings > Cellular Data > Find a New Plan to see available plans in your location. Carriers offer plans that differ by the amount of data and duration. You can also purchase a plan before you travel.
Carriers also offer prepaid data plan options that you can purchase from the carriers' websites or apps before you arrive, or in person after arrival, through a carrier kiosk at the airport, carrier store, or other location. Depending on local regulations, you might be asked to show identification (like your passport) to purchase. Check with individual carriers for details.
In addition to purchasing a prepaid eSIM plan, you might wish to get a postpaid account if you plan to be in another place for an extended time. Carriers around the world that support eSIM offer postpaid plans. Depending on the country or region, you might need proof of local residency, an established local bank account, or credit card.
Find wireless carriers and worldwide service providers that offer eSIM service on iPad .
1 Your iPad is subject to your wireless service provider’s policies, which may include restrictions on transferring a data plan. Contact your carrier for more details. If you aren't sure which carrier to call, go to Settings > Carrier on your iPad.
Explore Apple Support Community
Find what’s been asked and answered by Apple customers.
Contact Apple Support
Need more help? Save time by starting your support request online and we'll connect you to an expert.
More convenience, delivered.

How In-Gate Delivery works

Buy the hardware you need to get started.
Ring access controller pro 2.

Frequently asked questions
- Amazon Newsletter
- About Amazon
- Accessibility
- Sustainability
- Press Center
- Investor Relations
- Amazon Devices
- Amazon Science
- Sell on Amazon
- Sell apps on Amazon
- Supply to Amazon
- Protect & Build Your Brand
- Become an Affiliate
- Become a Delivery Driver
- Start a Package Delivery Business
- Advertise Your Products
- Self-Publish with Us
- Become an Amazon Hub Partner
- › See More Ways to Make Money
- Amazon Visa
- Amazon Store Card
- Amazon Secured Card
- Amazon Business Card
- Shop with Points
- Credit Card Marketplace
- Reload Your Balance
- Amazon Currency Converter
- Your Account
- Your Orders
- Shipping Rates & Policies
- Amazon Prime
- Returns & Replacements
- Manage Your Content and Devices
- Recalls and Product Safety Alerts
- Conditions of Use
- Privacy Notice
- Consumer Health Data Privacy Disclosure
- Your Ads Privacy Choices

East Passyunk Avenue Unveils 'Rainbow Gate' Art Installation by Artist David Guinn
PHILADELPHIA, PA — East Passyunk Avenue Business Improvement District is set to illuminate South Philadelphia’s renowned food street and shopping district with a captivating new public art project. The eagerly anticipated grand opening reception for the mesmerizing Rainbow Gate at Mifflin Triangle (1845 EPA) is scheduled for Wednesday, May 22nd from 6:00 pm to 8:00 pm, followed by an exciting after-party. Attendees can look forward to meeting the talented artist behind the installation, David Guinn, while enjoying light refreshments from P’unk Burger and FUEL, accompanied by live entertainment from Fred S. Acoustic. This special event is open to the public with no admission fee, but RSVP is required for planning purposes.
The Rainbow Gate, a multi-media creation by artist David Guinn, serves as a symbolic representation of the journey leading to the present moment. Delving into themes of contemplation and transformation, the installation invites viewers to ponder the mysteries lying beyond the vibrant colors of the gate.
Expressing his profound connection to the project, Guinn shared, “This painting is my statement about the journey of life, especially mid-life, for me, and for the world. With courage, positive transformation is possible.” Embracing the challenges and excitements of the creative process, Guinn’s meticulous craftsmanship and innovative use of LED lights breathe life into the artwork.
Elaine Johnson, EPABID Board Secretary and Owner of Frame Fatale, expressed gratitude for hosting this iconic piece in the community, highlighting Guinn’s international acclaim as a mural artist and East Passyunk Avenue member.
Mark your calendars for an unforgettable evening of art and celebration as East Passyunk Avenue welcomes the Rainbow Gate and artist David Guinn. Experience the magic of the installation, indulge in lite bites, and revel in the artistic ambiance, promising an evening filled with creativity and inspiration.

- Search Please fill out this field.
- Manage Your Subscription
- Give a Gift Subscription
- Newsletters
- Sweepstakes
If you click on links we provide, we may receive compensation.
- Travel Products
The First Thing I'm Packing for My Trip to Italy Is This Comfy Linen Set, Starting at $18
I can get three different outfits out of it.
:max_bytes(150000):strip_icc():format(webp)/IMG_5794-2f7cad937c974869ba7b4a61993c65d0.jpg "set travel gate")
Travel + Leisure / Reese Herrington
I’m sure everyone in my life is sick of me talking about my upcoming Italy trip, but I’m honestly so stoked I truly don’t care. I’ve already started planning my travel wardrobe little by little, and I’m pretty proud of my finds.
While shopping practically everywhere and saving inspo on Pinterest, I’ve kept a watchful eye on Target . The retailer’s huge selection of summer styles never disappoints, and this year, there are so many breezy linen pieces that are perfect for travel. My latest addition for my Italian getaway is a two-piece linen set, which includes a matching tiny tank top and bow-front maxi skirt from Wild Fable.
Wild Fable Linen Tiny Tank Top
At this point, a sizable amount of my wardrobe is neutral-toned, but I decided to branch out and add a bit of color to my outfits for this upcoming vacation. Something about the limoncello-inspired yellow spoke to me, and I immediately bought it at Target.
Since I already own my fair share of dresses, I wanted to add a set or two like this one so I could repurpose each piece and wear them together and separately if I needed additional outfits; it’s basically three looks in one. The breathable linen is perfect for hot weather and is lightweight enough to allow airflow without being see-through. Although the top ’s tie-up back is an aesthetic detail, it also helps me get the perfect fit around my bust.
Wild Fable Linen Bow-Front Maxi Skirt
I gravitate toward maxi-length skirts because I can layer bike shorts underneath to prevent chafing. I’m good to go with this one since it’s flowy and opaque, which prevents my undergarments from showing through. It sits at my natural waistline, and the delicate bow detail in the center is a sweet touch. The skirt runs slightly large, so I bought a size down.
One shopper said the tank top was “so cute and flattering” and looked like one of their favorite high-end brands “without the price tag.” In a similar sentiment as the top, another reviewer said the skirt offered a “flattering fit” and mentioned that it’s a great option if you’re tall.
Grab the tiny tank top and matching maxi skirt from Wild Fable, and keep scrolling for more linen resort-ready styles available at Target .
A New Day Short-Sleeve Linen Midi Shirtdress
A new day linen mini shift dress, universal thread linen midi sundress, shop more t+l-approved picks.
:max_bytes(150000):strip_icc():format(webp)/samsonite-tumi-travelpro-and-more-popular-luggage-brands-tout-6a1816cd65ed42ea916f93a58a3f1e5b.jpg "set travel gate")
Related Articles
Travel to Mordor With the New LEGO® Icons The Lord of the Rings: Barad-Dûr set

Today, the LEGO Group, in partnership with Warner Bros. Discovery Global Consumer Products, reveals the LEGO® Icons The Lord of the Rings: Barad-Dûr set, inspired by the award-winning film adaptations. Now in brick form, the epic dark tower and Eye of Sauron build has many hidden fan “treasures” and film references from The Lord of the Rings.
Prepare to journey deep into the heart of Middle-earth with the unveiling of the spectacular LEGO Icons The Lord of the Rings: Barad-Dûr set! With its imposing 5,471 pieces, this awe-inspiring masterpiece brings to life the dark tower of Mordor in stunning detail, packed with thrilling features and beloved characters from the timeless trilogy. The journey through the dark tower continues with the throne room – which includes a compartment that opens to reveal a map, and a ladder on the top floor of the tower that can be moved left and right.
At the summit lies the Eye of Sauron that rotates in various directions and features a light brick to make the eye glow. There are also 10 minifigures, including Sauron™, Mouth of Sauron™, Orc™, Frodo, Sam, Gollum™ and Gothmog.
In addition, purchases made between 1-7 June will receive a free LEGO® Icons The Lord of the Rings™: Fell Beast™ set, which features posable wings and joints and a Nazgul minifigure.
The build is split into four main sections, with the tower section being fully modular. LEGO fans with more than one copy of the set will be able to stack this section to build a taller tower.
The LEGO® Icons The Lord of the Rings: Barad-Dûr set are available for LEGO Insiders from 1st June 2024 at www.LEGO.com/LOTR and LEGO Stores for all from 4th June priced at €459.99 / £399.99/ $459.99. When purchasing the set between 1-7th June, fans will also get a free LEGO The Lord of the Rings Fell Beast set.
Notes to Editors
Product Information: Age: 18+ RRP: 459.99€ / 459.99$ / 399.99£ Pieces: 5471 pieces Product No.: 10333 Dimensions: Measures over 32 in. (83 cm) high, 11 in. (30 cm) wide and 17 in. (45 cm) long Available: LEGO Insiders: 1st June 2024 All: 4th June 2024 Link: www.LEGO.com/LOTR
About the LEGO Group The LEGO Group’s mission is to inspire and develop the builders of tomorrow through the power of play. The LEGO System in Play, with its foundation in LEGO bricks, allows children and fans to build and rebuild anything they can imagine.
The LEGO Group was founded in Billund, Denmark in 1932 by Ole Kirk Kristiansen, its name derived from the two Danish words LEg GOdt, which mean “Play Well”. Today, the LEGO Group remains a family-owned company headquartered in Billund. However, its products are now sold in more than 120 countries worldwide.
For more news from the LEGO Group, information about our financial performance and responsibility engagement, please visit www.LEGO.com/aboutus.
ABOUT WARNER BROS. DISCOVERY GLOBAL CONSUMER PRODUCTS Warner Bros. Discovery Global Consumer Products (WBDGCP), part of Warner Bros. Discovery Global Brands, Franchises, and Experiences, extends the company’s powerful portfolio of entertainment brands and franchises into the lives of fans around the world. WBDGCP partners with best-in-class licensees globally on award-winning toy, fashion, home décor and publishing programs inspired by the biggest franchises from Warner Bros.’ film, television, animation, and games studios, HBO, Discovery, DC, Cartoon Network, HGTV, Eurosport, Adult Swim, and more. With innovative global licensing and merchandising programs, retail initiatives, and promotional partnerships, WBDGCP is one of the leading licensing and retail merchandising organizations in the world.
IMAGES
COMMENTS
What is the Travel Medallion For? Setting up Fast Travel Gates. The Travel Medallion allows you to set up a travel gate at your current location. This is useful to quickly travel to your favorite place or a location you constantly return to. You can access the Travel Medallion through your inventory under the Key Items tab.
The White House travel office controversy, sometimes referred to as Travelgate, was the first major ethics controversy of the Clinton administration.It began in May 1993, when seven employees of the White House Travel Office were fired. This action was unusual because executive-branch employees typically remain in their posts for many years (even though they can be terminated by, and serve at ...
You'll need to blow up the rocks to get in. The entrance to the cave is at coordinates (3741, -2085, 0208). We used a bomb flower to get it — stand back! Head into the cave and glide down the ...
To use the Travel Medallion, access it from the Key Items menu and place one at your current location. When you talk to Robbie at the Hateno Ancient Tech Lab, ask him about the Travel Medallion ...
Just open your inventory and mark the location to place a fast travel gate there. It's a little limited to start, but subsequent quests reward upgrades by unlocking new map areas. Robbie offers you a second gate slot for finding ten map-data locations, and a third for finding 15 map-data locations. This allows you to place and manipulate three ...
Gate 1 Travel offers a variety of travel styles to accommodate all types of travelers. Many of our destinations include escorted tours, small group tours, river cruises, walking tours and independent travel packages to explore on your own. Choose from any of our travel styles and experience the best of a destination in a way that is suited for you.
In 1996, while investigating Travelgate, congressional investigators discovered that, starting in 1993, the White House had improperly obtained access to hundreds of FBI files on former White ...
Image: Nintendo Life. The enormous world map in Zelda: Tears of the Kingdom comes packed with plenty of pre-set fast travel points for you to make use of during your adventures, with both Skyview ...
There is a way to fast travel through Hollow Knight other than using a stag station. In this video I will show you how to acquire the Dream gate as well as h...
Committee members heard testimony on the so-called "Travelgate" scandal in the first six months of President Bill Clinton's first term. The entire staff of the White House Travel Office was ...
Headquartered in Greater Philadelphia, Pennsylvania, Gate 1 Travel also operates a network of international offices to handle on-the-ground logistics and around the clock support. With more than 40 years of service, Gate 1 Travel works continuously to improve their escorted tours based on customer feedback, while providing adventure seekers the ...
A demonstration of setting open and close limits. Learn how to adjust bi-parting gates limits independently.
The Legend of Zelda; Tears Of The Kingdom. Is there a particularly useful place to set a fast travel gate? I'm content enough fast travelling to shrines and towers to get much use out of fast travel gates, however since we're limited, I'm looking for some tips on useful locations to put them. This could be a farming spot to return to ...
TravelgateX is purely focused on connectivity so to be able to work with us via API and make the most of our Platform, you should ensure the following solutions are set up, whether in-house or outsourced: API: It will be necessary to integrate with our Hotel Pull Sellers API or Hotel Push Sellers API and interact with your Buyers. Booking ...
In a pull-to-open installation, close the gate using the remote so that the arm is fully extended to your set position. Pull the front CLEVIS PIN, SPACER, and HAIRPIN from the Front mount of the operator so it comes loose from the gate. Swing the arm away from the gate. Hold the front of the gate operator so that it does not spin, and use your ...
The bimiti foldable safety barrier is a portable black metal barrier made up of 5 panels one of which is a gate. It can be used as a room divider, stair gate and fireguard keeping your baby or toddler safe from household dangers. Due to the 5 different panels you can easily configure the barrier to fit awkward spaces and thus deal with whatever ...
This Travel Pet Gate is Easy to set up and without any installation required. These Dog Gates are also perfect for Cats and Small Animals with a zippered entrance for walking right through ; Simply twist the 2 outer ends to expand the width of the gate to fit on door openings 26.4 - 36.4 inches, fits all standard door size openings and most ...
Shop travel set Free shipping on orders over 35€ Fast delivery and easy returns within 30 days
Login | Gate 1 Travel - More of the World For Less! Loading... My Account. New Res. 1-215-572-7676. Sign up! Sign up for our Weekly Specials! Sign up for our Weekly Specials! Gate 1 Travel has provided quality, affordable escorted tours, river cruises and vacation packages for 40 years.
Quickly learn how to set handing, program limits, and adjust force settings on a LiftMaster SL3000, slide gate operator.
Here are a couple TSA-approved alternatives, if you're on the fence about getting a Real ID. State issued enhanced driver's license DHS trusted traveler cards (Global Entry, NEXUS, SENTRI, FAST)
Follow the onscreen instructions to set up and activate your new cellular data plan on your iPad. Use a QR code. You can use a QR code from your carrier to activate an eSIM on your iPad. Activate an eSIM using a QR code while setting up your iPad for the first time: When you get to the Set Up Cellular screen, tap Use QR code.
Amazon Key In-Gate Delivery allows your packages to be conveniently and securely delivered inside your gate. When a package arrives at your home, delivery drivers are given one-time, secure access via the Ring Access Controller Pro 2 to pass through your gate and bring the package to the front door of your home or apartment.
The eagerly anticipated grand opening reception for the mesmerizing Rainbow Gate at Mifflin Triangle (1845 EPA) is scheduled for Wednesday, May 22nd from 6:00 pm to 8:00 pm, followed by an ...
The Wild Fable Linen Tiny Tank Top and matching Linen Bow-Front Maxi Skirt at Target topped one shopping writer's travel wardrobe for her trip to Italy. The $18 top and $25 skirt can be worn ...
Lake Tahoe is expected to fill this spring for the first time in nearly five years, thanks to the lingering effects of two particularly wet winters. The last time the lake filled up was in June ...
Travel to Mordor With the New LEGO® Icons The Lord of the Rings: Barad-Dûr set Download all assets - 860 MB Today, the LEGO Group, in partnership with Warner Bros. Discovery Global Consumer Products, reveals the LEGO® Icons The Lord of the Rings: Barad-Dûr set, inspired by the award-winning film adaptations.
We would like to show you a description here but the site won't allow us.
The zoo's giant panda bear agreement with China expires in late 2024, and plans are underway for Lun Lun, Yang Yang, Ya Lun and Xi Lun to travel to China later in the year, though further ...
The 9150 Slide Gate Operator delivers the convenience of self-setting limits with the safe operation you expect from a DKS Operator. This operator can be use...