- Press Releases
- Industry News
- Product Spotlight
- Fresh from Apple
- Video Production
- Installation Videos
- Explainer Videos
- Testing Lab
- Networking & Security
- Special OWC Deals
- The Other World
- Powered by OWC
- Space & Beyond
- Random Thoughts & Topics
- OWC Unplugged
- Article Archives
- Make a Suggestion

Send us a Topic or Tip
Have a suggestion for the blog? Perhaps a topic you'd like us to write about? If so, we'd love to hear from you! Fancy yourself a writer and have a tech tip, handy computer trick, or "how to" to share? Let us know what you'd like to contribute!
How to Take a Screenshot of an Entire Webpage in Safari on a Mac

Taking screenshots of a webpage is a normal operation for many. Perhaps it’s to capture an image for a meme, graphs for a presentation, or to send that annoying error message to a disbelieving customer service rep. Whatever the reason, some of the standard Mac screenshot options may not do the trick.
Most of us are familiar with Shift-Command-3 to capture the entire screen, or Shift-Command-4 to capture a selected portion of a screen. You may even be familiar with Shift-Command-5 to capture a single window. But what if you want to take a scrolling screen capture of an entire webpage? The aforementioned tools can’t do that – they can only capture visible areas of your screen. So, is it even possible to take a screenshot that includes a portion of a webpage you would normally need to scroll to see?
Yes, there is! But it does take a few extra steps than just executing a single keystroke combination.
Screenshot a Webpage
- Open Safari and go to “ Safari > Preferences… “
- Click the Advanced tab and toggle on “ Show Develop menu in menu bar .”

- Navigate to the webpage you want to capture and from the Develop menu, choose “ Show Web Inspector .” Alternatively, you can hit alt-command-I (⌥⌘I).

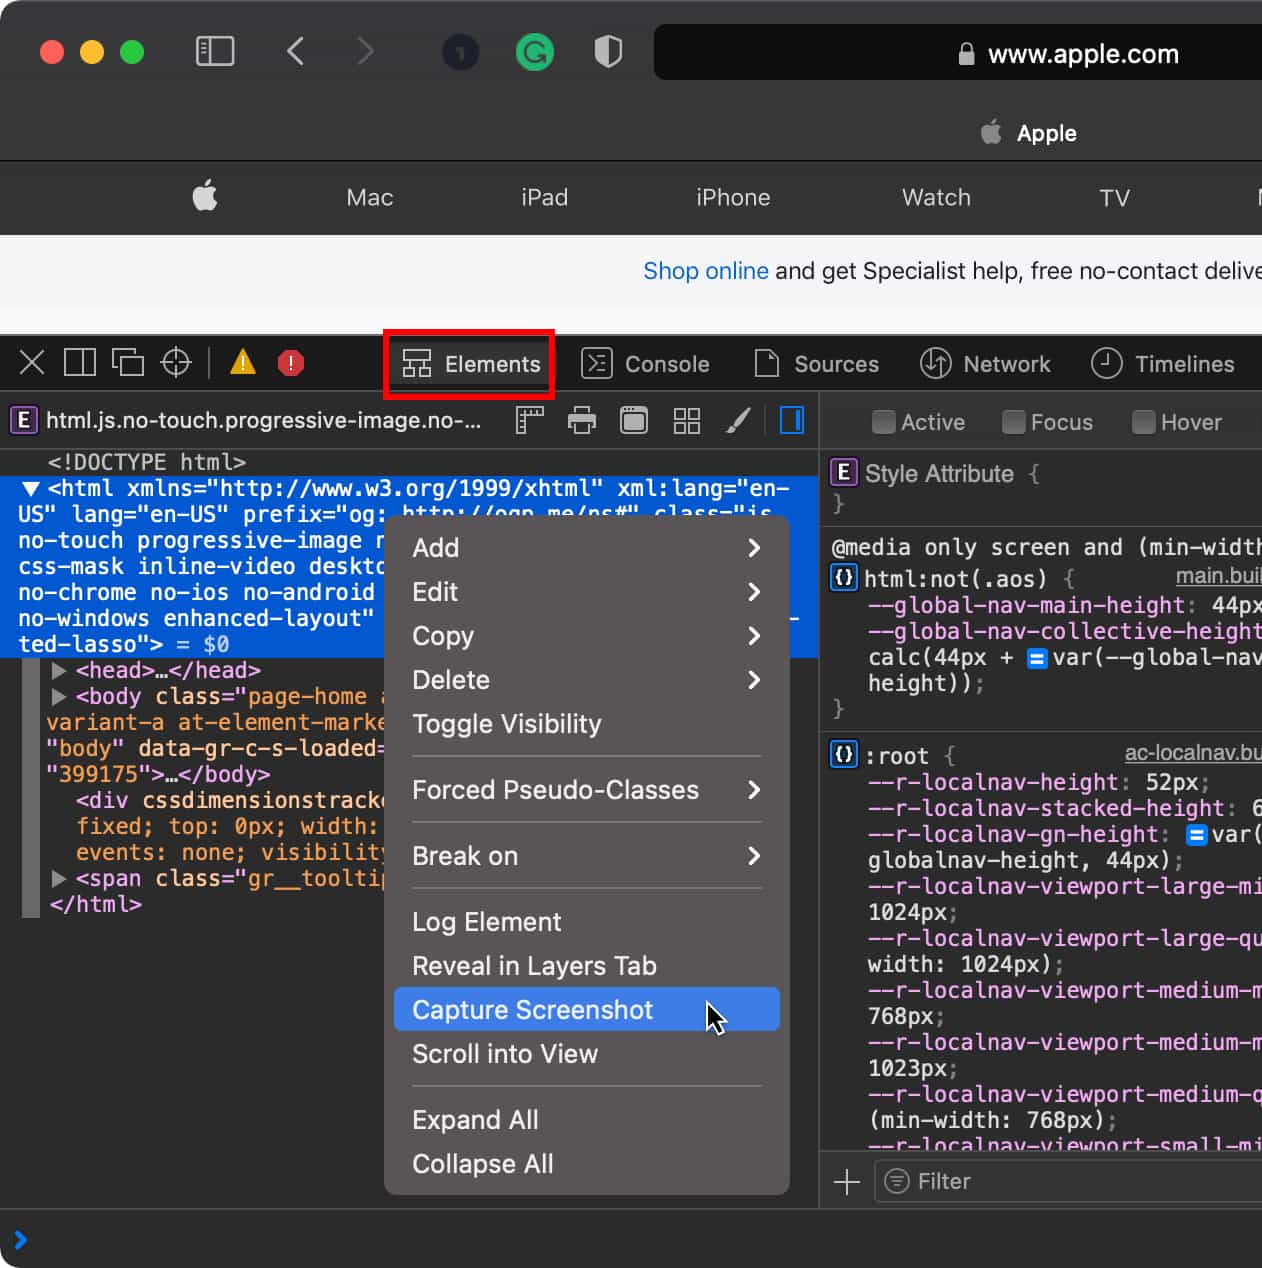
- Select the Elements tab and right-click on the line that begins with “<html…”
- Choose Capture Screenshot
- Give it a moment to do it’s magic, and then select a name and location to save the file.

All done! Well, almost…
This could just be an issue I run into, but when capturing entire pages in this manner, there is a lot of empty container buffer around the image in the PNG file. You can see this in the Quick Preview of the file:

Let’s fix that.
- Open the file in Preview . If Preview is already your default application to open PNG files, you can simply double-click its icon.

- Drag the crosshairs in the empty area around the image. You’ll see the empty space selected and highlighted in red. Drag too far, and you’ll pick up the image itself. Don’t do that, we only want to select the empty area.
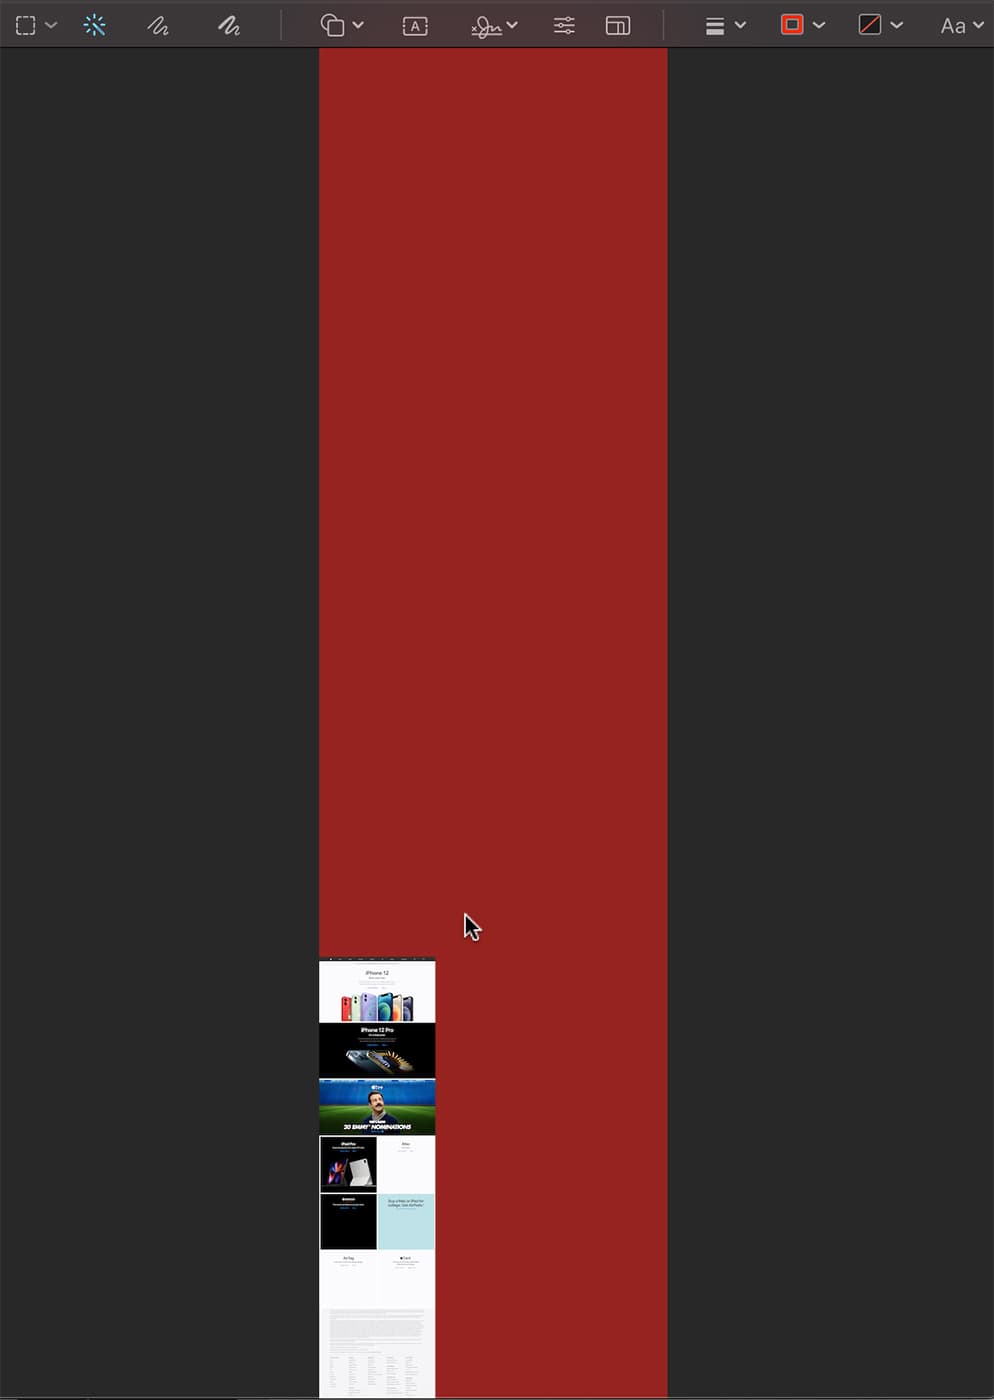
- When you let go of the mouse button, the highlighted color will disappear and be replaced with a dotted line indicating the selected area.

- Hit Shift-Command-I (⇧⌘I) to invert the selection.

- Hit Control-K (⌘K) to crop the image to the selection.
- Now you can hit Save (⌘S) and you truly are done. One cleaned up screenshot of an entire webpage.

Related Links
- macOS 101: What’s in the Utility Folder, Part 2
- Friday Five: Apple Webpages You Should Bookmark Right Now
- Using Activity Monitor Part 1: CPU and Memory
- Your Mac Doesn’t Want to Empty the Trash? Make It!
- How to Print a Webpage Without Ads and Backgrounds on a Mac
Other Topics You Might Like:

Leave a Reply Cancel reply
Save my name, email, and website in this browser for the next time I comment.
Notify me of follow-up comments by email.
Notify me of new posts by email.
13 Comments
OH man, Thank you so much for this post. it really helped me and saved a lot of my time.
Thanks for the helpful screen capture. I cannot get the clean up to work. The Shift+Command+I doesn’t work and I cannot get the Control+K to work. Can select the red area but that’s it.
Hoping you can help.
You show us how to capture OTHER web pages but NOT your own? That’s not cool dudes! If its not NOT for you, its not OK for anyone, right?
on Catalina, the part involving Preview to crop the image was a bit different, but I figured it out. Click on the show Markup Toolbar icon, then click on Rectangular Selection, then draw a box around the bit of interest, then click on “crop” in the toolbar. Repeat if needed. Zoom as needed.
Thanks for the insight!
Tried it on the article and when I try to pen saved .png I get message that either file is corrupted or can’t open the file format.
I ran into this also, then I quickly realized the file does not have the .png extension. Recaptured the screen and ensured when renaming the file, I added .png. Opened as a webpage though not as a preview. Still to figure out how to set preview as the default file opener for png files.
I’ve often wanted to do this. However, on this very page, while the initial steps seem to work, the resulting .png is un-openable by Preview or Pixelmator Pro or Quicklook. (“It may be damaged or use a file format that Preview doesn’t recognize.”)
File->Print->Save as PDF, and File->Export as PDF work as expected in Safari (full HTML-rendered page) with the added features of selectable text and extractable images in the PDFs (for those memes y’all). ~Tim~ macOS Big Sur, 11.4 Safari 14.1.1
Awesome tip! These are the articles that make it worthwhile to keep visiting Rocket Yard of OWC. Thanks. BTW an application to do it is Paparazzi! (but it does not work in all cases) https://derailer.org/paparazzi
I just tried that same Apple webpage with Safari 14.1.1 in OS 11.4. Went to File > Export as PDF… and bingo! Got a nice high-res 8.2MB PDF on my desktop instantly. Image is clean, no unexpected margins.
That works! Thank you!
Huh. I just tried that in Mojave with the latest Safari (14.1.2), using this webpage for the test.
I end up with a 20.6mb file ending in .PNG format, but which will not open. It’s either “damaged” or in a format that Preview can’t open.
In most other applications, this function would be easily performed using the Print button, and then Save as PDF. It is truly unfortunate that web developers have blocked the normal Print functionality on the web.
You Might Also Like

Apple Unveils New iPad Pro, Its Thinnest Product Ever with “World’s Most Advanced” OLED Display
M4 is Here: Apple’s Latest Chip Adds Dedicated Display Engine
Apple Adds External Drive Editing, Multicam Production in Final Cut Pro for iPad 2

How To Share Passwords With Others in macOS Sonoma Using iCloud Keychain
Email Address
- Brand Assets
8 Galaxy Way Woodstock, IL 60098 1-800-275-4576 +1-815-338-8685 (Int)
All Rights Reserved, Copyright 2020, OWC – Since 1988 | Terms of Use | Privacy Policy
We use cookies to provide you with a full shopping experience, including personalized content, and to help us improve your experience. To learn more, click here .
By continuing to use our site, you accept our use of Cookies, Privacy Policy and Terms of Use .
Stay connected
Trending news, two ways to play roblox on mac – our experience , three ways to play hades 2 on mac – our experience , the privacy paradox: why we willingly share personal data despite risks , 3 ways to play manor lords on mac – our experience , 3 ways to play content warning on mac – our experience , 4 ways to play supermarket simulator on mac – our experience .

Screenshot entire webpage (Mac)
Table of Contents
How to screenshot an entire webpage on Mac
The easiest way to screenshot an entire webpage on Mac is to use the Shift + Command + 3 combination. Alternatively, you can use built-in browser screen capture features to screenshot an entire webpage on Mac, but the way to do this would depend on the browser.

Taking a screenshot on a Mac computer is very easy – all you need to do is press Shift + Command + 3 and this will create a screenshot using the built-in Screenshot mac utility. This app actually has several useful options, so, to actually open it and gain access to those options you can search for them in Spotlight by typing Screenshot and opening the first result. You can also use the Shift + Command + 5 combination from your keyboard to directly open the Screen capture utility. Once you open it, at the bottom of your screen, you’d be given the different options of the app – to screenshot the entire screen or a specified selection, or to record a video of your entire screen or of a selection. If you want to take a screenshot of the whole screen, click the first button from left to right (should be labeled Capture Entire Screen) and then click anywhere on your screen. A screenshot image file will soon be saved in a location specified in the settings of the Screenshot utility. To see what that location is and to change it if you want, click Options when the Screenshot utility is open and see what folder is checked below Save to . If you want, you can change that folder to another location.
If you want a quick way of making screenshots of specified selections of the screen, you can instead use the Shift + Command + 4 keyboard combination. This will directly turn your cursor into a selection tool. To use it, click and hold somewhere on your screen and then drag the cursor over the area of your screen that you want to capture. Once you’ve selected the area you want, release the click and a screenshot will be taken and saved to the Save to the location of the Screenshot utility.
This is the easiest way to take screenshots on Mac, but note that a lot of browsers offer their own screenshot utilities and functions. Below, we will show you how to take a screenshot of a webpage using Chrome and Firefox.
How to screenshot a webpage in Chrome on Mac
- Open the Chrome browser on your Mac and go to the page you want to screenshot.
- Press the Command + Option + I keyboard combination, and you will see a window appear to the right.
- Next, press Command + Shift + P and then type “ Screenshot” in the Run field.

- If you chose the Capture area screenshot feature, click-hold on your screen and drag the cursor while holding the click to select the area you want to screenshot and then release the click. Any screenshots you create in this way will be saved to the Google Chrome download location, but you can also directly open the screenshot by clicking it from the bottom of your screen, as it should appear there after you take it.
How to screenshot a webpage in Firefox on Mac
- Launch Firefox and visit the page that you need to screenshot.

10 Best MMORPGs for Mac in 2022
Polls for iMessage

Martina Nikolova
Leave a reply cancel reply.
Save my name, email, and website in this browser for the next time I comment.
Username or Email Address
Remember Me
Registration is closed.
How To Take Full Page Screenshots In Safari For Mac
Safari comes as the default browser on Mac computers. It is a perfectly capable browser and if you prefer using native software instead of downloading third-party browsers, we get it. However, unlike Edge, there is no straightforward built-in tool for capturing full page screenshots in Safari.
We’re not sure if Apple ever plans to introduce the feature in an easier manner, but don’t worry, if capturing full page screenshots is something you’re interested in, there are ways around this problem which we will cover in the guide below, so read on to find out.
Saving Websites As PDFs
What’s interesting about this method is that if you try to take a scrolling screenshot on an iPhone , it actually saves as a PDF, so this method is pretty similar.
- Open Safari
- Go to the website you want to capture
- Click on Show Reader View
- From the menu, select File > Export as PDF
- Choose the location and name and click Save
Note that because you’re saving it as a PDF file, it is actually not an image file. The upside to this method is that if you have a PDF editor, you can actually make some edits to the file like adding notes. The downside is that it is equally easy for someone else to make the same edits if they have the file, versus images which might be slightly trickier to manipulate seamlessly.
Using Safari’s Developer Tools
Similar to how Google approaches full page screenshots with Chrome, it appears that Apple has also hidden its full page screenshot tool for Safari behind its developer tools.
- Click on Develop > Show Web Inspector
- In the newly opened window, right click the very first line that reads “html”
- Select Capture Screenshot
- Save the file
The upside to this method is that if you don’t need to capture the entire page, you can just highlight portions of the code that you want to capture, but that’s assuming you know what you’re looking at. Also, Apple already built-in screen capture tools into macOS that will work in Safari (except it doesn’t do full page captures), so that would be an easier method than this.
Using Awesome Screenshot Extension For Safari
If neither of the options above sound appealing to you, then you might be interested to learn that you can use a browser extension for Safari called Awesome Screenshot that makes the entire process a lot simpler.
- Download and install the Awesome Screenshot extension
- Once the extension is installed, go to the website you want to capture
- Click the extension’s icon and select Capture entire page
- You can now make edits to the screenshot if you want
- When you’re ready to save it, click the download icon and it’ll save it to your computer
Using TechSmith’s Snagit Desktop Tool
If you don’t mind paying for software, then perhaps TechSmith’s Snagit could be the end-all to all your screenshot needs. This is because Snagit won’t just work with Safari, but it will work across your Mac so in addition to capturing websites, you can use the Snagit tool to capture other screenshots like from applications, games, and so on.
- Download and install Snagit
- Launch Snagit and click the “All-In-One” tab to the left
- Click the Capture button
- Select the area of the website you want to capture and click the “Launch a Panoramic Capture” button
- Click start and start scrolling down the website and click Stop when you’re done
Keep in mind that Snagit is not free. There is a free trial that you can check out to see if this is what you want, but once the trial is up, you’ll have to pay $50 for a single-user license. It is expensive, but if you think you can get your money’s worth, why not?
Filed in Apple > Computers . Read more about macOS and Safari .
How to capture full-length screenshots of web pages using Safari for Mac

Getting a screenshot of the entire length of a web page can be useful for a variety of reasons, whether you’re creating a scrolling mockup for presentation purposes or you recently purchased a font bundle and want to capture the page that shows type specimens of your new treasure trove for future reference.
There’s always the tedious, manual way of doing this: taking a screenshot (shift-command-3), then scrolling down the page in your browser, and repeating the process until you’ve reached the bottom of a web page. Then, you’re likely off to Photoshop to stitch multiple screenshots together. While that method works, it’s not a good use of your time.
There are plenty of standalone apps and browser extensions that can assist with streamlining this process, like Awesome Screenshot , but you might not realize that your Mac’s built-in browser, Safari, has this capability already. You just need to take a few steps to activate it and shoot those screens to your heart’s content.
1. Turn on the Develop menu.
First, launch Safari, select Safari > Preferences from the menu, and go to the Advanced tab. Check the box next to Show Develop Menu in Menu Bar .

2. Browse to your web page of choice.
For this exercise, let’s visit espn.com . It’s got a pretty lengthy home page.
3. Start inspecting.
From the Develop menu, choose Show Web Inspector .

A panel will open at the bottom of your Safari window that might look intimidating, but you don’t need the skills of a developer to get what you need here.
4. Take your shot.
Make sure you’re on the Elements tab in the Web Inspector panel at the bottom of your Safari window. Hover your pointer over the <html> tag. You’ll see almost all of the web page content highlighted.
Control-click or right-click while hovering over the <html> tag. You’ll get a flyout menu, within which you can select Capture Screenshot .

5. Save your shot.
After a second or two, you’ll be prompted to select a location and a filename for your screenshot. Click Save when you’re ready.
6. Edit your shot.
Head to the location on your Mac where you saved the screenshot. Select it by clicking once with your mouse in the Finder, then hit your spacebar to preview it. Chances are, there are a lot of empty containers around the screen image that you’ll want to remove. Click the Edit button at the top right of the window.

From there, click the Crop tool at the top left.

Click and drag the corners of the marquee that appears to crop comfortably to the edges of your screenshot, then click Done at the top right.
You’ve now captured the full length of a web page without any additional software or tools.
Have any similar productivity tips to share? Let us know in the comments below.
How to capture full page screenshots in Safari, Firefox, and Chrome on Mac
There are plenty of times when you want to capture and save a screenshot of an entire webpage. It could be a research article, a helpful tutorial, a vertical photo, a shopping site’s product display, or even a lengthy meme.
In this tutorial, we will show you how to take and save a screenshot of a full web page or scrolling screenshot in Safari, Chrome, and Firefox on your Mac.

Screenshot an entire web page – no app required
Important: Most websites use the lazy-loading feature, which loads the image only after you scroll to that point on the page. So, before following these steps, load the web page completely and scroll to its bottom to ensure all images are also visible. After that, take a full-page screenshot.
To accomplish this in Safari, you’ll need to display the Develop tab in the menu bar. If you already have it, you’re a step ahead. If you don’t, here’s how to show it:
- Open Safari and click Safari > Settings or Preferences from the menu bar.
- Go to the Advanced tab.
- Check the box for Show Develop menu in menu bar .

Take your screenshot:
Now, head to the webpage you want to capture and follow these steps.
1) Click Develop > Show Web Inspector from the menu bar. The Inspector will open with the webpage on either the right or the bottom, depending on the default position. This displays the HTML code for the page.
2) Go to the top of the code in the Inspector and right-click the first line beginning with “html”.
3) Select Capture Screenshot from the shortcut menu. It can take several seconds before you see the screen in the next step, so be patient.

4) Choose a location to save the image and optionally rename it.
5) Hit Save .
You can then open the saved image in Preview or your Mac photo editor to see it in full.
To close the Web Inspector in Safari after you capture the shot, just click the X on the top left corner of the panel.
Related : How to save or share a full Safari webpage as a multi-page PDF
Firefox users will be happy to know that this browser provides the easiest option for capturing a scrolling screenshot. Head to the page you want to capture and follow these steps:
1) Right-click on the page and choose Take a Screenshot .
2) Click Save full page on the top right.

3) Hit Download to save the image or Copy to place it on your clipboard to paste where needed.

And that’s all there is to it! After you choose to Download or Copy the image, the webpage will go back to its original view.
Chrome also makes it pretty simple to snap a full-page screenshot. Visit the webpage you want to capture and do the following:
1) Click the Customize and Control button (three dots) on the top right.
2) Move down to More Tools and pick Developer Tools in the pop-out menu.

3) When the panel opens on the right of the webpage, click the Toggle Device Toolbar button at the top.
4) With your webpage on the left, you can choose to view it as a different device at the top or just leave as Responsive.
5) Click the three dots on the top right of the left-hand panel and select Capture full size screenshot in the menu.

The image will be downloaded for you to grab and open in whichever app you like. You can close the Developer Tools by clicking the X on the top right of that panel.
Use the Awesome Screenshot extension
You can use the excellent Awesome Screenshot extension to capture full-page screenshots inside any popular browser.
Start by getting the extension for Safari , Chrome , or Firefox . After that, click the extension icon and choose Capture Full Page > Done > Download .

Note: For Safari, you will have to first:
- Allow screen recording permission: Once the app is downloaded, open it and click Go to Screen Recording Setting . It will take you to System Settings > Privacy & Security > Screen Recording. From here, enable the switch for Awesome Screenshot & Recorder and confirm. After that, click Quit & Reopen .
- And enable the extension: Go to Safari Settings > Extensions and check the box for Awesome Screenshot before its icon appears in the top left of the address bar.
Check out next:
- 3 ways to quickly find all screenshots on your Mac
- How to take a full-page screenshot in Safari on iPhone
- How to capture a screenshot of a whole text thread on iPhone

How to take a screenshot of an entire webpage in Safari on a Mac?
Capturing a screenshot of an entire webpage can be useful for various reasons, such as for archiving, sharing, or for personal reference. Safari, the default web browser on Mac, provides an easy method to capture an entire webpage as a screenshot.
In this guide, we will walk you through the steps to take a screenshot of an entire webpage in Safari on a Mac .
Table of Contents
Steps to take a screenshot of an entire webpage in Safari
Step 1: Launch Safari on your Mac and navigate to the web page you wish to capture. From the top menu bar, click on the File option, and then select the “Export as PDF” option from the drop-down menu.

Step 2: Once you have selected the “Export as PDF” option, a save dialog box will appear. Choose the desired location where you want to save the captured web page, and click on the “Save” button to complete the process.

Step 3: Now the captured web page will be saved as a PDF file in the selected location. If you prefer to save it as an image, you will need to open the saved PDF file first.

Step 4: With the PDF file open, click on the File option at the top of the screen once more. From the drop-down menu, select the “Export” button.

Step 5: In the Export dialog box, select the image format you desire, such as PNG, and then click on the “Save” button. This will save the selected page or pages as image files in the chosen format.

Step 6: After following the above steps, you will now have both the original PDF file and the exported image file saved at the location you chose. You can use either the PDF screenshot or the photo screenshot, depending on your needs, for further use or reference.

By following the steps outlined in this guide, you will now be able to take a screenshot of an entire webpage in Safari. Whether you prefer to save the screenshot as a PDF file or as an image, you will have the option to do so. Now, you can use the captured screenshot for your personal or professional needs, or simply keep it as a reference for future use.
Also Read:- 7 ways to reduce system storage on Mac[2023]
What if I want to capture a screenshot of only a portion of the webpage?
If you want to capture a screenshot of only a portion of the webpage, you can use the built-in screenshot tool in Safari, which allows you to capture a selected portion of the screen. To use this tool, press Shift + Command + 4 on your keyboard
How do I access the saved screenshot files in Safari on a Mac?
The saved screenshot files in Safari on a Mac can be accessed by going to the location where you saved the files, either as a PDF or an image file. You can access the saved files through the Finder app on your Mac or by searching for the file name in Spotlight.
Can I edit the screenshot after it has been saved?
Yes, you can edit the screenshot after it has been saved. You can use an image editing tool, such as Preview or Photoshop, to make changes to the image file.
What file formats can I save the screenshot as using Safari on a Mac?
You can save the screenshot as a PDF file or as an image file in various formats such as PNG, JPG, TIFF, HEIC, JPEG, and OpenEXR.
Share this:
- Click to share on Twitter (Opens in new window)
- Click to share on Facebook (Opens in new window)
- Click to share on WhatsApp (Opens in new window)
1 thought on “How to take a screenshot of an entire webpage in Safari on a Mac?”
- Pingback: How to take a screenshot of an entire webpage in Chrome on a Mac? - NixLoop
Leave a Comment Cancel reply
Notify me of follow-up comments by email.
Notify me of new posts by email.
This site uses Akismet to reduce spam. Learn how your comment data is processed .
How To Take A Scrolling Screenshot On Mac

This site contains affiliate links. As an Amazon Associate, We earn a commission from qualifying purchases at no extra cost to you.
Want to capture entire web pages or documents in a single scrolling screenshot on your Mac? This article covers native and third-party methods to take long screenshots without fragmentation.
Key Takeaways:
- Use QuickTime Player, Safari, Chrome, or Preview to capture scrolling screenshots on a Mac.
- Third-party apps like Snagit, Lightshot, and Skitch provide extra functionality like editing tools.
- On an iPhone with iOS 13+, take scrolling shots by pressing side/volume buttons and selecting Full Page.
- Copy text from screenshots on macOS Monterey using Live Text in Preview or Safari.
- Take full page screenshot on Firefox/Chrome using built-in features or extensions.
Top Native Ways To Take Scrolling Screenshots
You probably know about the trusty old Shift + Command + 3 and 4 keyboard shortcut that lets you capture your screen or a part of it. But what if you must capture something beyond your screen’s limits?
Fear not, my friend! There are several ways of taking scrolling screenshots on Mac, so let’s walk through them.
1. QuickTime Player
QuickTime Player is a multimedia player and screen recording software application developed by Apple Inc. It also includes basic editing features, such as trimming and merging video files, and the ability to record entire screen button of your Mac.
Here are the steps to take a scrolling screenshot using QuickTime Player:
- Open QuickTime Player from the Applications folder or search for it in Spotlight.
- Click File in the menu bar and select New Screen Recording.

- Click the drop-down arrow next to the record button and select None under the microphone option.
- Click on the red record button and select the area of the screen you want to capture.
- Once you have selected the area, click the Start Recording button to start screen recording.
- Scroll through the page or document you want to capture.

- Once you have reached the end of the page, click on the stop button in the menu bar.
- The recording will automatically be saved as a .mov file. To save it as an image file, open it in Preview and select File , followed by Export . Choose the desired image format and save it.
Safari is not just a web browser but also allows you to take scrolling screenshots. This method is especially useful for capturing entire web pages beyond the visible area.
- Open Safari and navigate to the web page you want to capture.
- Press the keyboard shortcut Command + Shift + 5 to open the Screenshot tool.
- In the Screenshot tool, click the Options button and select Capture Entire Page from the drop-down menu.
- Click the Capture button to start the scrolling screenshot capture process.
- Safari will automatically screen scroll through the web page and capture the entire page length of the browser window.
- Once the capture process is complete, the screenshot will appear in the bottom right corner of your screen.
- Click the screenshot preview to open it, then use the editing tools to make any necessary adjustments or annotations.
- Save the scrolling screenshot to your desired location by clicking on the Save button in the top right corner of the screenshot preview window.
This method is easy and useful if you need to take a scrolling screenshot of a web page in Chrome. However, it requires you to install a third-party extension, Full Page Screen Capture , which may be better for some users. If you don’t have any issues with it, Here are the steps:
- Open Google Chrome on your Mac and go to the Chrome Web Store.
- Search fo r Full Page Screen Capture and click Add to Chrome to install the extension.

- Navigate to the web page you want to take a scrolling screenshot of.
- Click on the Full Page Screen Capture icon in the toolbar.
- The extension will automatically start capturing the entire webpage, and you will see a scrolling screenshot preview.

- Once the capture is complete, you can save the screenshot to your computer or share it directly.
Preview is a built-in app on Mac that allows you to view and edit images and PDFs . It also can capture screenshots. Here are the steps to take a scrolling screenshot using Preview:
- Open Preview from the Applications folder or Spotlight search.
- Go to File > Take Screenshot> From Entire Page .

- Preview will then automatically take the screenshot and display it for you to edit or save.
You can then edit or annotate the screenshot and save it in your desired format.
Top 3 Third-Party Apps For Scrolling Screenshots
There are several apps available that allow you to take scrolling screenshots. But the three we recommend below are the best and safest ones for Macs. On top of that, they offer some extra features too.
1. Snagit

Snagit is a powerful third-party app that captures scrolling screenshots, videos, and audio. It is a paid app with a one-time purchase price of $49.99 for the individual license and discounts available for volume purchases. The app also offers a free trial period. It provides an intuitive user interface and customizable capture settings that enable you to capture any screen part.
To take a scrolling screenshot using Snagit, follow these steps:
- Open the app.
- Select the Capture button.
- Choose the All-in-One option.
- Select Scrolling Window.
After that, Snagit will capture the entire length of the page or window and save it as an image file.
2. Lightshot

Lightshot is a simple yet effective third-party app that allows you to capture screenshots of web pages or applications. It’s free and can be used on both Mac and Windows platforms. I have used it and personally found it a little slow.
To take a scrolling screenshot using Lightshot, you need to take these steps:
- Open the web page or application you want to capture.
- Click the Lightshot icon on your toolbar.
- Select the Capture Scrolling Window option.
- Scroll through the page.
Lightshot will capture the entire length of the page and provide you with editing options before saving the image.
3. Skitch

Skitch is a third-party app developed by Evernote that allows you to capture and annotate screenshots. It’s available for free and provides an easy-to-use interface with a variety of annotation tools.
Here’s how to take a scrolling screenshot using Skitch:
- Select the Screen Capture button.
- Choose the Capture Scrolling Window option.
- Scroll through the page. Skitch will capture the entire page length and allow you to annotate it before saving it as an image file.
If you don’t want the complexity of native solutions or the hassle of downloading apps, you can use two online screen capture tools: Screenshot Guru and Visualping .
Frequently Asked Questions
Here are some common questions to add to your knowledge.
How do you take scrolling screenshots on an iPhone?
To take a scrolling screenshot on your iPhone, it needs to have iOS 13 or above. Take a screenshot (press the side and volume up buttons together), tap on the thumbnail in the bottom-left corner, and choose Full Page. You can scroll through it using the bar on the right side and do some quick editing. Note that this file is saved in PDF format rather than PNG. Note : this scrolling screenshot feature only works on native Apple apps.
Can you copy text from a scrolling screenshot?
If you’re using macOS Monterey , you can access Live Text in Preview and Safari . It means you can copy and use the text in an image. Just position the pointer over the text you want to copy and then drag it to select it. There are also OCR (Optical Character Recognition) apps like Prizmo and TextSniper , which you can check out.
How to take full webpage screenshots with Firefox and Chrome on macOS?
You can still take full-webpage screenshots if you don’t use Safari as your primary browser. Firefox has an in-built feature to do it. For Chrome users, you can get the GoFullPage extension. It’s free and takes full webpage screenshots.
Taking a scrolling screenshot on your Mac is a real-time-saver, trust me. You can either stick with macOS’s built in screenshot tool or try some fancy third-party apps. Personally, I’m all about native solutions, but you do you! Find the best tool for you and start capturing epic scrolling screenshots.
And remember to share your preferred method in the comments below.

Leave a Reply Cancel Reply
Your email address will not be published. Required fields are marked *

Tips and guides for MacBook Pro users. As an Amazon Associate, I earn from qualifying purchases.
Featured Pages
- Best Mac Cleaner Software
- Clear System Data Storage
- Stop Spinning Wheel Mac

Screen Capture Entire Web Pages On Your Mac
Check out Screen Capture Entire Web Pages On Your Mac at YouTube for closed captioning and more options.
No related posts.
Comments: 7 Responses to “Screen Capture Entire Web Pages On Your Mac”
I have found the best way to clip from the Web is to use Evernote Web Clipper with options to save full page, article, simplified article. Of course you need an Evernote account as this only saves to Evernote.
I follow you up to control click while the html is highlighted and I do not get what you show on the screen Screen Shot 2019-08-29 at 7.41.11 PM.png I don't know if that shot I took shows to you but I do not get the options you show when I Op Cm I control click.
Joe: Do you mean at 2:23? Are you Control+Clicking on the "body" like I am? What version of Safari do you have? You can always post a screenshot to Imgur.com and link to it here.
The iOS option "Create PDF" seems to save the web page in a very similar manner: a long image.
Darrell: As I mention in the video, saving as a PDF won't get you the same look as exporting as an image. But it is a great way to save an article to read later. It just doesn't work for those that want a pixel-perfect image of what they see in the browser. At least for most websites.
Great video, Gary. I used to use SnagIt every day when developing internal company web pages. It was a very useful piece of software, but even it would occasionally have trouble capturing an entire web page. Nowadays I need this functionality only occasionally, so it's good to know about the Safari and Firefox options versus shelling out $50 for SnagIt. Thank You!
I've been using Paparazzi for years. Easy to use, free, always updated, and just for Mac. :)
https://derailer.org/paparazzi/
Welcome to MacMost
Free weekly newsletter.
- MacMost Online Courses

- macOS Sonoma
- Mac Shortcuts
- Mac Numbers
- Mac Keynote
- Final Cut Pro
Keyboard Shortcuts PDF

Connect with MacMost
- Free Email Newsletter
- YouTube Channel
- Follow Gary on Threads
- Follow Gary on Mastodon
- Follow Gary On Bluesky
- MacMost @ Apple News
- iPhone/iPad App
MacMost Sections
- The Practical Guide To Mac Security
- Videos by Category
- Video Archive
- Virus and Malware Information Center
- Protect Yourself From Online Scams
- A Graphical Guide To iCloud
- Free iPhone Ringtones
- Recommended Products
- Printable Mac Keyboard Shortcuts PDF
- macOS System Requirements List
Popular Tutorials
- How To Free Up Space On iCloud Drive
- 7 Ways To Add Spacer Lines Between Paragraphs In Pages
- 10 Common Internet Scams and How To Avoid Them
- How To Sort Files in the Finder on a Mac
- Creating a Photo Collage In Freeform
- How To Back Up Your Apple Notes
- Move the Menu Bar Below the Camera Notch On Your MacBook
- 15 Mac Settings To Make Your Mac More Secure
Information
- About MacMost
- Support MacMost
- Contact MacMost
- MacMost Video List
- MacMost Site Map
- MacMost Site Policies
Copyright © 2006-2024 CleverMedia, Inc. All Rights Reserved.
How To Take A Screenshot On Safari

- Software & Applications
- Browsers & Extensions

Introduction
Taking a screenshot is a handy skill that allows you to capture and save a snapshot of what's displayed on your screen. Whether you want to preserve a memorable moment, share information with others, or keep a record of important details, knowing how to take a screenshot on Safari can be incredibly useful. Safari, the default web browser for Apple devices, offers several methods for capturing screenshots, each with its own unique advantages. In this article, we'll explore three simple and effective ways to take a screenshot on Safari, empowering you to effortlessly capture and save images of web pages, online articles, or any other content you encounter while browsing the internet.
By mastering these screenshot techniques, you'll be equipped to capture and share visual information with ease. Whether you're a student needing to save excerpts from online research, a professional seeking to document web content for presentations, or simply someone who wants to preserve memorable online moments, the ability to take screenshots on Safari will prove to be a valuable skill. So, let's dive into the methods and learn how to capture and save screenshots using Safari on your Apple device.
Method 1: Using Keyboard Shortcuts
Capturing a screenshot on Safari using keyboard shortcuts is a quick and convenient method that allows you to capture the entire screen, a specific window, or a selected portion with ease. These keyboard shortcuts are intuitive and can be executed seamlessly, making them a popular choice for many users.
Full Screen Screenshot
To capture the entire screen, simply press the Command + Shift + 3 keys simultaneously. Upon doing so, Safari will instantly capture a screenshot of the entire screen, including the browser window and any open tabs or applications in the background. The captured image will be automatically saved to your desktop, ready for you to access and utilize as needed.
Screenshot of a Specific Window
If you wish to capture a screenshot of a specific Safari window, such as a single browser tab, you can do so by pressing Command + Shift + 4 followed by the Spacebar . This combination will transform your cursor into a camera icon, allowing you to click on the desired Safari window to capture a screenshot of it exclusively. Once captured, the image will be saved to your desktop, providing you with a focused snapshot of the selected Safari window.
Custom Selection Screenshot
For scenarios where you only need to capture a specific portion of the Safari window, the keyboard shortcut Command + Shift + 4 enables you to create a custom selection screenshot. Upon pressing this combination, your cursor will transform into a crosshair, empowering you to select the exact area of the Safari window that you want to capture. Once the selection is made, releasing the mouse or trackpad will trigger the screenshot to be saved to your desktop, offering you a tailored image of the chosen portion.
By leveraging these keyboard shortcuts, you can efficiently capture screenshots while browsing on Safari, empowering you to preserve and share valuable visual information effortlessly. Whether you need to capture the entire screen, a specific window, or a custom selection, the keyboard shortcuts in Safari provide a seamless and efficient way to capture and save screenshots, enhancing your browsing experience and productivity.
Method 2: Using the Screenshot Toolbar
Another convenient method for capturing screenshots on Safari is by utilizing the built-in Screenshot Toolbar. This feature, introduced in macOS Mojave and later versions, offers a user-friendly interface that simplifies the process of taking screenshots while browsing. The Screenshot Toolbar provides various options for capturing specific portions of the screen, adding annotations, and even recording video clips, making it a versatile tool for visual documentation.
To access the Screenshot Toolbar while using Safari, simply follow these steps:
Open Safari : Launch the Safari browser and navigate to the web page or content you wish to capture.
Activate the Screenshot Toolbar : Once on the desired page, press the Shift + Command + 5 keys simultaneously. This keyboard shortcut triggers the Screenshot Toolbar to appear at the bottom of the screen, presenting a range of screenshot and recording options.
Select Screenshot Type : Within the Screenshot Toolbar, you can choose from various screenshot options, including capturing the entire screen, a specific window, or a custom selection. By selecting the appropriate screenshot mode, you can tailor the capture to suit your specific needs.
Customize Screenshot Settings : The Screenshot Toolbar also allows you to customize additional settings, such as setting a timer for delayed captures, choosing the save location for screenshots, and enabling options for showing the mouse pointer in the screenshot.
Capture and Save : Once the desired settings are configured, simply click on the "Capture" button within the Screenshot Toolbar to initiate the screenshot. The captured image will be saved to the designated location, ready for you to access and utilize as needed.
The Screenshot Toolbar not only streamlines the process of capturing screenshots on Safari but also offers additional features for annotating and editing the captured images. After taking a screenshot, the Screenshot Toolbar provides options for adding text, shapes, and other annotations to the image, empowering you to highlight specific details or provide context to the captured content.
Furthermore, the Screenshot Toolbar enables users to record video clips of their screen, making it a comprehensive tool for visual documentation and communication. Whether you need to capture a static image of a web page or record a dynamic demonstration within Safari, the Screenshot Toolbar equips you with the necessary features to accomplish these tasks seamlessly.
By leveraging the Screenshot Toolbar in Safari, users can enhance their screenshot capabilities, benefiting from a user-friendly interface and versatile options for capturing, annotating, and recording visual content while browsing the web. This method provides a modern and intuitive approach to taking screenshots on Safari, catering to a diverse range of visual documentation needs.
Method 3: Using the Preview App
In addition to the keyboard shortcuts and the Screenshot Toolbar, Safari users can also utilize the Preview app, a versatile and feature-rich tool that offers advanced capabilities for capturing and editing screenshots. The Preview app, which comes pre-installed on macOS devices, serves as a powerful image viewing and editing application, and it includes seamless integration with Safari for capturing and annotating screenshots.
To utilize the Preview app for capturing screenshots while browsing on Safari, follow these simple steps:
Access the Preview App : Once on the desired page, navigate to the Applications folder or use Spotlight Search to locate and open the Preview app.
Capture the Screenshot : Within the Preview app, click on the "File" menu and select "Take Screenshot." This action will present options for capturing the entire screen, a specific window, or a custom selection.
Customize Screenshot Settings : After selecting the desired screenshot mode, the Preview app allows users to customize additional settings, such as setting a timer for delayed captures, choosing the save location for screenshots, and enabling options for showing the mouse pointer in the screenshot.
Annotate and Edit : Once the screenshot is captured, the Preview app provides a comprehensive set of tools for annotating and editing the image. Users can add text, shapes, arrows, and other annotations to highlight specific details or provide context to the captured content. Additionally, the app offers features for cropping, resizing, and adjusting the image, empowering users to refine the screenshot according to their preferences.
Save and Share : After annotating and editing the screenshot, users can save the image in their preferred format and share it with others as needed. The Preview app supports various image file formats, ensuring compatibility and flexibility in sharing the captured screenshots.
By leveraging the Preview app, Safari users can elevate their screenshot capabilities, benefiting from advanced annotation and editing features that enhance the visual documentation process. Whether you need to capture, annotate, or edit screenshots of web pages, online articles, or any other content within Safari, the Preview app provides a comprehensive solution for these tasks, empowering users to capture and customize visual content with precision and efficiency.
Incorporating the Preview app into your screenshot workflow expands your capabilities, allowing you to capture and refine screenshots seamlessly while browsing on Safari. This method offers a robust and versatile approach to capturing and editing screenshots, catering to a diverse range of visual documentation and communication needs.
In conclusion, mastering the art of taking screenshots on Safari opens up a world of possibilities for capturing and preserving visual content while browsing the web. By exploring the three methods outlined in this article, users can equip themselves with versatile and efficient techniques for capturing screenshots on Safari, each offering unique advantages and capabilities.
The keyboard shortcuts method provides a quick and intuitive way to capture screenshots, allowing users to effortlessly capture the entire screen, specific windows, or custom selections with ease. This method is ideal for those seeking a streamlined approach to capturing screenshots without the need for additional interfaces or tools.
The Screenshot Toolbar, introduced in macOS Mojave and later versions, offers a modern and user-friendly interface for capturing and annotating screenshots. With its versatile options for capturing specific portions of the screen, adding annotations, and even recording video clips, the Screenshot Toolbar caters to a diverse range of visual documentation needs, enhancing the screenshot experience on Safari.
Furthermore, the integration of the Preview app with Safari provides advanced capabilities for capturing, annotating, and editing screenshots. By leveraging the comprehensive set of annotation and editing tools offered by the Preview app, users can refine and customize their screenshots with precision, adding context and visual enhancements to the captured content.
By incorporating these methods into their workflow, Safari users can elevate their screenshot capabilities, benefiting from a range of options for capturing, annotating, and refining visual content with precision and efficiency. Whether it's capturing web pages, online articles, or dynamic content within Safari, the ability to take screenshots empowers users to preserve and share valuable visual information seamlessly.
In essence, the knowledge and proficiency in taking screenshots on Safari not only enhance individual productivity and documentation needs but also contribute to effective communication and collaboration. Whether you're a student, professional, or casual user, the ability to capture and share visual content with ease enriches the browsing experience and facilitates seamless information sharing.
By embracing these screenshot techniques, users can harness the power of visual documentation, preserving valuable moments, information, and insights encountered while browsing on Safari. With these methods at their disposal, users can confidently navigate the digital landscape, equipped with the tools to capture, annotate, and share visual content effortlessly.
Leave a Reply Cancel reply
Your email address will not be published. Required fields are marked *
Save my name, email, and website in this browser for the next time I comment.
- Crowdfunding
- Cryptocurrency
- Digital Banking
- Digital Payments
- Investments
- Console Gaming
- Mobile Gaming
- VR/AR Gaming
- Gadget Usage
- Gaming Tips
- Online Safety
- Software Tutorials
- Tech Setup & Troubleshooting
- Buyer’s Guides
- Comparative Analysis
- Gadget Reviews
- Service Reviews
- Software Reviews
- Mobile Devices
- PCs & Laptops
- Smart Home Gadgets
- Content Creation Tools
- Digital Photography
- Video & Music Streaming
- Online Security
- Online Services
- Web Hosting
- WiFi & Ethernet
- Browsers & Extensions
- Communication Platforms
- Operating Systems
- Productivity Tools
- AI & Machine Learning
- Cybersecurity
- Emerging Tech
- IoT & Smart Devices
- Virtual & Augmented Reality
- Latest News
- AI Developments
- Fintech Updates
- Gaming News
- New Product Launches
How to Use Email Blasts Marketing To Take Control of Your Market
Learn to convert scanned documents into editable text with ocr, related post, how to make stairs planet coaster, how to rotate camera in planet coaster, how to make a good roller coaster in planet coaster, where is the minecraft folder, how to update minecraft windows, how to update minecraft education edition, related posts.

How To Download Apps From Safari

10 Best Browsers for Privacy That Aren’t Google Chrome

How To View Page Source On Tablet

How To Download The Latest Version Of Safari

MovieBox Pro: How to Install It on Your Phone

How To Get Adblock For Safari

What Is Cross-Browser Testing

How To Download Vshare On IPad
Recent stories.

Top Mini Split Air Conditioner For Summer

Comfortable and Luxurious Family Life | Zero Gravity Massage Chair

Fintechs and Traditional Banks: Navigating the Future of Financial Services

AI Writing: How It’s Changing the Way We Create Content

How to Find the Best Midjourney Alternative in 2024: A Guide to AI Anime Generators

How to Know When it’s the Right Time to Buy Bitcoin
- Privacy Overview
- Strictly Necessary Cookies
This website uses cookies so that we can provide you with the best user experience possible. Cookie information is stored in your browser and performs functions such as recognising you when you return to our website and helping our team to understand which sections of the website you find most interesting and useful.
Strictly Necessary Cookie should be enabled at all times so that we can save your preferences for cookie settings.
If you disable this cookie, we will not be able to save your preferences. This means that every time you visit this website you will need to enable or disable cookies again.
How to Screenshot the Whole Page on a Mac
Here are the best ways to take a full screenshot on a Mac:
- Movavi Screen Recorder – a desktop app
- Movavi ScreenShot – a browser extension
- Screenshot Guru – an online tool
- Developer tools – a browser feature
- 10+ Ways to Screenshot Whole Page on Mac [2024]

It is fair to say that taking a screenshot on a Mac isn’t always the most intuitive, and taking a full-page screenshot can feel clunky. In this guide, you’ll learn how to screenshot the whole page on your Mac.
Movavi ScreenShot
High-resolution screenshots
Has no editing tools
Screenshot Guru
Capturing web pages
No way to screenshot images from your desktop
Developer tools
Precise dimensions
Challenging for less-technical users
Capturing video and still images
- You have to pay to use the program
Mojave shortcuts
Inbuilt tool that doesn’t require installation
Can’t edit screenshots
Print and save
Creating a PDF screenshot
PDF is the only output format available
Web page size reduction
Fitting lots of information
Not convenient and time-consuming
Mozilla Firefox screenshotting tool
High-resolution browser captures
Only for Firefox users
Parallels Toolbox
Multiple tools for Mac
- You may not need all of the tools you are paying for
Capturing embedded frames
- Only works as a Chrome plugin
How to take a full screenshot on a Mac
Best for: High-resolution screenshots
Browser: Google Chrome, Mozilla Firefox
Chrome Web Store rating : 4.2 out of 5, 10,000+ users
We’ll start our review with Movavi ScreenShot. It is an easy-to-use extension for browsers that takes screencaps at different sizes: the entire page, specific areas, or standard captures of your screen.
For the top-to-bottom screenshot, the extension will scroll the page automatically, even if it's a mile long. You don’t need to lift a finger!
Here are the pros and cons of using the extension.
Advantages of Movavi ScreenShot:
Works perfectly with Google Chrome and Mozilla Firefox
Supports high-resolution images
Requires no permissions for installation
Works in incognito mode
Doesn’t require registration
No charge for downloading images
Disadvantages of the extension:
Has no editing tools like cutting, trimming, annotations, graphics, etc.
Doesn’t generate a shareable link
Has no cloud storage for storing screenshots
Now let us guide you through Movavi ScreenShot.
Step 1. Get the extension from the browser web store
Go to your browser web store and find Movavi ScreenShot . Hit the Add to Chrome button and pin the screenshot icon in the top right corner of your browser.
Step 2. Take a full-page screenshot
Open the page you want to capture. Now press the screenshot icon and choose Capture entire page .
Step 3. Save the image
Your screenshot will appear in a new tab where you can download it to your desktop. The default format is JPG.
How to screenshot the entire webpage on a Mac online
Best for: Capturing web pages
Browser: Any
Go to Screenshot Guru
Screenshot Guru is a great way to grab a screenshot of any web page. You simply visit Screenshot Guru, put the URL into the text box, and let it do its thing. It couldn’t be easier to use. It has some downsides due to the fact that you can’t take screenshots of anything that requires a login. If you put your Gmail URL in, the site isn’t going to be able to take a full-page screenshot. Though you can use the web page version on any browser, you can add the function to Chrome as an extension.
Advantages of Screenshot Guru:
Super simple to take screenshots using your browser
Hi-res images captured directly on the website
Disadvantages of Screenshot Guru:
No option to screenshot sites, you have to log in
No way to screenshot images from your desktop or programs
How to screenshot the entire page on a Mac using Screenshot Guru:
Step 1. Find the URL of the page
Find the web address from the URL bar on the full web page you want to screenshot. Copy this to your clipboard.
Step 2. Paste the URL
Navigate to Screenshot Guru. There is no login required, you simply paste the URL into the text box and click the Screen Capture button.
Step 3. Save your image
The image is generated in the browser, and you then have the option to save this wherever you want to on your computer.
How to screenshot the entire page on a Mac with a built-in browser tool
Best for: Precise dimensions
Browser: Google Chrome
Can you capture a web page without using a third-party app or software? Yes! If you use Google Chrome, you should definitely try the developer tools as a screenshotting service.
This trick is well-known to developers because they’re familiar with all the secrets of HTML. Now you can be one of those in the know!
But first, let’s check the pros and cons of using the developer tools.
Advantages of using developer tools:
No installation required
The width and height of the screenshot can be customized
Disadvantages of using developer tools:
You will need to spend more time on set up
No editing tools
You can only download the screenshot to your desktop because there’s no shareable link
Step 1. Open developer tools
To open developer tools, hit the three dots in the right top corner of the browser. You can also press Alt + Command + I .
Now go to More Tools and choose Developer Tools .
Step 2. Customize the size
Open the Device Toolbar tab. Here you can set the size of the screenshot. If you’re working on a design project, you may find it helpful to make a screenshot of the web page using different devices.
Step 3. Take a Screenshot
Close to the size settings, you’ll see three dots. Hit them, and the screenshot drop-down menu will appear.
Select Capture full size screenshot .
Finally, choose the folder and save the image to your computer.
How to take a full-page screenshot on a Mac with a desktop program
Best for: Capturing video and still images
Mac App Store rating: 4.4 out of 5, 292 reviews
Download Capto
You may find it more convenient to use desktop software for making screenshots. Traditionally, such apps offer many more options than regular extensions or online capture services. Apart from screenshotting a web-page, you can use Capto to capture other screen acivity, e.g. to take a picture from a video . The most significant advantage is the availability of image editing tools and video recording options that make the app much more flexible.
Let us introduce Capto which is designed specifically for Mac.
Advantages of Capto:
- Multi-functionality
- High-quality support
- Continuous updates and program improvements
Disadvantages of Capto:
- Audio recording is unreliable
Note that Capto has a 7-day trial period, so you can try making screenshots with this app first by following these steps.
Step 1. Launch the program
Install Capto on your computer and launch the program.
Step 2. Run the screenshotting function
In the top menu, hit the Web icon. In the drop-down menu, select one of the screenshot options. If you’ve already opened the page you want to capture, choose the last item – Snap active browser URL .
Step 3. Edit the image and save it
In the preview window, you can crop your screenshot and add arrows or highlights to it.
When you’re done editing, save the image to your preferred folder. Note that you can choose the image format - one more argument in favor of Capto.
Best for: Inbuilt tool that doesn’t require installation
If you have macOS 10.14 or higher, you can skip all the foregoing methods and use the built-in Mojave tool. It will be the fastest and easiest way to capture the web page.
Step 1. Press shortcuts
Press Shift + Command + 5 to run the screen control panel.
Step 2. Take a full-size screenshot
Click on the full screenshot icon and get your image.
You can also press Shift + Command + 3 to get a screencap.
Print and save lifehack
Best for: Creating a PDF screenshot
There’s one more way to capture a web page. You can pretend that you want to print the page but, instead of printing, you save it as a PDF file on your computer!
But it’s not the most convenient method if you need an image in PNG or JPG format. After saving the screenshot, you’ll need to use another app or online service to convert the file from PDF to your desired image format.
Here are the two steps to this life hack.
Step 1. Print the page
Open your browser and find the Print option in the settings. You can also press Command + P .
Step 2. Save the image
Click the Save button to download the file as a PDF.
Best for: Fitting lots of information
We can’t ignore this crazy way of taking screenshots! You reduce the size of the web page and copy everything that fits on your screen.
It isn’t the most convenient or fastest way of screenshotting, but it seems to work reliably in any browser.
Step 1. Reduce the page size
Open the web page you want to capture. Now press Command and - (minus) simultaneously. Hold the keys down until you see the whole page on your screen.
Step 2. Define the capture area
Press Command + Shift + 4 and frame the web page. The framed area will be your screenshot so pay attention to how you move the cursor, otherwise, you’ll have to crop the image later.
Step 3. Get a screencap
When you release the mouse button, your Mac will take a web page photo automatically. The screencap will be saved to your computer.
Don’t forget to reset the web page size. To do this, press Command + 0 .
Best for: High-resolution browser captures
Browser: Firefox
The Mozilla Firefox browser includes a handy tool for taking screenshots. It’s very simple to use – it never seems to crash, and it provides a high-resolution image. Another advantage of this online tool is that you can get a shareable link to the image.
Follow these simple steps to use the Firefox built-in tool.
Step 1. Find the screenshotting function
If you look at the address bar, you’ll see three dots in the right corner. This opens the Page actions menu. Click on it.
The screenshotting tool is the last item in the drop-down menu.
Step 2. Take a screenshot of the entire page
Click on Take a Screenshot . The browser will offer you several options – capture a specific area, capture the visible part of the screen, or capture a full-page screenshot. Hit the Save full page button.
A window containing the screenshot will appear. Now you can download it to your computer or copy the link to the clipboard.
Full Page Screen Capture
Best for: Free browser screen captures
AlternativeTo rating: 2.5 out of 5
Go to Full Page Screen Capture
The next tool is Full Page Screen Capture. It’s an online screenshot maker that’s free to use.
Advantages of Full Page Screen Capture:
Quick and easy to use
No registration or installation required
Good image quality
Disadvantages of Full Page Screen Capture:
Can’t capture screens that require logins - for example, you cannot screenshot your Gmail inbox
Must open the screen capture web page every time you need to make a screencap
No choice of size. If you want to get a partial screenshot, you’ll have to use another app
For full-page screen capture, follow these steps.
Step 1. Copy and paste
Copy the link of the web page you want to capture. Go to Full Page Screen Capture and paste the URL into the empty field.
Step 2. Capture and save
Click on the Capture button and wait while the capture is created.
Now hover your mouse over the image and click on it. You screencap will appear in a new tab. Click on it with the right mouse button and save the picture. You can also copy the link and share it with others.
Best for : Multiple tools for Mac
Browser : Any
PCMag rating : 4.5 out 5
Download Parallels Toolbox
Parallels Toolbox is one install for your Mac operating system that provides you with a lot of tools that you can use, including a screenshot option. It frees up memory but also has a lot of different features and functions, including the option to check your clipboard history and optimize your system ready for a presentation. For one yearly fee, you can access all of these tools.
Parallels Toolbox is accessible from the upper toolbar on your MacBook, so it is easy to quickly capture any screen.
Advantages of Parallels Toolbox:
- Easy to capture any screen without having to navigate to another URL
- Select the area you want to capture if you wish
- Comes with a variety of other tools
Disadvantages of Parallels Toolbox:
How to screenshot a full page using Parallels Toolbox:
Step 1. Prepare the screen or web page
Navigate to the screen you need to take a screenshot of first of all, so you are ready to capture.
Step 2. Open the app
Open Parallels Toolbox from the upper toolbar on your Mac. On the drop-down menu, you can find the screenshot tool. Once you click on this, you can simply choose the area to screenshot.
Step 3. Drag your cursor to capture the image
Drag across the area that you want to capture, from the bottom left to the top right, for example. This will select the full screen that you wish to capture. The image will automatically save to your desktop.
Best for : Capturing embedded frames
Browser : Google Chrome
Chrome Web Store rating : 4.9 out of 5, 5,000,000+ users
Download GoFullPage
GoFullPage gives you a way to capture both everything that is visible on the page as well as everything “below the fold” on a webpage, so it actually has a way to scroll and capture every single aspect of the web page. It can capture things like embedded iframes which a lot of other options struggle with. You can also choose how to export the page, so for instance, you may wish to save it as a PDF rather than a JPG.
Advantages of GoFullPage:
- Easy operation with the click of a button or a shortcut
- No annoying ads
- Manages to capture embedded frames and more
Disadvantages of GoFullPage:
- No option to just capture a small area
How to take a full-page screenshot on a Mac using GoFullPage:
Step 1. Install the browser add-on
Within Chrome’s web store, you can simply and easily install GoFullPage for free.
Step 2. Navigate to the web page
Find the page you would like to grab a screenshot of.
Step 3. Take the screenshot
You can do this by either clicking the camera button that is the icon of the app or you can press the press Alt + Shift + P .
Step 4. Save the image
The image will open in a new tab, and you can choose how to save it and in which format. You might choose that a PDF is best, or you may want to save it as a JPG.
Conclusion: What to look for in a screenshot tool
Hopefully, this has given you a better idea of what to look for and consider when trying to choose a screenshot tool. Features to think about include:
- Ease of use: It should be simple to take a screenshot from any page.
- Format: What does the tool save your screenshots as, and are they high quality?
- Compatibility: If you use a certain browser, the tool needs to be suitable for use with your browser. Most are suitable for use with Google Chrome.
- Reviews: Always check other peoples’ reviews and see what has been said about the software in question. Is it well-reviewed?
Frequently asked questions
How can i screenshot an entire webpage on a mac.
The easiest way to take a whole page screenshot on Mac is to use a browser extension. It's a fast and reliable tool that provides high-quality images.
Step 1. Install Movavi ScreenShot. You can search for the extension in the Google Web Store and add it to Google Chrome or Mozilla Firefox.
Step 2. Capture the web page. Click on the screenshot icon in the top right corner of your browser and choose the Capture entire screen option. Let the extension scroll the page from top to bottom. It will take just a few seconds!
Step 3. Save the image. The screenshot will appear in a new tab. Now you can download it in JPG format. You don’t have to register on a website to get your images.
How can I take a whole page screenshot on a Mac?
Here’s a list of the best tools to help you capture a whole web page.
- Full Page Screen Capture – an online screen capture
- Google Chrome developer tools
- Capto – a desktop program for Mac
- Mojave hotkeys
- The print and save trick
- Reduce and copy the page
- Built-in screenshot tool in Mozilla Firefox
Check the guide above to learn more about how to scroll and save an entire web page.
Take a screenshot on your Mac
You can capture the entire screen, a window, or just a portion of the screen.
How to take a screenshot on your Mac

To take a screenshot, press and hold these three keys together: Shift, Command, and 3.
If you see a thumbnail in the corner of your screen, click it to edit the screenshot. Or wait for the screenshot to save to your desktop.
How to capture a portion of the screen

Press and hold these three keys together: Shift, Command, and 4.
To take the screenshot, release your mouse or trackpad button.
How to capture a window or menu

Open the window or menu that you want to capture.
Click the window or menu to capture it. To exclude the window's shadow from the screenshot, press and hold the Option key while you click.
Where to find screenshots
By default, screenshots save to your desktop with the name ”Screen Shot [date] at [time].png.”
In macOS Mojave or later, you can change the default location of saved screenshots from the Options menu in the Screenshot app . You can also drag the thumbnail to a folder or document.
In macOS Mojave or later, you can also set a timer and choose where screenshots are saved with the Screenshot app. To open the app, press and hold these three keys together: Shift, Command, and 5. Learn more about the Screenshot app .
Some apps, such as the Apple TV app, might not let you take screenshots of their windows.
To copy a screenshot to the Clipboard, press and hold the Control key while you take the screenshot. You can then paste the screenshot somewhere else. Or use Universal Clipboard to paste it on another Apple device.
Explore Apple Support Community
Find what’s been asked and answered by Apple customers.
How-To Geek
4 ways to take a scrolling screenshot on a mac.
Grab a screenshot of a full web page or document even when it doesn't fit on your screen.
Quick Links
Take full-page screenshots in safari with the develop menu, take a scrolling screenshot with the fireshot safari extension, take screenshots in an online tool, take scrolling screenshots in any app with shottr.
macOS has a built-in tool for taking screenshots, but it can only capture what's actually visible on the screen at any time. What if you need to take a screenshot of an entire web page or lengthy document? Here are the best ways to take scrolling screenshots on a Mac.
Safari has a hidden screen capture tool that you might not know about. It's a bit technical, but is accessible to everyone, and if you only need it for occasional use, this is the simplest option to try.
To access the feature, you first need to enable the Developer Settings in Safari. Go to Safari > Settings > Advanced and click "Show Features for Web Developers".
Exit the settings, and you should see that a "Develop" option has appeared in the Safari menu bar. Now load up the web page you want to screenshot and go to Develop > Show Web Inspector. A panel will open at the bottom of the screen. It looks pretty complicated if you aren't used to it, but don't be put off—you don't need to know what any of it means.
To take your screenshot, make sure the Elements tab is selected at the top of the panel. In the code in the left-hand pane, scroll to the top and right-click on the line that begins "html"—it'll normally be the second line. From the dialog box that opens, click "Capture Screenshot."
You'll now be prompted to choose where to save your image. Click "Save" and you're done.
If you take screenshots of websites regularly, then you'll be better off using an app to handle it. For Safari, you can install an extension to capture scrolling screenshots. The one we like is FireShot, which is free and is also available as an extension for Chrome and other third-party browsers.
Head to FireShot on the Mac App Store and download it by clicking "Get" followed by "Install."
Now open Safari and go to Safari > Settings > Extensions and locate FireShot in the Installed pane. Check the box alongside the name to activate the extension. In the right-hand pane, you can click "Always Allow on Every Website" if you plan to use it a lot. For security reasons, it's better not to do this. You can simply grant permission for the extension to work as and when you need it instead.
Now load up the page you want to screenshot in Safari. You'll see that a FireShot icon has been added to the toolbar alongside the address bar. It'll be grayed out at first, so click the icon and select "Allow for One Day" to give it permission to run.
Click the icon again, followed by "Capture Entire Page." The screenshot will open in a new tab, and you can choose to save it as an image (in the PNG format) or PDF, email it, copy it to your clipboard, or print it.
The other good option for taking full-page screenshots of websites is by using an online tool. This is less convenient in some cases, but it comes with the benefit of being able to share your screenshots between your Mac and another device more easily.
There are many web services that can capture full-screen screenshots of websites. FullPageScreenCapture.com is as good as any. It's free to use and fast, and it assigns a unique URL to every screenshot it saves, so you can access it through any browser on any device.
Simply head to fullpagescreencapture.com and type or paste the URL of the web page you want to save into the box, then click "Capture Now."
It takes a few seconds to process. Once it's done, you'll see the image displayed on the site. Click it to open the image in a new browser tab, then right-click on the image and select either "Save to Desktop" or "Save As."
You can also click in the address bar in Safari and hit Command+C to copy the unique URL for the image and share it with other devices.
Finally, if you need to take a full-page or scrolling screenshot from within any app, not just of a website, you can do this with the third-party app Shottr. You can use it to capture screenshots of PDF files, spreadsheets, documents, large photos, or anything else.
You can use the app for free for as long as you like. After 30 days, it will occasionally ask you if you want to pay for it. You're not obligated to do so, but it only costs $8 and is great value if you use it a lot.
The app isn't available through the Mac App Store. Instead, download it from the official Shottr website and install it to get started .
Launch Shottr, and its icon will appear in your menu bar at the top of the screen where it's always easily accessible. Open the app and content you want to screenshot, then click the Shottr icon and select "Scrolling Capture."
Your mouse pointer will turn into a crosshair. Click in the top-left corner of the area you want to screenshot, then drag to the bottom-right. When you let go of the mouse button, the screen will begin to scroll up. Everything within the width of the rectangle you drew will be captured, right down to the bottom of the page.
Your screenshot will open in a preview window. You can annotate or crop it, or click the Save icon to save it. If you close the preview accidentally, click the Shottr icon and select "Reopen Shottr."
It's easy to take scrolling screenshots on a Mac. Whether you just need a quick tool or a more professional solution, choose the method that's best for you, and you can grab full-page screenshots in any app.
Tips & Tricks
Troubleshooting, take full webpage screenshots on mac via command line with webkit2png.
Ever needed to take a full webpage scrolling screenshot on the Mac through the command line?
While there are various approaches to taking full webpage screenshots on a Mac easily with Firefox or another browser, and many ways to take screenshots on the Mac , including taking screenshots from the Terminal , none of the native options are quite as simple for capturing full page screenshots of websites as the simple approach offered on iPhone or iPad . But if you’re a Terminal user, you can accomplish the task pretty easily with a tool called webkit2png.
This is a commonly required task for web developers, designers, project managers, and many others.
How to Take Full Page Screenshots on Mac via Command Line
Using the webkit2png command line tool, you can capture full webpage screenshots on the Mac.
First you’ll need to install Homebrew on the Mac,
brew install webkit2png
Once installation of webkit2png has completed, you can take a full page screenshot with the following syntax in the command line:
webkit2png -F https://osxdaily.com
The -F flag specifies full page.
You can also specify the width of the browser screenshot in pixels by using -W like so:
webkit2png -F -W 1000 https://osxdaily.com
Important note about capturing screenshots of pages with lazy-loading images : If you are taking screenshots of a web page that uses lazy loading to speed up site loading and page speed, which is incredibly common on the modern web, most of the web page images will not be captured in the screenshot. To avoid that, you’d have to use another full page screenshot method on the Mac like what’s available with Firefox , Safari Developer Tools, or using the iPhone/iPad to take full webpage screenshots .
We covered this tool over a decade(!) ago, but the utility has evolved considerably since then, and the need for it has also increased, thus we’re covering it again and a bit more in depth.
Do you have another approach to taking full page screenshots either from Terminal or elsewhere on the Mac? Let us know in the comments.
Enjoy this tip? Subscribe to our newsletter!
Get more of our great Apple tips, tricks, and important news delivered to your inbox with the OSXDaily newsletter.
You have successfully joined our subscriber list.
Related articles:
- How to Take Full Page Screenshots in Safari on iPhone & iPad
- How to Take Screenshots of Webpages via the Command Line
- Using the Screenshots Album on iPhone and iPad
- How to Change the Font of a Webpage in Safari on iPhone & iPad
» Comments RSS Feed
Simple installation, without homebrew:
sudo curl -L ‘https://raw.githubusercontent.com/paulhammond/webkit2png/master/webkit2png’ -o /usr/local/bin/webkit2png
sudo chmod a+x /usr/local/bin/webkit2png
The homebrew version of webkit2png has not been updated for recent macOS versions that use only python3.
The webkit2png python script has /usr/bin/python hard-coded as the python interpreter to use, which is not installed by default on recent macOS versions.
And if you try to run “python3 /opt/homebrew/bin/webkit2png” you’ll get python3 syntax errors that indicate the script uses obsolete python2 syntax.
Solution: brew uninstall webkit2png
This is accurate. Unfortunately. :(
Leave a Reply
Name (required)
Mail (will not be published) (required)
Subscribe to OSXDaily
- - How to View Instagram Without an Account
- - How to Listen to Voicemail from Apple Watch
- - 3 Great Photo App Tips for iPhone, iPad, & Mac That You May Have Overlooked
- - How to Fix the Apple Watch Squiggly Line Screen
- - How to Enable Screen Sharing in MacOS Sonoma & Ventura
- - MacOS Ventura 13.6.7 & macOS Monterey 12.7.5 Updates Available
- - iOS 16.7.8 & iPadOS 16.7.8 Updates for Older iPhones & iPads Available
- - iOS 17.5 & iPadOS 17.5 Updates Released with Bug Fixes
- - MacOS Sonoma 14.5 Update Released with Security Fixes
- - Release Candidate of iOS 17.5 & iPadOS 17.5 Available for Testing
iPhone / iPad
- - How to Find Your Phone Number on iPhone
- - How to Convert Photos to Videos on iPhone & iPad
- - Beta 4 of macOS Sonoma 14.5, iOS 17.5, iPadOS 17.5, Available for Testing
- - What Does the Number Badge Mean on Microsoft Edge Icon?
- - How to Hide iPhone Keyboard When It’s Covering Buttons & Won’t Go Away
- - What’s a PXM File & How Do You Open It?
- - Fixing Apple Watch False Touch & Ghost Touch Issues

About OSXDaily | Contact Us | Privacy Policy | Sitemap
This website is unrelated to Apple Inc
All trademarks and copyrights on this website are property of their respective owners.
© 2024 OS X Daily. All Rights Reserved. Reproduction without explicit permission is prohibited.
Sign up for our daily newsletter
- Privacy Policy
- Advertise with Us
How to Take a Scrolling Screenshot on Mac

Is the full screen screenshot on Mac not enough for your web page image capturing needs? Use these built-in tools, third-party apps, and browser extensions to take a scrolling screenshot on Mac . These tools and apps only work for web pages and files you can view in browsers.
How to Take a Scrolling Screenshot on Mac Using Safari
Third-party apps for taking scrolling screenshots, how to use browser extensions to take scrolling screenshots on mac, frequently asked questions.
Tip : you can also take scrolling screenshots in Windows using web browsers and third-party apps like Microsoft Edge and ShareX.
You can take a scrolling screenshot on Mac without downloading or using third-party apps. You only need Safari, which comes with Mac computers as the default web browser. Follow these steps to use it to take a scrolling screenshot:
- Go to the web page you want to screenshot.
- Scroll down to the bottom of the web page.

- From the menu bar, click on “Safari,” then select “Settings … “

- In the Safari settings window, go to the “Advanced” tab, tick the “Show Develop menu in menu bar,” then close the settings window.

- From the menu bar, click on “Develop,” then select “Connect Web Inspector” or “Show Web Inspector.”

- A window will appear containing elements and other web page assets.

- Select the first HTML element under the “Elements” tab in the web inspector.

- Right-click on the element, then select “Capture Screenshot.”

- Rename the screenshot, select a save destination, and click on “Save.”

- You can find the image in the save location you selected when you saved it to your Mac. In this example, we are saving the screenshot to the “Desktop” folder as shown above.
If you find Mac’s native scrolling screenshot method complicated, you can download and use third-party apps instead. Two such apps that you can use are listed below:
How to Take a Scrolling Screenshot on Firefox
The Firefox web browser has a built-in tool that makes taking screenshots of entire web pages a breeze. Follow these easy steps:
- Launch Firefox and visit the web page you want to capture.
- Right click on a blank space within the web page and select “Take Screenshot.”

- Click on “Save full page” to take a screenshot of the whole web page.

- In the pop-up window with the screenshot preview, click on the “Download” button.

- You can find the downloaded image in Firefox’s default downloads folder or a different location that you have previously selected.
How to Take a Scrolling Screenshot on Microsoft Edge
Windows’s native browser, Microsoft Edge, has a built-in screenshot tool that lets you capture a scrolling screenshot on Mac. The steps below show how to take a screenshot of a full web page using Microsoft Edge for Mac:
- Right click on a blank space within the web page, then select “Web Capture.” You can also press Shift + Command + S .

- When a small pop-up appears, click on “Capture Full Page” to capture the whole web page.

- In the web capture preview window, click on the floppy disk icon to save the image.

- You’ll find the image you downloaded in Microsoft Edge’s default downloads folder or different location that you have previously selected.
How to Use Full Page Screen Capture to Take a Scrolling Screenshot on Mac
Full Page Screen Capture is a free web app you can use to download a screenshot of a web page by pasting the page link on the app’s website. Use this tool with any web browser on your Mac. These step-by-step details show how to get a scrolling screenshot on your Mac using this third-party web app:
- Launch your web browser and go to Full Page Screen Capture’s website.
- Paste or type the URL of the web page you want to take a screenshot of, then click “Capture Now.”

- Wait for the app to process the web page’s screenshot.
- When the screenshot is ready, you’ll see a preview below the URL field. Click on the “Click to Download” button over the web page’s image. You’ll be directed to a new tab to view and save the full screenshot of the website.

- In the new tab, right-click on the image, then click on “Save Image As … “

- Add a filename, choose the image’s save destination, then click “Save.”

- You can find the image in the save location you selected when you saved it to your Mac. In the example above, we are saving the screenshot to the “Desktop” folder.
Aside from using Mac’s native tool and third-party tools, you can add dedicated web browser extensions, then use them to take scrolling screenshots on Mac. Listed below are two free browser extensions that can be used for this:
How to Use GoFullPage to Take a Scrolling Screenshot
GoFullPage is a browser extension that takes full web page screenshots . You need to add GoFullPage as a browser extension to use it. Follow these steps to take a scrolling screenshot on Mac:
- Launch Google Chrome and add the GoFullPage Chrome extension to your browser by clicking on the “Add to Chrome” button.

- A pop-up will appear asking if you want to add the GoFullPage browser extension. Click on the “Add extension” button to continue.

- After adding the GoFullPage extension to your browser, you’ll be taken to a web page showing you how to use it.

- Pin the GoFullPage icon to Chrome for quick access. To do this, click on the puzzle piece icon at the top right of Google Chrome’s window, then click on the pin icon to the right of GoFullPage.

- Go to the web page you want to take a scrolling screenshot of.
- Click on the GoFullPage icon at the top right of the Google Chrome window to process a screenshot of the web page. You will be directed to a new tab where you can view and download the screenshot.
- In the new tab, you can download the screenshot as a .pdf or an image (.png). Click on your preferred file type to start downloading the image.

- You can find the image in your Mac’s downloads folder or different location that you have previously selected.
How to Use Movavi Screenshot Chrome Extension
The Movavi Screenshot Chrome Extension is a screenshot tool from Movavi’s multimedia suite that will take scrolling screenshots on Mac. Like GoFullPage, you only need to add Movavi Screenshot Chrome Extension to your browser to use it. Follow this step-by-step guide to use it:
- Launch Google Chrome and go to the Movavi Screenshot Chrome Extension page on the Chrome Web Store.
- Click “Add to Chrome” to add this as a Google Chrome browser extension.

- A pop-up will ask you if you want to add Movavi Screenshot Chrome Extension. Click on the “Add extension” button to continue.

- Open the extensions tab by clicking on the puzzle piece icon at the top right of Google Chrome’s window. Click on the pin icon to the right of “Movavi Screenshot Chrome Extension” to pin it for easy access.

- Visit the web page you want to take a scrolling screenshot of.
- At the top right of your browser window, click on the Movavi Screenshot Chrome Extension camera icon.
- Select “Capture entire page” to take a screenshot of the whole web page.

- Let the extension process the image. When it’s done, you’ll be directed to a new tab where you can view and download the screenshot.
- In the new tab, click on the “Save JPG” button to download the image.

- When the extension asks for your permission to manage your downloads, click on the “Allow” button.

- Rename your screenshot, select a save destination, then click on “Save.”

- You can find the image in the save location you selected when you saved it to your Mac. In the above example, we are saving the screenshot to the “Desktop” folder.
Can I use the inspect tool to take a scrolling screenshot on a non-Safari browser?
Firefox also has a screenshot feature within its inspect tool. Just like on Mac, you can right-click on the first element and select “Screenshot Node” to save an image of a whole web page. Google Chrome doesn’t offer this feature.
Do GoFullPage and Movavi Screenshot Chrome Extension work with other browsers?
GoFullPage works on Google Chrome and Microsoft Edge. Movavi Screenshot Chrome Extension works on Google Chrome and Firefox.
How can I remove extensions on Google Chrome?
Click on the puzzle piece icon at the top right of Google Chrome’s window. Find the extension you want to remove, click on the three horizontal dots to its right, then select “Remove from Chrome.”
Image credit: Unsplash . All screenshots by Natalie dela Vega.
Our latest tutorials delivered straight to your inbox

Natalie is a writer specializing in tech how-tos and gaming. When she's not writing, she plays PC games and travels. Here at MakeTechEasier, you will see her write about guides, tips, and solutions for Windows and iOS.

Want to highlight a helpful answer? Upvote!
Did someone help you, or did an answer or User Tip resolve your issue? Upvote by selecting the upvote arrow. Your feedback helps others! Learn more about when to upvote >
Looks like no one’s replied in a while. To start the conversation again, simply ask a new question.
Full page screenshot in Safari
Is there a way to take a screenshot of the entire page, not just what's visible in the window, in Safari? This would typically involve the ability to scroll while taking the screenshot. I cannot find how to do this unless using a 3rd party app. Thanks
iMac 21.5″, macOS 10.15
Posted on Oct 17, 2020 1:12 PM

Posted on Oct 17, 2020 1:59 PM
Here is a solution that does not require the use of third-party applications.
- Open Safari and navigate to the webpage.
- Show Reader View if available and preferred.
- From the menu bar, select File > Export as PDF > [Location] > Save .
Alternatively, this can also be done on an iPhone.
- Take a screenshot , then tap on the thumbnail to edit.
- Tap Full Page > Done > Save PDF to Files > [Location] > Save .
- Share the PDF file with your Mac using AirDrop , iCloud Drive , or another method.
- Open the PDF file in Preview.
- Select File > Export > [Location] and Format: HEIC/JPEG/PNG > Save .
Similar questions
- How to take a full page screenshot in Safari? I’ve been trying to take a full page screenshot on safari, but the option doesn’t function correctly. It gives me an even smaller screenshot than the regular option. Any help to get this to work? Safari is not in a folder by the way. 3028 1
- How do you take a screenshot of an entire webpage that scrolls? How do you take a screenshot of an entire webpage that scrolls? 663 14
- Did full page screenshots in Safari disappear with iOS 15.4? Did full page screenshots in Safari disappear with iOS 15.4? I no longer see the options for “Screen” and “Full Page” when taking a screenshot in Safari. 930 4
Loading page content
Page content loaded
Oct 17, 2020 1:59 PM in response to TVCA89

Oct 17, 2020 1:53 PM in response to TVCA89
Safari 14 does no have a image-based screen capture for the entire web page.
You can print, or export the page content to PDF, or if it is indicated as a Safari Reader page, then choose that, so you will have a reformatted page without advertisements to export to PDF.
Oct 18, 2020 1:54 PM in response to VikingOSX
Thanks for the tips Vik. This will work for what I need.
Oct 18, 2020 1:54 PM in response to Sean_W.
Thanks for the response and tips Sean. This is helpful.
FireShot: Web Page Screenshots 4+
Full page captures for safari, evgeny suslikov.
- 4.7 • 121 Ratings
Screenshots
Description.
The best way to save full web pages to PDF with live hyperlinks, PNG or JPEG. Copy webpage screenshots to clipboard, print or directly attach to Gmail messages. Capture full page screenshots in Safari on Mac. Create PDF files from web pages including hyperlinks. Awarded as "The Best Free Google Chrome Extension" by PCMAG.COM. More that 3,500,000 users worldwide use FireShot in different browsers. Instant screenshots are stored locally, and never leave your computer, so it's 100% safe for storing a sensitive information. FireShot can work offline. No spyware and unnecessary permissions - you're just in a couple of clicks away from an ideal screenshot. The app is known as FireShot on other browsers. ### What you can do with Full Page Screen Capture (FireShot) - Save screenshot as PDF (with hyperlinks), PNG, or JPEG - Perform screen capture of full page, visible part of the web page or just a selection - Capture all tabs in one click - Automatically capture a list of web pages - Attach screenshots to Gmail messages - Copy to clipboard - Print ### Depending on Safari version, some features may be unavailable - the browser's API is still under a heavy development.
Version 1.12.18
- Capture all open tabs in one click - Create a list of web page addresses and automatically capture it with FireShot - Improved "Save as" dialog - Improved PDF saver, adding metadata to created PDF files
Ratings and Reviews
121 Ratings
Must have software tool
Very easy to use. Much better than the screen capture software that came standard with Mac OS Monterey. Allows user to make a screen printout immediately after the screen selection is displayed. This is done by clicking on the app's menu option "print." The app's menu has several other options for saving the screen selection. A great app. Apple should include this app as standard in Mac OS.
Developer Response ,
Thank you for your feedback!
Problems capturing very large web pages
Fireshot saves web pages thet otherwise won't fit on your screen because they have content that runs off the bottoom of the browser. It integrates with Safari almost flawlessly. It is quick and simple to use, with the press of a button on any loaded web site. The tool allows several capture options, form a small portion of the page to the whole page. It also has the ability to send the image or PDF file in an email message directly from the browser window. It would be perfect if it could capture multi page portions of exceptionally large web pages and/or then allow the user to zoom in and then crop the desired section(s) of the page before saving.
Thank you for your feedback. The feature you suggested will become available once we roll out the editing capabilities.
Just what I needed
Just what I needed to capture full web pages as screenshots. Intuitive to use. Options to export as images and PDFs, and for the latter you can specify "smart" page breaks if the web page is particularly long. I've only been using it for a week or so, but it's worked like a charm and saved me the trouble of piecing together screenshots.
Thank you for your review!
App Privacy
The developer, Evgeny Suslikov , indicated that the app’s privacy practices may include handling of data as described below. For more information, see the developer’s privacy policy .
Data Not Linked to You
The following data may be collected but it is not linked to your identity:
- Diagnostics
Privacy practices may vary, for example, based on the features you use or your age. Learn More
Information
- Developer Website
- App Support
- Privacy Policy
- Apple Watch
- Accessories
- Digital Magazine – Subscribe
- Digital Magazine – Info
- Smart Answers
- 11th-gen iPad
- New AirPods
- Best Mac antivirus
- Best Mac VPN
When you purchase through links in our articles, we may earn a small commission. This doesn't affect our editorial independence .
How to use Mac Recovery Mode

MacOS Recovery (often referred to as Mac Recovery Mode) was introduced back in 2010 with OS X 10.7 Lion. This Recovery HD partition contains the latest version of the macOS you installed on your Mac and makes it possible to troubleshoot issues with your Mac. It is a useful tool that the majority of Mac users will almost never need to use.
Why use macOS Recovery?
I did say almost . There are a few instances where you may need to use macOS Recovery:
- You need to wipe a Mac because you want to sell it or pass it on to a new user. MacOS Recovery will allow you to wipe your Mac, removing your data and your Apple ID. We have a detailed tutorial on how to wipe your Mac and restore it to factory settings . Note that there is a new way to wipe your Mac in macOS Monterey, which we investigate in that tutorial as well.
- You need to troubleshoot problems, such as failure to start up. For more info read: What to do if your Mac won’t start up .
- There is an issue with your disk and you want to use Disk Utility to repair it. Read: How to use Disk Utility on a Mac .
- Disk Utility was unable to repair the issue with your drive.
- You are encountering problems with a particular version of macOS and want to go back an older version. Read: how to reinstall macOS using Recovery Mode .
- You want to do a clean install of macOS. This could fix issues that might be slowing down your Mac, for example. Here’s how to clean install macOS.
- You want to erase your disk for another reason.
- You want to restore from a Time Machine backup. Read: how to restore from Time Machine .
- You are having problems with your internet connection.
How to start a Mac into Recovery Mode
There are now two ways to start Recovery Mode and the method you use depends on which Mac you own.
M-series Macs
If you have a new Mac with an Apple processor, such as the M1 Macs introduced in November 2020, or one of the newer M3 Pro MacBook Pro models, you need to enter Recovery using a new method (lots of people don’t know this and are wondering why Command+R no longer works ).
- Turn off the Mac.
- Press the on button and keep it pressed.
- Eventually, the Apple logo will appear with text below it informing that if you continue holding the power button you will be able to access startup options. Keep pressing that button.
- Eventually, you will be able to select Options > Continue and this will open up Recovery, as per the image below. (Please excuse the quality when it’s not possible to screenshot!)

If you need to enter Recovery Mode on a Mac with an Intel processor follow these steps:
- Click on the Apple logo at the top left of the screen.
- Select Restart .
- Immediately hold down the Command and R keys until you see an Apple logo or spinning globe. You will see the spinning globe if the Mac is trying to start macOS Recovery via the internet because it is unable to start from the built-in recovery system.
- Eventually, your Mac will show the Recovery Mode Utilities window with the following options:
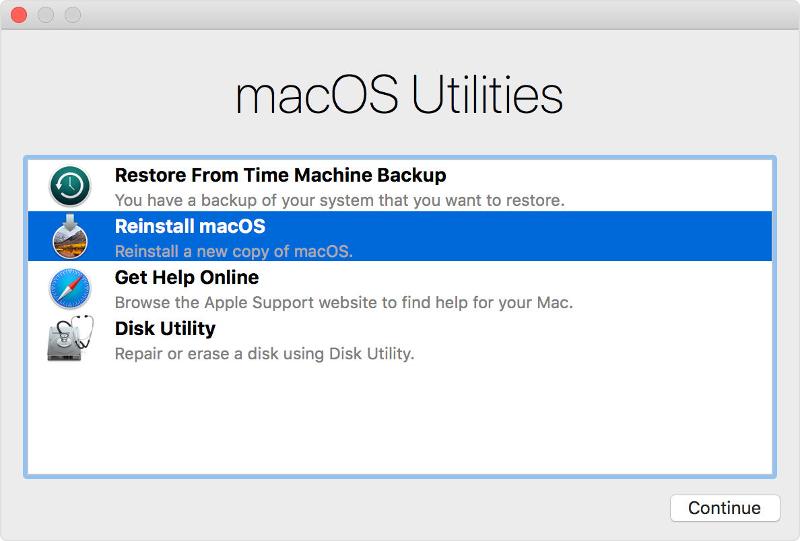
There are several different key combinations you can use to boot in Recovery mode depending on what you want to do, we detail these below.
Which keys to use for macOS Recovery Mode
Depending on what you want to do with macOS Recovery there are several key combinations to use during start up. These options work on an Intel-powered Mac:
- Command+R : Use this if you want to install the latest version of macOS that you had installed on your Mac (it won’t install a newer version if you haven’t upgraded). Note that if you’re selling or giving away a Mac that is using OS X El Capitan or earlier you should also use Command + R–this will make sure that the installation isn’t associated with your Apple ID.
- Option/Alt+Command+R : Use this if you want to upgrade to the latest version of macOS that is compatible with your Mac.
- Shift+Option+Command+R : This will install the version of macOS that came with your Mac, or the one closest to that version if it isn’t available as a download.
Mac Recovery Mode options
When you start up in Recovery Mode you will see the following options:
- Restore from a Time Machine backup : If you have a Time Machine backup this is an easy way to restore your system
- Reinstall macOS : This will allow you to reinstall macOS (the version will depend on the key combination used above)
- Safari (or Get Help Online in older versions): To access Apple’s support web pages. This gives you access to Safari so you can look for the help you need, but some browser features won’t be available.
- Disk Utility : This option allows you to verify and repair connected drives.
Select the option that applies to you and click Continue .
We have various tutorials that might help you here. For example:
- How to restore from a Time Machine Backup
- How to reinstall macOS using Recovery
- How to use Disk Utility
Other options in Recovery Mode
There are also various options accessible from the menu at the top of the page via the File, Edit, Utilities and Window tabs. These include:
- Terminal : You can get to Terminal through the Utilities menu. Read about how to use Terminal here .
- Startup Security Utility : Found under the Utilities menu. Startup Security Utility includes settings that allow your Mac to start up from a trusted startup disk. M-series Macs and Macs with the T2 chip have additional options including Firmware password protection, Secure Boot, and External Boot options. It is in this second section that you will find Allow booting from external or removable media. You will need this selected to boot from a bootable drive. See: How to create a bootable USB macOS installer.
- Network Utility : The Network Utility app gives you access to tools and information that can help you with problems with your network connections. Read more about fixing network problems . Click on the Network Utility option if you want to test ping on your Mac (we have a guide to testing Ping on a Mac ).
What to do if macOS Recovery doesn’t work
If you can’t start up in macOS Recovery, there are a couple of options, but again, they are different depending on whether you are on an M-series Mac or an Intel Mac.
Apple has a “fallback Recovery mode” that is detailed here. In this case, double press the power button: first press it, release it, and then press and hold down the power button. Fallback recovery mode accesses a second copy of the recoveryOS on the SSD of the Macs with an M-series chip. Apple says the second copy is there for resiliency. There is no Internet Recovery for M-series Macs as there is for Intel Macs.
You can try forcing it to boot in macOS Recovery over the internet. Internet Recovery Mode allows you to download a new copy of macOS over the internet so that you can reinstall it on your Mac. This only works on Macs from 2011 or later, and you will need OS X Lion or later installed.
Here’s how to do that:
- On an Intel Mac hold down Option/Alt-Command-R or Shift-Option/Alt-Command-R at startup to force macOS Recovery to boot over the Internet.
We have more tips for booting without a Recovery partition .
If you still can’t boot then you could try booting via an external Mac startup disk.
How to exit macOS Recovery?
To exit macOS Recovery, you need to shut down or restart the Mac. Go to the Apple menu and select either Restart or Shut Down. If you restart, the Mac will boot as usual. If you shut down, your Mac will boot as usual when you power it on.
Author: Karen Haslam , Managing Editor

Karen has worked on both sides of the Apple divide, clocking up a number of years at Apple's PR agency prior to joining Macworld more than two decades ago. Karen's career highlights include interviewing Apple's Steve Wozniak and discussing Steve Jobs’ legacy on the BBC. Having edited the U.K. print and online editions of Macworld for many years, more recently her focus has been on SEO and evergreen content as well product recommendations and buying advice on Macworld.com.
Recent stories by Karen Haslam:
- How to type euro symbol, pound sign, €, Æ, #, @, © & @ on a Mac
- macOS 14 Sonoma superguide: Everything you need to know
- Apple Back to School 2024: When and what is Apple’s back to uni deal?
- a. Send us an email
- b. Anonymous form
- Buyer's Guide
- Upcoming Products
- Tips / Contact Us
- Podcast Instagram Facebook Twitter Mastodon YouTube Notifications RSS Newsletter
Apple Releases macOS Sonoma 14.5 With Apple News+ Improvements
Apple today released macOS Sonoma 14.5, the fifth update to the macOS Sonoma operating system that launched last September. macOS Sonoma 14.5 comes more than two months after the launch of macOS Sonoma 14.4 .

macOS Sonoma 14.5 adds a new word game for Apple News + subscribers and allows for tracking stats and streaks of News+ games. Apple's release notes:
macOS Sonoma 14.5 includes the following improvements and bug fixes: - Quartiles is a new and original daily word game that is now available in Apple News+ - Scoreboard in News+ Puzzles gives you access to new player data for Crossword, Mini Crossword and Quartiles, including stats and streaks Some features may not be available for all regions, or on all Apple devices. For detailed information about the security content of this update, please visit: https://support.apple.com/kb/HT201222
We're nearing the end of the macOS Sonoma development cycle, and this could be one of the last feature updates that we see. Apple is already working on macOS 15 , and plans to introduce it next month at WWDC.
Get weekly top MacRumors stories in your inbox.
Top Rated Comments

I really hope Mac OS 15 is a bugfix/refinement update and also that Apple secretly fired their UI team and got a competent one

Popular Stories

Apple Apologizes for 'Crush' iPad Pro Ad, Won't Put It on TV

10 Reasons to Wait for Next Year's iPhone 17

OpenAI Announces ChatGPT App for Mac, GPT-4 for Free, and More

Apple Releases iOS 17.5 With Cross-Platform Tracking Detection, EU App Downloads From Websites and More

Apple Releases tvOS 17.5
Next article.

Our comprehensive guide highlighting every major new addition in iOS 17, plus how-tos that walk you through using the new features.

Apple News+ improvements, cross-platform tracker alerts, website app downloads for the EU, and more.

Get the most out your iPhone 15 with our complete guide to all the new features.
A deep dive into new features in macOS Sonoma, big and small.

Revamped models with OLED displays and M4 chip, plus Apple Pencil Pro and redesigned Magic Keyboard accessories.

Updated 11-inch model and new 13-inch model, both with M2 chip.

Apple's annual Worldwide Developers Conference will kick off with a keynote on June 10.

Expected to see new AI-focused features and more. Preview coming at WWDC in June with public release in September.
Other Stories

1 day ago by Juli Clover

1 day ago by Tim Hardwick

6 days ago by Tim Hardwick

1 week ago by Tim Hardwick
iOS 17.5 includes these 15 security patches for iPhone users
iOS 17.5 has landed for everyone with several new user-facing features . And there are also 15 important security fixes that come with the update. Here are the full details on everything that’s been patched.
Apple shared the specifics of the iOS 17.5 vulnerability fixies on its Security Updates site .
Fortunately, none of the 15 fixes were reported as previously exploited.
But it’s still important to install the update and get these patches as soon as you can. Some of these vulnerabilities could allow an attacker to access user data and execute arbitrary code with kernel privileges.
- iOS 17.5 is now available: Here’s everything you need to know
What are the iOS 17.5 security fixes?
Here are some of the apps/systems of iOS that saw patches:
RemoteViewServices
Screenshots
Voice Control
There were also updates with fixes for the App Store, Face ID, Safari Downloads, and more.
Check out what all is new with iOS 17.5 and the full security update release notes below:
Available for: iPhone XS and later, iPad Pro 12.9-inch 2nd generation and later, iPad Pro 10.5-inch, iPad Pro 11-inch 1st generation and later, iPad Air 3rd generation and later, iPad 6th generation and later, and iPad mini 5th generation and later
Impact: An app may be able to execute arbitrary code with kernel privileges
Description: The issue was addressed with improved memory handling.
CVE-2024-27804: Meysam Firouzi (@R00tkitSMM)
AppleMobileFileIntegrity
Impact: An attacker may be able to access user data
Description: A logic issue was addressed with improved checks.
CVE-2024-27816: Mickey Jin (@patch1t)
AVEVideoEncoder
Impact: An app may be able to disclose kernel memory
CVE-2024-27841: an anonymous researcher
Impact: A malicious application may be able to determine a user’s current location
Description: A privacy issue was addressed by moving sensitive data to a more secure location.
CVE-2024-27839: Alexander Heinrich, SEEMOO, TU Darmstadt (@Sn0wfreeze), and Shai Mishali (@freak4pc)
Impact: An attacker may be able to cause unexpected app termination or arbitrary code execution
CVE-2024-27818: pattern-f (@pattern_F_) of Ant Security Light-Year Lab
Impact: An app may be able to access protected user data
Description: A permissions issue was addressed by removing vulnerable code and adding additional checks.
CVE-2023-42893: an anonymous researcher
Impact: An app may be able to read sensitive location information
Description: A path handling issue was addressed with improved validation.
CVE-2024-27810: LFY@secsys of Fudan University
MarketplaceKit
Available for: iPhone XS and later
Impact: A maliciously crafted webpage may be able to distribute a script that tracks users on other webpages
Description: A privacy issue was addressed with improved client ID handling for alternative app marketplaces.
CVE-2024-27852: Talal Haj Bakry and Tommy Mysk of Mysk Inc. (@mysk_co)
Impact: An attacker with physical access to an iOS device may be able to access notes from the lock screen
Description: This issue was addressed through improved state management.
CVE-2024-27835: Andr.Ess
Impact: An attacker with physical access may be able to share items from the lock screen
Description: A permissions issue was addressed with improved validation.
CVE-2024-27803: an anonymous researcher
Impact: A shortcut may output sensitive user data without consent
CVE-2024-27821: Kirin (@Pwnrin), zbleet, and Csaba Fitzl (@theevilbit) of Kandji
Sync Services
Impact: An app may be able to bypass Privacy preferences
Description: This issue was addressed with improved checks
CVE-2024-27847: Mickey Jin (@patch1t)
Impact: An attacker may be able to elevate privileges
Description: The issue was addressed with improved checks.
CVE-2024-27796: ajajfxhj
Impact: An attacker with arbitrary read and write capability may be able to bypass Pointer Authentication
WebKit Bugzilla: 272750 CVE-2024-27834: Manfred Paul (@_manfp) working with Trend Micro’s Zero Day Initiative
Additional recognition
We would like to acknowledge an anonymous researcher for their assistance.
We would like to acknowledge Adrian Cable for their assistance.
We would like to acknowledge Lucas Monteiro, Daniel Monteiro, and Felipe Monteiro for their assistance.
HearingCore
Managed Configuration
We would like to acknowledge 遥遥领先 (@晴天组织) for their assistance.
Safari Downloads
We would like to acknowledge Arsenii Kostromin (0x3c3e) for their assistance.
We would like to acknowledge Abhay Kailasia (@abhay_kailasia) of Lakshmi Narain College of Technology Bhopal for their assistance.
Top image via Apple
FTC: We use income earning auto affiliate links. More.
Check out 9to5Mac on YouTube for more Apple news:

Introduced in 2007 by Steve Jobs, iPhone is Appl…

Michael is an editor for 9to5Mac. Since joining in 2016 he has written more than 3,000 articles including breaking news, reviews, and detailed comparisons and tutorials.
Michael Potuck's favorite gear

Satechi USB-C Charger (4 ports)
Really useful USB-C + USB-A charger for home/work and travel.

Apple Leather MagSafe Wallet
My slim wallet of choice for iPhone 12

Manage push notifications
IMAGES
VIDEO
COMMENTS
Open Safari and go to " Safari > Preferences…. Click the Advanced tab and toggle on " Show Develop menu in menu bar .". Navigate to the webpage you want to capture and from the Develop menu, choose " Show Web Inspector .". Alternatively, you can hit alt-command-I (⌥⌘I). Select the Elements tab and right-click on the line that ...
Open the Chrome browser on your Mac and go to the page you want to screenshot. Press the Command + Option + I keyboard combination, and you will see a window appear to the right. Next, press Command + Shift + P and then type " Screenshot" in the Run field. You will see several screenshot options ( Capture area screenshot, Capture full size ...
Update: Safari introduced a feature accessible via the developer tools, which lets users capture screenshot of the entire webpage.This feature was not available at the time the answer was written. The original answer is kept as is for reference. For Safari, refer to the answer by shawncampbell.. But, are there any keyboard shortcuts that can scroll a webpage or any other pages and get the ...
Download and install Snagit. Launch Snagit and click the "All-In-One" tab to the left. Click the Capture button. Select the area of the website you want to capture and click the "Launch a Panoramic Capture" button. Click start and start scrolling down the website and click Stop when you're done.
Now right-click (Ctrl-click) anywhere on the webpage and select Take Screenshot from the contextual menu. To capture the entire webpage, click Save full page in the top-right corner of the browser ...
Under the "Paper Size" pop-up, select "Manage Custom Sizes". Create a new paper size that fits the entire webpage (eg, 8.5in x 30in). Use the PDF pop-up to "Save as PDF..." The downside to this approach is that if the site has different screen and print styles, you can only get a PDF of the print style. Share.
Click the Edit button at the top right of the window. From there, click the Crop tool at the top left. Click and drag the corners of the marquee that appears to crop comfortably to the edges of your screenshot, then click Done at the top right. You've now captured the full length of a web page without any additional software or tools.
4) Choose a location to save the image and optionally rename it. 5) Hit Save. You can then open the saved image in Preview or your Mac photo editor to see it in full. To close the Web Inspector in Safari after you capture the shot, just click the X on the top left corner of the panel.. Related: How to save or share a full Safari webpage as a multi-page PDF
Steps to take a screenshot of an entire webpage in Safari. Step 1: Launch Safari on your Mac and navigate to the web page you wish to capture. From the top menu bar, click on the File option, and then select the "Export as PDF" option from the drop-down menu. Step 2: Once you have selected the "Export as PDF" option, a save dialog box ...
Press Command + Shift + 5 together. 3. Click on the record option or camera icon on the screen. 4. Now scroll to the end of the page and press Command + Shift + 5 again. 5. Click on the stop icon in the screenshot toolbar. Now the whole scrolling screenshot will be saved in the form of a video. Also Read: How to Take Screenshots on Mac.
Open Safari and navigate to the web page you want to capture. Press the keyboard shortcut Command + Shift + 5 to open the Screenshot tool. In the Screenshot tool, click the Options button and select Capture Entire Page from the drop-down menu. Click the Capture button to start the scrolling screenshot capture process.
https://macmost.com/e-1989 If you need to capture an entire web page as an image, it can be difficult to do so because macOS screenshots don't allow you to c...
If you need to capture an entire web page as an image, it can be difficult to do so because macOS screenshots don't allow you to capture all of the contents of a scolling window. However, you can use many different techniques to get the entire contents of a web page. Safari has a hidden feature to do this, but sometimes it won't work on certain pages.
Then, to capture the full page, press Command - Shift - 3. 2. Firefox screenshot feature. If you use Firefox as your chosen browser, it has a handy feature that lets you screenshot an entire page on a Mac; here's how: Open Firefox and head to the webpage you want to capture. Scroll all the way down to the bottom of the webpage.
Open Safari: Launch the Safari browser and navigate to the web page or content you wish to capture. Activate the Screenshot Toolbar: Once on the desired page, press the Shift + Command + 5 keys simultaneously. This keyboard shortcut triggers the Screenshot Toolbar to appear at the bottom of the screen, presenting a range of screenshot and ...
If you want to take a full page screenshot using safari on a mac, try this: go to the page you want a screenshot of. click "file," then select the option for "export as pdf..." "save as" window appears: give the screenshot a name, tags, and click where you want it to save. press "enter".
The easiest way to take a whole page screenshot on Mac is to use a browser extension. It's a fast and reliable tool that provides high-quality images. Step 1. Install Movavi ScreenShot. You can search for the extension in the Google Web Store and add it to Google Chrome or Mozilla Firefox. Step 2.
Take a screenshot on your Mac. You can capture the entire screen, a window, or just a portion of the screen. How to take a screenshot on your Mac . To take a screenshot, press and hold these three keys together: Shift, Command, and 3. If you see a thumbnail in the corner of your screen, click it to edit the screenshot.
macOS has a built-in tool for taking screenshots, but it can only capture what's actually visible on the screen at any time. ... Take Full-Page Screenshots in Safari With the Develop Menu Safari has a hidden screen capture tool that you might not know about. It's a bit technical, but is accessible to everyone, and if you only need it for ...
Using the webkit2png command line tool, you can capture full webpage screenshots on the Mac. First you'll need to install Homebrew on the Mac, Once installation of webkit2png has completed, you can take a full page screenshot with the following syntax in the command line: The -F flag specifies full page. You can also specify the width of the ...
Launch your web browser and go to Full Page Screen Capture's website. Paste or type the URL of the web page you want to take a screenshot of, then click "Capture Now.". Wait for the app to process the web page's screenshot. When the screenshot is ready, you'll see a preview below the URL field.
Open Safari and navigate to the webpage. Show Reader View if available and preferred. Take a screenshot, then tap on the thumbnail to edit. Tap Full Page > Done > Save PDF to Files > [Location] > Save. Share the PDF file with your Mac using AirDrop, iCloud Drive, or another method. Step 2: Open the PDF file in Preview.
Screenshots. The best way to save full web pages to PDF with live hyperlinks, PNG or JPEG. Copy webpage screenshots to clipboard, print or directly attach to Gmail messages. Capture full page screenshots in Safari on Mac. Create PDF files from web pages including hyperlinks. Awarded as "The Best Free Google Chrome Extension" by PCMAG.COM.
Intel Macs. If you need to enter Recovery Mode on a Mac with an Intel processor follow these steps: Click on the Apple logo at the top left of the screen. Select Restart. Immediately hold down the ...
Apple's release notes: macOS Sonoma 14.5 includes the following improvements and bug fixes: - Quartiles is a new and original daily word game that is now available in Apple News+. - Scoreboard in ...
Here are the full details on everything that's been patched. ... Face ID, Safari Downloads, and more. ... Screenshots. Available for: iPhone XS and later, iPad Pro 12.9-inch 2nd generation and ...