- Best Hikes In The World
- Appalachian Trail
- European Hikes
- Nepal Hikes
- Patagonia Hikes
- See All Hikes
- Mount Kenya
- Mount Kilimanjaro
- Mount Toubkal
- See All Mountains
- South Africa
- New Zealand
- Switzerland
- United Kingdom
- Packing Lists

W Trek Patagonia – Guide To The Most Popular Hike In Torres Del Paine

Chile , Hikes , Patagonia , South & Central America

The Torres Del Paine W Trek in Patagonia is a 5-day, 100km adventure that brings you to some of the best features of Torres Del Paine. Visit Grey Glacier, the base of the Towers, the French Valley, and much more on this epic trek.
In this comprehensive guide, I'll go through everything you need to know about planning for and hiking this trail. I’ve also thrown in some up-to-date tips and links for booking campsites in Torres Del Paine.
Get ready to embark on the trail of a lifetime!
Why Hike The Patagonia W Trek?
See the highlights of torres del paine.
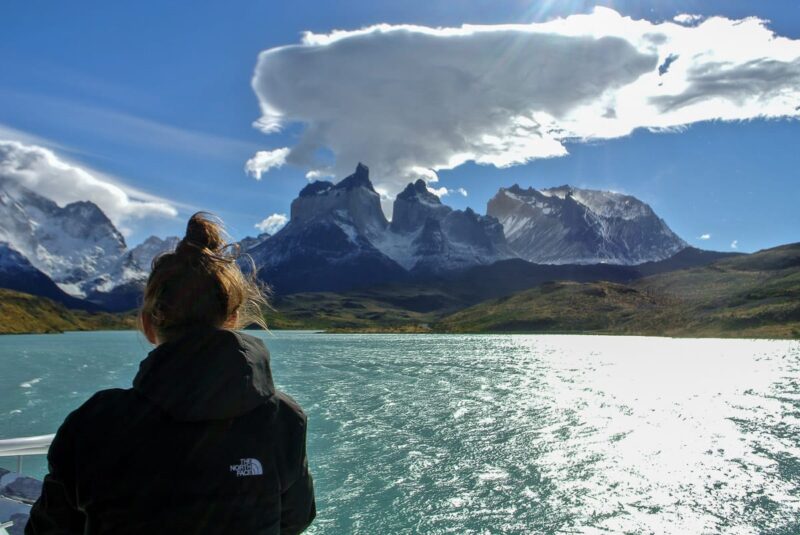
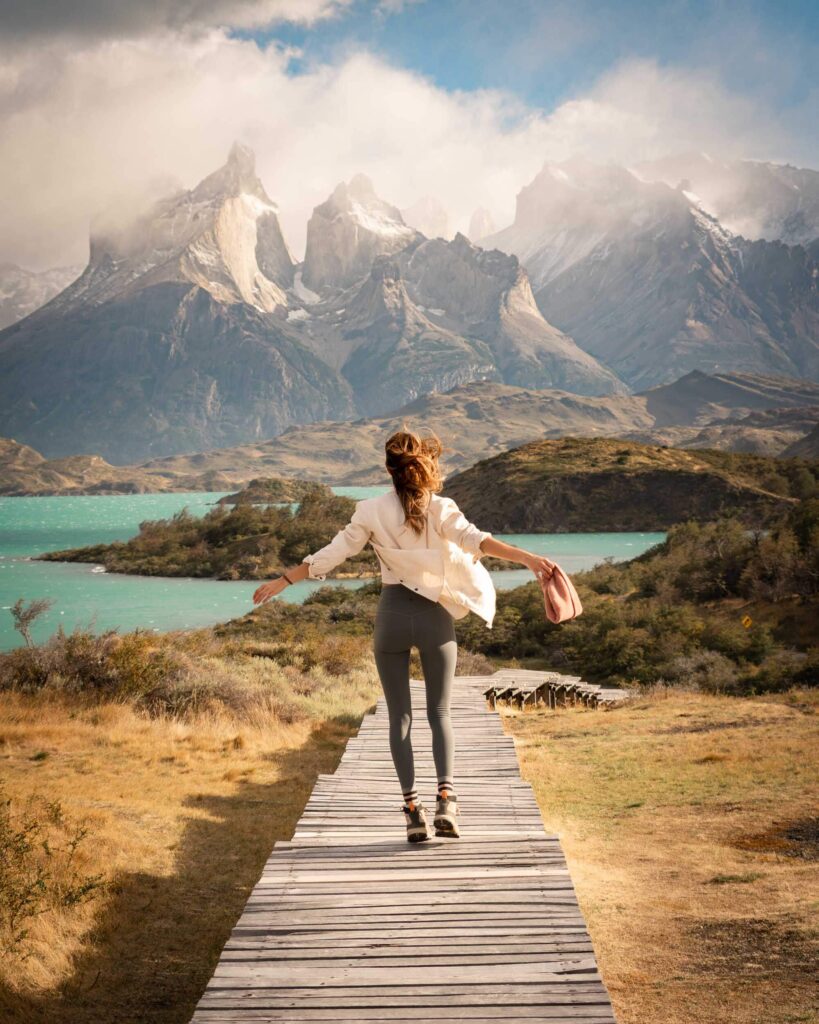
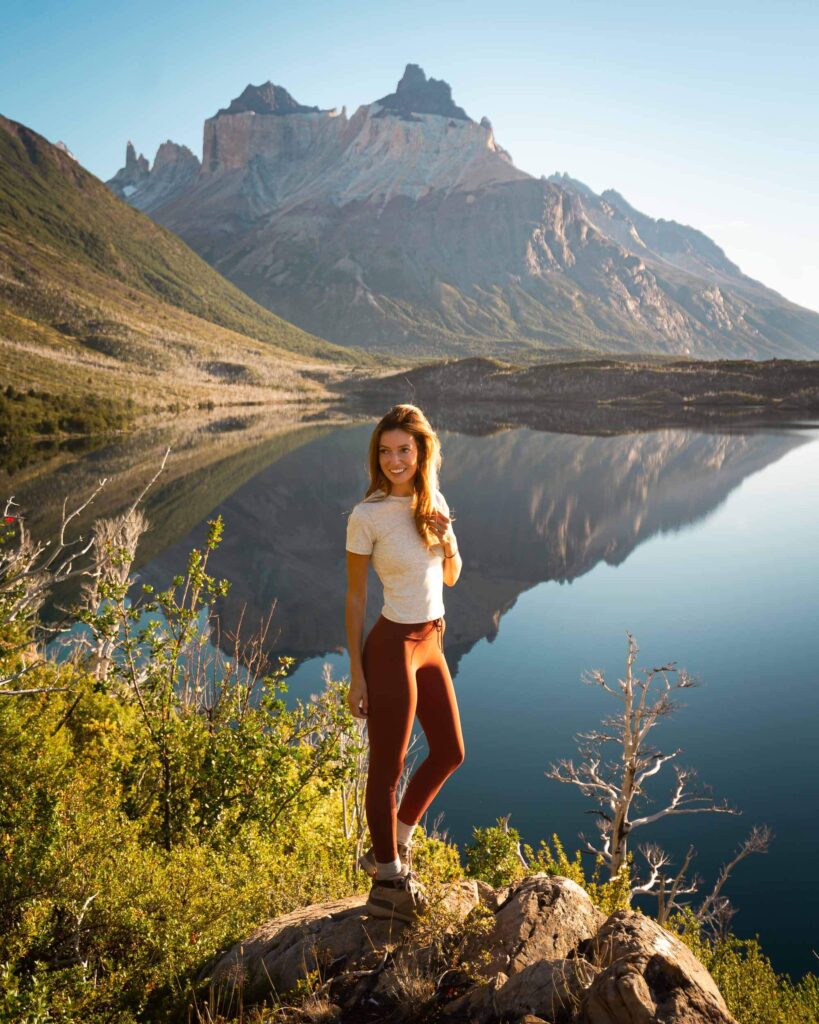
One of the main reasons why the W Trek in Patagonia is so popular is the stunning scenery that hikers encounter along the way. The route takes visitors past the park’s most popular features. See the granite spires of Torres del Paine, the turquoise waters of Grey Lake, and the vast glaciers that dominate the landscape.
An Accessible Trail If You Have Limited Time
Another reason why the W Trek in Patagonia is so popular is its accessibility. Unlike many other remote treks in Patagonia, the W Trek is relatively easy to reach and can be completed in a week or less. This is great if your Patagonian backpacking trip has a time limit.
Additionally, the W Trek offers several options for accommodations, from camping to refugios (mountain huts), making it accessible to a wide range of budgets and experience levels.
W Trek Patagonia- Know Before You Go
W trek in patagonia- location.
The Torres Del Paine W Trek is situated in Chile near the southern tip of South America. The park itself is located 112 km north of Puerto Natales and 312 km north of Punta Arenas.

When is the best time to trek the W Hike Patagonia?
To highlight the pros and cons of each season, we have written a brief description of each below.
It’s worth also reading our articles on the best time to trek in Patagonia and, more specifically, when to hike in Torres Del Paine .
Spring - September to November
This is the perfect time of year to visit the park if you're wanting to experience warm, clear weather but without the huge crowds. Although not as warm as the summer months, the skies are often clear and you will get incredible views across the park. This is also the best season to see flowering flora in the region and witness the breeding season for wildlife.
Summer - December to March
This is the high season at Torres del Paine national park . Although the trails in Torres Del Paine are at their busiest, the weather is at its warmest. You'll get the maximum amount of clear days on your trek at this time of year. If you're the active type, then summer is also the period when you can horse ride, kayak, and mountain bike alongside your trek!
Fall - March to June
My favorite season without a doubt. The landscape becomes ablaze with color as the trails start to empty out and days become colder. The wind is often ferocious, but the spectacularly beautiful views are worth it!
Winter - June to August
Between May- September, self-guided hiking is not permitted in Torres Del Paine. Over this period, you can only hike Patagonia W Trek with a guide.
The major benefit of this season is that it is the quietest. There will be very few other visitors and you'll have many of the trails to yourself. This is the coldest period though and you will certainly experience cold nights and high, cold winds.

Torres Del Paine National Park
How Difficult Is Patagonia’s W Trek?
The Torres Del Paine W Trek is considered to be an easy multi-day trek as the elevation remains fairly steady throughout the hike. There is also the added benefit that the trek can be done over a longer or shorter period depending on your fitness levels.
Although regarded as easy, the trek still requires a solid level of fitness as you will be trekking a total of 100km/ 62 miles. This is 10-20km per day depending how many nights you camp out.
Hikers generally stay at the same elevation and certainly never go high enough for altitude sickness to become an issue.
The trails are well-defined and you’ll find signposts dotted along the trails at regular intervals. Water is available at all campsites, as is food. Ranger stations are dotted along the trail and you’ll most likely be among other trekkers (depending on when you trek).
Be careful though, storms are frequent in Patagonia and the wind can get extremely cold and strong. Always check weather forecasts before your day of trekking as the John Gardner Pass is often closed due to high winds.
Are Permits Required for The W Trek in Patagonia?
Yes, a permit is needed to enter the park. Permits cost $49 for more than three days. You need to book tickets online at least 24hrs before you visit.
You can print the permit or show it to officials on your phone. The park officials will need to see proof that you have booked your camping ground accommodation in advance.
Accommodation And Food On The W-Hike Patagonia
There are 11 campsites in the park which are run by three different companies. Currently, you can book campsites through Vertice Patagonia and Las Torres . Campsites cost between $10-$25 (Site only). Both companies also have the option to rent camping gear.
As well as tents, there is also options to stay in dormitories, cabins, and refugios. You can book these with the same companies mentioned above. I suggest using only one company to book your entire trek, for simplicity's sake.

Hotel In Torres Del Paine National Park
At the camps, you will find bathrooms, shops, and even small restaurants. You may need to pre-order your meal so check beforehand.
Note: As of 2022/2023, the free CONAF campsites (El Paso and Italiano) are not available. It is unclear when and if these will re-open. It’s better to budget in paying for all your sites. If this has changed, please drop us a comment.
How Far In Advance Should You Book The W Trek, Patagonia?
Torres Del Paine treks are not something you can decide to do last minute. I’ve seen a friend break a sweat over finding campsites when she already had flights to Punta Arenas booked. This was a whole three months before her hike in November! To be safe, I’d say you should plan and book your trip at least six months in advance. Maybe even more if you plan on hiking the W Trek in the peak season (December-March)
Since 2016, the amount of people who can hike the W Trail is 80 persons per day. Visitors must reserve a place if trekking solo without an operator and you’ll need to take the trail in a counterclockwise direction.
How Do You Get To Torres Del Paine And The Start Of Patagonias W Trek?
Visitors can fly into Punta Arenas, Chile, or El Calafate, Argentina. From either of these towns. You can then take a bus to Puerto Natales.
The bus ride from Punta Arenas to Puerto Natales takes three hours and costs between $20-$30 dollars.
Buses between El Calafate and Puerto Natales are quite a bit longer (around 5 hours). Tickets cost between $30-$40.

Its good to spend at least one night before the W Trek resting and exploring Puerto Natelensis
Daily buses run between the town of Puerto Natales to the entrance of Torres Del Paine. This ride will set you back $15-$15. If you have a higher budget, you could arrange a private transfer to the park and organize for the driver to pick you up after your trek.
How much does the W Trek Patagonia Cost?
The cost of a Torres Del Paine W Trek varies depending on when you book flights and when you trek (out-of-season tends to be a little cheaper). If you go with a trekking agency, local companies will be much cheaper than booking through an American or European operator. Trekking independently in Patagonia is always the most budget-friendly choice.
- Tour Agency: ~$500 for a cheap local agency to ~$2,000 for a pricey Western trekking agency
- Visa, Vaccinations, Insurance etc:~$300-$500
- Equipment (buying and hiring):~$500-$800 – camping gear can be rented at the park entrance for $200.
- Return flights to Punta Arenas: ~$1,500
- Tips: ~$10-20
- Misc (additional food, unplanned travel/hotels, etc): $50
Total costs with tour agency: $2,000 – $4,000 It is possible to plan an independent W trek for less than $300. This price includes food, park entrance, and camping (assuming you have your own equipment). Food can be purchased from refugios throughout the park, however, it is very expensive.
You may also like : Guide to Fitz Roy hikes
Hiking The W Trek Patagonia - Route Guide
The most popular trek in Patagonia , the Torres Del Paine W Trek is fast becoming one of the most well-respected short hikes in the world due to the trail's stunning scenery.

Guanaco in Torres Del Paine
Located in the amazing Torres del Paine National Park which was made a World Biosphere Reserve by UNESCO in 1978. The 100km trek generally takes around 5 days to complete. It takes visitors into the very heart of the park, through haunting forests, soaring mountains, and colossal glaciers.
Where does the W Hike Patagonia Start And End?
The trek begins with a lovely boat ride near the Grey Glacier and finishes with a magical sunrise at the famous Torres on the final morning. There is the option to do the longer full circuit O trek , however, most travelers opt for the shorter W Trek.
Patagonia W Trek - Day By Day Trail Information
Below is a standard, 5-day itinerary outline for your Torres Del Paine W Trek. This can vary depending on fitness levels, available camps, and routes. It should at least provide a good idea of what to expect. This is especially useful if you are trekking Patagonia independently .
Day 1: Puerto Natales to Refugio Grey (11km)

Grey Lake with Grey Glacier in the background, the start of the W Trek
Leave early from the town of Puerto Natales. Buses depart at 7:15, if you go with a tour or taxi, you will probably leave earlier.
Take your transportation Pudeto. This is the next stop after the park entrance.
If you have time, visit the local waterfall and take some pictures. You then take a lovely boat ride by catamaran to Paine Grande. After arriving you begin your trek in earnest with a 3-4 hour (uphill) hike along Lago Grey to Refugio Grey where you camp the night. If you have some energy after dinner, head down to the lake and feel the cold water!
Day 2: Grey Glacier to Paine Grande (19km)
Today you’ll be up early – around 8 am – to hike up to the former campsite of Paso. From the campsite, you take a small path to the lookout platform where you get stunning views across Grey Glacier.
After spending a little time appreciating the glacier, you have the option to continue the hike to Paso.
This is an uphill trek and will add extra mileage to your day. However, I’d recommend it as the trail is absolutely beautiful and gives incredible views all the way along the glacier.
After visiting Paso, return along the trail back down to where you camped the previous night.
After lunch, it is a 3-4 hour hike down to your next campsite at Paine Grande. If you can, find a campsite next to the hill so you’re not battered by the strong winds overnight.

Refugio Paine Grande lies at the other side of Laguna Pehoe
Day 3: Valle del Frances to Los Cuernos (28km)
Today is a long one! Mentally prepare yourself for a full day of hiking. You begin your trek around 8am and hike for several hours until you reach camp.
At the camp, you should dump your large backpack at Campamento Italiano and head on up to Mirador Frances with your daypack. Take your lunch with you along with water and sunscreen.
The walk takes 2-3 hours and you should reach the Mirador around lunchtime.
After stopping to eat and explore the area, you’ll head back down to Campamento Italiano and retrieve your large backpack.
From there you head to your next campsite at Los Cuernos. This is roughly 2 hours walk away.
Day 4: Los Cuernos to Campamento Torres (20km)
This is the last full day of hiking on the circuit. After a leisurely breakfast, you should head off around 9 am towards Campamento Chileno.
Your trek begins on flat ground as you make your way along the Lago Nordernskjöld. After a few hours, you’ll come to a sign saying “shortcut to Chileno”.
Take the shortcut and walk for several hours until you reach the Refugio Chileno. Have lunch here before continuing on.
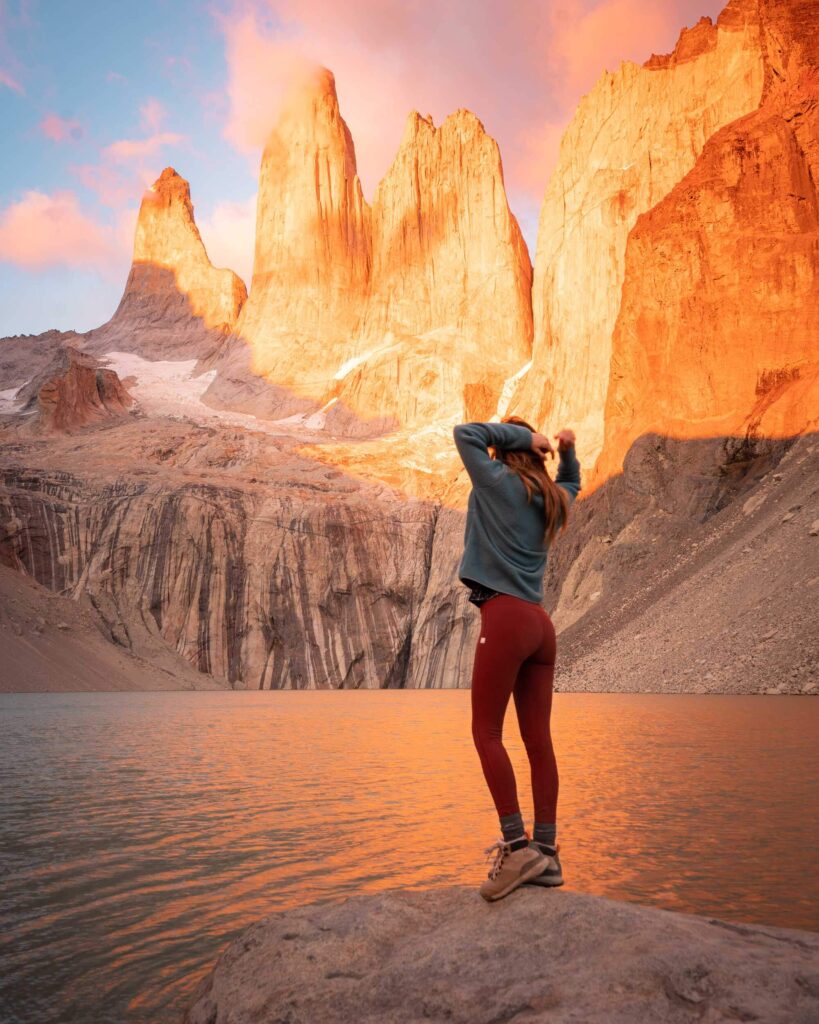
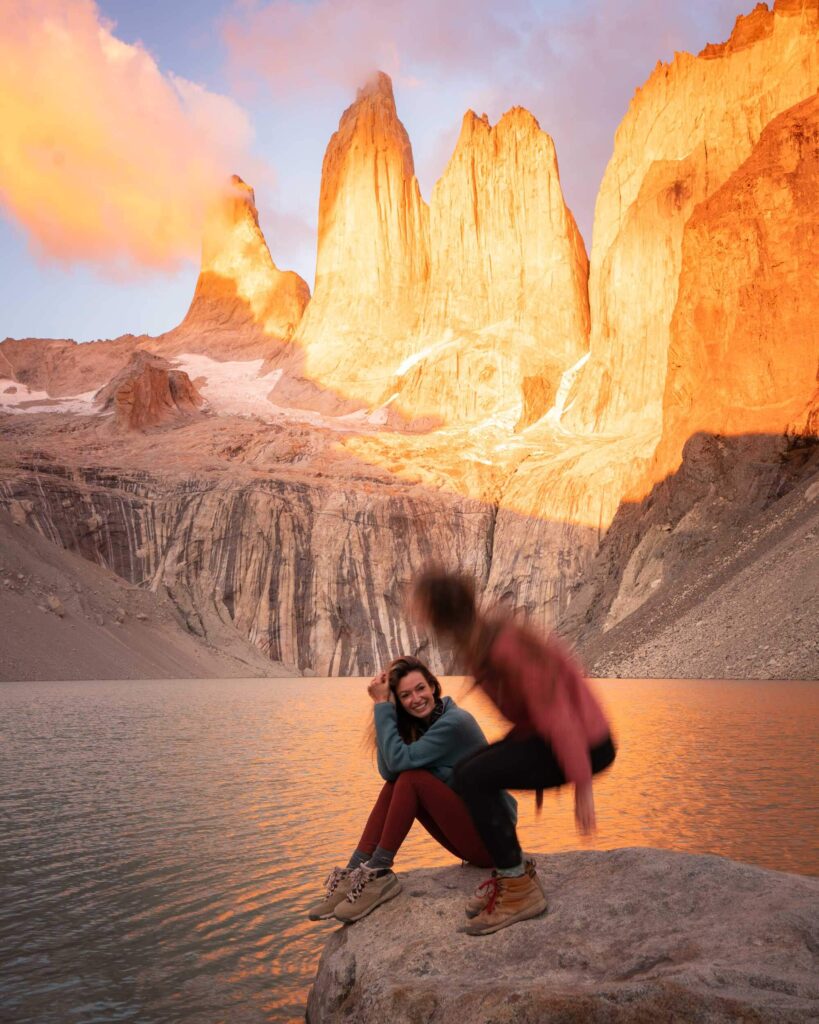
After lunch, you will walk uphill for an hour or so until you reach Campamento Torres. Leave your large backpacks here and head upwards for 45 minutes until you reach the Torres! Take a well-deserved break and soak in this iconic view.

A steep climb up is rewarded with this view of the Iconic Las Torres granite spires
Back at the Refugio, make sure you hit the sack early. You’ll need to be up before sunrise the following day!
Day 5: Torres to Puerto Natales (10-15km)
Don’t sleep in on Day 5! You’ll want to rise early (around 5 am) to get the sunrise views at the mirador of the Towers. Sunrise happens around 6 am in summer and there is just a short walk to the viewing and picnic area. If you’re lucky with the weather, you’ll get an incredible view and witness one of the most beautiful sunrises on our planet! If it’s raining in camp, do not give up – the weather is frequently very different up near the viewing area and the weather can clear fast. It’s worth taking a chance. After your sunrise moment, head back down to camp and pack up all your gear. From camp, you will head down to the Hotel Las Torres. This walk takes roughly 3 hours. From the trail’s end, you can walk to the park entrance. The 7km/ 4.3 miles will take you around 1.5 - 2hrs. At this point, you will be exhausted and may prefer to take the 2 pm minibus to Laguna Amarga at the entrance. Its worth budgeting an extra $10 for this bus fee. The return bus to Puerto Natales leaves at 2:30 pm from the park entrance. Double-check bus times before you set off.
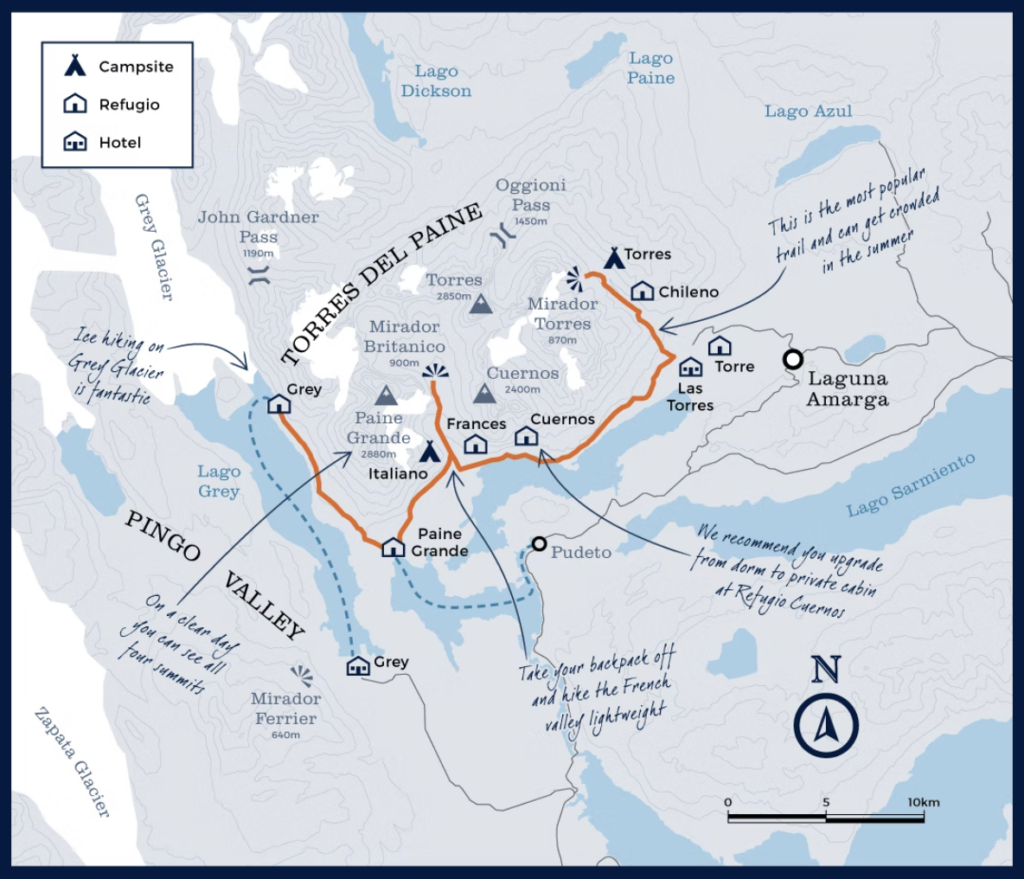
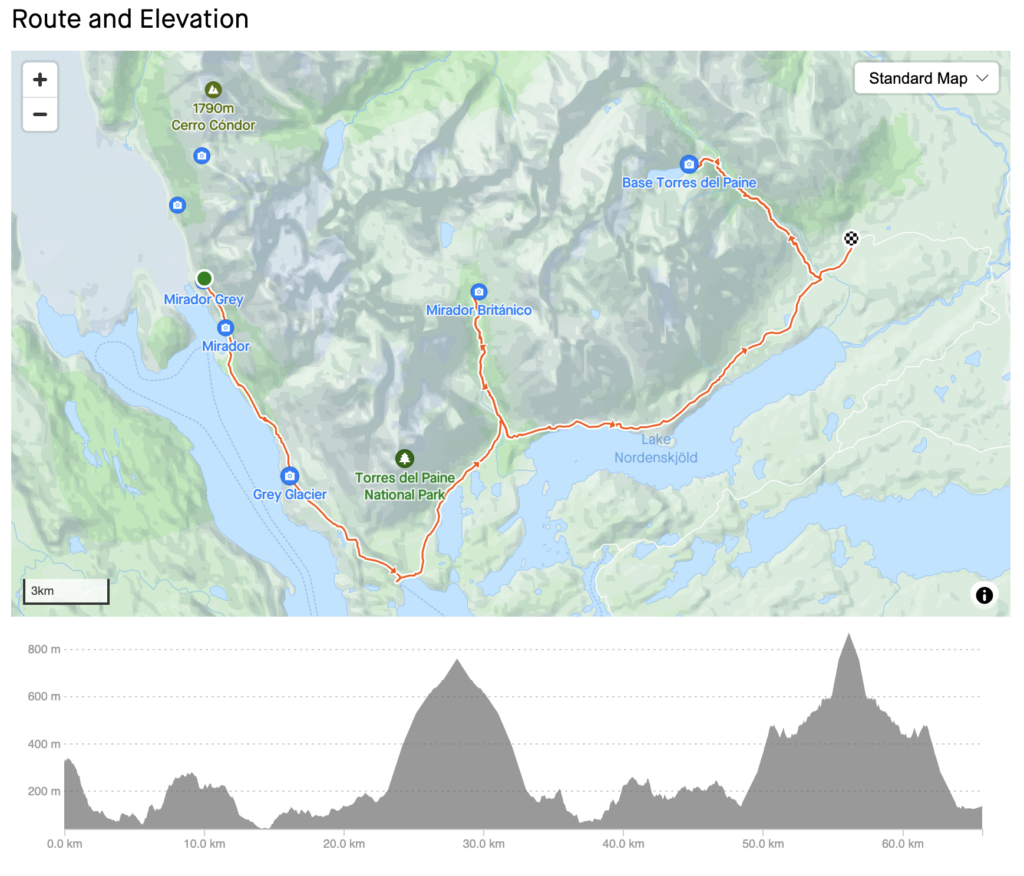
W Trek Patagonia Map
The best map I've found for the Torres Del Paine W Trek is the Torres del Paine Waterproof Trekking Map by Sergio Zagier. The map provides compressive satellite relief, contour lines, shelters, timed trails, camping, and inns.
Other W Trek FAQs
Is altitude sickness a risk on the w trek.
There is essentially zero risk of altitude sickness on the Torres Del Paine Full W Trek. The highest point reached is under 700 meters which is far too low to bring on altitude sickness. See our guide on altitude sickness .
What W Trek guidebook do you recommend?
The one guidebook that stands above all others is Trekking Torres del Paine: Chile’s Premier National Park and Argentina’s Los Glaciares National Park by Rudolf Abraham. The guidebook covers eight major trails within the park including the Full Circuit and the ‘W’ Trek. Maps, tips, and detailed information is provided for each trek and the book is a must for trekkers hiking solo.
What gear do you need for the W hike?
Trekking the W requires a certain amount of essential pieces of trekking clothing and equipment.
Many pieces of equipment including tents, sleeping bags, and mats, can be rented at the campsites. However, rental prices are high. We recommend bringing the most important pieces of gear with you.
To help you plan and prepare for your trek we have written a detailed hiking gear list .
About the author
Alison Macallister
With a degree in Nature Conservation and experience working with wildlife including the Big 5, Alison used to work as a guide for a 5-star safari reserve in South Africa. Today she is a full time traveller and editor for Mountain IQ. She has travelled and hiked extensively in South America, including many solo hikes in Patagonia, the Cusco region of Peru, Ecuador and Chile.
Leave a Reply
Your email address will not be published. Required fields are marked
We work with local guides to offer great value adventures at unbeatable prices

Everything You Need to Know for Hiking the W Trek in Torres Del Paine National Park
- Last Updated March 17, 2024
- Chile , South-America
Rising almost 2000m from the Patagonian steppe, the jagged granite spires of Torres Del Paine dominate this region of Chile and make for one of the most jaw-dropping sights in South America. This Unesco Biosphere reserve is one of the finest national parks in the world, covering 181,000 hectares of turquoise lagoons, glacier-fed waterfalls and verdant forest.
However, It’s Torres Del Paines rocky peaks that draw most visitors to the park. The three sheer peaks of Los Torres and the unmistakable outline of Los Cuernos are almost a pilgrimage site for hikers from around the world who flock here to walk the famous ‘W’.

Getting to Torres Del Paine from Puerto Natales
During the high season from October to April, 5 different bus companies provide daily trips from Puerto Natales to Torres del Paine, stopping first at Laguna Amargh (2hr journey) where you will have to hop of the bus to pay your park entry fee (CH$25,000 for foreigners or CH$35,000 if staying for more than 3 days as of Jan 1 2020; note that this can also be paid at the bus station in Puerto Natales), then onwards to Pudeto (3hrs) where you will leave the bus if you are catching the catamaran to Paine Grande, before finally reaching the administration building (4hrs 15).
Return tickets between the park and Puerto Natales cost CH$15,000. During the high season between September and April, the buses leave Puerto Natales at 7am, 7.30am and 2.30pm, getting to Laguna Amarga at 9am, 9:30am. and 4.45pm respectively and Pudeto at 10:00am, 10.30am and 5.30pm. For the return leg of the journey, buses pick up from Pudeto at 1pm, 1.30pm and 7pm and from Laguna Amarga at 2pm, 2.30pm, 7.45pm each day.
Check Bus prices and availability to Torres Del Paine
It is worth noting that between the park’s busiest months, Bus Sur also run a 6.40am service that reaches Pudeto at 8.45am, in time for the first catamaran of the day.
What is the W Trek?
Although there are myriad hiking routes in Torres Del Paine National Park, the most famous and most popular is the W, a 4 to 5-day hike that takes in the park’s most spectacular sights: from the iconic spires of Mirador Las Torres and the enormous Grey Glacier to the steep trail along Valle Francis and the contorted, multicoloured horns of Los Cuernos. It runs up three valleys, creating the W shape that gives it its name. In each of those valleys lies one of the iconic sights of the park
With a route of 80km (50 miles) the W is moderately difficult, mostly on gentle terrain but with the occasional climb up to 800m. With that in mind, you don’t necessarily have to be an experienced hiker, but it helps to be reasonably fit, especially as you will be hiking with a backpack, sometimes for up to 8 hours in a day.

When is the Best Time to Hike the W?
Accommodation on the w trek.
You have two options of where to stay while hiking the W: In a refugio or on a campsite. Deciding which is best for you is generally a toss-up between ease and cost. While refugios offer an extra level of comfort, they can be much more expensive than camping.
A refugio is basically rustic hostel-meets-hotel and they are dotted around all the major stopping points on the trek. They’re open year-round and have dorm-style rooms, shared bathroom facilities with hot showers and a basic, on-site restaurant/canteen and bar. The rooms are generally warm and clean with comfortable beds and the refugios themselves often have open and sociable communal areas where you can relax in front of a roaring fire after a hard day of hiking.
There is also the added bonus of not having to haul camping equipment, bedding (although I recommend bringing your own sleeping bag to avoid the extra rental cost at the refugios), and food with you throughout your trek. All refugios provide meals on a full-board (breakfast, dinner, & a packed lunch), half-board (breakfast and dinner) or meal-by-meal basis. The food is expensive, even by Patagonian standards, so there is the option of using the refugios kitchen to cook your own food if you wish.
Most refugios also have campsites with separate facilities if you would prefer to camp out of the main building.

If you prefer a wilder experience in which you get to sleep under the stars and stare at the park’s incredible views through your doorway, you can camp at certain points along the W Trek’s trail. At refugio campsites you have the option of sleeping in pre-erected tents, meaning you don’t need to carry your own equipment. Sleeping mats and warm sleeping bags are available to rent (although I would recommend bringing your own as they don’t add much extra weight) to keep you cosy. As these campsites are often on the grounds of nearby refugios, you have access to toilets, warm showers, and the communal spaces of the refugios where you can enjoy a hot meal or cook your own dinner.
There is also a free campsite at Italiano, run by the National Park authority (CONAF). You will need to bring your own tent and facilities are a little basic, but they do have on-site toilets, running water and a cooking shelter. Note: You still have to book this free campsite in advance.
BOOKING YOUR ACCOMODATION
With Torres Del Paine being one of Chile’s most popular attractions and the W-trek being the most desirable hiking routes on the South American continent, it’s safe to say that booking your accommodation in advance – even up to 2 months in advance during the high season – is essential. All refugios and campsites can be booked online but to complicate matters slightly, there are 3 different companies that you will potentially have to use, depending which camping spots you choose: CONAF, Vertice Patagonia, and Fantastico Sur.
To check which campsites you will need to book, check out my hiking itinerary lower down this page.
Fantastic Sur run Chileno, Frances, Los Cuernos and Las Torres and their booking site can be found here . The booking system is fairly simple. You just select your dates and then choose whether you would like to camp or stay in a dorm room using the drop-down boxes. After this, you can add additional extras such as sleeping bags and mats, full-board, half-board, or sperate meals. If you have any issues with the booking, you can email them at [email protected] or drop into their office in Puerto Natales.
Vertice Patagonia run both Paine Grande and Grey. Their booking site can be found here . The process for booking with Vertice is slightly different from the one for booking with Fantastico Sur. First, you will need to select the number of people, set your nationality to ‘another’ if you are not Chilean, and the currency to US dollars. On the next page, you will select the W-trek option and then on the following page, you can choose which accommodation you would like to book. If you follow my itinerary below, you will need to select the Grey and Paine Grande option, however, there are multiple combinations as well as the ability to book each one separately. If you have any issues, you can contact them at [email protected] .
The only free campsite on the trek route is Italiano, managed and maintained by the National Park authority (CONAF). Although the site is free, you still need to make a booking in advance via the CONAF booking site . Make sure to print out your reservation and bring it with you.
What Equipment do you need?
If you plan on spending as little money as possible when hiking the W, you will need to bring plenty of camping equipment to avoid having to rent it at the refugio campsites. However, if you choose to stay in the dorm rooms or pre-erected tents, you will obviously avoid having to bring your own tent. I still recommend carrying a sleeping mat and sleeping bag as otherwise, you will have to pay to rent these each night despite forking out for a pre-erected camping spot.
Please remember that whatever you pack you will have to carry with you on your back for up to 7 hours a day so try to pack as lightly as possible.
Camping Essentials : Tent, sleeping bag, sleeping mat, small camping stove and gas canisters, a lightweight set of pans and cutlery, a bowl and a mug.
The weather is incredibly changeable in Patagonia, meaning that you can encounter almost every possible combination of sun, rain and snow that nature can throw at you over the course of just one day. I’m not joking: on one day of my hike, I went from hiking in shorts and a t-shirt in glorious sunshine to having to navigate my way through a blizzard wearing as many layers as possible. Even on a bright clear day, the winds can reach up to 100km/h.
The key to surviving Torres Del Paine’s climate it layering. Try to pack a mix of thin under-layers and warmer, insulated outer layers.
Clothing Essentials : Zip-off convertible hiking trousers x 2, t shirts x 5, warm jumper, fleece jacket, waterproof jacket, hiking socks x 5, underwear x 5, hiking leggings or long johns, gloves, a warm hat, scarf and a lightweight travel towel.
Hiking Essentials : Good quality walking boots, hiking poles, a 50 – 60 litre rucksack for your main gear, a 15 litre daypack, headlamp or torch, and a water bottle.
Additional Items : Sunglasses, suncream, phone, phone charger and universal adapter, padlocks, compact first aid kit, toiletries, and a good camera.
If you are spending an extended length of time travelling around Patagonia or the South American continent, it’s understandable that you may not want to carry a full range of camping equipment with you for your entire trip and will have to get some when you reach Torres Del Paine. If this is the case, you have 3 options: Buy equipment; Rent equipment in Puerto Natales; Or rent equipment at each campsite in the park.
As Puerto Natales is heavily tourist-focused and you should have no problem finding all of the equipment that you need in the myriad hiking and camping shops. However, for high-ticket items such as tents and sleeping bags, you may be better off purchasing them in Punta Arenas (if you have come from southern Patagonia) as the city’s duty-free status reduces the prices significantly.
I chose to rent all of the equipment that I needed from Erratic Rock in Puerto Natales. Not only is this a fantastic hostel, but they also host a daily seminar, nicknamed the 3 o’clock talk. You can join their expert guides each day at 3pm for a cup of coffee and seminar that covers everything you need to know about Torres Del Paine. This includes current weather conditions, accommodation, equipment, trail routes and transportation.
Erratic rock don’t allow reservations on gear and so operate on a first-come-first-serve basis, so you may just have to hope that they have everything you need. Their prices are below and listed as Chilean pesos per day.
Sleeping bag – CH$3000; Sleeping mat – CH$1500; Trekking poles x 2 – CH$3500; Waterproof jacket – CH$3000; Backpacks – CH$4000; Down Jackets – CH$2500; Gloves – CH$1500; Headlamp – CH$1500; Cooking kits for 3 people (Stove, bowls, cups, cooking pot, & water bottle) – CH$4000

Food on the Trek
Although a hot meal at the end of a hard day of hiking may sound tempting, food in refugios can be incredibly expensive, even by Patagonian standards. They are generally set menus and can be pre-booked online when booking accommodation. Many of the refugios do have shops where you can buy basic food supplies such as rice, pasta and sauces as well as snacks but the prices of these are also inflated.
I recommend bringing enough food for the entire trek, packing plenty of non-perishable items that are easy to carry and cook such as rice, pasta and cans/jars of sauces. Noodles, powdered soups and pasta pots will go a long way to keep you fed and energised throughout the hike. Cured meats or sausages also make a great addition to liven up the meal slightly.
For breakfast, bring some sachets of quick-cook porridge and instant coffee. You will not need to bring any bottles of water with you as you can re-fill bottles in the park’s rivers and streams or at the refugios.
Note: You are only able to use stoves at certain spots within camp sites. If you think you will need a warm coffee or tea while hiking, boil water in a morning and take an insulated flask with you.
Meal Costs at Refugios and Campsites

What Route Should You Take?
The W Trek can be walked in two directions; from east to west, starting at Refugio Las Torres and ending at Refugio Paine Grande; or from west to east, starting with the catamaran ride across lago Pehoe and ending with a spectacular view of the morning light bouncing off the spires of Las Torres at sunrise.
The hike from west to east is the most popular as it offers superior views and ends at the park’s most iconic viewpoint.
ITINERARY OVERVIEW
5 days / 4 night itinerary for the w trek in torres del paine.
Day 1 : Puerto Natales to Grey Day 2 : Grey to Paine Grande Day 3 : Paine Grande to Frances/Los Cuernos Day 4 : Frances to Chileno Day 5 : Chileno, La Torres and back to Puerto Natales
DAY 1 ITINERARY
Puerto natales to grey.
Distance : 11km/6.8 miles Time : 3 – 4 hours
7am : Take the bus from Puerto Natales to Torres Del Paine National Park. You will have to hop off the bus at the park entrance to pay the entry fee (CH$35,000) but try to hop off quickly to get to the front of the queue and pay quicky as you will need to re-board the bus in order to get to the next stop.
10am : You should arrive at Pudeto sometime between 10am and 10.30am giving you enough time to head to the ferry office and buy a ticket for the boat ride over to Paine Grande. The ferry is operated by Hielos Patagonicos and costs CH$18,000 one-way. If you have enough time before departure, you may be able to visit Salto Chico waterfall but if not, the boat ride in itself offers spectacular views of the Cuernos del Paine’s horn-shaped peaks. The usually leaves around 11am but timetables can change depending on the weather conditions.
You should arrive at Paine Grande between 11.30am and 11.40am and from here you will begin your first day of trekking.
If you want to Hike the W in 4 Days / 3 Nights...
It is possible to do the hike in one day less by hiking from Paine Grande up to Glacier Grey and back in one day, but this will mean a long day trekking 22km. You will be able to set up camp in Paine Grande before beginning your hike and just take your daypacks with you – just be sure to take any valuables. Upon reaching the Grey Campsite, you will be continuing along a short trail path to the first rocky outcrop with a spectacular view across Lago Grey to the glacier. This viewpoint is only around 1km from the campsite but as the path between Grey and Paine Grande closes at 4pm (you are not allowed to begin your hike after this time), you won’t really have time to hike further north to any of the other viewpoints.
The entire hike will take around 6 hours and with the time spent admiring the glacier, you will probably arrive back at Paine Grande between 6pm and 7pm, ready for the next day of hiking (day 3 in this itinerary).
From the pier at Paine Grande, the clearly marked path initially leads north through scrubland before meandering into Quebrada de Los Vientos, the windy gorge, after an hour or so (I can confirm that it was very windy when I hiked this path). From here you will catch your first glimpse of Lago Grey with enormous chunks of pale blue ice bobbing in its water with the glacier itself peeking out behind the almost black shape of La Isla Nunatak.
Continuing the walk alongside the lake, you will enter an eerily silent lenga wood. Part of this area was badly damaged by the forest fire that sadly ran rampant through the park on 27th December 2011. The devastating fire only affected 7% (about 40,000 acres) of the park’s area but went on for nine days before it was finally extinguished by the fire brigade. Unfortunately, some of the affected vegetation will take 200 years to reach maturity again, but the charred, contorted remains of the trees do add a haunting, melancholic beauty to the area.
You should arrive at Refugio y Camping Grey around 3 or 4pm, giving you chance to set up your tent before cooking dinner if you have opted to camp, or relax with a well-earned coffee or glass of wine if you have pre-booked a dorm room and dinner. While it is still light, you may want to take the small trail that forks off from the main path and head over to the glacier viewpoint on the shore of Lago Grey (1km walk).
DAY 2 ITINERARY
Grey to paine grande.
Distance : 19km/11.8 miles Time : 7 hours
Starting your hike at 8am, you will head north from Grey, towards the viewpoints that overlook Glacier Grey. You can leave the majority of your equipment and gear at the campsite or refugio as and just take your daypack and valuables as you will be looping back to Grey again on your way towards Paine Grande.
Walking alongside Lago Grey, you will eventually reach a series of rope bridges suspended over gorges that offer spectacular views of the Glacier and, on a clear day, the entire ice field. The icy ramparts tower as high as 100m in some places and the glacier stretched the entire 6-mile breadth of the lagoon, grey in both name and colour, only brightened by the shimmering turquoise of the glacier and the bobbing icebergs that navigate its waters.
This section of the hike is around 3.5km each way, meaning that you should arrive back at Grey before lunch, just in time to retrace your steps from the previous day and walk the 11km trail back to Paine Grande.

DAY 3 ITINERARY
Paine grande to frances or los cuernos.
Distance : 20.5km/12.7 miles Time : 7.5 hours
Leaving Paine Grande at around 8am, you will begin a 2-hour walk eastbound along the scrubland bordering Lago Pehoe, before catching a glimpse of the blue waters of Lago Skottsberg with the towering 3000m peak of the Paine Grande massif on your left-hand side. After around 2.5 hours and crossing a wobbly bridge, you will reach Italiano, a free campsite where you can leave your bags with the ranger before continuing the hike.
The steep path leading up Valle Frances, the middle section of the W, can either be a breeze of a slog, depending on the weather conditions but the 1-hour section leading to Mirador Frances isn’t too challenging no matter the weather. Here you will find spectacular views of Glacier Frances and Glacier Los Perros and it is the perfect point to stop for a quick lunch beside the turbulent Rio del Frances. On my W-Trek, this is the point I had to stop my journey up Valle Frances: blizzard-like conditions had left me freezing cold and the trail had become dangerous so I had to turn around.
Terrible weather isn’t uncommon in this section of the park, but if you have a clear day, continue onwards through the woods towards Mirador Britanico. It is an additional 3.5km/1.5 hours each way but the lookout is one of the best in Torres del Paine, giving you a close-up view of Los Cuernos. Ensure you have hiking poles as the steep walk down can be a little treacherous.
If you are staying at Campamento Italiano, you can set up for the eveing and relax, otherwise, it is another 30-minute walk along the shore of Lago Nordenskjold to Frances. If you feel like you will have the energy to do it, you can book to stay in Refugio y Camping Los Cuernos, a further 2-hour hike along Lago Nordenskjold. This will make your walk on day 4 significantly shorter and they even have double cabins available if you fancy a quiet night away from a dorm.
DAY 4 ITINERARY
Frances to chileno.
Distance : 17km/10.6 miles Time : 5 hours
If you are staying at Italianos or Frances, you will need to start your penultimate day of hiking at 8am. If you have opted to stay at Los Cuernos, you can treat yourself to a well-deserved lie-in, leaving the refugio at 10am to begin your walk.
The hike begings with a long, meandering walk along the lake through hilly scrubland and across small glacial streams before you turn northwards into Valle y Rio Ascencio for the uphill, 2-hour slog to Chileno. You will have an early start the next morning in order to see the towers of Mirador Las Torres at sunrise, so ensure that you get an early night
DAY 5 ITINERARY
Chileno to las torres & back to puerto natales.
Distance : 13km/8 miles Time : 6 hours
To see the sunrise at the famous Mirador Las Torres, you will have to wake up well before dawn at around 4.30 to begin your walk pre-5am. Just take a small bag of warm clothes and food, as well as a headtorch, for the steep 2-and-a-half-hour ascent to the towers alongside the Rio Ascendio. The final part of the climb is a 1-hour long scramble across boulders and rocks, emerging in front of the magnificent Torres, their peaks reflecting in in the still waters of Laguna Torres. When I visited in March, sunrise was at 7.30am.

If you feel up to it, you can hike further north through the aptly named Valle de Silenco (1 hour each way) to the little-visited Mirador Japones, otherwise, the hike back to Chileno to collect your backpacks and equipment is a little easier than the morning’s ascent, taking just 1.5 to 2 hours.
The W Trek ends with the walk back down Valle Ascencio to Hotel Las Torres (2 hours; 5.5km). From here, you can either catch 2pm shuttlebus (CH$5000) to Laguna Armarga in order to board the 2.30pm bus back to Puerto Natales or walk the extra 1.5 hours to Laguna Amarga Ranger Station yourself just make sure you arrive in time to get one of the buses.
Alternatives to Hiking the W
For more experienced hikers, the O-Circuit is a challenging seven to ten-day hike that includes the entirety of the W, with the addition of a trail that leads walkers further north, around the back-side of the Torres. This allows you to catch glimpses of the park’s much-quieter outer reaches as well as have bragging rights over anyone that has hiked the W.
While the circuit starts and ends at Paine Grande, some people decide to stay on the shuttle bus past Lake Pehoe until it reaches the Park Administration building, adding a scenic 5-hour walk onto the circuit, which is called doing a Q.
If a multiday trek isn’t for you, each of the W’s sections can be split into day hikes while staying over night at some of Torres Del Paine’s luxury lodges or eco accommodation spots.

Dave McClane

David McClane is a photographer and travel writer based in Leeds, UK. Since first picking up a camera on a yearlong journey through Central and South America in 2014/2015, He has carefully documented his travels through almost 50 countries.

A Guide to San Pedro de Atacama, Chile

Patagonia Itinerary: 3 Weeks in Argentina and Chile

10 Beautiful Day Hikes in Torres Del Paine National Park
Patagonia Packing List: Hiking the W Trek in Torres Del Paine
2 responses.
Hello David, thanks a lot for posting about your Patagonia W Trek trip. I found it very helpful as my wife and me are preparing to visit the trek in October this year. I have one question on the routing: Is it possible to start the hike at the “left top” of the W near Refugio Grey? On your map it looks like there is a boat trip available to get there. It would enable us to not walk the same way twice between Grey and Paine Grande. Thanks a lot in advance, Best Nils
Hi Nils. I’m glad that you found the post helpful! As far as I am aware, you can only take the boat across to Paine Grande, meaning you will have to hike the section between there and Refugio Grey in both directions (at least this is what I had to do). I think the boat trip shown on the map doesn’t actually stop near Glacier Grey.
Leave a Reply Cancel reply
Your email address will not be published. Required fields are marked *
Subscribe to my Newsletter
Sign up for my newsletter to get a monthly dose of beautiful photography and travel stories that are bound to fuel your next adventure.
Copyright © 2024 Man Vs Globe
Ultimate W Trek Patagonia Map Guide: Tips, Routes, Distances and Essentials for Hikers

Travel Resources
- Accommodation at the best prices.
- Book activities and excursions in Spanish.
- Find cheap flights.
- Rent your Car for Patagonia
- -5% eSIM discount with unlimited data and no roaming charges
- Store your luggage for US$ 5.90 per day
- Travel and cancellation insurance with -5% discount
- I will organize your trip
Are you ready to embark on an unforgettable hiking journey in one of the most stunning landscapes on Earth? Patagonia’s Torres del Paine National Park in Chile is home to the iconic W Trek, a five-day adventure that takes you through the heart of this breathtaking region. In this ultimate guide, we’ll cover everything you need to know about the W Trek Patagonia map, from the detailed day-by-day itinerary to essential tips on weather, accommodations, food, safety, and more. Get ready to experience the adventure of a lifetime!
Key Takeaways
- Explore Patagonia’s wild beauty on the iconic W Trek with this comprehensive map overview
- Challenge yourself by grasping distances between key points and enjoy an unforgettable journey
- Prepare for your adventure with essential tips, trail distances, itinerary breakdowns & packing essentials!
W Trek Patagonia: A Comprehensive Map Overview

The W Trek in Patagonia is a thrilling multi-day hiking route that takes you through the mesmerizing Torres del Paine National Park, one of the most remarkable hiking destinations in South America. This 80 km (50 mi) trail offers an exhilarating blend of spectacular scenery, challenging terrains, and unforgettable experiences.
This section offers a thorough trek map overview of the W Trek, covering key points of interest and trail distances, assisting in your adventure planning.
Key Points of Interest
The W Trek is famous for its iconic granite towers, the awe-inspiring French Valley, and the majestic Grey Glacier. These breathtaking landmarks will leave an indelible impression on you as you traverse the challenging yet rewarding trails through the national park.
One of the most exhilarating highlights of the W Trek is the French Valley, where you’ll have the opportunity to marvel at both majestic mountains and tranquil lakes. Another must-see is Grey Glacier, an imposing wall of ice that will leave you speechless as you take in its sheer scale and beauty. And let’s not forget Paine Grande, the grandest peak in the park, standing tall and proud as a testament to the incredible power of nature.
Trail Distances

Familiarizing yourself with the trail distances between key points is critical in planning your daily routes along the W Trek. The first day of the W Trek, for example, covers an impressive 22 km (13.6 mi) from Hotel Las Torres to Refugio Los Cuernos.
Throughout the trek, you’ll encounter invigorating hikes like the one up to the towers on the final day, boasting an elevation gain of 900 meters (2,956 ft). Along the way, you’ll also have the opportunity to witness the breathtaking Glacier Grey.
Grasping the trail distances paves the way for better preparedness in tackling the W Trek, optimizing your unforgettable journey through Patagonia’s wild and untamed beauty.
W Trek Itinerary: Day by Day Breakdown

The best way to experience the awe-inspiring landscape of the Torres del Paine W Trek is by taking your time and enjoying it over 4 nights and 5 days. This section provides a detailed day-by-day itinerary for hiking the W Trek in Patagonia, inclusive of recommended stops and accommodations you’ll encounter on your journey.
Whether you’re a seasoned trekker or a first-time hiker, this itinerary will help you make the most of your adventure in one of the world’s most extraordinary landscapes.
Day 1: Hotel Las Torres to Refugio Los Cuernos

Your first day on the W Trek includes:
- Journey from Hotel Las Torres to Refugio Los Cuernos
- Distance of 22 km (13.6 mi)
- Takes around 6 hours
- Follow the Ascencio River to enter the Ascencio Valley
- Pass by the lookout point for the Towers at 900 meters
- Refugio Los Cuernos is aptly named after “The horns,” a pair of stunning granite peaks in the area.
To kick off your adventure, you’ll take the Bus Sur bus from Puerto Natales to Pudeto at 3 pm the day before, arriving in time for the last ferry of the day at 6 pm. The bus fee is CLP 12,000 (US$14), and the ferry fee is CLP 20,000 (US$25). Alternatively, you can opt for a thrilling walk from Laguna Amarga entrance to Hotel Las Torres, and the bus fee from Laguna Amarga to Hotel Las Torres is CLP 5,000 (US$6).
Day 2: Refugio Los Cuernos to Paine Grande

Day 2 of your W Trek adventure takes you from Refugio Los Cuernos to Paine Grande. This portion of the trek covers an impressive distance of 20 km (12.4 mi) and takes around 7 hours to complete. Along the way, you’ll be able to take in the majestic view of the Grey Glacier from several different vantage points.
On this day, you’ll also have the opportunity to explore the French Valley, one of the most breathtaking highlights of the W Trek. This lush, verdant valley offers stunning views of the surrounding mountains and lakes, making it a perfect spot to rest and soak in the beauty of Patagonia.
Day 3: Paine Grande to Grey Campsite

On the third day of the W Trek, you’ll cover the hike from Paine Grande to Grey Campsite. This segment of the trek is a thrilling 19 km (11.8 mi) journey that takes around 8 hours to complete. You’ll start your day at Paine Grande, then head to the Italiano campsite, followed by the Mirador Frances.
If the weather is good, you’ll have the chance to take a detour to Mirador Britanico, where you’ll be able to admire a stunning ring of toothy granite peaks, including the park’s second most famous landmark, the three-horned Cuernos del Paine. Afterward, you’ll finish off the day in the beautiful Francés Valley and campsite.
Day 4: Grey Campsite to Paine Grande
On the fourth day of the W Trek, you’ll hike from Grey Campsite back to Paine Grande. This leg of the journey covers 11 km (6.8 mi) and takes around 3-4 hours to complete. Along the way, you can enjoy the magnificent views of the Grey Glacier and its surrounding landscapes. Once you arrive at the Paine Grande campsite, you can rest and prepare for the next day’s adventure.
As you make your way back to Paine Grande, take the time to appreciate the stunning vistas of Los Cuernos and the majestic mountains that surround you. This day offers a more relaxed pace, allowing you to fully immerse yourself in the breathtaking beauty of Torres del Paine National Park.
Day 5: Paine Grande to Hotel Las Torres
The final day of the W Trek covers the hike from Paine Grande back to Hotel Las Torres. This leg of the journey includes a thrilling afternoon of kayaking, ice hiking, or a short hike to the hanging bridges. As you reflect on your incredible adventure through the wild and untamed beauty of Patagonia, take a moment to appreciate the unforgettable memories you’ve made along the way.
After completing your epic journey, you’ll return to Puerto Natales via bus and ferry. The bus fee from Laguna Amarga or Pudeto to Puerto Natales is US$14 (CLP 20,000/US$23 from Hotel Grey). With your W Trek adventure complete, you’ll head home with a heart full of memories and a newfound appreciation for the remarkable landscapes of Patagonia.
Essential Tips for Hiking the W Trek in Patagonia

Being well-prepared and well-informed is paramount for the best possible experience on the W Trek. This section shares essential tips for tackling the W Trek, covering aspects like:
- Accommodations
Whether you’re a seasoned trekker or a first-time hiker, these tips will help you make the most of your adventure in one of the world’s most extraordinary landscapes.
Weather and Clothing

Patagonia’s unpredictable weather is one of the factors that make the W Trek such an exhilarating adventure. The best time to do the W Trek is from November to early March, when the average temperatures range from 10°C (50°F) to 18°C (64°F). Although it usually rains and snows throughout the hiking season, March and April are the peak months for precipitation, so it’s advisable to bring waterproof gear.
Selecting clothing and footwear for the W Trek requires consideration of factors like the terrain type, weather conditions, and the trek’s length. Be sure to pack a moisture-wicking base layer, a fleece layer for insulation and warmth, and a waterproof jacket and pants to protect against rain and wind. This layering system will help you adjust your clothing quickly and efficiently as the weather changes on the trek.
Accommodation Booking

Accommodations along the W Trek include paid campsites with basic mountain hotels (refugios) and one free campsite. Booking your accommodations in advance is advised, as spaces may fill up quickly, especially during peak season. Websites like Patagonline can help you check availability and book accommodations directly.
When booking accommodations, be sure to consider factors like location, price, and available facilities. For example, Refugio Los Cuernos offers a stunning location nestled between granite peaks, while Paine Grande and Grey campsites provide breathtaking views of Los Cuernos and the Grey Glacier, respectively. By researching and booking your accommodations ahead of time, you’ll ensure a seamless and enjoyable W Trek experience.
Food and Water

Attending to food and water supplies during the W Trek is a significant aspect of your adventure. Most camping sites and refugios have shops and restaurants where you can stock up on supplies and enjoy a hot meal. However, cooking your own food can be a great way to save money and add an extra element of excitement to your trek.
To ensure you stay well-hydrated, remember to bring a reusable water bottle and a water filter or purification tablets. Drinking water can be found all around the park and is of excellent quality. By planning your meals and water supply, you’ll have the energy and stamina needed to conquer the challenging terrain and make the most of your W Trek adventure.
Safety and First Aid
Safety takes top priority when embarking on the W Trek. Here are some essential safety tips to keep in mind:
- Stay reachable and inform people back home about your plans.
- Carry a charged phone with emergency numbers.
- Consider carrying a satellite phone, a hiking guide, or a paper map for added peace of mind and navigation assistance.
It’s also a good idea to carry a small first aid kit, including items such as band-aids, pain relievers, and any personal medications you may need. By taking these safety precautions and being prepared for minor injuries or ailments, you’ll ensure a successful and enjoyable W Trek experience.
Alternative Hiking Routes in Torres del Paine National Park
If you’re looking for alternative hiking options in Torres del Paine National Park, you’re in luck! In addition to the famous W Trek, there are several other exciting trails for you to explore. This section introduces:
- The more challenging and longer O Circuit
- A variety of day hikes
- Shorter treks, perfect for those with time constraints or seeking a less strenuous park experience.
The O Circuit

The O Circuit is an incredible full loop around the Cordillera del Paine, covering a distance of approximately 136 kilometers (85 miles) and taking around 6-10 days to complete. This challenging trek includes the popular ‘W’ route and the more remote backside, offering a unique and rewarding experience for adventurous hikers.
While the W Trek is great for those looking for a shorter and somewhat easier trek, the O Circuit is perfect for those seeking a more rugged and remote experience. The O Circuit takes you through a diverse range of landscapes, including dense forests, vast plains, and towering peaks, offering a true immersion into the wild and untamed beauty of Patagonia.
Day Hikes and Shorter Treks

For those with limited time or seeking a less strenuous experience, Torres del Paine National Park offers a variety of day hikes and shorter treks, including the popular trek Torres del Paine. Some of the most popular day hikes in the park are:
- Mirador Las Torres
- Mirador Cuernos/Salto Grande
- Laguna Azul
- Salto Grande Waterfall
These trails provide stunning views of the park’s most famous landmarks and can be completed in just a few hours.
Whether you’re looking for a leisurely stroll to take in the breathtaking scenery or a more challenging day hike to push your limits, Torres del Paine has something for everyone. With its diverse range of trails and breathtaking landscapes, the park is a hiker’s paradise just waiting to be explored.
Day Trek: Mirador Las Torres
Mirador Las Torres is one of the most popular day hikes in Torres del Paine National Park, and it’s easy to see why. This trail takes you to the base of the park’s iconic granite towers – the Torres del Paine – providing a close-up view that’s truly awe-inspiring.

The trek is a challenging one, covering a distance of about 19 km (12 miles) round trip with a significant elevation gain. However, the effort is well worth it. As you ascend, you’ll pass through lush beech forests and across rushing rivers before finally reaching the turquoise lagoon at the base of the towers. The sight of the sun rising or setting on the towers is a spectacle not to be missed, making this trek a must-do for any visitor to the park.
Getting to Torres del Paine: Transportation Options

Reaching Torres del Paine National Park is easier than you might think, with several transportation options available. This section offers information on bus services and car rentals, assisting in your journey planning to the park.
Whether you prefer the convenience of public transport or the flexibility of driving, there’s an option to suit every traveler’s needs.
Bus Services
There are several bus services available for reaching Torres del Paine from nearby cities like Puerto Natales. We highly recommend either Bus-Sur or Buses Fernandez for your travel to Torres del Paine. The bus ride from Puerto Natales to Torres del Paine costs only $25 USD (return), and you can book your tickets online through websites such as:
When planning your bus journey, keep in mind that there are specific departure times from Punta Arenas to Puerto Natales, such as:
By planning your bus journey in advance, you’ll ensure a smooth and hassle-free trip to Torres del Paine National Park.
Buses Inside Torres del Paine National Park
Once inside Torres del Paine National Park, there are shuttle buses available to transport you between key points along the W Trek. These buses run at regular intervals throughout the day, providing a convenient way to navigate the park and rest your legs between hikes. Be sure to check the timetable and plan your hikes accordingly to make the most of this service. The bus service within the park is an excellent way to save energy for the trail and allows you to cover more ground in a shorter time, enhancing your overall experience of this stunning landscape.

Car Rentals

For those who prefer a more flexible and independent travel option, renting a car is a great choice. To rent a car in Patagonia, you must have a valid driver’s license from your country and be at least 21 years old. The general costs of renting a car in Patagonia can vary, but on average, you can expect to pay around $76 per day for a small car rental.
Top-rated car rental companies in Patagonia include:
- Discover Cars
By renting a car, you’ll have the freedom to explore Torres del Paine National Park at your own pace and take breaks along the way to fully appreciate the breathtaking scenery.
Packing Essentials for the W Trek
Packing the right gear is crucial for a successful and enjoyable W Trek experience. This section provides a comprehensive packing list for hikers embarking on the W Trek, encompassing clothing, camping gear, and electronics.
By ensuring you have all the essentials, you’ll be well-prepared to tackle the challenging terrain and make the most of your adventure in the wild and untamed beauty of Patagonia.
Clothing and Footwear
Choosing clothing and footwear for the W Trek requires consideration of terrain type, weather conditions, and the trek’s length. Here are some recommendations:
- Pack a moisture-wicking base layer
- Bring a fleece layer for insulation and warmth
- Don’t forget a waterproof jacket and pants to protect against rain and wind
This layering system will help you adjust your clothing quickly and efficiently as the weather changes on the trek.
The ideal footwear choices for the W Trek in Patagonia are waterproof all-leather boots with deep treads. Additionally, gaiters can be a great way to keep your feet dry and prevent water from slipping in over the top of the boots. By investing in the right clothing and footwear, you’ll ensure your comfort and safety on the W Trek, allowing you to fully enjoy the incredible landscape and adventure that awaits.
Camping Gear
Camping gear is essential for your W Trek adventure. Invest in:
- A good tent, such as the Big Agnes Battle Mountain 2 or the ALPS Mountaineering Highlands Tent
- A lightweight and compact sleeping bag suitable for cold temperatures
- A roll mat for sleeping
- A mess kit for cooking
Additionally, don’t forget to pack:
- Base layers
- Trekking pants
- Hiking socks
- A waterproof backpack cover
By packing the right camping gear, you’ll be well-prepared to tackle the challenging terrain and make the most of your W Trek adventure in the stunning landscapes of Patagonia.
Electronics and Navigation
Electronics and navigation tools can be invaluable during your W Trek adventure. A GPS device, such as the Garmin inReach Mini or handheld devices from Outdoor Gear Lab and Switchback Travel, can help you stay on track and navigate your way through the park. Additionally, smartphone GPS apps like Gaia GPS and AllTrails can also be useful for navigating your way on the trail.
Remember to bring a charged phone with emergency phone numbers, a satellite phone if available, and a head torch for early morning or late-night hikes. By packing the right electronics and navigation tools, you’ll ensure a safe and enjoyable W Trek experience, allowing you to fully explore the breathtaking landscapes of Torres del Paine National Park.
In conclusion, the W Trek in Patagonia’s Torres del Paine National Park offers an unforgettable adventure through some of the most breathtaking landscapes on Earth. By following our comprehensive guide, you’ll be well-prepared to tackle the challenging terrain, plan your accommodations and meals, and make the most of your time in this extraordinary region. So lace up your hiking boots, pack your bags, and get ready to embark on the adventure of a lifetime!
Frequently Asked Questions
How long is the w trail in patagonia.
The W Trek in Patagonia is a moderately difficult hike covering 46 miles (76km) and typically takes 4-5 days to complete. It includes mainly gentle terrain with some challenging climbs of up to 800m. Be sure to come prepared for varying weather conditions.
Where do you sleep on the W trek in Patagonia?
On the W Trek in Patagonia, you can sleep in shared dormitories or upgrade to a private alternative. There are five refuges/campsites available along the route: Grey, Paine Grande, Frances, Cuernos and Central – check out our post for all the details!
What is the hardest trek in Patagonia?
The El Chaltén Trek in Patagonia is one of the most difficult treks to undertake, featuring demanding nature and views of Cerro Solo. So be prepared for a full test and take advantage of stunning scenery in this lesser-known area!
What is the best time of year to hike the W Trek?
The best time of year to hike the W Trek is from November to early March, when temperatures are mild and the weather is more stable for optimal trekking conditions.
How long does it take to complete the W Trek?
You can conquer the W Trek in 4-5 days, depending on how fast you go and what route you take.
PAINE TREKK
Book Travel Consultation
Book a 30-minute consultation with a travel expert to optimize your planned trip. I will assist you in organizing your trekk in Torres del Paine, ensuring an unforgettable adventure.
Book a 30-minute consultation with a travel expert to optimize your planned trip. I will assist you in organizing your trek in Torres del Paine, ensuring an unforgettable adventure.
My organised trips to Patagonia
In the carousel below you can see already assembled itineraries for inspiration, click on the one you are interested in and ask me for a quote.

Compact trip through the southernmost Argentinean Patagonia: Ushuaia and El Calafate

Enjoy the 3 most relevant ecosystems in Argentina: The End of the World, The Glaciers and the Iguazu Falls.

Trip to Patagonia Argentina in 7 days touring the most beautiful landscapes of Patagonia Argentina (Peninsula Valdés & El Calafate)

The Carretera Austral by rental car is probably one of the most spectacular routes in Patagonia, designed to be travelled with plenty of time in your rental car.

Tour along Route 40 in Patagonia, starting on Route 3 on the Atlantic coast and continuing along Route 40 until reaching the Andes Mountains and El Calafate.

The Australis Cruises are Expedition Cruises that sail through the Strait of Magellan and the Beagle Channel, exploring one of the most beautiful and unspoiled regions of the world such as Patagonia and Tierra del Fuego.

The Antarctic Cruise aboard the MV USHUAIA offers you an incredible introduction to the 'White Continent' at a reasonable price.
Book your tours
Search for your hotel, related posts.

Where is Torres del Paine
Torres del Paine National Park is located in southern Chile, five hours north of Punta Arenas,

Torres del Paine how to get there
Torres del Paine National Park is remote, a characteristic that adds to its intrigue but also

Where is Puerto Natales
In the south of Chile, Puerto Natales is one of the must-see places for those who

Where is Punta Arenas
Punta Arenas is located at the southern tip of South America, just north of the Strait

About the author
I am Matias, born in Patagonia, and a lover of my land.
For more than 20 years I help foreign travellers to organise their trip to Patagonia.
I also manage this exotic accommodation on the Atlantic coast.
- Torres del Paine
Latest posts
- Best Tango Show in Buenos
- Best Patagonia Travel Books
- Hop On Hop Off Buenos Aires
How much does a trip to Patagonia cost?
Top 15 must-see argentina locations for your 2024 trip, argentina vacation guide: explore top destinations and tours, top-rated patagonia tour companies for 2024/2025 adventures, is there a train from buenos aires to patagonia, can you fly from buenos aires to patagonia, explore the majestic ice: your ultimate perito moreno glacier tour guide, destinations, save on your trip.
- Book your excursions
- Search for cheap flights
Terms & Conditions / Privacy Policy

Dedicated to bringing you captivating stories, bucket list destinations, and off the beaten track experiences from near and far.
welcome to the blog
Inspiration
Middle east, latin america, north america, comprehensive guide to hiking the w-trek in patagonia, destination guides.
There are some views that are so iconic that they’re instantly recognizable – the Mona Lisa or Starry Nights of the natural world. They’re places that, even though you’ve seen hundreds of photos, feel surreal as you’re standing there, gazing, happily letting time slip away as you soak in their remarkable spirit.
The Base of the Towers in Chilean Patagonia is one of those spots. I’ve browsed through dozens, maybe hundreds of photos, hoping that I’d get the chance to see it myself. When that chance came last February, I grabbed it – even though I only had a couple of days to plan for a whirlwind trip. Luckily I had my friend Carrie from Venture Patagonia to plan the entire thing!
I would be joining my friend Andrea along the W-Trek through Torres Del Paine National Park, one of the most famous trails in a land famous for its natural beauty.
What is the W-Trek?
The mileage and elevation gain of the W-Trek is no joke – almost 50 miles and 9,000 feet of climbing through Torres Del Paine National Park. But that walking can be spread out between three and seven days, making it a manageable trip for those new to trekking. We decided to take four days but needed another day of travel to reach the hike’s launch point at Glacier Grey.
The W-Trek is normally walked east to west, starting at Refugio Las Torres and ending at Refugio Paine Grande. It runs up three valleys, creating the W shape that gives it its name. Instead of traveling east to west, we actually started on the west and at Glacier Grey.
There were two reasons for this: First, Andrea was actually backpacking the entire “O-Circuit” which, unlike the W-Trek, can only be completed in one direction. Second, we wanted to end our trek at its most famous viewpoint – the Base of the Towers.
The W-Trek in five days
Day one: lago grey.
Torres Del Paine is a huge national park, covering about 700 square miles, and the larger Patagonia region encompasses 400,000 square miles. Not unlike its largest American cousins, just traveling through the park can take some time.
To reach our launch point, we took The Grey III Ferry across Lago Grey, a lake at the base of the Grey Glacier. We stayed at the campground at Glacier Grey but had time for some fun before calling it a night. There are two great options that can both be completed in a few hours.
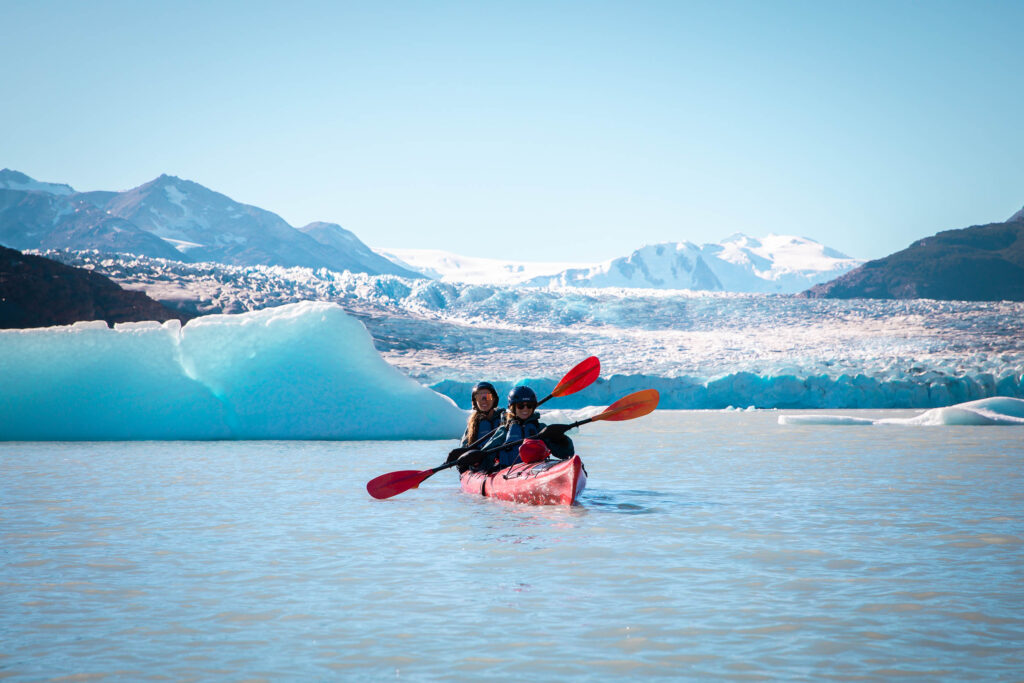
Activity One: Kayak Lago Grey
That first afternoon, after meeting up with Andrea, we kayaked Lago Grey , soaking in views of the glacier cascading into the lagoon, with more ice dotting the surrounding peaks. Talk about a cold lake – it was literally chilled by icebergs that had broken off the glacier!
Our 2.5 hour beginner-friendly expedition service outfitted us with kayaking gear, including a neoprene suit, additional drysuit and booties, and other safety gear. At the time (2022), kayaking Lago Grey cost: $66.000 CLP per person.
Andrea and I shared a double kayak, slowly weaving through icebergs as the sun glinted off the water. It was the sort of unexpected joy that can be hard to capture on a meticulously planned backpacking trip!
Activity Two: Suspension Bridge Hike
A great second option is to hike to a pair of suspension bridges that span the lagoon and glaciers, offering stunning views of the massive, shifting ice. The 2.3 mile hike gains about 950 feet of elevation, making it manageable for the day before embarking on a major trek.
Day 2. Glacial exploration and Paine Grande: 11 km/6.8 miles
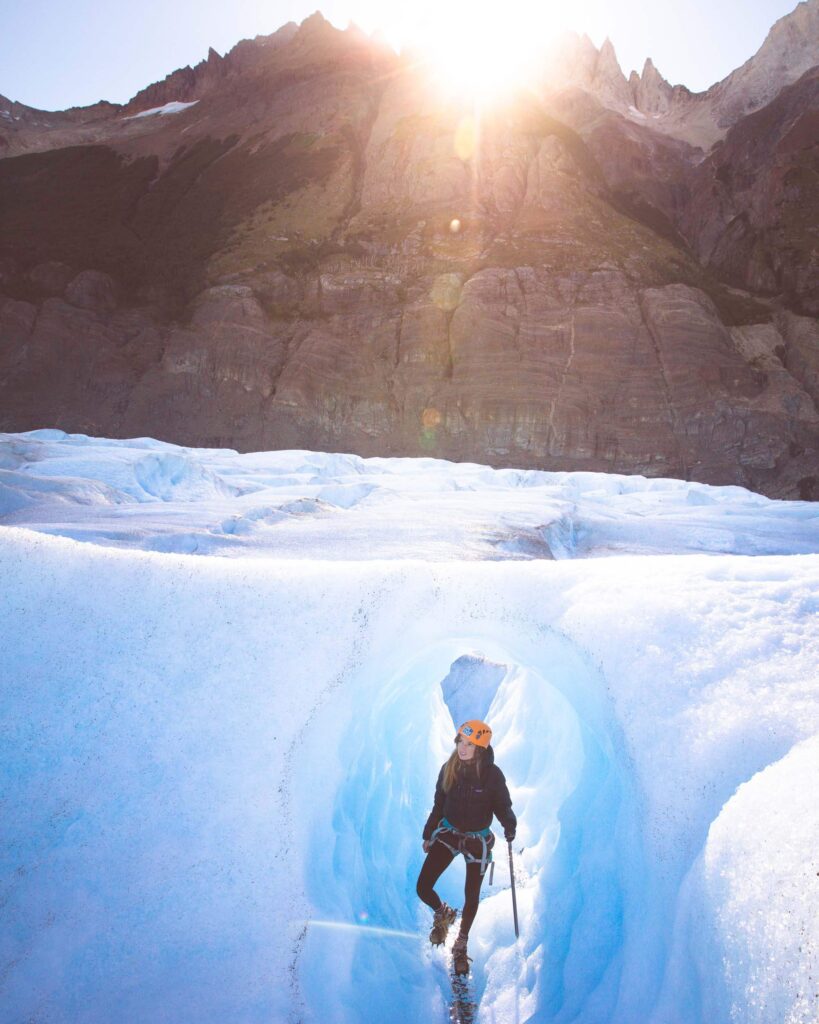
It’s hard to comprehend the scope of glaciers in Torres Del Paine. That’s what makes a hike on a glacier so incredible; there’s really no other way to feel so dwarfed by these amazing structures.
Before hitting the trail on our second day, Venture Patagonia arranged for us to go on a five-hour walk across the Grey Glacier. Our guide did a wonderful job of pointing out pools of stunning blue melt water, navigating safely around crevasses, and finding great photo spots. We were outfitted with crampons, an ice axe, and helmets.
After the glacier walk, it was time to actually begin our path on the W-trek. Our first leg was the easiest, an 11km/6.8 mile walk. We set up our tent at Paine Grande and indulged in some luxuries like wifi, a shower, and a why-is-this-so-good ramen noodle dinner.
Day 3: Paine Grande to Los Cuernos: 25 km/15.8 miles
The realities of trekking set in quickly on day three. Sometimes, you just need to cover some miles. And sometimes, those days are hot – hot enough to make you wonder if hiking an extra section is worth it.
I’ve run into this question in a lot of different conditions. Making the safe choice matters most, but I’m almost always happy when I push forward… and we were thrilled that we pushed on to Mirador Britanico. After all, if you don’t do the French Valley to Mirador Britanico, did you even really hike the “W”?
This series of lookouts covers the middle swoop of the W, where the French Valley slices from Lake Nordenskjold into jagged highlands. We weren’t sure exactly what views would greet us as we hiked through the forested valley.
But the scenery was spectacular. Hanging glaciers lined sweeping rock walls, and sharp peaks gave us a taste of the famous towers to come. It’s amazing to think about how the same glaciers we walked across a few days ago helped to shape these gigantic peaks.
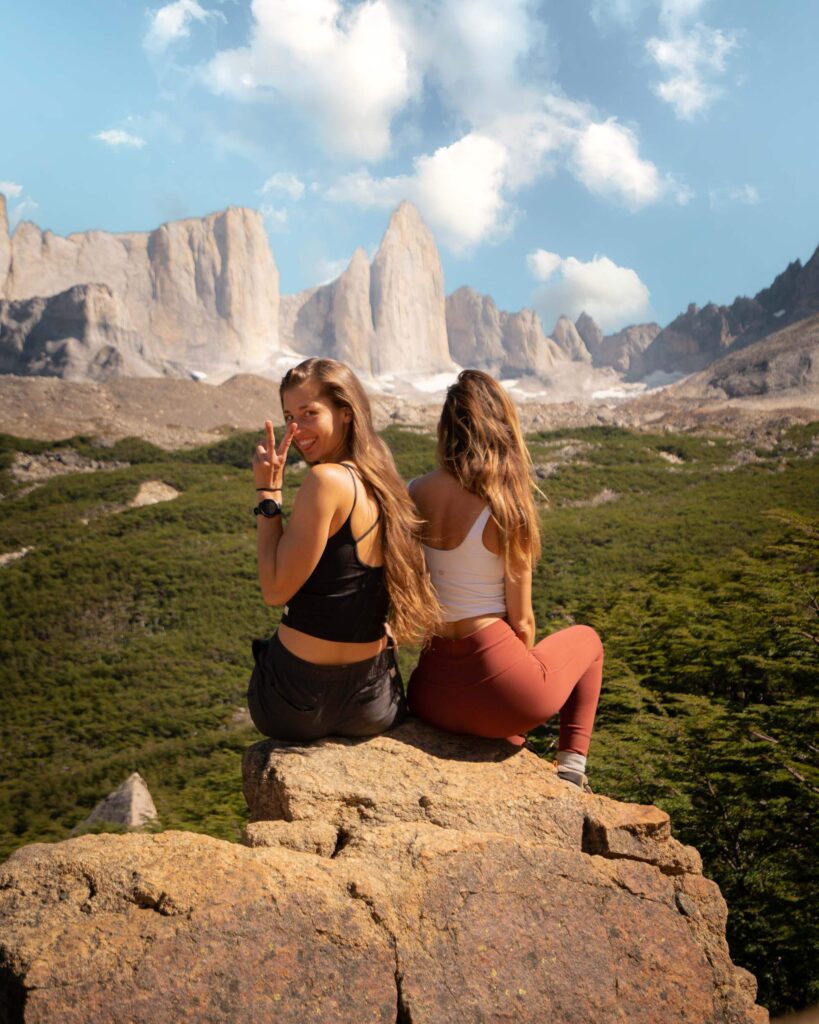
These were the sort of views that end up on Instagram feeds – the greatest hits of a hike. And that’s great! They’re hits for a reason!
But for me, the hot, wooded trek there, the decisions we made along the way, and even the extensive travel to just get to our trailhead all help build into a crescendo that peaks at these kinds of beautiful spots. Without the journey there, they don’t have the same power.
We stayed at Refugio Los Cuernos, which is named after “the horns,” a pair of massive granite peaks in the area. If you’re looking for a shorter day, Frances also has lodging options.
At Refugio Los Cuernos we opted to upgrade to our own private hut. Such a fun luxury! It was at this point that we also started enjoying breakfast and dinners at the refugios.
Day 4: Los Cuernos to Chileno: 12.8 km/8 miles
In some ways, this felt like a wrong way day. We hiked away from some of the most spectacular views at Los Cueros, traveling back along the middle swoop of the W, downhill past the towering granite and hanging glaciers.
At multiple points, Andrea and I mentioned how cool it would be to hike the W-Trek in the opposite direction – into the views. But we were soon back on the right track, continuing on the westward route that would eventually lead us to Los Torres.
We climbed into the Ascension Valley gaining about 500 feet in a little more than a mile, reaching our camp at Refugio Chileno. Tomorrow would be our big day at the Base of the Towers… or at least we hoped so.
Day 5: Sunrise at Los Torres: 14 km/8.7 miles
This wasn’t a necessary sunrise hike. It’s only about 3 miles from Refugio Chileno to Los Mirador del Torres – The Base of the Towers – and we had enough time for a leisurely morning. Our beautiful weather was also running out.
A ranger at our refugio warned that ripping winds and rain were likely this morning. Those iconic towers would probably be swathed in clouds. But I’d seen too many photos of the stunning alpenglow that stains the towers bright pink at sunrise to give up that easily.
In hindsight, maybe it’s fitting that we decided to go anyway. It was a trip that I joined at the last second, that depended on so many little things going right. We put our faith in this one last thing breaking our way.
There’s no better way to soak in a beautiful view than in the early, changing light, as it shifts from a pale, even haze to a soft glow with hues of orange and pink.
We hiked up about 1,600 feet from Refugio Chileno, taking on the second major climb of the route. When we arrived at the base of the towers, it was still dark. We waited to see if we would get a weather window as the sun rose.
Did. We. Ever.
Orange light bathed the towers and washed into the lake below. It was a fitting way to cap a trip that I had already spent so much time thinking about.
Ironically, I botched the camera settings for my own photos. Maybe it was the 4 a.m. wake-up call. Maybe it was cold fingers. I’d like to think that I was just lost in a surreal moment.
After the light show was over up at The Towers, we headed back down to Refugio Chileno to eat some lunch and pick up all the gear we had left behind for our quick assent that morning. Once we had packed up it was time for the final push. We ended our W-Trek at Hotel Las Torres with celebratory pisco sours.
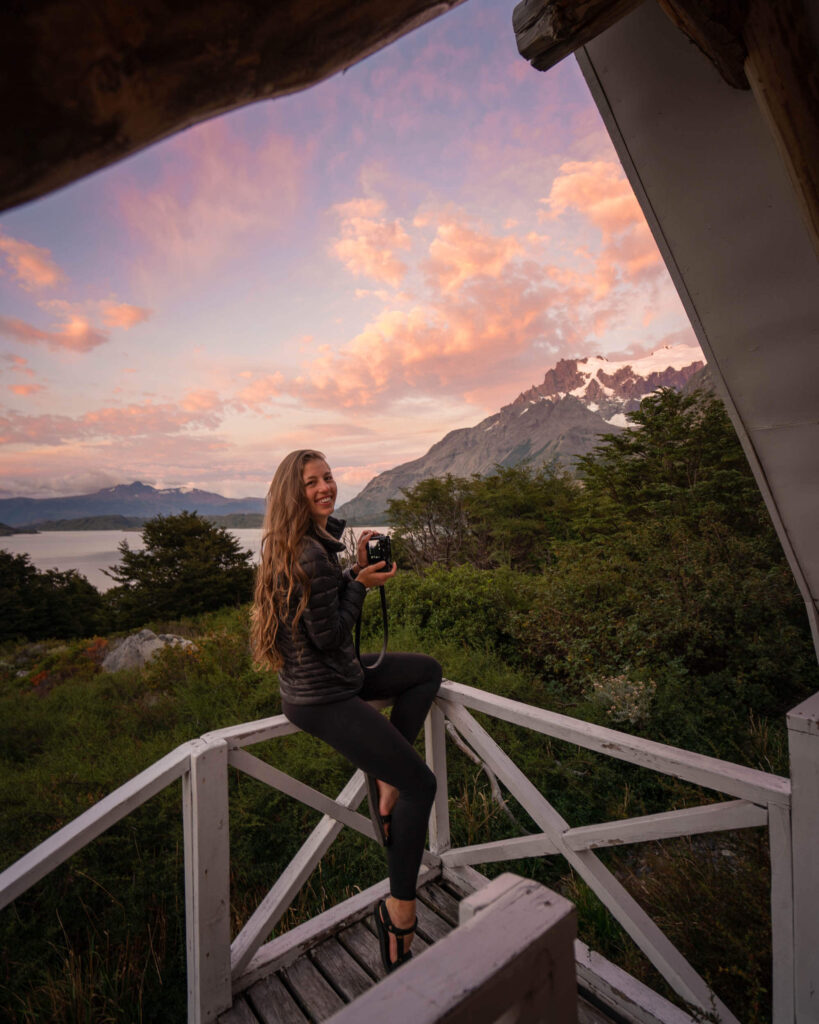
We spent our final night with a surprise stay at EcoCamp Patagonia , a domed refugio that sits at the western edge of the trail. There’s nothing like a hot shower at the end of a trek, and a picturesque rainbow gave us one last shot of Patagonia beauty.
Final Thoughts About My Experience On The W-Trek
The towers are among the most spectacular scenery that I’ve seen. It’s truly a privilege to be able to explore natural beauty far beyond my backyard, with logistics taken care of by Venture Patagonia to ease our path.
It’s also a fundamentally different experience than taking friends to places I’ve long visited in Washington, where I’m the one who can teach them about what we pass by on the trail.
Travel can be a pain (Paine? Too much?). There’s cost, planning, time off work, logistical hurdles, and simply the anxiety of putting yourself in an unfamiliar place.
But it can be so rewarding, and not just for the spectacular views that show up in an Instagram post. I got to spend time with my friend Andrea, an amazing writer and photographer in her own right. I met wonderful people from Venture Patagonia, who graciously shared their wisdom about Torres Del Paine.
And, as it gets increasingly difficult to take time off for outdoor adventures, I got to spend five days on the trail filled with appreciation for natural beauty and personal reflection.
Camping vs. Refugios
It’s important to understand how lodging and backpacking operate in Torres Del Paine. There’s no dispersed camping like in some National Forests in the U.S. You can’t pitch a tent wherever you please.
Instead, camping occurs only at designated campgrounds. These are operated by different companies, have different costs, and are booked through different services.
CONCAF (Chile’s version of the NPS) runs the Paso and Italiano campgrounds. Both are currently closed but might reopen for the 23-24 season. When open, they are free to stay at but need to be booked in advance at this Spanish-language website.
Fantastico Sur runs the Chileno, Frances, Los Cuernos, Seron, and Los Torres campgrounds. Each costs $21 USD for two people per night with an extra $11 USD per person. Book here.
Vertice Patagonia runs the Dickson, Los Perros, Glacier Grey, and Paine Grande campgrounds. Each campsite costs $9 USD per person. Book here.
We were lucky enough to get to experience a bit of everything. Our first two nights we camped in a 2-person tent I brought from home. Our third night we had a private hut at Los Cuernos, and our last night was spent in a dorm-style refugio room at Chileno.
There’s one huge advantage of spending every night at a refugio – you can carry way less stuff! There are also luxuries like wifi, showers, soft beds, and the comfort of enclosed sleeping quarters.
The flip side? Refugios are significantly more expensive than campgrounds. They aren’t available at all campgrounds in the park, including Italiano about halfway through the W-trek. Plus, you might end up in a dorm with a noisy sleeper.
Whether staying in a tent or refugios, you’ll share amenities like stores, restaurants, and bars. Some are great; others are a mixed bag. Most stores aren’t well stocked, campground bars can be a little noisy, and lodging whether by tent or refugio can seem a little cozy for those used to backpacking in solitude.
There’s also a middle ground. Many campsites rent tents, sleeping bags, and sleeping pads, helping you save on pack weight but avoid spending on a refugio. You can also bring some gear and rent some.
Does this seem like a lot to navigate? If so, you may want to work with a guide service like Venture Patagonia as we did !
Full Board vs. Self Supported – The Best Way to Eat on the W-trek
The availability of restaurants and stores at campgrounds along the W-trek opens up a variety of possibilities for staying fueled. You can select options ranging from full board, with meals prepared for you to get through the entire day, to self-supported, which is more like a solo backpacking trip where you carry all your food.
Most campgrounds have a restaurant that can provide dinner and breakfast on site, plus lunch to go. They can accommodate vegetarian and gluten-intolerant diets. You can order full board whether you stay in refugios or campsites.
If you prefer to prepare your own food, options are much like backpacking that many of us are used to in the U.S. You carry what you can eat and what you need to cook with. This includes dried meals, snacks like bars and gels, and larger cooked meals if you like a larger spread and can carry a bit more.
Campgrounds also have stores that focus on calorie-heavy staples like pasta, beans, candy, soda, chips, and ramen. They also have hygiene products, and if you like to unwind, beer and wine.
You can also pick and choose from available options. Do you want to eat breakfast and dinner on full-board but prefer your own snacks for lunch? That works. Do you want to prepare your own meals but enjoy an evening beer? That works. At our first campsite, we feasted on ramen noodles. You do you!
The Value of a Guide
A self supported hike along the W-Trek is not only possible, it’s an amazing experience! There are few things as rewarding as a successful solo backpacking trip. BUT given the extensive time and travel cost required to even get to Patagonia, you might consider going on a guided trip. Especially if you don’t have any previous trekking experience.
Reasons to Do a Guided Trek:
You don’t just hike the route, you learn about it. Guides are a wealth of information about the history, plants and animals, and hidden gems along the route. Hiking is so much more than trodding a path; guides help you immerse yourself in a place.
Lodging is a breeze. Guide companies take care of the sleeping arrangements, letting guests relax and enjoy the hike. A guide can also help secure any additional permits and fees you need.
No giant packs! I know I mentioned this already, but it’s a real treat to be able to embark on a multi-day hike without hoisting on a full pack.
Guides support local jobs. Outdoor recreation can be a critical resource for local economies, and services like guiding help local residents steward amazing natural places while providing for their families. Venture Patagonia’s owners Carrie and Kevin, live in Patagonia where Kevin grew up in a 5th-generation ranching family.
Self Supported W-Trek
If you are an experienced backpacker, self-supported can be a great option. The trail is in good shape and easy to follow, especially if you use a mapping application. You frequently see other hikers, who are usually happy to help with questions.
In many ways, the biggest challenge is booking campgrounds and refugios, arranging transportation into Torres Del Paine, and navigating the wider scope of international travel.
Self-Guided – An In-Between option!
You can also select a mix of services – which is what Andrea and I did. We felt confident that we could hike self-supported, but didn’t want to deal with the logistics of booking campgrounds, ordering meals, planning activities along the route, or arranging transportation before and after the trek.
That’s where Venture Patagonia came in! Many services let you customize the level of support you need.
When to Visit Torres Del Paine
Torres Del Paine is best visited during the Southern Hemisphere’s summer months of December-February, though spring (September-November) and fall (March-May) also have their charms.
Winter (June-August) is more challenging and usually requires a guide but can be an amazing experience. Even during the summer months, be prepared for all types of weather!
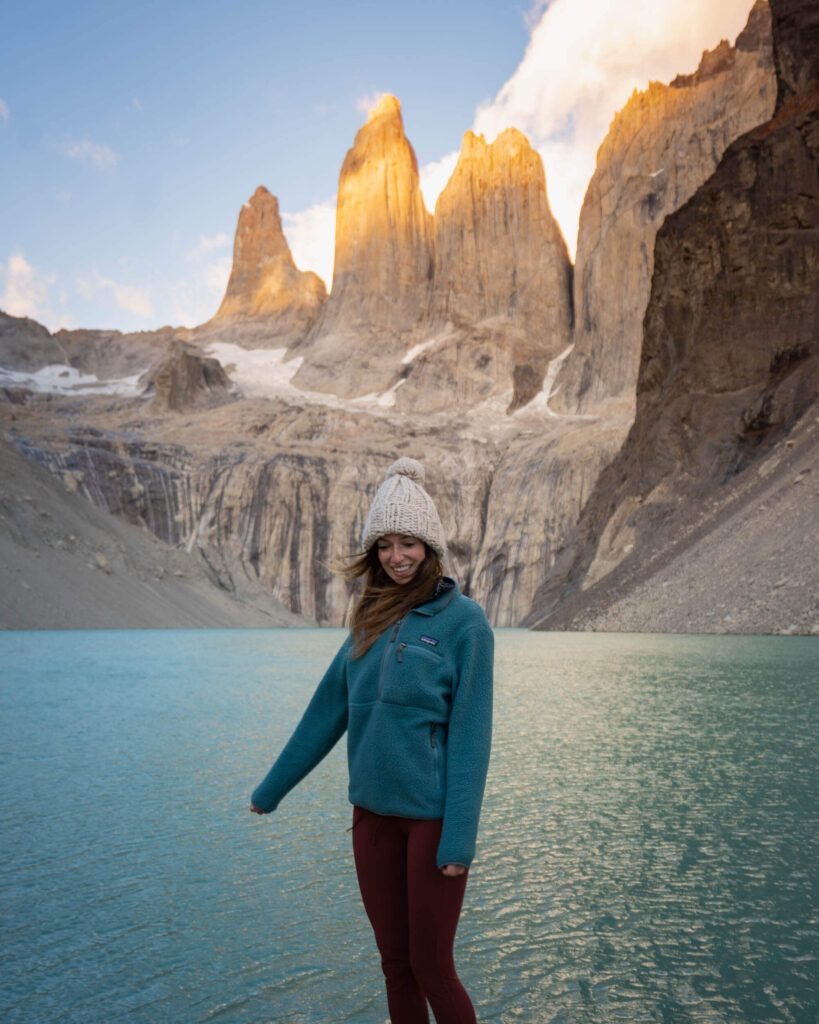
What to Pack for The W-Trek in Torres Del Paine
Packing layers is a crucial aspect of preparing for any trekking trip as it helps you stay comfortable and safe in changing weather conditions. The weather can be unpredictable in Torres del Paine, and temperatures can vary significantly at different elevations and times of day.
Packing appropriate layers for the W-Trek allows you to adjust your clothing to match the changing conditions, keeping you warm, dry, and protected. I have an entire blog post dedicated to the gear you will need for the W-Trek , but here’s a packing list to help you get started:
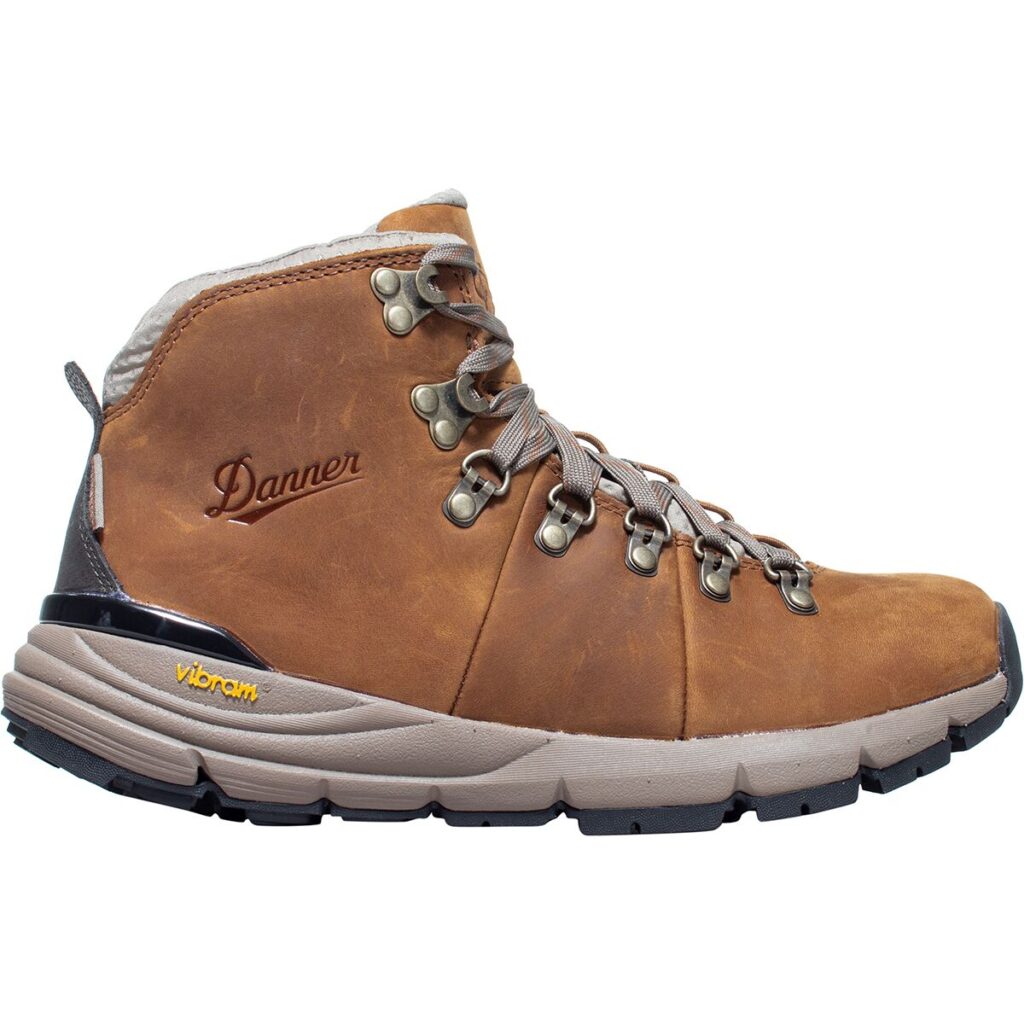
- Hiking boots : Choose sturdy, waterproof hiking boots that provide ankle support.
- Waterproof and breathable rain jacket : The weather in Torres del Paine can be unpredictable, so a waterproof and breathable rain jacket is essential.
- Insulated jacket : Nights can get chilly, so bring a warm, insulated jacket.
- Quick-dry hiking pants : Opt for lightweight and quick-dry hiking pants that are comfortable for long hikes.
- Moisture-wicking base layers : Bring moisture-wicking base layers, including shirts and underwear, to stay dry and comfortable during the trek.
- Hiking socks : Pack several pairs of moisture-wicking hiking socks to keep your feet dry and prevent blisters.
- Sun hat : A wide-brimmed sun hat will protect you from the sun during the trek.
- Gloves and beanie : Bring gloves and a beanie for warmth, especially if you plan to hike during the colder months.
Camping gear (For Self Supported Trips):
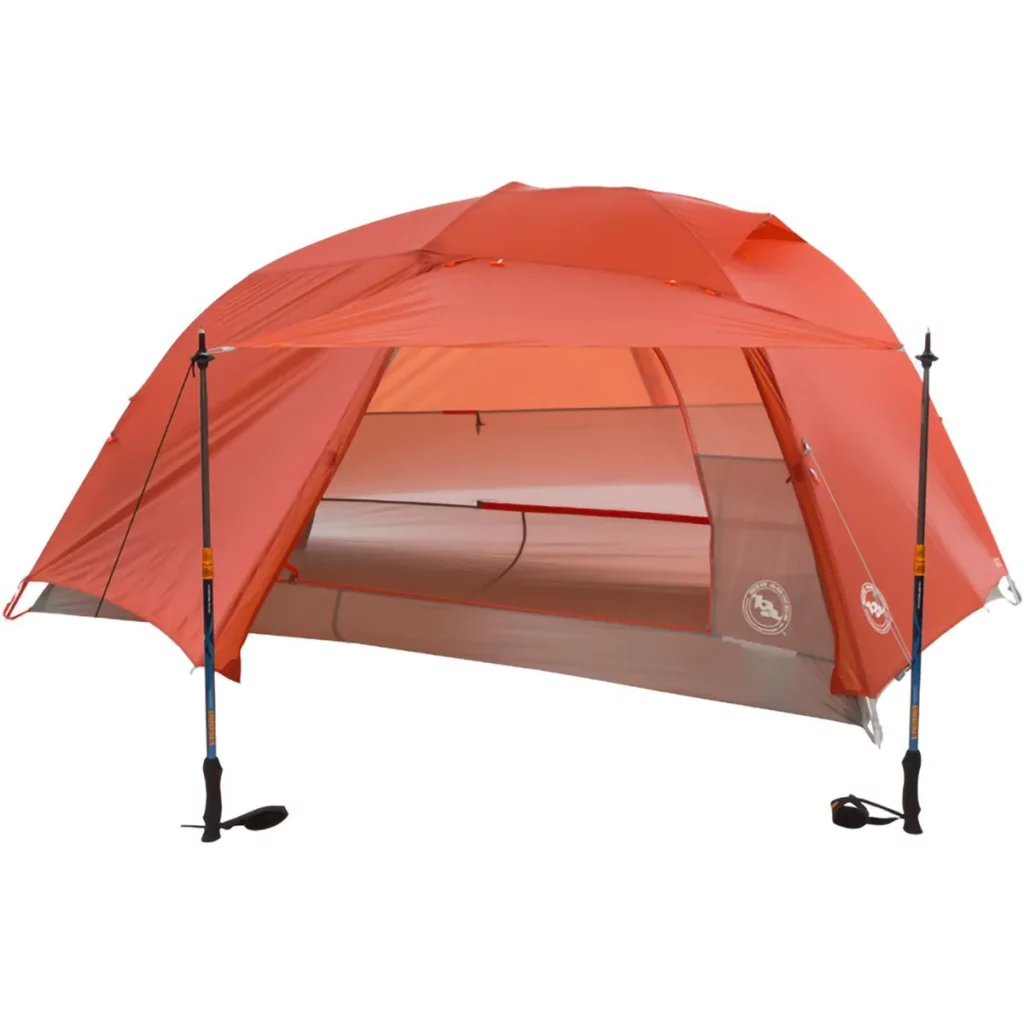
- Tent : If you plan to camp along the trail, bring a lightweight and waterproof tent.
- Sleeping bag : Choose a sleeping bag suitable for the weather conditions, preferably rated for cold temperatures.
- Sleeping pad : A sleeping pad provides insulation and comfort while camping.
- Cooking equipment : If you plan to cook your meals, bring a lightweight camping stove, cooking utensils, and a fuel canister (wait until you get to Patagonia to purchase).
Food and water:
- High-energy snacks : Bring lightweight, high-energy snacks like nuts, trail mix, and energy bars to keep you fueled during the hike.
- Water bottles or hydration bladder : Carry enough water bottles or a hydration bladder to stay hydrated along the trail, as water sources may be limited.
Other essentials:
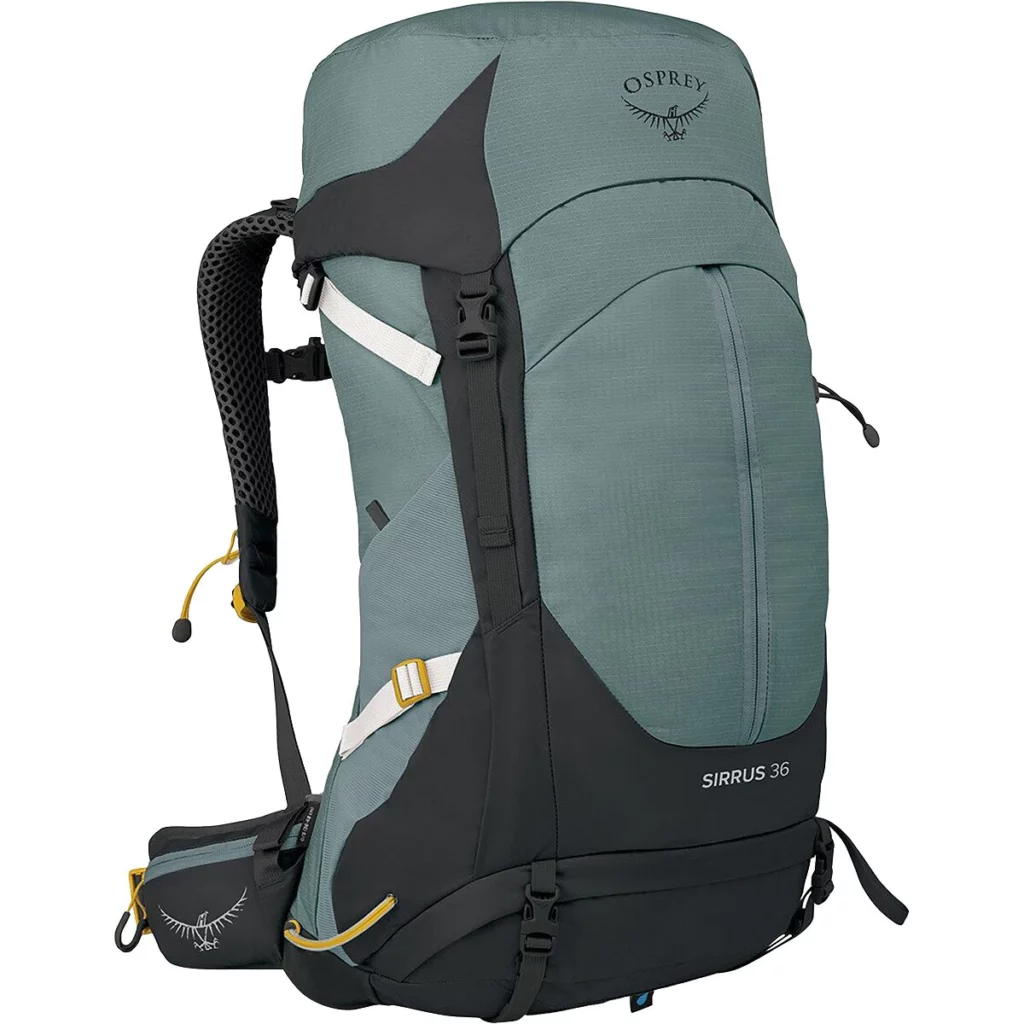
- Backpack : A sturdy and comfortable backpack with a hip belt is necessary to carry all your gear during the trek.
- Trekking poles (optional): Trekking poles provide stability and reduce strain on your knees during steep ascents and descents.
- Headlamp : A headlamp is essential for navigating in the dark, especially if you plan to camp.
- Sunscreen and sunglasses : Protect your skin and eyes from the sun’s harsh rays with sunscreen and sunglasses.
- Insect repellent : Torres del Paine has mosquitoes and other insects, so bring insect repellent to protect yourself.
- First aid kit : Carry a basic first aid kit with essentials like bandages, blister pads, and any necessary medications.
Remember to check the weather forecast and trail conditions before your trip, and pack accordingly. It’s also advisable to pack light and only bring what you absolutely need to keep your backpack manageable during the trek. Happy hiking!
Just a quick heads up! Some of the links on this blog may be affiliate links, which means that if you click on them and make a purchase, I may earn a commission. Don’t worry, though – it won’t cost you anything extra, and it’s a way for me to keep this blog up and running. Thanks for your support!
Leave No Trace
Don’t be that tourist! It can be tough to remember that areas of Patagonia are a fragile wilderness when your campground has a bar. But continue to keep a clean camp and embrace zero-impact principles when on the trail and in the backcountry to ensure that future generations have the chance to enjoy this amazing place!
Other Treks You Might Enjoy
Complete Packing List For The W-Trek In Patagonia
Tips For Hiking The Tour Du Mont Blanc
Complete Guide To Backpacking The Mineral King Loop
Thru-Hike The Enchantments In One Day
4-Day Ausangate & Rainbow Mountain Trek
Like this post? Pin it for later and share it with others!
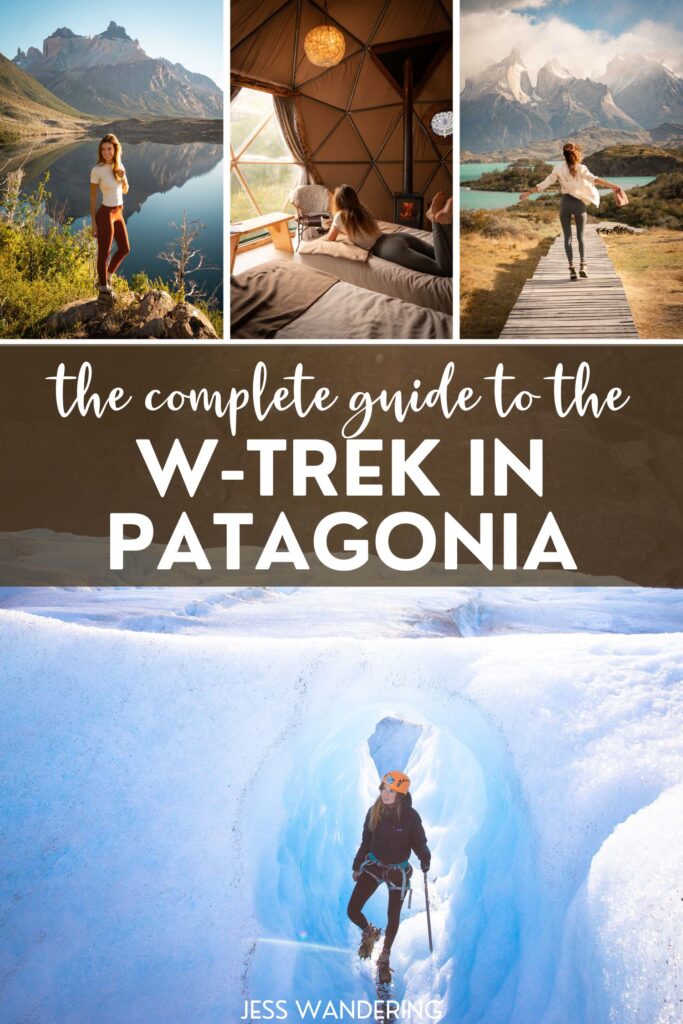
Complete Packing List For The W-Trek In Torres Del Paine »
« a complete guide to the baunei coast: sardinia’s east coast paradise.

keep reading
Leave a reply cancel reply.
Your email address will not be published. Required fields are marked *
Save my name, email, and website in this browser for the next time I comment.
WoW! Always inspiring and so hard to choose which views are my favorite when all are fantastic. I love living my life vicariously through your treks!
Thanks so much for the kind feedback John! the W-Trek was definitely one of my favorite adventures. Thanks for taking the time to stop by the blog and leave a comment – always very appreciated.
Amazing W-trik. I go through your blog post and it’s Wounderfull and very attractive. For a short time I feel like I was with you on your five day trip. Enjoy your day
Hi Jess, thanks a lot for the very detailed itinerary. Wondering what did you do on the final day after the trek before returning to Puerto Natales ? Did you have some private transportation to get you back while stopping at view points along the way ?
Yes! That’s exactly what we did. After the trek we spent the night at EcoCamp Patagonia, then the next day Venture Patagonia picked us up and drove us on a scenic tour through the park back to Puerto Natales.
Reader Favs

Travel Writing
The stories behind your favorite instagram posts of 2020.

10 Best Hikes in Washington (A Local’s Must Do Washington Hikes)
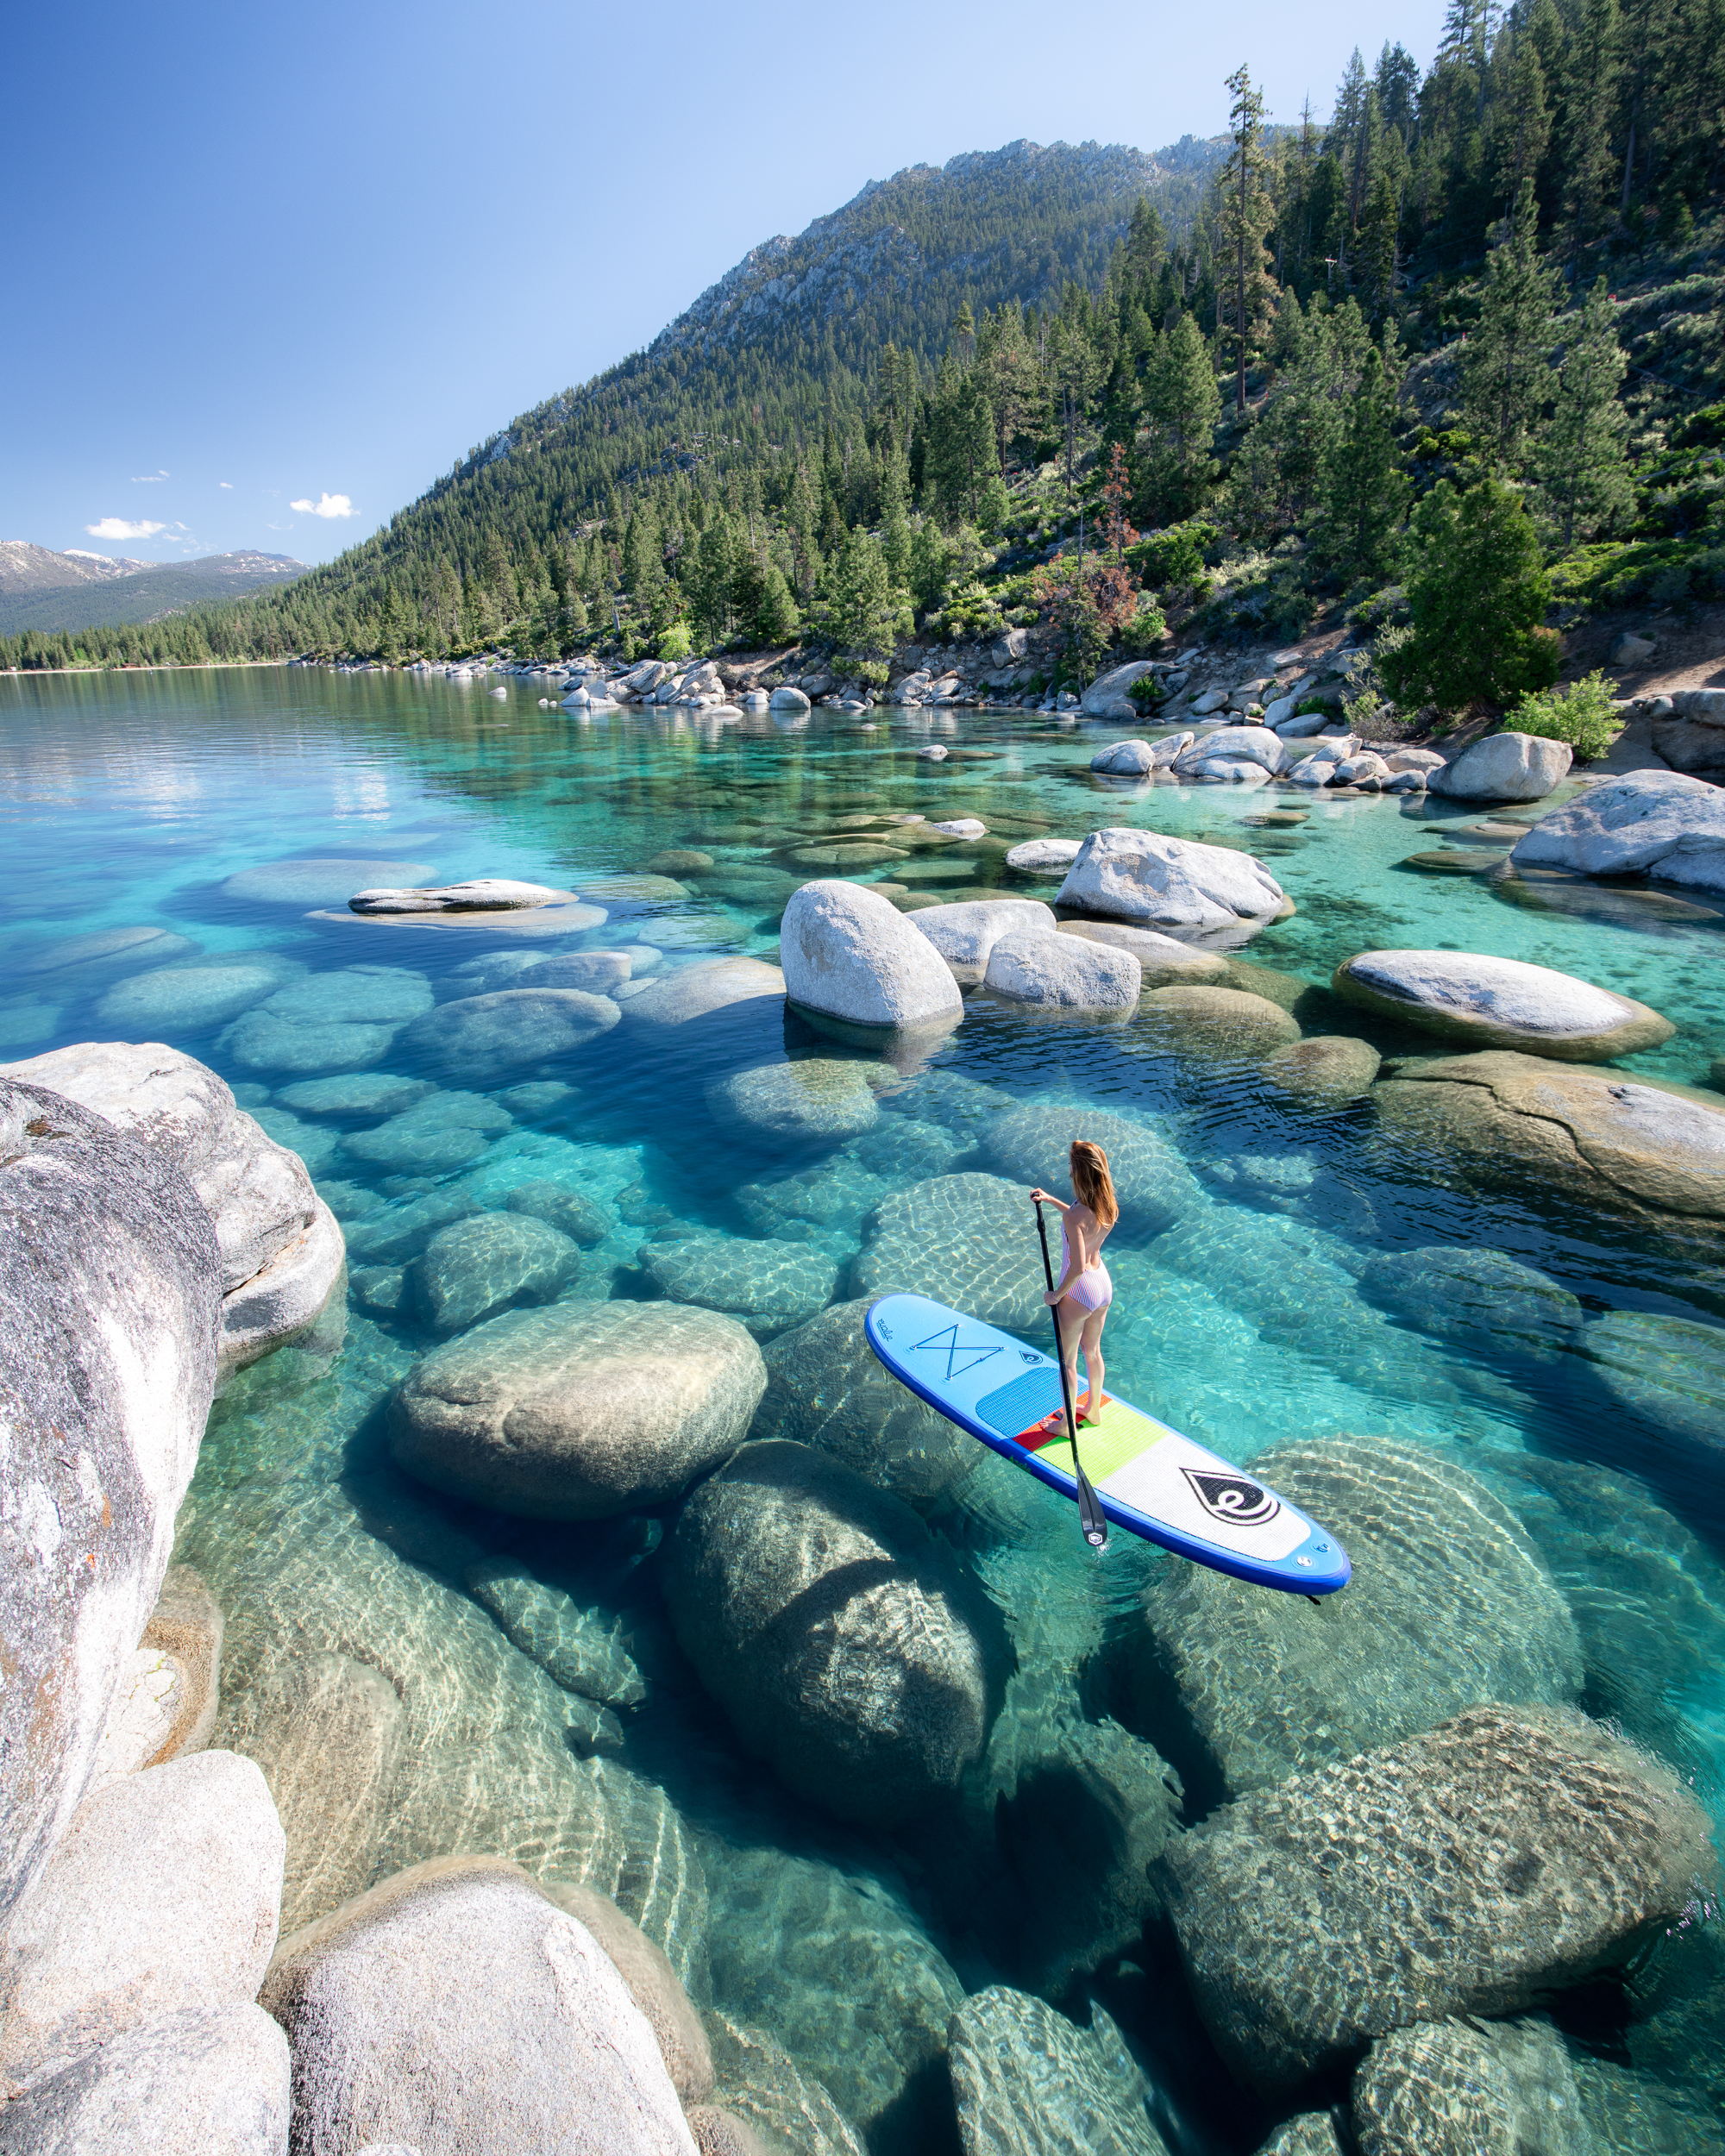
72 Perfect Hours In Lake Tahoe: Best Things to Do
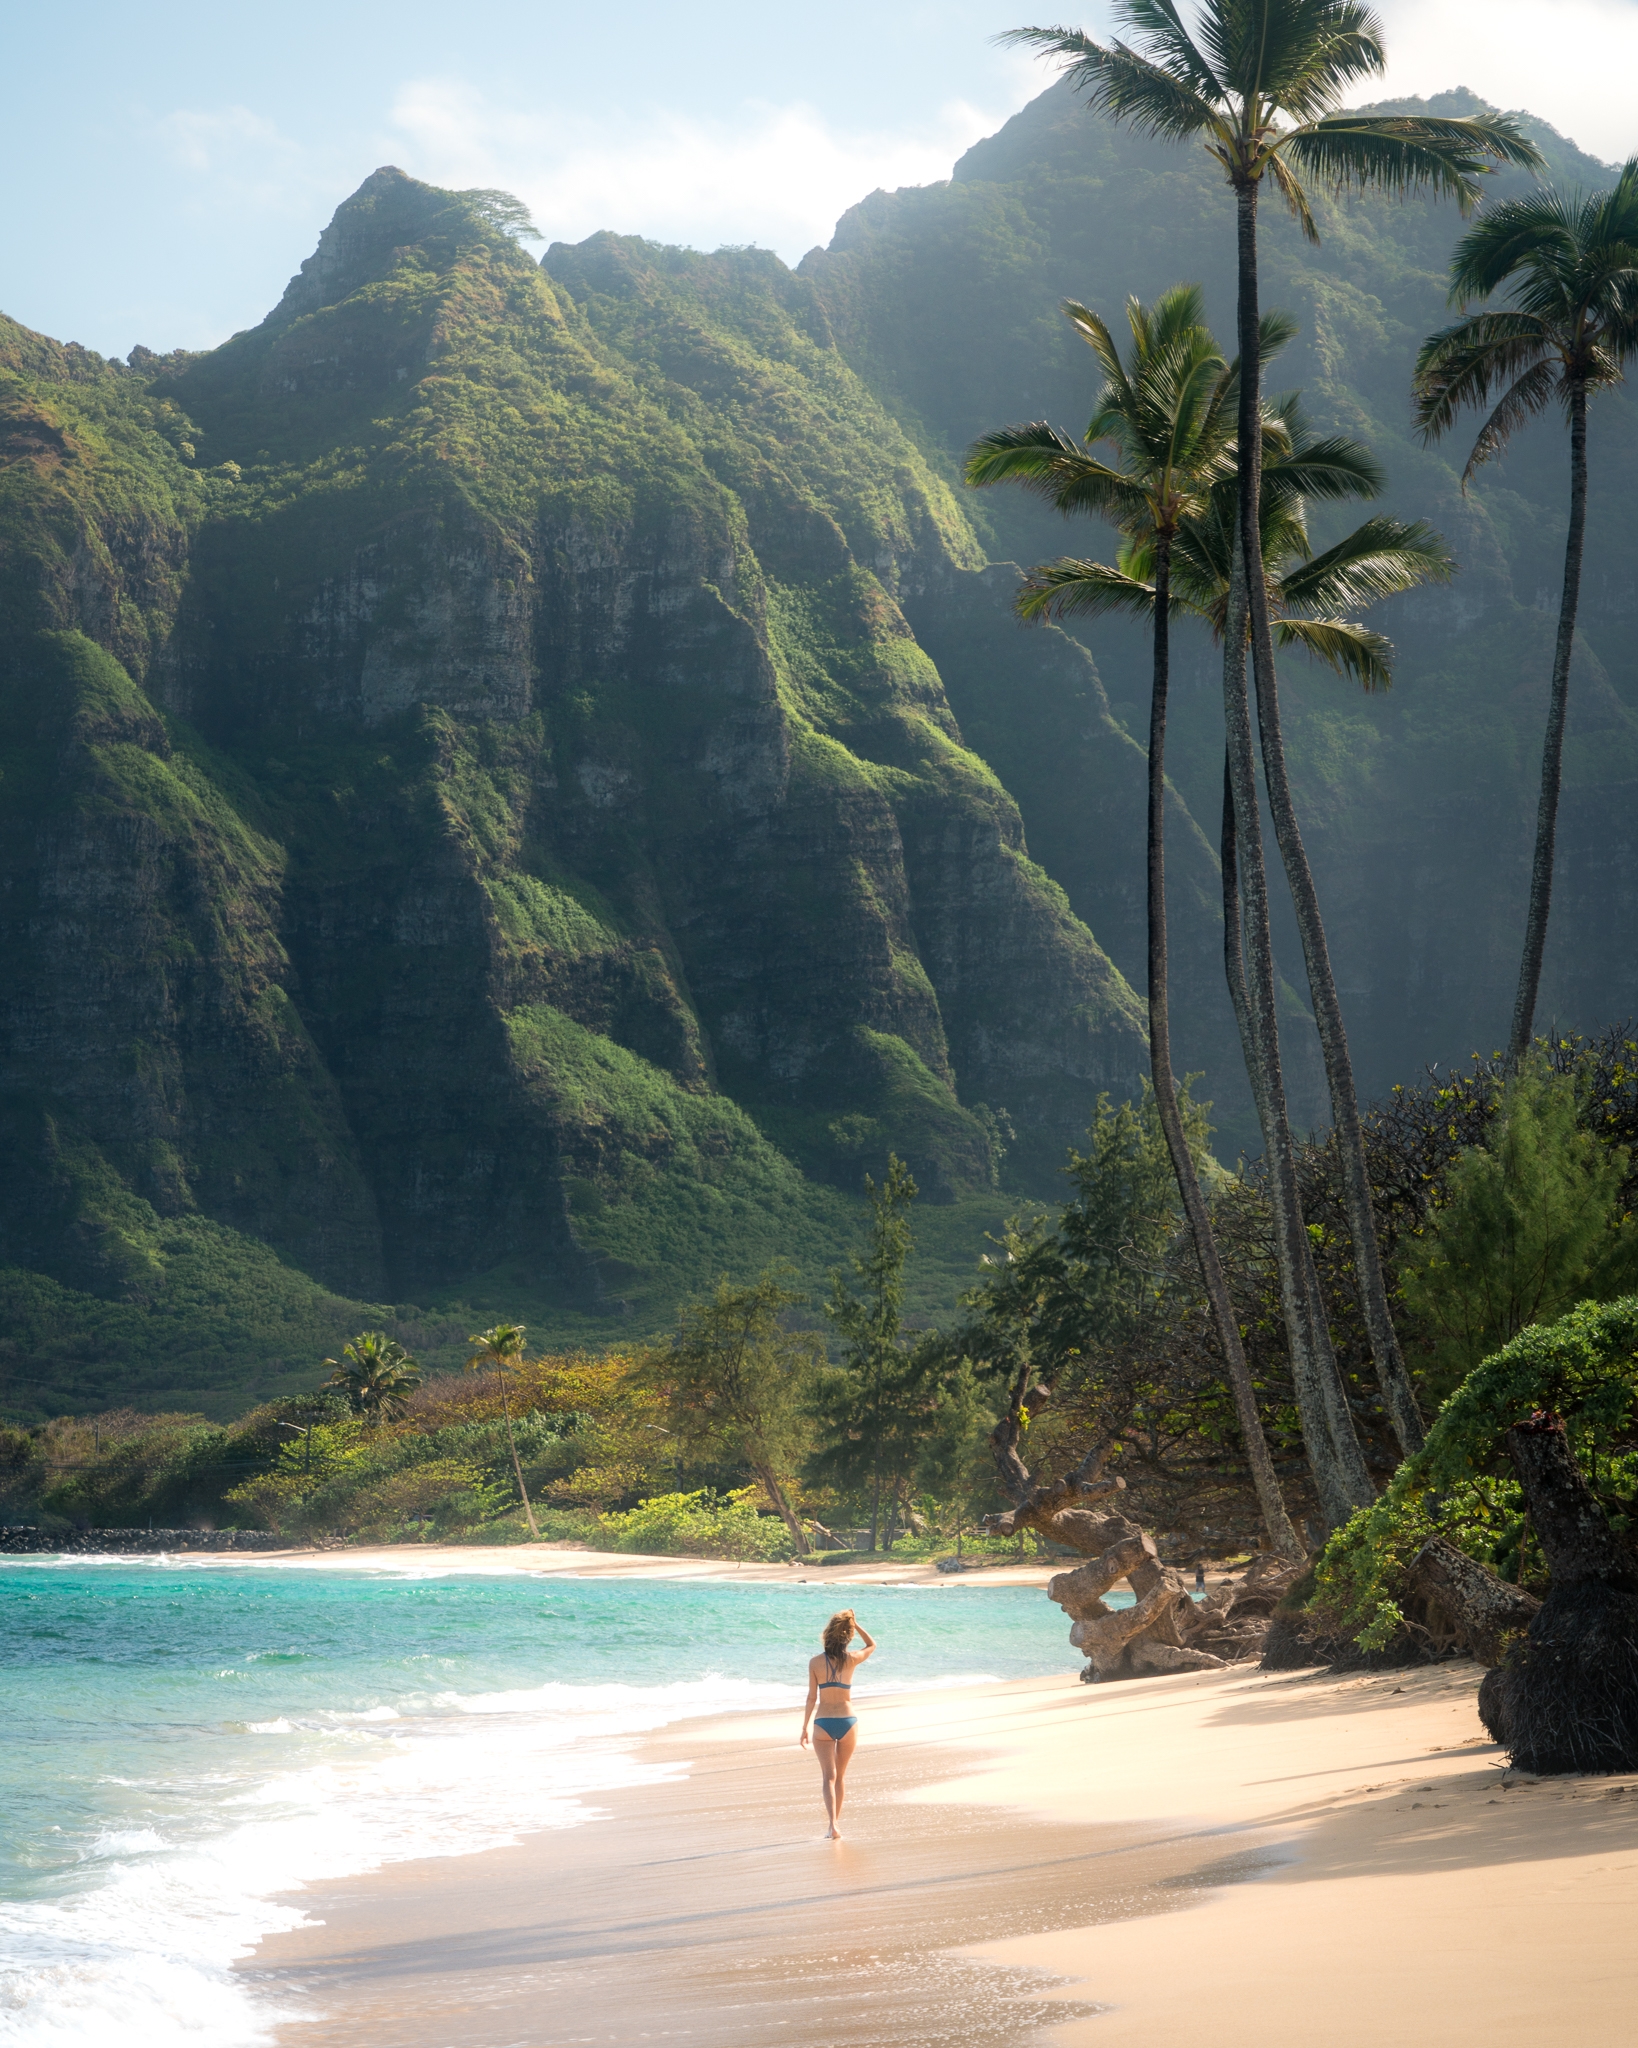
How I Afford To Travel All The Time

Hi, I’m Jess, an outdoor enthusiast based in Seattle. I grew up exploring the Pacific Northwest, and early on was infected with the travel bug. I tried to suppress my wanderlust in pursuit of a traditional career path, but after a short stint as a lawyer, I left the confines of my office to get back in touch with my roots. Now, I wander the world taking photos, making memories, and sharing my love for travel with others!
Meet the Writer

Before you go, make sure to subscribe so that you don’t miss out on new blog posts, upcoming events, and other fun travel resources!
Wander with Me
@jess.wandering
Back to Top
Design by Oregon Lane
Privacy Policy
©2021 Jess Wandering
Terms and Conditions


Ultimate Guide to Hiking the W Trek in Patagonia
Situated in the southern realms of South America , Patagonia is one of the world’s last untouched wildernesses. Chilean Patagonia is a land of towering peaks, crystal-clear rivers, blue-hazed glaciers and treeless steppe, it offers vistas like nowhere else on Earth.

Often at the top of hiker’s bucket list, the region’s most celebrated trekking route, the W Trek, takes a ‘W-shaped’ path through Chile’s Torres del Paine National Park in Patagonia. There’s perhaps no better way to explore the region’s dramatic landscapes than on foot, so we’ve created a comprehensive guide with everything you need to know about hiking Patagonia’s famed W Trek.
Travel Guide to Hiking the W Trek in Patagonia
Hiking the w trek basics.

While scenic, hiking the W Trek is no gentle stroll in the park. Demanding in places, it requires a good level of basic fitness to cover its 50-mile length successfully. This is not least because altitude is a significant factor on the route, topping out at more than 3,500 feet above sea level. After all, the W Trek lies deep within the southern reaches of the mighty Andes mountain range. Located within Chile’s Torres del Paine National Park , the W trek can usually be hiked in four or five days.
There are a number of options available for those looking to hike the W trek. Some choose to pre-plan the lodging, purchase a pass and do it on their own. While this is certainly an option, the lodges fill up months in advance. Another option for those that don’t want to hike the W trek alone or are booking closer to your hike date and the lodges are full, is to book a guided hike.
Guided hikes can be private or you can book a small group hike to go with a guide and some other people.
Accommodation on the W Trek

Most of this multi-day hike will require overnight camping in tents or at a designated lodge, with hostels and hotels accessible at the start and end of the trek. Camping is only permitted with designated refuges, or refugios at Torres del Paine National Park. Keep in mind that these often get booked up a year in advance so make sure to plan ahead to get the best spots at your favorite refugio.
Lodging at the refugios are either tent camping or a shared room inside the lodge. Tents provided at the refuge are meant for the colder weather, rain and wind so they are warmer than tents you may be used to. Still, if you require the comfort of your own bed inside a warm, cozy lodge then make sure to book even further out because those rooms book up the fastest.
The upside of this arrangement is that you’ll have access to shared bathroom facilities, which generally include hot showers ideal for soothing sore muscles after a day’s walk. Refuges also have heating and electric lighting, and a communal dining room for eating meals sheltered from the elements. Most contain a small shop selling basic items.
Many of the refugios even have wifi so you can catch up on communication with loved ones. Keep in mind that the cost is much higher because it is satellite internet. You will not have cell service while hiking the W trek so make sure your loved ones are aware.
HOT TIP : If you find that individual reservations are booked up in all of the refugios, there may still be availability through a guided tour . You can join a guided hiking tour that is organized by the companies that own the shelters and this comes with a guide for your hike as well as lodging at the shelters along the way. It will be slightly more expensive than hiking and booking everything solo and you will be restricted to one company of shelters versus being able to pick and choose but the upside is your dates will be more likely to be available when planning closer to your travel date.
When to Tackle the W Trek

Hiking the W Trek is open right throughout the year, but if you’re planning on heading along it independent of guides and tour groups you’re limited to the period between October and April. This coincides with the southern hemisphere’s summer months and is also great to combine with a visit to the beautiful Atacama desert .
Independent hiking is complicated by the fact that places at refugios need to be reserved ahead of time, and can be fully booked months in advance. This is particularly true for the high season, which lasts from December to February. The route is also at its busiest during these months, which some trekkers find takes away from the overall experience of solitude and isolation Patagonia is renowned for.
Getting Started : Where to Fly Into and How to Get There
The standard gateway to the W Trek is the town of Puerto Natales , Chile. It lies more than 1800 miles south of the Chilean capital, Santiago. Limited flights connect the airport at Puerto Natales with Santiago, and it’s often easier to fly to either Punta Arenas further south in Chile, or even to El Calafate, just across the border in Argentina.
From either of these latter airports, you’ll then have to head to Puerto Natales by road. Long distance buses cover the distance from Punta Arenas in around three hours, or around 7 hours from El Calafate including border formalities. There is also an opportunity to rent a car and drive yourself .
If coming from Argentinian Patagonia, you should arrange your visa for Chile ahead of time. However, most European, North American and Australian passport holders require nothing more than six months validity on their passport for tourist visits of less than 60 or 90 days (dependent on nationality).
Puerto Natales – The Gateway to Torres del Paine National Park

Puerto Natales has a good cluster of hostels and hotels that are well used to welcoming those starting or finishing hiking the W Trek. Perhaps even more helpfully, this once small fishing village has a number of stores where hikers can rent any equipment they may need. Most stay open until 8 or 9 pm, allowing you to organize any kit requirements even if you arrive later in the day.
It’s also possible to securely store gear you won’t need during the trek. Ideally, your backpack won’t weigh more than around 30 lbs.
Storage can be arranged with your guiding service if you hire a guide, with your hostel/hotel depending on where you are staying or you can rent storage at the bus station. Ask your hotel or hostel if it is possible to store some of your items while you do the W trek. If they don’t have storage available, you can store your items at the bus station. Be aware of the opening hours if you choose this option as you will only be able to drop off or pick up your items during specific hours.
Getting to the W Trek from Puerto Natales, Chile
It’s possible to walk the W Trek in either west to east or east to west directions. That said, the vast majority of trekkers start the trail at the end closest to the entry gates into Torres del Paine National Park, which means they tackle the route from west to east. In turn, starting the trek in this direction means you’re not thrown into the deep end on day one.
Several trustworthy companies run buses that drop off and pick-up hikers from the park entrances. The trip takes between two and four hours depending on which entrance is used. They all have departures in the morning from Puerto Natales, usually around 7 am. If you’re struggling to get a seat, less popular services also operate in the early afternoon, leaving Puerto Natales around 2.30 pm.
You should buy your ticket ahead of time at the company offices inside Terminal Rodoviario , where the buses depart from. You’ll find the terminus on Avenida Espana. Round trip tickets (around $20) permit a ride on any of that company’s returning buses.
Buses generally have stops at Laguna Amarga, Pudeto, and Administrativa. The stop at Laguna Amarga is primarily used by those heading along the W Trek from east to west as it connects with the minibus to Las Torres base camp.
If you’re following the majority of trekkers in starting the W Trek at its western end, you’re better off buying a ticket to either Pudeto or Administrativa. From Pudeto, a catamaran crosses Lake Pehoé in around half an hour. Its destination is Paine Grande. As it lies midway along the W Trek route, arriving via Pudeto means repeating your day one walk on day two.
A way of avoiding this is to head instead to Administrativa and then catch the three-hour ferry that travels the length of Lago (Lake) Grey towards the stunning Grey Glacier where there is a campsite.
Fees for entering the park are the equivalent of roughly $30, and can be paid in Chilean pesos, US dollars or euros. If you pay in dollars or euros try and have the exact amount and don’t rely on there being change available. There are numerous currency exchanges in Puerto Natales. Tickets last as long as you stay within the park, or for five consecutive days of entry.
W Trek Itinerary

For those crossing Lake Grey, day one of hiking the W Trek will be mostly taken up by arrival at Grey Campsite, situated between the lake and montane forest. However, there’s still a chance to give your hiking boots a little action, with a trail leading to a viewpoint of Grey Glacier. Approximately one mile in either direction, it has an ascent and descent of around 1,200 feet in total.
If you get lucky with the weather you will have incredible views of the glacier and the glacial lake with icebergs swimming in it. The day we went was cloudy, windy and rainy making it very difficult to complete the hike. While you can’t predict the weather, be aware that the glacier creates a micro climate so just because it is sunny in other parts of the park does not mean that it will be the same nice weather near the glacier. Pack a hat and a warm jacket as it can get very cold, windy and wet.

Day two is usually the first full day of hiking the W Trek, with the path following the eastern shore of Grey Lake for the first third of the day’s route before moving inland.
The path is relatively gentle, and the scenery simply extraordinary from early on. The campsite of choice is called Refugio Italiano, which sits at the southern end of French Valley. In all, hikers usually take around eight hours to reach this point, covering around 13 miles and a further 1,000 feet in altitude.

Day three is normally dedicated to hiking French Valley which is the favorite part of hiking the W trek for many.
Following streams and rivers much of the way north, the valley offers spectacular views of glaciers towards the lookout at Britanicos Camp, although it’s uphill all the way. After taking in the majestic scene, you then complete the central part of the ‘W’ by returning to your previous night’s camp, having covered around ten miles and another 1,000 feet in altitude.
The day’s trek usually lasts around seven hours. Just like with the previous treks, the glaciers here can create microclimates which means that the weather could be unpredictable. Parts of this trek can be especially windy so hold on to your hats!

Day four of the W Trek sees hikers take on the second ‘V’ of the W-shaped route, along the Sendero Paso Los Cuernos trail. Much of the day’s path follows the shores of Lago Nordenskjöld, which are typified by alpine grasslands crisscrossed by small streams. You’ll more than likely end the day at Chileno Camp, after seven hours and 12 miles of walking.
Day five is normally the last day of hiking the W Trek, although it’s possible to cover shorter distances each day thanks to a chain of intermediate campsites along the way.
For most though, day five means the journey to the base of Los Torres mountains, which rise to a height of 9,500 feet. Heading towards their granite towers you’ll follow the sound of the River Asencio. The trek ends with a scramble over loose moraine, so be sure to save some energy.
In all, you’ll cover around nine miles in six hours, allowing plenty of time to meet the bus back to Puerto Natales.
What to Pack when Hiking the W Trek

Camping equipment can be rented at refugios, but this will add to your costs. If you’re completing the W Trek as part of a tour , tents and meals will be prepared for you. Even so, you’ll still need some specialty equipment to finish hiking the W Trek. In addition to cold weather gear, you should take waterproof clothing, as well as a battery-operated head torch for nights in camp and early morning starts.
Weather can really vary in the summer so you will need both warm clothing on the cold days and nights and light clothing for hotter days.
Below is a brief checklist of the must have things to pack along with you so you are prepared for the elements when hiking the W trek.
While there are many tours and ways to visit Torres del Paine National park , The W Trek in Torres del Paine National Park is an ultimate bucket list experience for anyone visiting Patagonia in Chile. Taking in incredible mountain, lake and glacier views there’s really nothing else like it. Follow the recommendations in our guide to hiking the W Trek in Patagonia, and you’ll be well on your way to being able to tick off this bucket list.
Looking for more epic bucket list destinations in South America? Check out our content for Ecuador for some incredible places to explore.

Bucket List Places Contributors
Roatán travel guide: best things to do, where to stay, eat, drink, galapagos luxury cruise review: aboard quasar evolution 8 days/7 nights, you may also like, kenya safari travel guide: the best parks to..., san juan islands travel guide and ultimate 10-day..., a guide to thailand’s remarkable temples, 10 day alaska road trip itinerary: ultimate alaska..., atacama desert travel guide: things to do, where..., most beautiful places in ethiopia: ultimate travel guide, 10 most beautiful places in laos to visit, diving in galapagos: one of the best places..., galapagos luxury cruise review: aboard quasar evolution 8..., roatán travel guide: best things to do, where....
This website uses cookies to improve your experience. We'll assume you're ok with this, but you can opt-out if you wish. Accept Read More
Hiking The W Trek In Patagonia: A Self-Guided Itinerary [2024]
01 apr 2024 11 nov 2023 | danielle.
You can choose your own adventure when it comes to trekking in Chile, but if you like to plan ahead, here’s our tried-and-tested 5 day/4 night, east-to-west, self-guided itinerary for hiking the W Trek Patagonia .
Last updated on 26 March 2024 by Dan
Torres del Paine National Park is a place so epic and otherworldly, its name is often spoken with a kind of hushed reverence. This vast and dramatic stretch of Chilean Patagonia is home to some of the most mind-blowingly beautiful scenery on Earth, and hiking the W trek is one of the greatest ways to immerse in it.
This is Patagonian hiking at its very best, but how you trek the W trail is entirely up to you .
You can go with a guide, or do the W trek self guided (in the warmer months anyway). You can stay in lodges and enjoy a cooked meal and a warm bed. You can carry your own gear and pitch your tent in one of the designated campsites along the way, or carry no gear and book a tent at each site. You can carry all your food, or add a half or full board meal package to your booking, or do a bit of both.
We opted to camp but rather than carry all the gear, we arranged for a pitched tent to be waiting for us each day. We packed food for most of the trek and booked a full board meal package (dinner, breakfast and packed lunch) at one of our overnight camping stays.
The direction you hike and the time you take to do the trek is also your call. As occasional hikers with temperamental knees, we opted for the typical self guided W trek itinerary of 5 days and 4 nights .
Many argue that hiking west to east, and saving the striking granite peaks of Las Torres for the last day is a fitting finale to this incredible hike. We took the opposite view though, starting with the awe-inspiring torres and hiking the W trek east to west so that we could tackle the toughest legs of the trail in the first couple of days, while we still had plenty of energy.
At the end of the day, no matter how you take on the W hike, you’re still trekking one of the most spectacular trails on the planet. And you’ll still get to enjoy the jaw-dropping vista of Las Torres. Twice even, if you’re keen.

Hiking the W Trek Snapshot Location: Torres del Paine National Park, Chile Nearest town: Puerto Natales, Chile Getting to and from the park: Torres del Paine is easily accessible by bus from Puerto Natales. Park entry: Park entry tickets and overnight stays in the park (campsites and lodges) must be arranged before visiting the park. Start and finish: The W Trek traverses a roughly w-shaped route through Torres del Paine National Park between Refugio Las Torres in the east and Refugio Paine Grande in the west. For this itinerary, we start in the east and hike west. Distance: appx. 74 kilometres (46 miles) one-way Time: This itinerary is 5 days and 4 nights Difficulty: Moderately difficult, with some challenging stretches and steep climbs, plus highly changeable weather. We’re occasional hikers but with some preparation and a reasonable level of fitness, we found the W Trek very do-able (even if all our muscles were screaming for days afterwards!).
What’s in this post?
Preparing for hiking the W Trek Patagonia What time of year is best for hiking the W? Where to stay before and after the trek Entry to Torres del Paine National Park Booking Camping and Accommodation on the W Trail Bus tickets to and from Torres del Paine Packing for the W Trek Our Self-guided itinerary for hiking the W Trail Day 1 – Puerto Natales to Chileno via Las Torres Day 2 – Chileno to Francés Day 3 – Francés to Paine Grande via Francés Valley Day 4 – Paine Grande to Grey Day 5 – Grey to Paine Grande (and return to Puerto Natales)
This post contains affiliate links. If you find these links useful and you choose to purchase through these links we may receive a small commission, at no extra cost to you, which helps us to keep this website running. Your support is much appreciated!
Preparing for hiking the W Trek Patagonia
We aim to fully check and refresh this post for each trekking high season (October to April). Things can change without notice though, so we recommend also visiting the links below for information while you’re planning and before you go:
- For the latest updates on requirements for travel to Chile, visit the official Chile tourism website .
- Torres del Paine National Park is managed by the park agency CONAF. Visit the official national park website for park reports, park entry information and more.
- When you check-in at the park for your trek, you’ll receive an information guide with a map showing the park’s trails, services and accommodations. The current brochure can be found here .
What time of year is best for hiking the W?
Patagonian weather will keep you on your toes no matter when you visit Torres del Paine National Park. Be ready for everything. However, there are two distinct periods to be aware of when planning your trip.
High Season – October to April
These are the warmer months in the southern hemisphere, and December to March is the busiest time of year to trek in the park, with visitation peaking over January and February. During this period, you can choose to do a self-guided hike or go with a guide .
If you’re travelling in high season, and particularly if you’re planning to visit during the peak months, be sure to reserve your place in the lodges or campgrounds as far in advance as possible . Torres del Paine is now one of the most popular places to trek in Chile and overnight places book up very quickly.
We hiked the W trail towards the end of March, and while sections were busy, like the path to Las Torres, there were stretches where we wouldn’t see more than a handful of people in hours.
That said, despite making our campsite reservations months prior to our visit, we initially struggled to find availability and had to change our trekking dates to suit what we were able to book.
Low Season – May to September
Many people say winter is even more magical in Torres del Paine.
The park entry fee drops during the low season and you’ll find far fewer people in the park. But temps will also be lower, daylight hours are shorter, rain is frequent and there can be snow and ice. Many of the mountain trails are closed, as are a number of the mountain lodges and services. Trails that are open can also close suddenly due to weather (though that can happen at any time of the year).
Most importantly, to do the W Trek or hike to the base of Las Torres during the low season, you must have a qualified guide . This period typically runs from 1 May to the end of August, but check the official Torres del Paine website for more information if you’re planning to visit over this time.
The bottom line: No matter what time of year you visit Torres del Paine, given the changeability of the weather there, you should check in with park agency CONAF for latest updates and closures.
Where to stay before and after the trek
The nearest major population centre, and the main jump-off point for a Torres del Paine trek is Puerto Natales , a low-key Patagonian town hugging the shores of the picturesque Última Esperanza Sound.
The drawcard of Torres del Paine’s trails has seen Puerto Natales develop a buzzing trekker scene.
We suggest giving yourself a couple of days in Puerto Natales before your trek to get organised, shop, hire any gear you need, and sort out transport to and from Torres del Paine if you haven’t already (see our section on sorting out bus tickets further on).
Just about everyone staying in Puerto Natales is out and about doing the same thing, so having extra time in town means you can stress less if you don’t find what you’re looking for in the first place you visit.
Spending a couple of days here after your trek is also worthwhile – you can rest your weary bones and enjoy this charming little town.

Accommodation in Puerto Natales
Puerto Natales isn’t a big place, but you’ll find everything from budget hostels through to five-star luxury in and around the town.
We stayed at the charming, centrally-located Hotel Aquaterra both before and after our trek. This is a great mid-range option and we really enjoyed our time here. They also stored our luggage for us while we were on the trail.
For more accommodation options like this in Puerto Natales, take a look at Booking.com . Or, if you’re after something more in the budget range, you’ll find various hostel options here .
One place we’ve definitely got our eye on for a future stay is this unique domed apartment . It’s about eight kilometres (five miles) out of town, but with the views this place has, we wouldn’t be moving from the window seats anyway. Perfect for a post-trek, legs-up retreat!
Entry to Torres del Paine National Park
Entry to Torres del Paine National Park is ticketed and there are capacity limits in the mountain lodges and campgrounds. This is for the long-term care and protection of this wild and remote place, and for the safety of visitors to the park. So whether you’re planning to hike the W, trek the O circuit or visit for the day, you will need a ticket to get into the park.
You must now buy your entrance ticket for Torres del Paine National Park at least 24 hours in advance of your visit to the park. You can no longer buy an entry ticket at the park itself. Visit the CONAF website to buy your park entry ticket .
Entry fees vary depending on whether you are Chilean or international, as well as your age, and whether you intend to stay in the park up to, or more than, three days. At last check, international adults 18 and over will pay CLP$31,200 (CLP is Chilean pesos) for up to three days in the park, and CLP$44,500 for more than three days.
Download your ticket to your phone before you head to the park (you won’t have reception there) and carry a printed copy just in case. You should also carry a copy of your passport as you may be asked to show your ID/nationality.
Booking Camping and Accommodation on the W Trail
There are various ways to stay overnight on the W trek in Torres del Paine National Park, but whether you’re planning a lodge stay, hiring camping equipment, or camping with all your own gear, you’ll need advance reservations to do so.
Overnight reservations are mandatory for Torres del Paine and, like park entry tickets, need to be made in advance . You cannot book camping or accommodation once you’re at the park, or camp outside the designated bookable camping zones.
You’ll also need to carry evidence of your overnight reservations as you may be asked to show proof at any time by a park ranger or when passing through checkpoints. We printed our reservation confirmations and carried these with us.
With trekking in Torres del Paine becoming ever more popular, limited accommodation spots and advance booking necessary, sorting out campsites or lodge accommodation is – in our experience – probably the trickiest part of planning a self guided W trek itinerary.
For this reason, we recommend booking your overnight stays as far in advance as possible , preferably as soon as bookings open for the season.
It also pays to be flexible about where you stay, as you may find you need to rework your trekking dates and approach based on what’s available.
Our final W trail hiking itinerary was the direct result of where and when we could get an overnight booking.
How to book your overnight stays in the park
There are a number of mountain lodges (refuges) and campsites in Torres del Paine, and you can only stay overnight in these designated zones.
Broadly speaking, the zones in the east are managed by Las Torres Patagonia (formerly Fantástico Sur) and those in the west are managed by Vertice Travel .
There are also a couple of free campgrounds in the park which are managed by the Chilean park agency CONAF. However, these campgrounds are closed for the 2023-24 season – visit the CONAF website for updates.
You can book direct via the Las Torres Patagonia and Vertice Travel websites, however we know from experience that trying to align availability and book spots for a workable W circuit itinerary across different websites can be complicated and time-consuming. Another reason to plan well ahead.
We’re now aware of a new website called Booking Patagonia , which offers an integrated booking system for travel, tickets and accommodation for Torres del Paine. Tours can also be booked through this site. We haven’t used it yet so we can’t personally vouch for it, but if you do use it, we’d love to know how you go (one of our readers has recently provided some feedback about their experience in the comments at the end of this post).
Bus tickets to and from Torres del Paine National Park
We based ourselves in Puerto Natales, the nearest town to Torres del Paine, before and after our trek and most travellers do the same. From Puerto Natales, it’s an easy bus trip to and from the park.
If you’re travelling by bus, we recommend organising your bus tickets to and from Torres del Paine well in advance . Don’t leave this until the day you head to the park or you may find the buses already full.
If you plan to buy your tickets when you arrive in Puerto Natales, aim to do so as soon as you arrive in town. You can buy bus tickets at the main bus station (Terminal Rodoviario), or through your hotel or hostel. We travelled to Puerto Natales by bus so we bought our tickets to Torres del Paine at the bus station the day we arrived. You can also search bus services and buy tickets online here .
It’s important to note that your bus drop-off/pick-up points at the park may vary depending on your final W trail itinerary, so keep this in mind when booking your bus ticket.
If you follow this itinerary and trek from east to west, you’ll start with the bus from Puerto Natales to Laguna Armaga . After your trek, you will board the bus at Pudeto for the return journey to Puerto Natales (this follows a catamaran ride across Lake Pehoe to Pudeto from Paine Grande). Vice versa if you’re hiking the W from west to east.
To ensure you’re on the trail in good time (and in line with this itinerary), we recommend booking one of the earliest buses out of Puerto Natales on Day 1.
Packing for the W Trek
Any hike, but especially a multi-day hike, can quickly lose its appeal if you’re carrying too much weight in your pack; something we can personally attest to. So we strongly recommend packing light and only carrying the clothes, gear and food you need for the trek.
If you’re travelling longer term and have more stuff with you – which was our situation – leave it in storage at your hotel. Your back will thank you for it.
You can find most of what you need to buy or rent in Puerto Natales for hiking into the surrounding landscapes, from sleeping bags, camping stoves and hiking poles to dried fruit and nuts for your trail mix.
That said, this is a small and relatively remote town and the local prices reflect it. We’re told there’s more choice and better prices at the supermarkets and shops in Punta Arenas, so if you’re coming from or via Punta Arenas, you might consider doing your trek shopping while in that town.
We’ve also read recent reports that it hasn’t been so easy to find dehydrated meals lately in Puerto Natales. If you’re planning your menu around these, you might think about sourcing them elsewhere.
It’s important to know that Chile has stringent rules around what foods you can and can’t bring into the country (fresh foods, fruits, honey, etc are a no-no). Be sure to declare any foodstuffs you do bring in and plan on buying most of what you need for trek meals and snacks once you’re in the country.
We had a tight meal plan for our spin on the W, but with hindsight, we would swap out some of the bulkier food stuffs we packed for lighter, more compact foods. Next visit, we’ll be looking to pack some dehydrated camping meals and light-weight but filling carbs like cous cous and oats.
The night before the trek, organise any food you’re carrying into daily packages of brekkie, lunch and dinner. Pre-bundling your meals saves scrabbling around in your pack for particular items on the trail). Then pack all the gear you’ll be taking with you in waterproof bags inside your backpack.
Cash, pesos or credit card? One question we get asked is whether to carry US dollars or Chilean pesos into the park, and whether the refuges accept credit cards. We carried all three. We paid for some things in pesos, like snacks and the shuttle to the trail head, and other things in USD, like the catamaran from Paine Grande to Pudeto. We also used our credit card at one of the refuges to buy beers. It’s our understanding that all of the refuges accept credit cards.

Our self-guided itinerary for hiking the W Trail
Day 1 – puerto natales to chileno via las torres, total distance: appx. 13.8 km (8.5 miles) total time: appx. 8 hours overnight: camping chileno.
Let’s get trekking! Hopefully you’ve secured your seat on one of the earliest buses out of Puerto Natales this morning (see above regarding buying your bus tickets in advance).
Buses making the run to Torres del Paine National Park generally depart from Terminal Rodoviario in town. Find your bus and load your pack, then kick back until it’s time to go. It’s around two hours to Laguna Amarga, the gateway to Torres del Paine National Park, so settle in, this is a perfect excuse to grab some extra sleep before starting the hike.
When you arrive at the Laguna Amarga Ranger Station, have your pre-purchased park entry ticket ready on your mobile phone or bring a printout. Here, you’ll check in and receive information about visiting the park, and its rules and regulations.
Don’t forget to buy your entrance ticket for Torres del Paine in advance, and at least 24 hours before you head to the park . It’s no longer possible to buy entry tickets on arrival at at the park. Head to the CONAF website for more information .
At Laguna Amarga, hikers split into two groups: those starting their journey here at the eastern end of the park, and those heading to the western starting point at Paine Grande, which involves a further bus trip to Pudeto and a catamaran ride across Lake Pehoé (even if you’re hiking west to east, you’ll get off the bus here to check-in before reboarding the bus for Pudeto).
If, like us, you’re hiking the W from east to west , your next step after check-in is to jump aboard the Hotel Las Torres public shuttle bus from Laguna Amarga to the Welcome Centre and the eastern starting point of the trek. This costs around US$5 per person and is paid in cash as you board (we paid this in pesos).
Alternatively, you can start your hike here from Laguna Amarga. The shuttle will just spare you a dusty 7 kilometre walk along the gravel road.
There’s a toilet at Laguna Amarga, and another at the Welcome Centre. This is a good chance to go before setting off into the mountains.
Trekking tip: We booked our first night’s accommodation at Camping Chileno, which is en route to today’s main destination – the towering granite peaks of Las Torres. We’ll be checking in at Chileno on the way and dropping off our packs ahead of the steep and challenging climb to the Las Torres mirador. If, however, you’ve booked your first night at Hotel Las Torres or Central Refuge and Camping, then we’d suggest dropping off your packs there first, and setting out on today’s hike to Las Torres with a lighter load.

1st Leg: Hotel Las Torres to Chileno ( appx. 5 km / 3.1 miles, around 2 hours)
We’re officially underway on the W trail around 10.30am and from the word go, the views are eye-popping. After a flat kilometre or so, the path starts to climb: get used to it, it’s pretty much uphill from here.
The hike is moderately steep in some spots, until about a kilometre (0.6 miles) or so from Camping Chileno, where the trail flattens out a little before descending into the campground.
Despite feeling like our hearts might explode for much of this first stretch, we cover the distance in around two muscle-busting hours, with frequent stops to take in the views, rehydrate, and give our racing pulses a break.

Drinking water There’s no need to lug extra water with you on the Torres del Paine circuit. You’ll pass pristine mountain streams regularly throughout your journey. Bring a water bottle, fill up at nature’s tap and enjoy some of the purest water you’ll ever drink. Just remember to top up well away from the camps and upstream of the trails.
We haul our packs into Chileno around 12.30pm . This campground is operated by Las Torres Patagonia (formerly Fantástico Sur), and is the closest camp you can stay at to the famous Las Torres hike and mirador (the CONAF-managed campground near the base of the Las Torres climb has been closed for some time).
The riverside setting at Chileno is truly stunning and the sheer peaks of the three granite towers – our ultimate goal today – rise tantalisingly above the forested mountains ahead.
The campground itself is a nice set-up of tiered camping platforms among the trees. There are shared bathrooms with hot showers, and a restaurant and bar with big windows, plus an outdoor terrace for soaking up the epic views.
Our tent is ready for us when we arrive at Chileno, so we check in, drop our bags in our tent, grab a smaller pack with snacks, water bottles and cameras, eat the lunch we prepared last night, and set out for Las Torres around 1.30pm . Timings here may vary depending on your check-in.
2nd Leg: Chileno to Las Torres (appx. 4.4 km / 2.7 miles, around 2 hours)
This is without doubt today’s toughest leg, so there’s a huge bonus in not having to tote your full pack up the mountain.
From Chileno, you’ll hike for around 3 kilometres (1.9 miles) or so along a meandering path through pretty woodland, across rushing rivers, and through a wonderfully moody stretch of fallen forest that we dub the ‘tree cemetery’. It’s a lovely, moderate walk, and we have no sense of what’s ahead when we reach the sign that tells us ’45 minutes to Mirador Las Torres’.
My notes from this point in our trek simply state: ‘hiking hell starteth here’. A touch dramatic maybe, but as irregular hikers, this was probably the hardest section of the entire W for us. Maybe you’ll breeze through it, just be ready for it.
Shortly after the sign, the climb to Las Torres begins in earnest. It’s a gritty, rocky terrain of steep, gravelly inclines and large boulders. The panoramas as you climb are absolutely breathtaking, but so is the hike itself. There are moments while we’re in the throes of it, looking up and spotting the tiny trekkers far above, that this stretch feels like it will never end.
It does end though, about an hour later, and the scene that awaits as we round a final boulder and face the towering granite pillars of Las Torres makes every single breath-wrenching step worth it.

It’s buzzing at the top: hikers drape the rocks surrounding the glacier lake; a bushy-tailed Patagonian fox weaves its way between the boulders; there’s even a guy getting his hair cut at the water’s edge (one hairdresser’s quirky approach to memorialising his travels while promoting his business).
We spend some time taking pics before settling onto a boulder of our own to simply take in this awe-inspiring scene. Aim to spend around an hour at Las Torres .

3rd Leg: Las Torres to Chileno (appx. 4.4 km /2.7 miles, around 2 hours)
The journey back down from Las Torres is in some respects even more challenging than the climb up. The constant down is tough on knees and the gravel makes the going slippery. We’re beyond grateful for our hiking poles, though we both still manage to pull off some memorable butt slides.
Trekking tip: Hiking poles made all the difference for us when we were trekking in Patagonia. We carried one each, which was ideal as it left us both with a hand free to grab branches and rocks, haul each other up and down, and catch our fall when we slipped. Which was often.
It takes us around two hours to get back to Chileno; we have time to shower, buy a couple of well-earned beers and watch the sunset burn the tips of Las Torres molten gold.
It was cloudy the entire time we were up at the base of the towers, so watching them all beautifully backlit now is a bit of a kicker, but if there’s one thing you’ll learn quickly hiking the W Patagonia, it’s that the weather doesn’t give a rats what you think.

Preparing for Patagonian weather If there’s one constant about the weather in Patagonia, it’s that there’s nothing constant about it. We were particularly lucky on our five days in Torres del Paine, but you should be ready for four seasons in a day. Layer up, have a rain jacket handy, and wear quick-dry clothes. Skip a rain cover for your bag though. While we never experienced the legendary winds that tear through the park from time to time, we heard plenty of stories of pack covers being whipped off suddenly and disappearing into the wilds. Expect to get rained on, and pack your gear in bag liners or waterproof bags inside your backpack instead.
Cooking stoves are not allowed to be used in the Chileno zone, so we opted for the full board food package here, which includes dinner tonight, breakfast tomorrow and a packed lunch to take with us.
Later in the evening, we join a host of other hikers in the restaurant for a surprisingly tasty and filling three-course meal full of protein and carbs.
We’re absolutely wrecked by the end of dinner, and we’re tucked up in our sleeping bags by 9.30pm.
Sunrise at Las Torres When we originally planned our itinerary for hiking the W, we had every intention of doing a second trek to Las Torres for sunrise on Day 2. In late March, this would have entailed getting back on the track up the mountain by 5.30am . As we climbed into our sleeping bags that first night though, we decided to pull the pin: we were just too tired, and we were also a little wary of making the tricky climb in the poor dawn light.* It was a tough call at the time, and it didn’t help when we poked our heads out of our tent the next morning to see the torres erupting with golden light above the silhouetted foreground. As we watched though, the clouds rolled in and soon enough the peaks were shrouded in mist. There’s no accounting for Patagonian weather, or how your body may feel after a long day of hiking. The best you can do is plan, and be flexible on the day. *PS. For safety reasons, hiking in the dark isn’t actually allowed in Torres del Paine. Trail sections have opening and closing times, check the park brochure for more info.
Day 2 – Chileno to Francés
Total distance: appx. 18 km / 11.2 miles total time: appx. 6 hours 45 minutes overnight: camping francés.
Sunrise is around 8am when we do the W trek in late March, and as we haven’t made the dawn hike to Las Torres, we enjoy a more leisurely start to the morning on Day 2.
If you do decide to do the dawn hike up to Las Torres for sunrise, factor in around five hours this morning and adjust the following timings for today’s next legs accordingly.
As breakfast is part of our full board package at Camping Chileno, we pack up our gear and head to the dining room at 8.30am for a hearty kickstart to the day.
1st Leg: Chileno to Los Cuernos (appx. 15 km / 9.3 miles, around 4.5 hours)
We’re on the trail by 9.15am , heading back towards Hotel Las Torres. We won’t be going all the way to the hotel though as there’s a shortcut off to the right around half-an-hour after leaving Chileno. The shortcut is signposted and takes you along a mostly downward sloping path surrounded by undulating hills and lake views.

We reach the end of the shortcut and rejoin the main W route around 11am . At some point after this though, we suddenly find ourselves in what can only be described as the Patagonian Swamps of Mordor and we start to wonder whether we’ve veered off on to a secondary trail by mistake.
We can still glimpse the Nordernskjöld Lake off to left, and we know the official trail travels alongside it. To this day, we’re unsure if we did actually go off piste (though the number of bootprints in the mud suggests not).
Eventually, we seem to be back on track according to the map, just a little muddier for the experience (and even more grateful for our depth guage hiking poles).

The next stretch travels up and down through very pretty lakeside country, with the occasional steep section, before passing down into the valley at Los Cuernos. We arrive at the Los Cuernos shelter and camping area around 1.45pm .
You could stop at any point along the stretch to Los Cuernos for a lunch break; we stop just past the shelter and find a nice rock with a view. We opted for the full board meal package with Camping Chileno so we’ve been provided with a packed lunch today as part of this.
We chill for around 45 minutes and then set off around 2.30pm for Camping Francés , where we’ll be staying tonight.

2nd Leg: Los Cuernos to Francés (appx. 3 km / 1.9 miles, around 1.5 hours)
The trail to the Francés campground is up and down and rubbly, with some steep sections, and a pretty pebbly beach crossing. Today’s walk has been positively sedate compared to yesterday’s heart-starter climbs, but never fear, a leg-burning rise awaits just before the descent into the camp.
We arrive at Camping Francés around 4.00pm . The campground here is run by Las Torres Patagonia (formerly Fantástico Sur).
The tent platforms are clustered between the trees and there’s a good shower and toilet block a short walk from the campsite. There’s also a small shop with basic amenities.
By 5.15pm we’re checked in and set up on our platform. We’ve arranged for a tent at Camping Frances but we’re cooking our own food tonight.
Sunset is close to 8pm in late March, and having made it through our second day on the W trail, we’re zipped up in our sleeping bags soon after.

Day 3: Francés to Paine Grande via Francés Valley
Total distance: appx. 20.3 km / 12.6 miles t otal time: appx. 9 hours overnight: camping paine grande.
Despite our fatigue, neither of us sleeps particularly well on our second night and we’re both groggy when the alarm goes off at 7am.
Our restlessness is partly due to the strange soundtrack that has accompanied us throughout the night: sharp cracking sounds like distant shot gun blasts and deep, thunderous rumbles. It’s not until we set out on the trail through the Francés Valley today though, that the source of the unnerving noises becomes obvious.
On this itinerary, today is the longest day hiking the W, and based on our experience, we recommend getting on the trail by 8am at the latest to maximise your time in the Frances Valley. We departed later when we trekked, so we’ve adjusted the timings below to suit an earlier start.
1st Leg: Francés to Italiano Ranger Station (appx. 2 km / 1.2 miles, around 30 minutes)
The first leg this morning is a rejuvenating, 30-minute leg-stretcher to Italiano Ranger Station. Aim to pack up and set out from camp by 8am.
There’s a ranger at the Italiano Ranger Station when we arrive. He points to some racks opposite the office building; this is where we opt to leave our backpacks ahead of the challenging hike into Francés Valley.
We sort our valuables and lunch into a smaller daypack, lock up the big packs, and get going again. Look to be back on the trail by 8.45am .
2nd Leg: Italiano Ranger Station to Británico Lookout (appx. 5.4 km / 3.4 miles, around 3 hours)
The first kilometre (0.6 miles) out of Italiano is a flat trail through pleasant forest, after which the track starts to climb steeply through a rocky, rubbly stretch.
The scenery is seriously beautiful, serving up views of the ironically named Paine Grande Hill – 3,050 metres above sea level – and the Francés glacier that clings to it. This is the source of the crackshots and grumbles we’ve been hearing as the hanging ice shifts, melts and avalanches down the mountain.
Soon enough, you’ll reach the Francés mirador, a lookout offering spectacular panoramas over the ‘hill’ and its glacier; this is the perfect spot for a short break and a snack, as the next stretch is tough.

From here, the trail to Británico Lookout is a challenging, rubble-strewn boulder dash with lots of climbing.
A flat, rocky clearance scattered with the parched white trunks of dead trees and overshadowed by the jaw-dropping Cuernos massif, marks the final stretch before a steep, 10-minute climb to the mirador itself.

Summitting the boulders of the Británico Lookout around three hours after setting out , we cast our eyes over what will become our favourite panorama of this epic journey: the vast and spectacular Francés Valley. Find a rock to perch on and settle in for lunch with this glorious scene at your feet.

We’ve come a long way, but there’s still a huge day of hiking the W ahead. To our eternal regret, we were only able to linger here for half an hour as we left camp too late on this morning. That’s why we recommend getting on the trail no later than 8am today – trust us, you’ll want as much time at Britanico as possible and by arriving around 11.45am, you’ll have close to an hour here.
We’ve promised ourselves that next time, we’ll spend an extra day or two in this valley so we can take in this view at our leisure. For us, this remains one of the most magnificent vistas we’ve come across in all our world travels.
Trekking tip: Get on the trail by 8am at latest this morning so you can hang out for at least an hour at Britanico, or better yet, stay an extra day in the Francés Valley.
3rd Leg: Británico Lookout to Italiano Ranger Station (appx. 5.4 km / 3.4 miles, around 2 hours)
Aim to set off back down the trail to Italiano around 12.45pm . We find this a knee-buckling downward journey and our legs are screaming by the time we reach our packs back at the Italiano Ranger Station just over two hours later.
Once we’ve retrieved our packs (now four-deep in a giant bag pile), re-sorted them, and stopped for a quick breather, we set out for the Paine Grande refuge and camping area, starting with a bridge crossing out of Italiano. It’s around 3pm by this stage .

4th Leg: Italiano Ranger Station to Paine Grande (appx. 7.5 km / 4.6 miles, around 2.5 hours)
The final stretch of the W trail today is a journey of around 7.5 kilometres (4.6 miles) and it’s mostly flat with some sloping ups and downs.
Travelling out of the valley and along the raised walkway as you head towards Sköttsberg Lake, remember to turn around and take in the mountain scene back the other way: it is immense.

After some more steady rises, we make our final descent into Paine Grande Refuge and Camping around 5.30pm . By this stage, we’re seriously sore and tired and very ready for a beer from the lodge bar, which is the first thing we do once we’ve checked in and dropped our packs at our tent.
The campground at Paine Grande, which is managed by Vertice Travel, is large and separated into sections for campers carrying their own gear, and those like us who have booked a tent. A wooden walkway links the campgrounds with the lodge, the campers’ kitchen and bathrooms.

As Paine Grande is the western starting point for hiking the W and a transit point for O circuit trekkers, as well as for day trippers and short stay visitors, this is the largest and busiest lodge and campground in the park.
There’s a good-sized kitchen building, which is heaving with trekkers when we make our way in there to cook dinner around 7pm.
The camp shower and toilet facilities here are basic. We recommend getting your ablutions out of the way while everyone else is cooking dinner and before the post-meal rush. Paine Grande also has dorms, a restaurant and bar, and a mini-market.
We’re tucked up in our tent just as a light rain begins to fall around 8.30pm.
Day 4 – Paine Grande to Grey
Total distance: appx. 11 km / 6.8 miles total time: appx. 3 hours 45 minutes overnight: camping grey.
Today is our shortest day so far on the W trail, so we decide to set out a little later as we’re definitely starting to feel the past three days’ hiking, and a strange kind of exhilarated fatigue.
We’re up at 8am with plans to be on the trail by 9am. However the banshee-like screeches of a fox followed by the thrilling appearance of a large, tawny-coloured puma on the hill behind the camp has us – and everyone else – lingering for a while in hushed awe, until the sleek big cat disappears around a bend into the next valley. Which happens to be the same valley we’re about to trek into.
After checking in at the ranger station for advice on what to do if we see the puma again, we set off through the narrow, pretty dell at around 10am . We’re both relieved (and maybe a touch disappointed) to find no further sign of our feline friend.
The big cats of Patagonia Don’t let the thought of pumas roaming the forests of Torres del Paine put you off trekking there. The fact is, these magnificent creatures are extremely shy and actively avoid humans. Seeing a puma is incredibly rare. Spotting one near camp as we did is apparently almost unheard of. However, it’s important to be across what to do and how to act if you do encounter a puma; you’ll find advice on this in the guide that you receive when you register for your Torres del Paine trek.
The valley walk is flat at first but soon begins to climb, and continues to serve up steady inclines followed by some steep descents into the Grey refuge and camping area.
The scenery on this leg is still epic, but maybe a touch more serene than the high drama mountainscapes of the last couple of days. Grey Lake is flat and still on the day we hike the trail, and dotted with blueish lumps of ice from the vast Grey Glacier at its head.
About halfway along the trail, a rocky lookout reveals the first glimpses of this immense glacier, a sea of ice six kilometres (3.7 miles) wide and 30 metres (98 feet) high in places.

We arrive at the Grey Camping area around 1.45pm , a journey of 3 hours and 45 minutes, with plenty of photo and snack stops along the way.
Grey Refuge and Camping is also operated by Vertice Travel. The lodge has a lovely bar and lounge area in addition to its dorms, and the campground out front is overlooked by the stunning peaks of the Cordon Olguín. By the time we arrive, the clouds have cleared and the mountains burn golden as the sun drops.

If you’ve got the energy, check in (or leave your pack with the office if check-in hasn’t opened yet), and then head back out to hike past the western tip of the W trail and on to the first leg of the O circuit towards Paso Ranger Station. This will bring you much closer to the glacier, but bear in mind, it’s a five hour, one-way hike to Paso itself.
Trekking tip: Leaving Paine Grande at 10am worked well for us, but if you do want to hike a stretch of the trail from Grey towards Paso and back to Grey today, consider starting out from Paine Grande earlier in the morning so you have more time to do this.
We opt to stop and enjoy our lunch with mountain views, then roll out our mats and nap in the sun until check-in opens.
After getting our tent sorted, we hike to a rocky outcrop on the lake just 15 minutes from camp. The views from here towards the glacier’s terminus are gorgeous and we spend time here just soaking up the scene.

On our return to camp, we head to the lodge for a drink at the bar before making dinner on one of the picnic benches outside the buzzing campers’ cooking area.
In addition to the bar, there’s a restaurant at Grey, and a small shop selling grocery basics. There’s an equally small toilet and shower block for campers (the showers only have certain hours of operation but the water is hot).
We’re in bed by 9pm and prepped for a very early departure in the morning.
Day 5 – Grey to Paine Grande (and return to Puerto Natales)
Total distance: appx. 11 km / 6.8 miles total time: 3 hours 15 minutes.
It’s our last day on the W hike! We’re on the trail early so we can get back to Paine Grande in time for the late morning catamaran across Lake Pehoe to Pudeto, where we’ll pick up the bus back to Puerto Natales.
It shouldn’t take more than four hours to get back to Paine Grande from the Grey campground, but we’re feeling pretty exhausted by this stage and John has nurtured some nasty blisters, so we’re up and on the trail before sunrise .
It’s freezing when we set out at dawn but as the day lightens, we’re treated to a stunning peach-tinted sky reflecting off the lake, and we stop often to snap pics.

Despite John’s sore feet, we make good time on the return journey and while we’re climbing for much of the first half, it feels easier than the trek up from Paine Grande yesterday. Maybe it’s because we’re on the home run, even though the thought makes us sad.
Our journey back to Paine Grande takes us 3 hours and 15 minutes , 30 minutes less than yesterday’s hike in the opposite direction.
We haven’t eaten breakfast and we’re starving by the time we arrive. We were planning to grab something to eat at the restaurant at Paine Grande, but we discover it’s closed between breakfast and lunch.
We make do with our leftover trail mix instead, which is a bigger deal than you might think: we packed way too much of the bitty hiker’s snack and after five days we have a serious love/hate relationship with it.
Fortunately, there’s now a mini market at Paine Grande, which is apparently open from 7am. But if you’re setting out really early like us, perhaps have something you can eat on the go for this final morning.
Tickets and times for the ferry between Paine Grande and Pudeto Ferry departure times from Paine Grande and Pudeto change throughout the year so be sure to check the schedule when you’re planning your w trek itinerary, and adjust your final day hiking start time to ensure you arrive back at Paine Grande at least 30 minutes before the ferry departs. You don’t need to reserve a place on the boat, just hop aboard and buy your ticket with cash (at last check, it’s US$30 for internationals). The journey to Pudeto takes around 30 minutes.
We board the late morning catamaran for our return to the eastern side of the park. The boat trip across Lake Pehoé offers spectacular views of the entire mountainscape we’ve spent the last five days traversing. It’s an epic perspective of the W panorama and a mesmerising finale to our W trek itinerary.
If the weather is nice, we totally recommend taking a seat outside on the catamaran so you can properly admire the breathtaking scenery.

Disembarking the ferry at Pudeto, we grab a coffee from the lakeside café (open from October throughout the trekking season), take a seat in the sun, and enjoy our last moments in Torres del Paine while we wait for our bus.
Pudeto ferry and bus connections In addition to checking ferry times for the catamaran between Paine Grande and Pudeto when you’re organising your trek, it’s also worth checking the bus connections to and from Pudeto, so you can work out the best approach for your final day on the trail.
From Pudeto, the bus makes its way back to the Laguna Amarga Ranger Station to collect hikers finishing their trek at the eastern end of the park. From there, we settle in for the return two hour bus journey to Puerto Natales .
Tonight, back in Puerto Natales, after a good hot shower and a lamentation on the ridiculous amount of trail mix we’ve got left over, we head out for a celebratory drink.
Our legs might be seizing, our knees protesting and we’re beyond exhausted, but we’re buzzing with the sheer thrill of having completed this epic trek. We’re already talking about when we might come back and hike the W trail again, or better yet, take on the longer O circuit.
However we do it, trekking in Torres del Paine is one nature experience we’re keeping firmly on our bucket list.

Got any questions? Have you trekked in Torres del Paine recently? We’d love to hear from you, drop us a message below.
For more exciting experiences and things to do in this incomparable part of the world, head to our Chile page or our South America section.
53 thoughts on “Hiking The W Trek In Patagonia: A Self-Guided Itinerary [2024]”
I been to Asia a couple times but never to enjoy much of the nature. Your destinations and experiences have me wanting to explore more of the hiking trails abroad. Thanks for sharing!
Cheers Bryan, happy travels!
Thanks for your info, it helps a lot. I’m planning to do W trek in coming January. If I book the camp, can I also use the facilities in the shelter (like shower and toilet)?
Hi Karen, all of the campsites along the W have dedicated facilities for campers, including showers and toilets. Some have cooking areas for campers as well. Happy planning and have a wonderful trek in January! Cheers, Danielle
Great website! We’re hoping to do this February/March 2025, and are wondering how best to spend our time on either side of this hike. Did you travel to El Calafate and El Chalten while you were in the area? Or do you recommend other areas down there? Any advice greatly appreciated!
Hi Lisa, thanks for your message! Fantastic to hear you’re planning a trip to Patagonia! Besides the W Trek, there are various activities you can do in and around Puerto Natales and Torres del Paine, like boat trips on Grey Lake to Grey Glacier or horseback riding.
We most definitely did travel to El Calafate and El Chalten after our trek and absolutely recommend, especially if you’re keen to get out on some further hikes. We bussed from Puerto Natales to El Calafate and the next day did a day trip to the Perito Moreno Glacier, which is an absolute must. From El Calafate, we travelled by bus to El Chalten (the panoramas on the bus ride in are wow – try and get the front seats!) and spent a good couple of days exploring this gorgeous area and just hanging out. There are a range of hikes you can do out of El Chalten – the day hikes to Laguna de Los Tres and Cerro Torre are epic.
If you head south from Puerto Natales to Punta Arenas, you can do day trips to see King penguins, Magellan penguins, whales and dolphins, so that’s another option.
Have a wonderful time and happy trip planning! Cheers, Danielle
Thank you for sharing your Patagonia insights! I found it very thorough and incredibly helpful. I we are planning our trip for October 2024. I have a question. How did you book your meal plan? Thanks! Kim
Hi Kim, thanks for your feedback, we’re glad you’ve found our post helpful! When you go through the booking process for each accommodation (including camping) along the trail, you’ll have the opportunity to add meals as part of those bookings. Links to the accommodation providers are in the post. Good luck with your planning and happy trekking in October! Cheers, Danielle & John
Hi thank you so much for this detailed blog. It appears that one would have to stay at Frances camp if going east to west in order to shave hiking time on day 3. Is there a bus company through which we have to pre-book a bus ticket from Pudeto ferry to Las Amargo? Or is it a shuttle service? Do you have any idea if booking a guided tour via Las Torres means that they carry your heavy rucksacks?? Is the last day at Grey really worth it ? Or would you rather end the trek on day 4? Thank you!
Hi SK, thanks for your message. Until the CONAF Italiano camp reopens, Frances camp is the closest camp to the Frances Valley so yes, it is the best bet timing-wise for getting in and out of the Frances Valley and on to Paine Grande on Day 3 if travelling from east to west. You could also stay at Los Cuernos, but that would add around 1.5 hours to Day 3.
The buses running from Puerto Natales to Torres del Paine drop off and pick-up from Laguna Amarga and Pudeto. When you buy your bus ticket to Torres del Paine, you’ll note where you’ll be getting off and on again (it will depend on your itinerary, but for us, travelling from east to west, we got off at Laguna Amarga and boarded at Pudeto on our return. Check out the section in our post on bus tickets to and from the park for more info. There’s a shuttle that runs between the Laguna Amarga ranger station and Hotel Las Torres for a fee.
We would suggest contacting the tour company you’re interested in for advice about whether porter services are available on their guided tours. We left most of our luggage in one of our backpacks at our hotel in Puerto Natales and carried only what we needed for the trek to keep the weight down.
We personally feel that every leg of the W is absolutely worth it – the scenery is superb throughout. Five days gave us just the right amount of time to enjoy the whole trail without pushing too hard. To do the trek in four days, you’d likely need to compromise on either the full hike into Frances Valley or the Grey leg in order to reach camps before dark, and we wouldn’t want to skip either. But that’s us. If four days was all we had to trek, we would possibly leave Grey but we’d have to make sure we did a boat tour out to the glacier instead! 🙂
All the best with your planning! Cheers, Danielle & John
This is seriously one of the best breakdowns I’ve read. Patagonia is one of three “Someday” treks I have on my list to head off on once my son is a little bigger and can carry more of his own gear. We’re building up now with longer and longer trips around Central/Eastern Europe
Love this site!
Thanks for your message Brian, we really appreciate your feedback. So cool that you and your son are already hiking together, and what an awesome bucket list adventure to look forward to with him! Happy trekking and thanks again! Danielle & John
Do you have a map with the accommodations you booked or where you rented out tents/gears? Planning on doing this solo in June!
Hi Erika, thanks for your message! There’s a trail map available at the official Torres del Paine website: https://parquetorresdelpaine.cl/mapa-2023-2024/ – it shows all the accommodations/campsites along the trail. You can also find links in our post to the accommodation providers we booked our campsites and camping gear through.
As you’re considering a June trip, we’d also encourage you to check out the official Torres del Paine website for information about winter hiking regulations – https://parquetorresdelpaine.cl/permisos-especiales/ . Many of the accommodations and trails close over winter and while you can visit the park, we understand it’s mandatory to have a guide for the W Trek and the trek to the base of Las Torres between 1 May and 30 August (though the timeframes can change depending on weather). All the best with your planning! ~ Danielle
Hello Dan, What a great find this was. Thank you so much for writing it. I’m looking to mimic your trek with some modifications. I will very likely have a car rental when I arrive into Punta Arenas. My plan is to drive myself and 2 others into the park and leave the vehicle parked at the welcome center or hotel (unsure if this is allowed). At the end you mention that you ferry to Pudeto- then catch a bus that swings by Laguna Amarga into Puerto Natales. Is there a bus that goes directly back to the welcome center or hotel from Pudeto so we can get back in my rental? It looks like the Laguna Amarga ranger station is about 8.5 km from the welcome center. Or is it best to just shuttle from Puerto Natales for the whole thing and leave the rental somewhere in town?
Hi Bruce, thanks so much for your message and feedback! Very good question re. parking – based on our limited research into this, our understanding is that you can leave your car at Hotel Las Torres while you trek if you’re a guest there, otherwise, cars can be parked at the nearby Welcome Centre. We’ve also seen reference online to a small car parking area at Pudeto, so in theory you could arrange bus tickets from Pudeto to Laguna Amarga, and from there get the hotel shuttle to Hotel Las Torres/the Welcome Centre. I would suggest posting your question on Tripadvisor and hopefully someone has done something similar recently and can provide latest info. It might also be worth contacting Hotel Las Torres and asking their advice; no doubt they get questions like this frequently. All the very best for your trip planning and the trek itself – it’s an unforgettable experience! Cheers, Danielle & John
Thank you so much for the great information. I’m a long term planner and we’re looking to book for our family of four, Christmas 2024. I found this blog really really helpful in hiking cost effectively. Thanks Again!
Hi Melissa, thank you so much for your message, we’re really happy you’ve found our post helpful in your planning. Also very excited for you and your family – what a fantastic Christmas experience! We hope you have a really wonderful time hiking the W, it’s just such an incredible place! All the best and happy hiking! Danielle & John
Thanks for the article, I find it very useful. I have just booked the circuit trail for this April. About that: I looked into using Booking Patagonia for the reservations, and it works really well. Though, there is a downside: they charge an extra $90. You’ll notice this at the very and of the booking process, which I found quite frustrating. For me that was a reason to book directly at Vertice and Las Torres Patagonia, which works fine.
Hi Valentijn, thanks so much for this update, that’s really helpful to know! Thanks also for your feedback on our post, we’re pleased you’ve found it useful. All the best for your upcoming trip in April, have a sensational time and happy hiking! Cheers, Danielle & John
Thanks for the great write up. The details are useful and your descriptions are inspiring. I’m leaving for Chile in a couple days and your post just added to my excitement.
Hey Mike, thanks so much for your feedback, we hope you have a really fantastic trip. Chile is an incredible country, one of our faves!
Cheers, Danielle & John
Thank you for that informativ Blog! I have a question: are there any possibilities to heat up some water in the Refugiés without a stove?
All the best Sophie
Hi Sophie, thanks for your message!
As we had a cooking stove (and booked meals at Chileno where stoves can’t be used), we can’t personally say for sure whether hot water is currently available at all of the stops on the route. That said, we did find a trekker’s report online from late 2023 noting that they were able to access hot water (not boiling) through the coffee/tea dispensers at each of the refugios they stayed at, which they used for their dehydrated meals. Would suggest seeing if there are other trip reports from this season, or posting on a forum for latest updates. Or perhaps hire a stove in Puerto Natales and buy a gas canister just to be on the safe side! We’d love to know what you find out!
Have a magic time trekking the W!
Cheers, Dan & John
Hi guys. Thanks for all the detailed info. Just wondering if you could give an estimate of how much it cost for the W trek. I am being quoted $1180 per person for 4 nights and five days starting 12th February with this included:
• camping accommodation with all the equipment • all the meals • transportation from/to natales-park • park entrance • catamaran • welcome kit
Not sure if this price is really high or if it would work out as that much if I book everything myself separately anyway.
Many thanks
Thanks for your message and feedback – we’re really excited for your trek in Torres del Paine.
We were travelling long-term when we did the W Trek so we went out of our way to keep costs down by booking the campsites directly, carrying some of our own camping gear and bringing most of our own food. Travelling as a pair also helped as the single supplements can add quite a bit. We’d also note that, like everything, prices have hiked post-Covid.
We’ve included some costings in our post but not many as we’re conscious things can change quickly (plus there are so many potential cost combos for accommodation/food, it’s tricky to provide a general estimate). As the bulk of your costs will be in the camping, gear and food components, you might consider checking out the latest price lists for camping and food package options on the Vertice and Las Torres Patagonia websites; that would give you a sense of costs in the context of your quote. Given how quickly accomm/campsites book up for the season and the challenge of trying to coordinate an itinerary across multiple websites, having a third party making the arrangements, while costing more, would take the hassle out of that.
All the best with your planning and we hope you have a sensational time trekking!
Cheers Danielle & John
Your hikes sounded amazing. We are going in Feb and I wasn’t sure what to expect. Sounds like I should do some training! Do you recommend stiff hiking boots to navigate the big rocks or are light hikers enough support?
Thanks for sharing, Karen. Canada
Hi Karen, many thanks for your feedback! To be honest, if you’re a regular walker/hiker, you may find the W Trek a breeze – we met plenty of people who barely cracked a sweat, lol. As irregular hikers, we found some of the steeper sections a little more ‘breath-taking’ but still very do-able. We both wore regular lightweight hiking shoes and they were fine (apart from John developing blisters towards the end), but we also saw people in solid boots. I guess it depends on your preference. We did find having a hiking pole each was useful on some of the more uneven terrain like the rocky climb to Las Torres. We’d love to hear about your trek when you get back – have a fantastic time! Danielle
Going in February, cant wait. Did you know how anyone who did the kayak at Grey and talked about there experience?
Hi Efren, that’s so exciting! We don’t personally know anyone who has kayaked at Grey but we wish we’d had time for it – what an amazing experience! The lake is beautiful and the glacier is epic! If you do kayak, we’d love to hear about it! Have a fantastic time, Cheers, Danielle & John
Awesome Post!
I’m looking at doing this the same direction as you guys did around the same time in 2025.
You mentioned availibilty determined your campgrounds; that being said would you change any of your stays if you could in retrospect? Maybe saw some better campgrounds/lodges along the way that you wish you could have booked had there been availibilty?
Hi Chris, thanks for your message and good question! We were on a long travel stint when we did the W Trek so we opted for camping to keep our costs down, plus the campsites we ended up with proved to be very well located for a five-day itinerary. That said, all of the lodges and refuges looked quite nice so if we were to do it again (and we hope to!), we would consider adding some lodge/refuge stays, following the same itinerary. Location-wise, the Cuernos and French refuges would be good alternatives to camping (though these are beds in dorms, which is less appealing to us). We would definitely consider the Cuernos Cabins (2-3 people per cabin), especially if we were planning a longer stay in the French Valley! We’d also consider staying at the lodge at Grey next time as, of all the campgrounds, this was probably our least favourite (plus we were very ready for a bed by that stage!). Overall, the quality of the campgrounds/refuges throughout the park is very good and we were really happy with our camping experience and itinerary. Best of luck with your planning and we’d love to know how you go! Happy travels!
Wonderful description. We are going in Jan 2024! Looking forward to it.
Hi Kishore Joshi, thank you so much for your feedback, we hope you’ve found it helpful! Wishing you a fantastic W Trek, it really is the most incredible place! Happy travels!
Hi! How much cash would we need, knowing that the bus and entrance are paid for and also full board meal plan at the refugios is booked? So for snacks, water or other costs etc? Do they accept USD or should we have it exchanged? Thanks!
PS, did you also really use ‘poop bags’ for your used toilet paper along the way? 😅
Thanks for your message. We carried both USD and Chilean pesos with us just in case, and we were able to use credit cards at the refuges. We paid for the shuttle from Laguna Amarga and the catamaran from Paine Grande in pesos, though we have read that the catamaran operators may take USD in high season. It’s handy to have pesos for smaller purchases like snacks. We carried a refillable bottle and filled up in streams and at the refugios, so we didn’t purchase water.
We have packed degradable doggy bags for carrying out toilet paper on past hikes! 🙂 On the W Trek though, we carried a loo roll and some trusty Ziploc bags, but we mostly just made strategic use of the campground facilities!
Happy trekking!
Hi John and Dan Thanks for such good info. Is it safe doing it self guided ? Thanks
Hey Iris, thanks so much for your message, we hope you found the post helpful. We found going self-guided very easy – the trails are well trodden and during the peak season, there are plenty of other people hiking too (guides are mandatory in winter). Plus all trekkers have to stay in the designated camping and accomm areas so there are others around and you can stay in dorms if you’re not keen on camping. Conditions can vary dramatically though and it is the great outdoors, so having appropriate gear is essential and hiking with friends is good idea though we hear lots of people do it solo. Everyone we met en route were friendly, encouraging and helpful too. We absolutely loved the hiking the W and hope you get to experience it too! Happy travels! Dan & John
This is really helpful thank you so much. Did you have much hiking experience before you took this on? Would you recommend any training prior to going? What size backpack would you recommend taking?
Thank you so much
Hi Jo, thanks for your kind words, we’re glad you found the post useful! We’re casual hikers and while we’d done a bit of hiking before the W, it was certainly one of the ‘biggest’ hikes we’d done. We definitely tried to up our walking/hiking game before the W in preparation and glad we did as we personally found some of the steeper, sustained-climbing parts of the trek relatively tough – we just took our time and had lots of breaks; necessary anyway to take in the gorgeous views! I carried a 30L daypack and John carried a 50L backpack – between us we carried everything we needed for the five day hike, but I would note that we didn’t have to carry tents, sleeping bags or mats as we hired these. We hope you have the chance to hike the W trek, it remains at the very top of our hiking list! Happy travels!
Thank you all for this awesome breakdown and information! We followed it exactly to book our accommodations and plan to do the trek end of March. Thanks again!
Hi Kristen, thanks so much for your feedback! We’re stoked you found our post helpful and we’re very excited for your upcoming trip. Torres del Paine is sooooo spectacular, wishing you a fantastic trek – let us know how you go! ~ Danielle & John
Thanks Dan for the great details and info.
Hi Kristen. I am doing the trek around of march with a friend. We are travelling from Perth, Australia. Would be great to collaborate in planning.
Thanks Bikash
Hello! This page is fantastic, thank you so much. We are looking at November and can be flexible in terms of dates. Did you book your accommodation first? Are there any other considerations i.e. tickets or entry to the park? Or should we just arrange accommodation and go from there? Do you mind sharing how much you paid approximately for your camping accommodation? No worries if not. Thanks 🙂 Amie
Hi Amie, many thanks! We booked our accommodation first and a couple of months in advance. Site availability ended up driving our approach to the trek – so it’s good that you have flexibility! Would definitely get in as early as possible to book. Tickets for the park itself are arranged at the park entry office, but you will need to have the accomm bookings in place (and evidence of them) when you get to that point. So it’s important to book the accommodation and bus tickets to the park in advance. Bus tix you can buy when you get to Puerto Natales, but try and do that as soon as you arrive rather than on the day you intend to travel to the park. Prices for camping and cabins may have changed since we trekked, but if you head to the accomm links in our post, you’ll be able to find out the current prices as it’s all bookable online. Hope that helps and have a fantastic trek! Cheers, Dan & John
Thank you for the detailed information. We are trekking this exact route this March 2020!
Hi Jackie, thanks for your message, we’re really happy you’ve found it helpful for planning. Hope you have a sensational trek!
Thank you so much for the detailed guide! This is really helpful 🙂
Hi Katherine, thanks for getting in touch! We’re really pleased you found the guide useful – happy hiking!
How did you book the campsite ? I unable to locate the source to book just the campsite
Hey Rajesh, thanks for the message.
The Camping areas are run by three different operators in the park, and you can find links to all three operators in our post.
All three operators’ websites have information about their camp sites, and how to book.
Hope this helps.
John & Dan
Exactly what I’m looking for, thanks! Chileno and Los Torres always been there on my bucket list, now I know where and how to start.
Awesome, thanks Rika, we’re really pleased you’ve found it helpful. It is the most spectacular walk – even if you just did the one leg to Las Torres, you’d have photography opps galore! Happy travels!
Leave a comment Cancel reply
Save my name, email, and website in this browser for the next time I comment.
Hiking the W Trek in Torres Del Paine, Patagonia: Itinerary, Gear & Camping Tips
Want to hike the W Trek in Torres Del Paine? We answer all of your questions about itineraries, gear, campsites, and whether a guide is necessary.
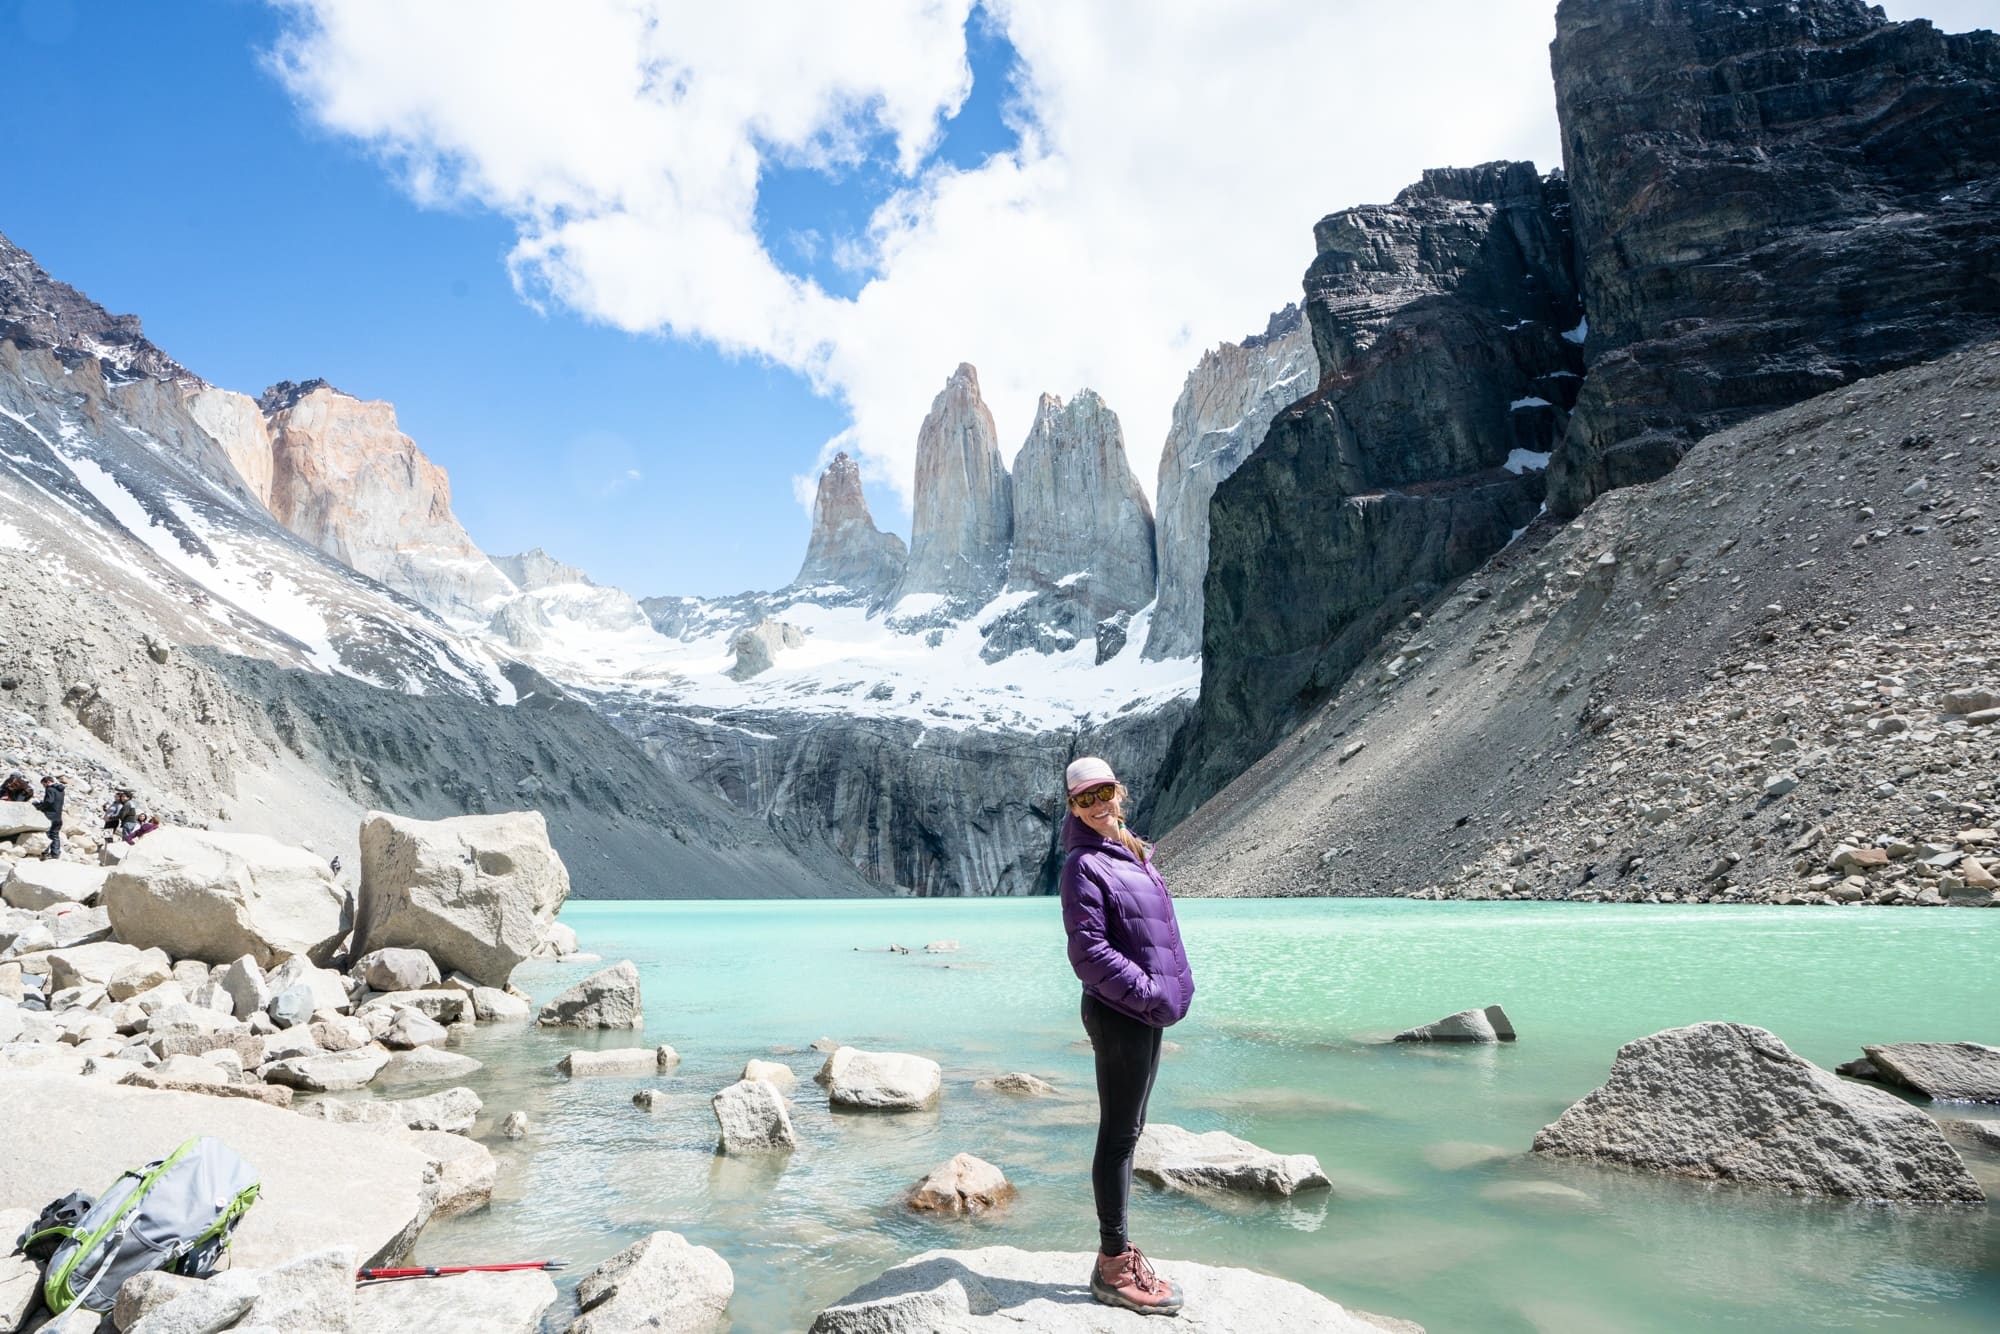
During my guided trip to Patagonia, I hiked the famous W Trek with G Adventures as part of the most recent Bearfoot Theory group trip. I spent four days and three nights in and around Torres del Paine and took in the amazing scenery of wild and rugged Patagonia.
There were comfortable campsites, home-cooked meals at the park’s well-known refugios which exist to serve backpackers and day hikers alike, not to mention top-notch guides. If you’ve ever thought about hiking this world-famous trail look no further.
Keep reading if you plan on hiking the W Trek in Patagonia for a complete itinerary, gear and camping tips.
W Trek YouTube Video
Watch my new YouTube vlog from our time on the W Trek in Torres Del Paine!
What is the W Trek in Patagonia?
Torres del Paine National Park in Chilean Patagonia is the most famous hike in the entire region. It’s a four to five-day hike that makes stops at the park’s iconic refugios for overnight stays with an option to hike the entire trek without carrying food. While hiking, it gives travelers unparalleled views of the granite towers and some of the park’s most well-known sites from up close.

Do you need a guide to hike the W Trek?
Now I’ll say that I’m not necessarily a “guided-tour-kinda-person.” I love traveling independently and the spontaneity that comes with being your own guide. However, it really depends on the destination for me and in the case of hiking the W Trek, there are a number of benefits to joining a tour, or hiring a local guide at a minimum. Hiking the W trek requires a ton of advanced planning. All of the campsites are run by different operators and fill up from 6 months to even a year in advance . Getting your desired dates and sites can be difficult.
If you hike the W Trek with a tour, you can be more spontaneous with your travel plans since the campsite reservations are made for you. You won’t have to book a year in advance in the case that you find yourself with unexpected vacation time. You’ll also learn so much more about the culture, local language, geography and history of the park because of the guide’s own personal experience and familiarity with the area.
Our two local guides contracted by G Adventures, Jarek and Marcello (along with our G Adventures tour guide Marina ) were very knowledgeable, a lot of fun, and had high safety standards, and I had a more memorable experience because of them.

They were adamant about Leave No Trace practices and were full of local insight including what water sources were safe to drink, prime lunch spots, and more.
G Adventures even arranged for us to have all of our gear transported for us each day to the next campsite. So all we had to carry was our daypacks full of food, water, camera, and extra hiking layers. Plus, all of our meals were set up for us, we always had a hot breakfast and dinner at the refugios and were given a boxed lunch for the trail every day.

It’s worth pointing out that joining a tour or hiring a guide is the more expensive option; so you have to decide if the logistical conveniences are worth it to you. If you do decide to do it independently, don’t worry about hiking it solo. The trail is very well marked and well traveled, so it would be tough to get lost.
Overall, I thought our G Adventures tour was a great value given how much time and effort they saved us in planning and the amazing experience we had as a group. You can read the full review of my Patagonia G Adventures tour here .
If you do want to do it independently, check out these resources:
- Camping in Torres Del Paine
- 6 Options If You CAN’T Get Torres Del Paine Reservations
- Torres Del Paine Park Information, Fees, and Boat Schedules
Leave No Trace When Hiking in Patagonia
Whether you are traveling with a guide or not, please educate yourself on local Leave No Trace practices. Here’s a quick refresher if you’re a little fuzzy on the most basic (and global!) ethics…
- Anytime you go outside, pack out your toilet paper and don’t go to the bathroom near water sources
- Stay on the trail. Don’t cut switchbacks or take shortcuts.
- Only camp at established campsites (making your own campsite in Torres Del Paine is prohibited)
- NO CAMPFIRES OR BURNING TOILET PAPER (there was a huge fire recently that burned a huge portion of the park).
- There is also no smoking allowed on the trail.
- Make sure you secure your trash when you are eating. It is very windy in Patagonia and if you leave a wrapper sitting on your pack while you eat, there is a good chance it will blow away.
- Pack out all of your trash, and don’t leave your food trash in refugio bathrooms. It’s much easier if everyone just takes the trash they produce back with them to Puerto Natales and disposes of it there.
- Leave wildlife alone. If you are lucky enough to encounter wildlife, don’t approach or feed them.
- Yield to uphill hikers and be friendly . This is a world-famous hike and it’s important to share it and practice good trail etiquette.

Best Time to Hike the W Trek
The W Trek can be hiked year-round (including winter with a guide). The busy season is December through late March. This is the warmest time of year, but also when you’ll experience the strongest winds. April is Patagonia’s fall with beautiful bursts of colors, while November is Spring when you’ll encounter wildflower blooms. No matter when you go, you should always be prepared for crazy weather.

What Gear do you need to hike the W Trek?
I wrote up a detailed W Trek gear list that you can check out here.
On our tour, G Adventures provided sleeping bags, tents, and sleeping pads. The tents and pads were already set up at each site so all we had to do was unpack our sleeping bag. We were given a small dry bag for all of our clothes and personal belongings for camping. Both that and our sleeping bag were put in the dry bag and transported for us each day to the next campsite. All we had to carry was lunch, water, camera, and extra layers in our day packs.

If you are hiking independently and need to carry all of your own gear, make sure you bring a backpacking pack that you’ve worn before. Since the summer season in Patagonia is known for the high winds, a rain cover might be ineffective in wet conditions, so in rainy condition, line your pack with a trash bag and then pack all of your stuff in that. Your tent also needs to be very solid and bring plenty of guy lines and stakes to secure your tent in high winds.
Aside from the windy conditions, it was hotter than I expected and I wish I had brought shorts. Pack layers with everything from warm to cold layers so you’re prepared for any kind of weather.
A half-buff is also helpful. A trick we learned from our guides is to use the buff as a headband over your hat so it prevents your hat from flying off in the wind.

In addition to the clothing, I’d recommend bringing a portable water purifier, like a Steripen or a Grayl water bottle. I did drink unfiltered tap water and water right out of streams, but I’d bring a purifier just to be safe.
If you want to eliminate the need for heavier camping gear, the Refugios also offer rooms for rent.
My W Trek Itinerary
What direction should you hike the w trek.
On our trip, we hiked the W Trek a little out of order (roughly from East to West) which was due to the way G Adventures arranged for our bags to be transported. On Day One , we hiked out and back to the base of the Towers (the famous spiraling granite towers) so the bags could stay put. The second day , we took a ferry to Refugio Paine Grande, dropped our bags, and hiked another out and back to Gray Glacier.
On Day Three our bags were transported by boat, while we hiked from Refugio Paine Grande to the French Valley, ending at Refugio Los Cuernos.
On Day 4 , our bags were transported by horseback to our finish line back at the Base of the Towers trailhead.
Although we did hike the W Trek in a slightly different sequence, it seemed a little easier than the opposite direction. I liked that we hiked the busiest day first because every day after that got less and less busy. That said, there are many different ways to hike it, so get familiar with the map and different locations. If you go independently, it’s important to understand that your itinerary may be determined by campsite availability.

How many days do you need to hike the W Trek?
We hiked the W Trek in four days and three nights . The hike to the Towers and the French valley were pretty long days, but the other two were fairly mellow and I thought the days were planned well.
Some people take five days and take a boat out to Gray Glacier Refuge and start there. Taking 5 full days would also allow you to take a little more time and hike farther up into the French Valley.
Is it worth purchasing meals at the refugios on the W Trek?
Meals may seem expensive but remember that you are in the middle of nowhere and getting your meals through the refugios means you don’t have to carry four to five days worth of food on your back.
We were given lunch boxes each day by the refugios which consisted of a large chicken salad sandwich, cookies, fruit, trail mix and a piece of chocolate. Plenty of food to energize you for the day. Overall, I thought dinners at the refugio were better than the breakfasts which matters since you can purchase meals ala carte.
To give you an idea of prices independent travelers paid at the time of my hike:
- Refugio Paine Grande: $55 US for dinner, breakfast, and a boxed lunch (not including accomodations or camping)
- Refugio Los Cuernos: $80 US for dinner, breakfast and a boxed lunch / $115 US for a fully equipped campsite (with a tent, bag, and pad rental) and all meals
- Nash Patagonia Lodge: $29 for dinner / $112 for a fully equipped campsite and all meals
Note that Patagonia is very remote, lodging and food options are limited, and prices reflect that.
Day 1 – Hiking to the Base of the Towers (12 miles)
This is a very busy trail so be prepared for crowds and a steep uphill climb. At times the congestion made it feel like Disneyland, as a line formed hiking up the mountain. The lake was beautiful but this was honestly my least favorite day of the hike due to the crowds. We hiked on Sunday, so maybe it’s less busy mid-week?
Once you’re about 30 minutes from the trailhead, the trail starts climbing and doesn’t really quit. Make sure you pack plenty of water, as there isn’t a place to fill up until you reach a river crossing at Refugio y Camping El Chileno.

I will say that the lake is one of the prettiest lakes I’ve ever seen. Just set your expectations for crowds, or get a very early start to try and beat them. If you are doing the trek independently you could try to get a camping spot at the refugio which would allow you to hike to the base of the towers for sunrise.

Camping Night 1
G Adventures booked out an entire campsite on the Serrano River called Nash Patagonia that we stayed on the first night. The campsite is just on the outskirts of the park with the friendliest staff of all of the refugios we stayed at. The drive to that campsite, while it may look long on the map, took only an hour and a half and was absolutely gorgeous. The drive was a way to get a feel for other parts of the park. The campground only had one other G Adventures group so it was very quiet with gorgeous views. We had a tasty group dinner with braised beef and vegetables.
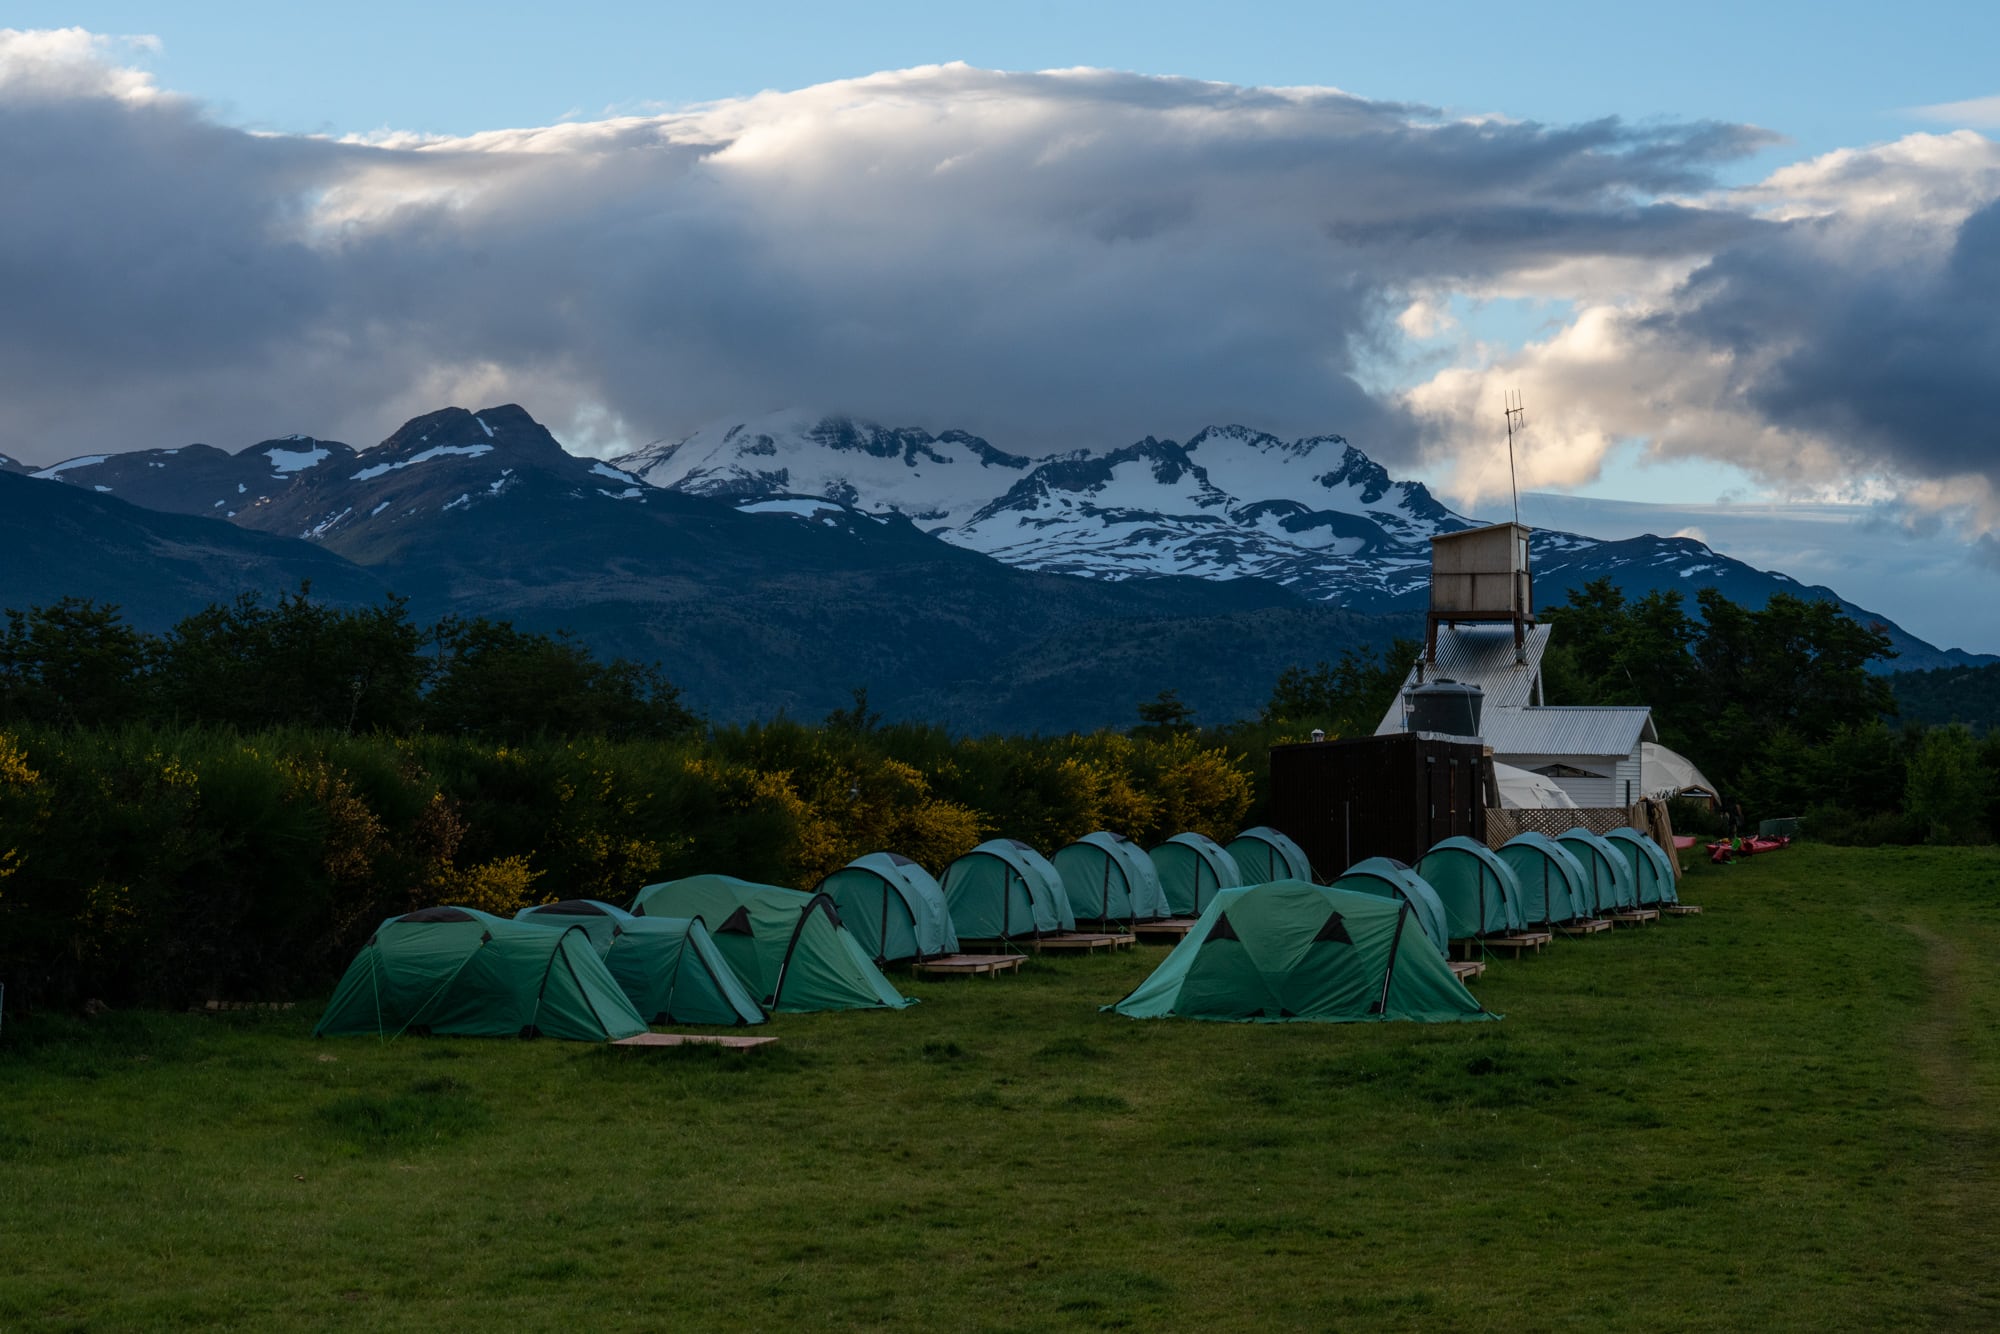
Day 2 – Refugio Paine Grande to Grey Glacier Overlook and back (7 miles)
The next morning we drove back into the park and took the 30-minute catamaran ferry across Lago Pehoe where we arrived at Refugio Paine Grande . On the G Adventures tour, our guide had reserved tents and sleeping pads that were already set up and waiting for us at each campsite. That way it was less for us to lug around on the hike.
Day 2 to the Grey Glacier was a much more mellow hike than Day 1 that takes you over a ridge, past a Laguna Los Patos), and around the shoreline of Lago Grey. Eventually, it reaches a lookout with beautiful views of the Gray Glacier. If you want to get closer, you can keep walking all the way to Refugio Gray, which ends up being 13 miles round trip from Refugio Paine Grande.

You’ll note from the map that on day two that we didn’t hike all the way to the Gray Glacier and only went to the lookout. I was satisfied, but I do think with a quicker pace, it would have been possible to hike all the way to the Gray Glacier and back. Alternatively, you can also arrange to take a boat to Refugio Gray and start your W Trek hike from there.

Camping Night 2
We stayed at the Refugio Paine Grande where there were hundreds of people camping and gorgeous views. Dinner is served cafeteria-style and was my least favorite food of the W Trek. Dinner times are assigned so you should get in line a little early. Good news is that you can cook your own food in a separate cabin if you want to bring your own food. There’s also a bar upstairs with beer and place to hang out. Hot showers were available at certain times of the evening.
Day 3 – Paine Grande to the French Valley to Refugio Los Cuernos (11.5 miles)
On our third day of hiking the W Trek, the views from the trail were non-stop. First, you pass Lake Skottsberg, and there are a few different rocky outcrops that make for a good snack break.

Next, you’ll hike through a burn area and eventually arrive at the Italiano campsite. Here you hang a left and start hiking up towards French valley. This is steep but didn’t feel as steep as the Base of the Towers hike and also had the bonus of way less people. The French Valley offered my favorite views from our entire time hiking the W Trek, and just past the main overlook, there is a nice lunch spot on the river where you can watch avalanches breaking off the glacier. You are also right under the Horn which is one of the famous peaks in Torres Del Paine.
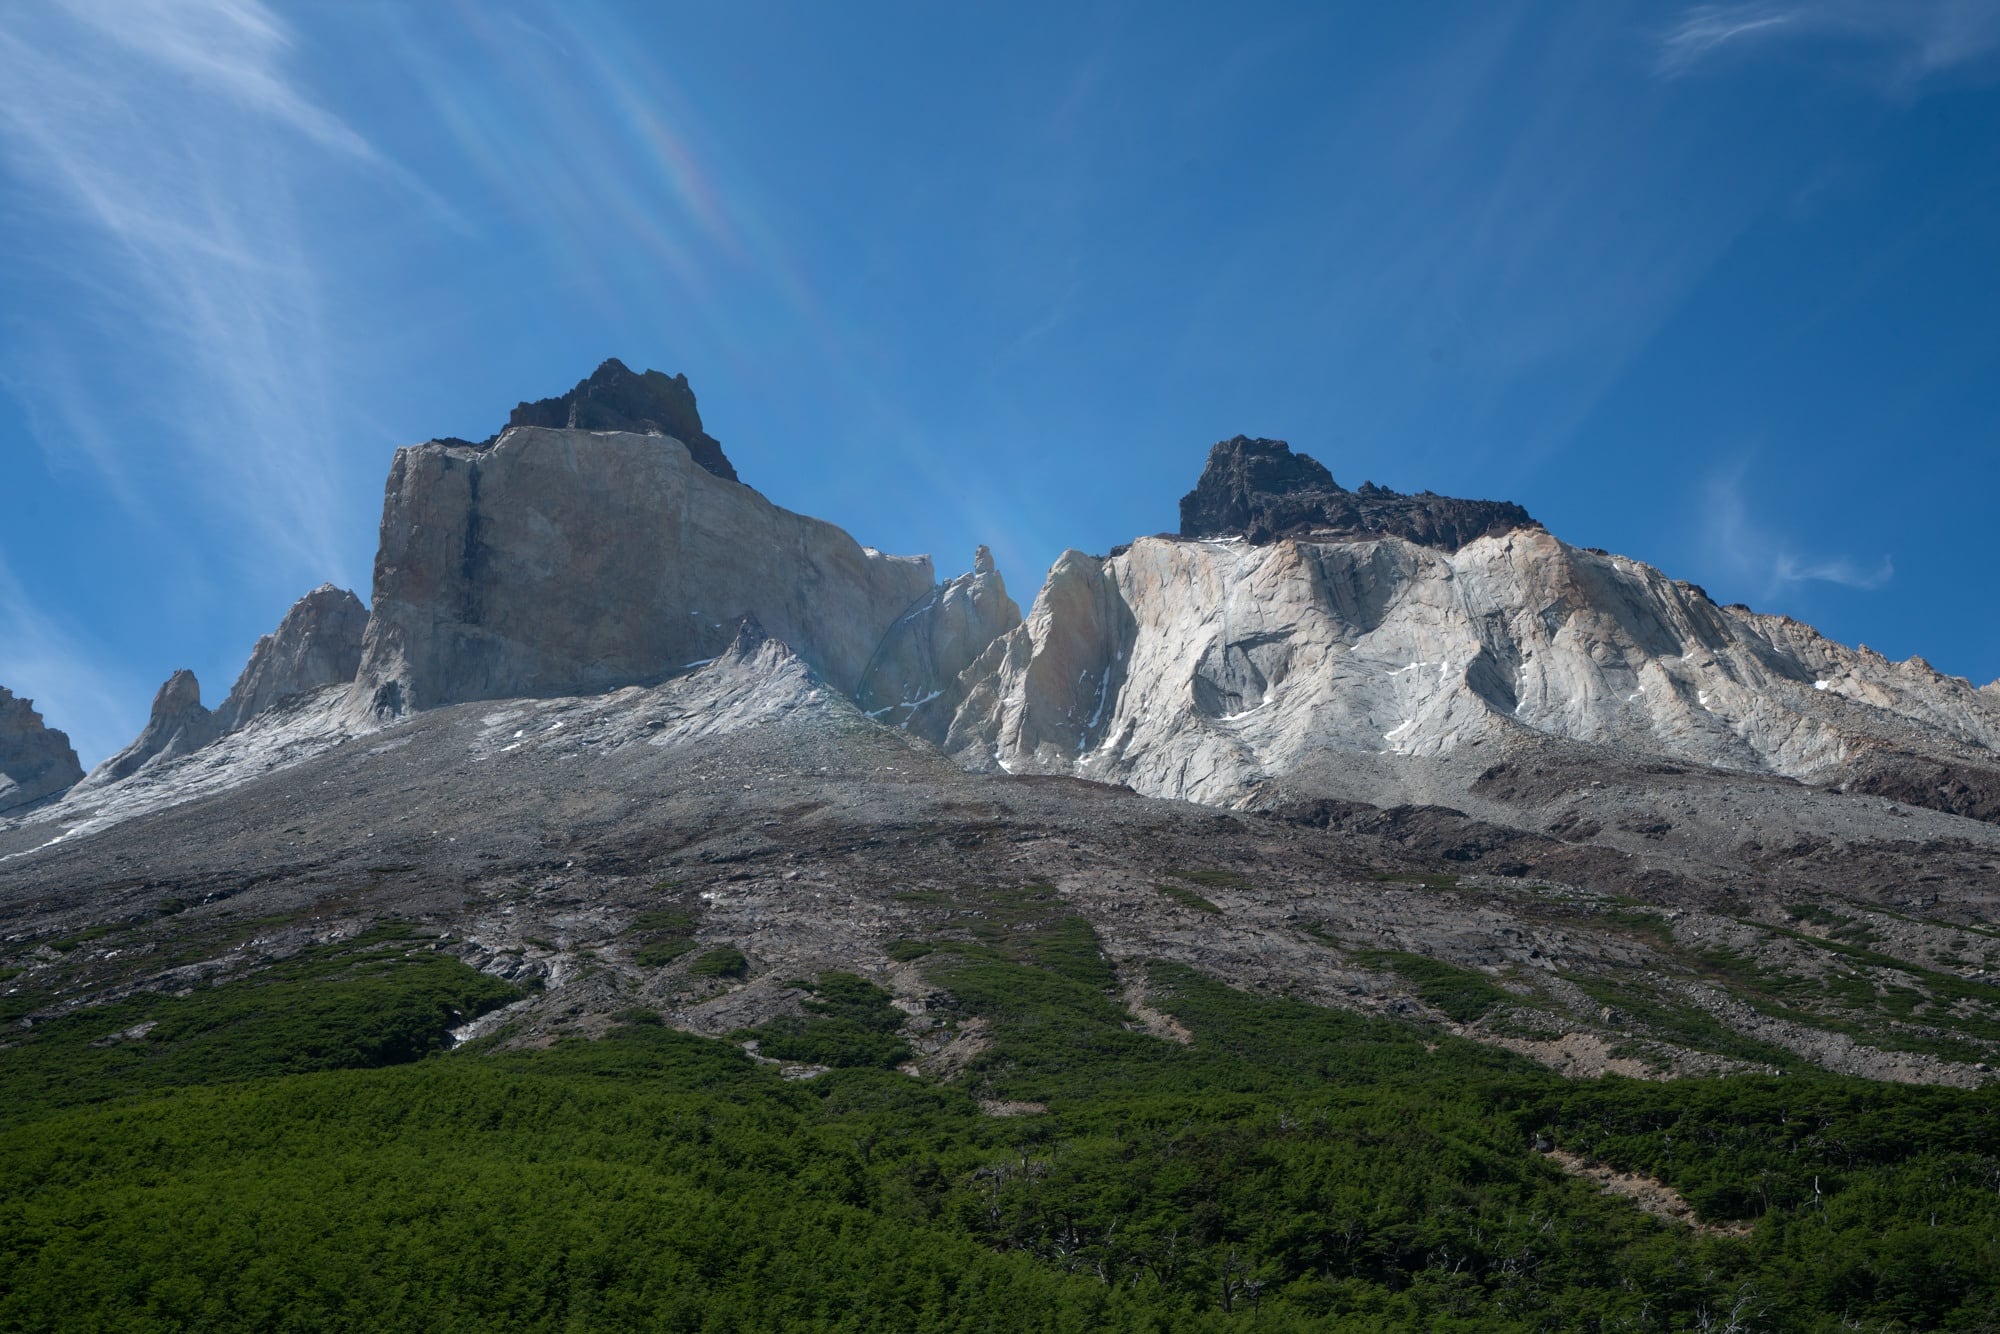
On day 3, we only hiked to the French Valley (Mirador Frances) lookout but the trail continues quite a bit farther back to the Mirador Britanica. Our guides told us this was very difficult, and we still had 2 hours of hiking once we got back down to the Italiano campsite to reach Refugio Los Cuernos where we would be camping.
If you want to hike all the way to Mirador Britanica, you should consider starting or ending at the Italiano campsite and get a very early start. We heard this is one of the most beautiful and isolated areas of the park and would probably recommend five full days for the W Trek if you want to go to the very back of the valley.
Camping Night 3
This campsite was the Refugio Los Cuernos and also my favorite campsite. The refugio is located right underneath the Horn and had a beautiful beach with a great place to enjoy a beer from the bar. Luckily, there were clean, hot showers to boot. The dinner here was also my favorite spot. On the menu there was a hot soup, bread, braised beef with mashed potatoes, and a dessert.

Day 4 – Refugio Los Cuernos to Hosteria Los Torres and back to Puerto Natales (7.5 miles)
This was a mellow morning and breakfast consisted of toast, eggs and coffee. Our day was fairly short so we were able to take our time and enjoy the scenery. There were lots of beautiful flowers in bloom and we hiked along Lake Nordernskjold the entire day so we had non-stop views. In total, it took us about four hours.

Since we had a shorter day on the trail, we stopped at the last spot with a view of the lake, where we enjoyed lunch and some mate tea.
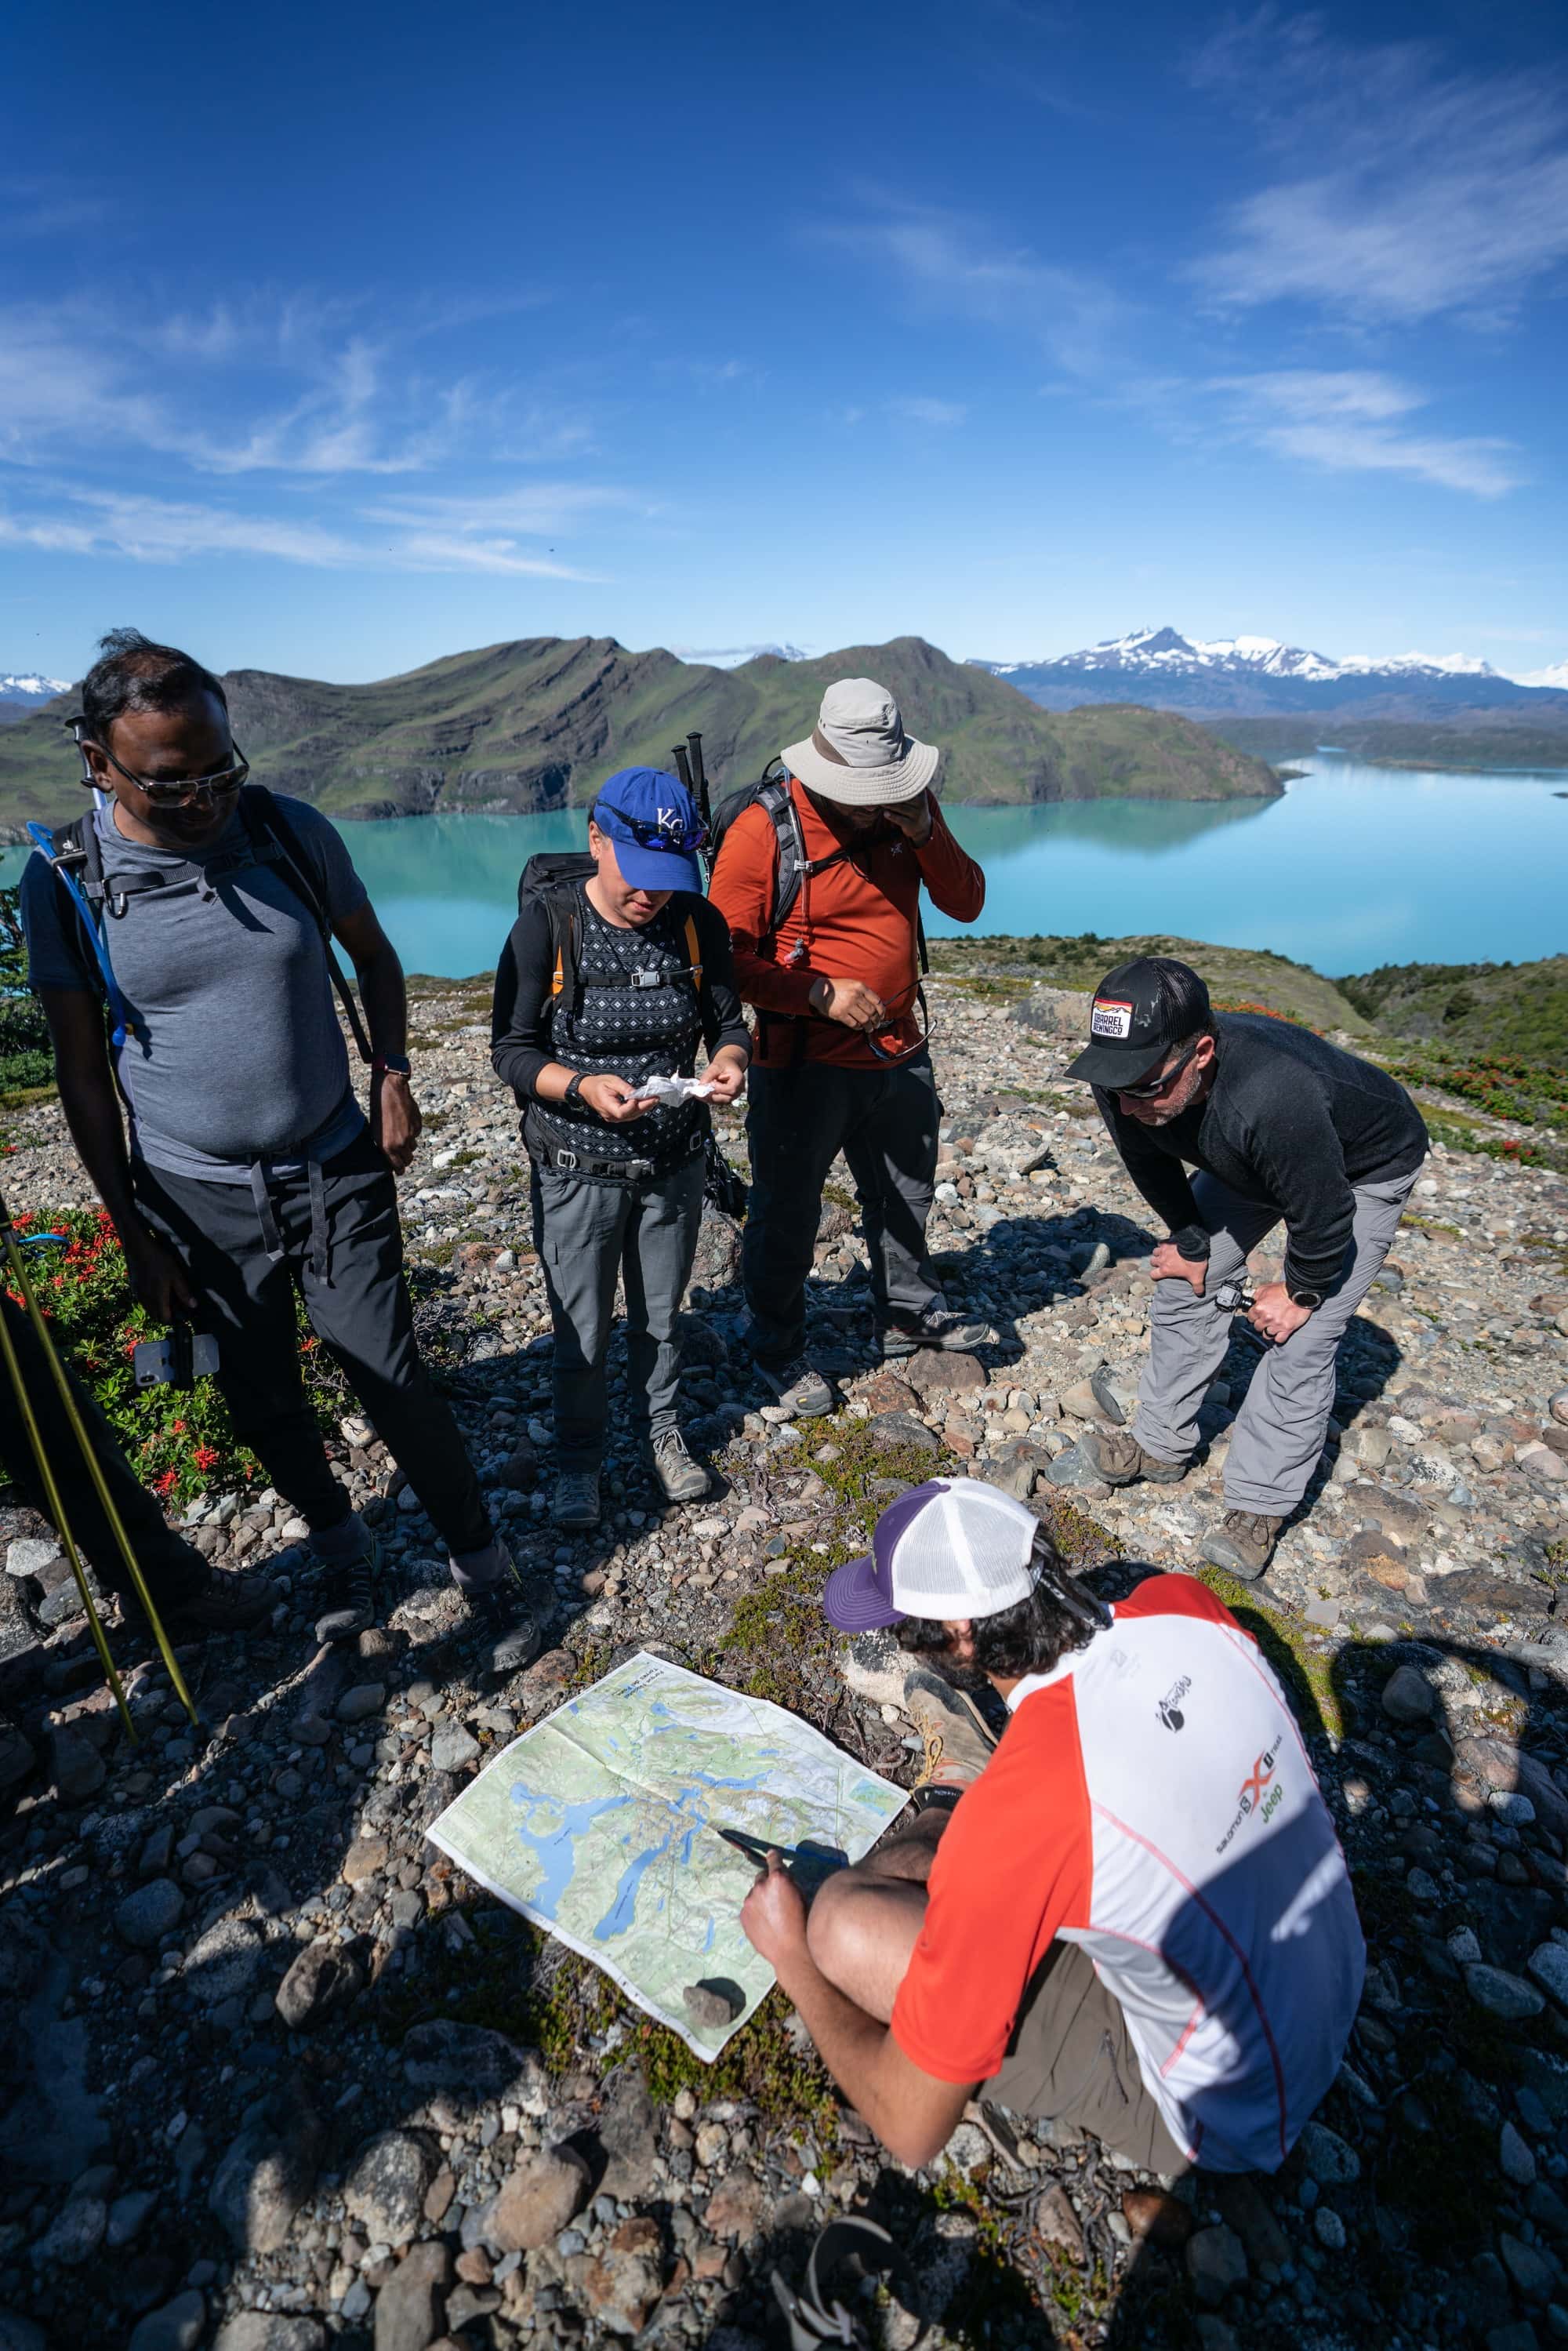
When we got back to our Day 1 starting point, our driver was waiting for us at the end to take us back to Puerto Natales where we grabbed pizza with our guides at the basecamp.
What questions do you have about hiking the W Trek in Torres Del Paine? Leave us a comment below!
With two decades of hiking and seven years of van life under her belt, Kristen has dedicated her life to helping people experience the positive effects of nature. As a pioneer in the outdoor blogging space, she founded Bearfoot Theory in 2014 and has since authored more than 350 blog posts about outdoor travel, hiking, camping, and van life. Her work has been featured in National Geographic, Outside Magazine, and Backpacker, and when she’s not on the road, she lives in Park City, Utah with her partner Ryan, their son, and two adventure pups.
Leave a Reply Cancel reply
Your email address will not be published. Required fields are marked *
Save my name, email, and website in this browser for the next time I comment.
Awesome post. I appreciate your time and effort in your work. Keep posting..
Hi Kristen,
Thank you for your blog. I’m curious, when did you hike the W Trek? I have booked campsites for the second week in March and am hoping for some early Fall foliage on our visit.
Hi Rachel – Kristen hiked the W trek in November which is spring in Patagonia. I realize that you may have had to change your travel plans, but when you do make it to Patagonia, Fall begins in mid-late March so you just might catch some of that early Fall foliage you’re looking for if you go that time of year. Best of luck!
I’m looking for a guide to go with a small group in December 2021. Recommendations? Thanks!
There are a lot of great tour operators in Patagonia. Kristen’s group trip was with G-Adventures and she had a great experience. You can read more about it here: https://bearfoottheory.com/g-adventures-review-hiking-patagonia-in-depth/

Solo Hiking the W Trek in Torres del Paine, Chile
Some links on this page may be affiliate links. That means if you follow one, see something you like, and purchase it, I may receive a small commission at no cost to you. For more information, see this site's disclosures .
A guide to solo hiking the W trek in Chile’s breathtaking Torres del Paine National Park. Trekking this route by myself was one of the most beautiful, fun, and affirming travel experiences I’ve ever had. I’ll be back to hike the O one day!
If Torres del Paine isn’t on your bucket list, add it right now! This national park in Chilean Patagonia has some of the most spectacularly beautiful mountain scenery in the world. It’s perfect for trekking and, consequently, immensely popular. Trails are well-maintained, and there are accommodation options for all different budgets and levels of “roughing it.”
For many people, the best way to experience the park is backpacking along one of the popular multi-day trekking routes. The most famous of these is a 4-5 day route known as “the W.”

If you like hiking, mountains, meeting travelers from all over the globe, or any combination of the above, you will love Torres del Paine.
And if you’re hesitating because you’re traveling alone, just go for it. Yeah, your backpack will be a little heavier, but that’s truly the only downside! The trails are well-marked and easy to follow, and there are plenty of opportunities to meet other people (on the bus or boat, taking photos at particularly scenic spots, cooking in the shelters in the evenings). It is a popular place, after all!
Choosing your hiking route: the W, the O, or the Q
In terms of multi-day hikes in Torres del Paine, you have two basic options: the “W” (named this way because the route is shaped roughly like the letter) and the “O” (you guess it; it’s a loop).

These are the two main routes, but if you’re trekking the W “backwards” (i.e. starting from the east) or hiking the entire O circuit (which must be done counter-clockwise), it’s possible to hike an additional day. Adding this extra section between Paine Grande and the Administración bus stop forms the “Q.” From November 1 to March 31, you can only hike this part in one direction (south), so you would have to do it at the end of your trek.
I just hiked the classic W trek, so that is what I’ve outlined below. I would have loved to complete the entire O circuit, but I was limited on time, unfortunately. Sigh! Some day. (Stay tuned.)
Accommodation along the W trek in Torres del Paine
There are many options when it comes to sleeping in Torres del Paine. The park has everything from campsites to luxury hotels! Along the W trek, however, you have three choices.
The first is to rent or bring your own tent and stay in the designated campsites along the route. This is, of course, the most affordable way to go. All of the campsites have basic toilet facilities, and the ones adjacent to refugios have showers.

There are also designated cooking areas where you can prepare your meals and often meet other hikers. (Note that you are required to cook in the designated shelters. This is to prevent the kinds of devastating wildfires that have destroyed sections of the park in the past.)
The second option is to sleep in the refugios, or lodges, along the trail. Refugios provide bunk-bed sleeping arrangements in mixed dorms with shared bathroom facilities. Some offer restaurants and heated common areas.
The third is a kind of middle path – you can actually reserve a tent on the grounds of some of the refugios. You don’t have to carry anything – the tent will be pitched and ready for you when you arrive.
Important note: Reserving campsites and refugios
Note that all accommodation in Torres del Paine must be reserved in advance. Spots fill quickly (i.e. months beforehand), so check for availability and book as soon as possible.

Just to complicate things, the various campsites and lodges in Torres del Paine are run by three separate agencies. You’ll have to check availability separately on each website – and be fast!
As of early 2024, the campsites run by CONAF (Chile’s National Forest Corporation) remain closed for repairs. The bad news is that the CONAF-run sites were the only free options. The good news is that now you only have to contend with two booking companies for reservations!
For reservations at Paine Grande and Grey, head to the Vertice Patagonia website. The Francés, Cuernos, and Chileno campsites/refugios are managed by Las Torres .
Preparing for solo, self-guided hiking in Torres Del Paine
Most people access Torres del Paine by bus from Puerto Natales, a small town in southern Chile. If you’re efficient and arrive early enough, you only need one day here to gather your gear and buy food.

Before you start renting and buying supplies for your hike, I highly recommend attending a briefing at Erratic Rock hostel. This is a free daily info session that goes over everything you need to know to prepare for your trek. The hosts explain the different trekking routes, recommended gear, how much food to take, and transportation options to and from the various trails in the park.
You can also rent gear while you’re there, which is convenient! Lots of people have the same idea, though, so it can be hard to find everything you need. I found better prices elsewhere, so I personally recommend shopping around first. (Future-you will thank you if you only have to return gear to one place later in the week!) I’ve included packing suggestions at the end of this post.
Transportation to Torres del Paine
As mentioned above, the jumping off point for Torres del Paine is the quiet town of Puerto Natales, located on the shores of the Señoret Channel.
You have a few options to get there, whether you’re traveling by air, land, or sea!
Getting to Puerto Natales
One option is to fly to Punta Arenas and take a bus from there. There are direct flights from both Santiago and Puerto Montt to Punta Arenas. From there, the bus to Puerto Natales takes about three hours.

Puerto Natales actually got an airport of its own a few years ago, and there are direct flights from Santiago and Puerto Montt in the peak and shoulder seasons. They tend to be more expensive than the flights to Punta Arenas, but there are deals to be had if you look far enough in advance. (This may not be much of a problem, since you’ll have to reserve your accommodation in the park well ahead of time anyway.)
Another option if you’re traveling from elsewhere in Chile is to take the Navimag ferry from Puerto Montt. There are mixed reviews on this experience (with most complaints related to perceived poor value). I still think it looks amazing and hope to try it one day.
If you’re coming from Argentina, there is a bus to Puerto Natales from El Calafate (home of the incredible Perito Moreno glacier). The trip takes between five and six hours, including time at the border crossing. Heading in the other direction, buses from Ushuaia to Puerto Natales take about 13 hours.
Buses from Puerto Natales to Torres del Paine
Once in Puerto Natales, buses to Torres del Paine leave several times a day, with at least one morning and one afternoon departure. If you plan to hike the W trek in 4-5 days, you definitely need to catch a morning bus.
Check updated timetables at the bus station when you arrive, as schedules can and do change. There also may be slight variations among the different transportation providers.

You should book your bus tickets in advance, especially in high season. It’s possible to reserve a roundtrip ticket with an open return date. (Buses head back to Puerto Natales from Laguna Amarga every day in the morning, afternoon, and evening. Again, make sure to confirm the exact times before you head out on your trek.)
It takes about two and a half hours to get to the Laguna Amarga park entrance from Puerto Natales. The bus stops here so everyone can register with the ranger station. From there, it continues to Pudeto Pier, about 30 minutes away.
Note that it is no longer possible to purchase tickets at the park entrance. You must book tickets to the park on the CONAF website at least 24 hours in advance. As of 2024, the price for international visitors is $55 USD for a multi-day pass (3 days or more).
Day 1 of the W trek: Boat from Pudeto to Paine Grande and hike to Refugio Grey
From Pudeto, there is a catamaran that takes you to Paine Grande, your starting point for the W hike. Be prepared for a seriously windy but incredibly beautiful half-hour trip across Lake Pehoe. (Did I mention the legendary Patagonian wind? It literally blew the rooftop emergency exit of our bus open!) You can purchase tickets for the catamaran when you arrive at Pudeto.

When you get to Paine Grande, you’ll head northwest (the trail to your left when you get off the boat) to Refugio Grey. Along the way you’ll pass streams, waterfalls, fields of purple lupines, and many beautiful lookout points over Lago Grey.
Pitch your tent anywhere in the designated field, and head over to the lookout over Gray Glacier.
Another option for your first night is to camp at Paine Grande and just do a long out-and-back day hike up to the glacier. Personally, if I were to hike the W trek again, I would probably do this. It’s about 13.8 miles (22.2 km) roundtrip, but obviously you’ll be able to move more quickly with just a day pack.

That said, I don’t regret spending the night near the glacier, as the weather was much better the following day! I took a little trip to see it in under clear blue skies before heading out in the morning.
Day 2 of the W trek: Refugio Grey to Camping Francés or Italiano
If you’ve spent the night next to Glacier Grey, you’ll return to Paine Grande the same way you came. Due to Patagonia’s notoriously changeable weather, the scenery might look completely different the second time through!
From there, the rest of the day is a beautiful, relatively flat walk overlooking Torres del Paine’s beautiful lakes. The impressive Cuernos del Paine also loom in the distance.

When I hiked the W, I pitched my tent at Campamento Italiano*, at the base of the Valle Francés. This was a basic campsite, with no refugio (nor the amenities that come with one). *Note that this campsite is closed for the 2023-2024 trekking season.
Another option for your second night is Camping Francés, which is a bit further along the trail and adjacent to Domos Francés. The advantages of staying at Francés are the additional facilities (e.g. hot showers, flush toilets, a restaurant, wifi, etc.). The main disadvantage is a bit of additional backtracking to get to the Valle Francés (a must-visit). Again, for the foreseeable future, you don’t really have a choice.

If you camped at Paine Grande your first night, you’ll likely have time to head up to the Valle Francés on Day 2. If you’ve come from Refugio Grey, it’s better to save it for the next day.
Day 3 of the W trek: Francés or Italiano to Refugio los Cuernos
The best part of this day is that you can ditch your large backpack and head up to the Valle Francés with just a day pack! (Make sure you still have the essentials, like water, some snacks, layers, etc.)
This is an out-and-back hike, so you’ll head back to your campsite, grab all of your gear, and head east towards Refugio los Cuernos.

This was probably my favorite day on the trail. You’ll walk along the incredibly beautiful Lago Nordenskjöld, and there is even a lovely little pebble beach at one point.
You can swim, if you dare, or just chill out and watch the others as they squawk and run back to the shore after 10 seconds.
I was one of the last to arrive at the Cuernos campsite (as I usually am, because I generally like to sleep in and take my time), and I ended up with a small patch of land near the top of the hill on a considerable slope. Bad for sleeping, AMAZING for sunset-viewing.

Truly, it was worth rolling into the corner of the tent all night. This was one of the most beautiful sunsets of my life. The refugios have very strict rules about where you can cook (as you can see in some of my photos, the park was scorched by massive wildfires in 2005 and 2011). The Cuernos cooking area was near the base of the campsite, next to the lakefront and the lodge. I ended up eating a gourmet dinner of dried fruit and nuts because I couldn’t bear to leave my perch at the top of the hill.
Day 4 of the W trek: Refugio Los Cuernos to Refugio Chileno or Torre Norte/Central
The next day, you’ll continue along a mostly flat trail, admiring Lago Nordenskjöld and its 36534 shades of blue and green. You’ll then reach a fork. To the left is a shortcut to Refugio Chileno, where you’ll start to ascend through the breathtaking Ascencio Valley. Continue to the right to descend to Torre Central and Torre Norte.
You have a few options for sleeping. Currently, as of 2024, your best option is Refugio Chileno. It has dorms, showers, tent platforms, and a campsite in a lovely setting next to the river. Note that there is no cooking area, so campers have to order food from the refugio if you want a hot meal.

When I first hiked the W trek, I was able to spend my last night at Campamento Torres. This was another basic campsite without showers, flush toilets, or refugio dining facilities. It was the closest spot to the famous towers, saving me the most time in the early morning hours. However! Campamento Torres has been closed for years, and it now seems like it may be closed forever. RIP Campamento Torres!
The other refugios and campsites at Torre Norte and Torre Central are located several hours downhill (in the opposite direction).
If you can’t secure a reservation at Chileno, it’s going to be pretty difficult to catch the sunrise at Mirador Base las Torres. It’s certainly not impossible, but it will entail a long ascent in the dark. For me personally, it wouldn’t be worth it. The sunrise view was lovely, but I’m fairly certain it would have been just as impressive in the middle of the day. You also never know what kind of weather awaits! The only thing worse than reaching a summit shrouded in clouds is having woken up at an ungodly hour to get there.
Day 5 of the W trek, Part I: Sunrise at the Torres
For that iconic sunrise view of the towers, you’ll have to get going early. How early will depend on where you slept and the time of year you’re there. Plan for about an hour and 45 minutes from Refugio Chileno to the lakeside viewpoint at the base of the towers.

If you, like me, had the privilege of beautiful long days in the peak of summer, a tradeoff is coming in the form of a painfully early alarm on Day 5!
You can leave your tent as it is and pack up when you return on the way down. If you’re coming from Chileno, the first hour of your hike takes you along an easy, forested trail. The last section is mostly rock scrambling, although you’ll still be able to make out the trail fairly easily. From the onset of the rocky section, just past Campamento Torres, it takes about 45 minutes to reach the mirador.
Note that it’s freezing once you reach the lake and stop moving. If you’ve made decent time, you’ll likely be waiting a bit for the spectacular moment when the sun’s rays hit the granite. It was almost certainly cold when you set out in the dark of night, so you should have plenty of layers with you, but you may want to consider stuffing your sleeping bag in that day pack if you can.
Day 5 of the W trek, Part II: The long hike down to Hotel Las Torres
Then comes the loooooong descent. Pro tip – bring or rent hiking poles! After the morning at the Torres, the rest of the day is entirely downhill, and some of it a fairly steep downhill. You’ll retrace your route back to your lodging and then descend all the way to Hotel Las Torres.

Even if you don’t use the poles at any other point on the trek, your knees will thank you if you have them for this last stretch. (Seriously, when I was a teenager I could scramble up and down the fourteeners in the Rockies like it was nothing, and probably go for a jog the next day. My body stopped being able to do that without consequence just a few years later. Unless you are 16 – bring poles!)
Transportation back to Puerto Natales from Torres del Paine
There are shuttle buses that run from Hotel Las Torres to the park entrance at Laguna Amarga. These are timed to connect with the buses back to Puerto Natales, with one departure in the morning, one mid-afternoon, and one in the evening. (Again, double check the schedules at the beginning of your trek.)
It’s also possible to walk for an additional hour and a half along the road to get back to Laguna Amarga. (After the early start and long, hot, steep hike downhill, almost everyone I trekked with that day opted for the shuttle. No shame in it, my friends!)
Even if you hiked the W trek alone, you’ll likely find yourself chatting with all of the new friends you made over the past few days. There is a celebratory mood at the bottom of the hill – despite the general sense of exhaustion!
Enjoy your scenic bus ride back to Puerto Natales, likely followed by one of the best showers of your life. Don’t forget to return your rented gear! If you have leftover food or half-empty gas cannisters, you can usually leave them for future trekkers at your hotel or hostel.

Hopefully you’ve booked a nice comfy bed for the night, and you’ll be rested and refreshed before moving on to explore more of Chile .
I personally headed off to Punta Arenas and the penguin tour on Isla Magdalena the following day.
Packing for your solo trek in Torres del Paine
Most people who set out on the O or the W trek in Torres del Paine bring a combination of personal items from home and rented gear. Make a list before you start running around to all the rental shops in town. It should include:
Hiking and Camping Gear
A proper hiking backpack with a frame (internal or external) and waist strap.
A day pack . There are several out-and-back hikes along the W trek where you can leave most of your heavy gear behind.
Tent (if camping).
Sleeping bag. (I personally would bring one even if you are staying in refugios.)
Sleeping pad.
Headlamp . It’s such a small thing, but this is an absolute must if you plan on hiking to the Torres for sunrise. Much of the hike must be done in the dark, and you’ll want your hands free for the rocky sections. (And obviously, if you’re camping in a tent, you’ll need a light of some kind.)
Stove and gas cannister.
Cookware and utensils.
First aid kit.
Trekking poles.

Hiking boots with ankle support.
Wool hiking socks . (Wool keeps you warm even when wet.)
Flip flops (or hiking sandals like Tevas or Chacos) for the showers. (Though if they’re flooded, the sandals won’t help much…)
Rain gear, including a waterproof jacket . Even if you get lucky with no rain, you’ll thank yourself for the windbreaker.
Warm hat and gloves.
Lots of layers! The weather in Patagonia can be really variable. I rented a down jacket that I only used as a pillow for days 1-4… but man was I glad I had it at the mirador on day 5!
Sunglasses and sun hat.
Miscellaneous
Lightweight towel .
Water bottle or reservoir .
Basic toiletries.
Wet wipes, toilet paper, and hand sanitizer.
Plastic bags for trash, wet clothes, etc.
Most hotels and hostels in Puerto Natales will store anything you don’t want to take trekking until you come back. Almost every town visitor is heading to Torres del Paine, so accommodation providers are used to offering secure storage facilities.
Why hike the W alone?
Although I’d done plenty of backpacking trips with friends and day hikes by myself over the years, this was my first solo multi-day trek. I was nervous before heading out, but I ended up enjoying the trip immensely.
I booked my trip to Chile with every intention of hiking the W, but I had no plans to do it by myself. It was January, which is peak season, and I was staying in hostel dorms and taking public transportation. I thought I’d have no trouble finding someone to backpack with.
As it turned out, nope! My hostel roommates in Puerto Natales were heading to Torres del Paine the same day as me, but they were planning to start from a different point on the trail. I went to the daily info session at Erratic Rock hostel twice to see if I could find a trekking buddy, but I had no luck. So that was that; I was going on my own!
In the end, it was perfectly fine. I had to visit seemingly every gear rental shop in Puerto Natales, but I found a one-person tent. I planned and bought five days’ worth of meals for just myself, which was straightforward enough!
Most hikers follow similar routes, so it was easy to make friends along the trail. Without a trekking partner or group, I was free to hike at my own pace and stop every three feet for a new photo if I saw fit.
I walked when I wanted and rested when I wanted. I slept in until I woke up naturally. And I found gorgeous moments of peace, watching the clouds pass and listening to the birds without a soul in sight.
Solitude is possible, even in one of the world’s most famous trekking destinations.
Yes, meeting new people is one of the best things about traveling. And yes, it’s nice to think that someone might notice if you break an ankle and never show up at camp.
But for the actual putting-one-foot-in-front-of-the-other part of hiking, I genuinely love being alone. To my delight – even on one of the world’s most iconic treks – I was able to find a perfect balance between social time and solitude.
To be clear, the classic five-day W is the park’s most popular trekking route. If you’re looking for complete isolation, this is not your place. But you can still have the path to yourself – at times. You just have to be willing to take your time and roll into camp a bit late!
Alternatively, visit outside of peak season. Summer is the busiest time of year in the park, but spring and fall are also nice times to hike.
And if you have a bit more time, Torres del Paine has other trails to explore with fewer people.
The northern half of the O circuit has no lodges (just campsites), unlike the southern part of the loop that forms the W trek. It is also a more difficult undertaking, with an especially strenuous day hiking over the John Gardner Pass. The added challenge, extra days required, and lack of creature comforts thin the crowds.
There are also many beautiful day hikes, plus opportunities to kayak and ride horses.
More Chile travel
One month in Chile: Planning your itinerary
Exploring the otherworldly Atacama Desert
The best street art tours in Valparaíso
Climbing Volcán Villarrica in the Chilean Lake District
The top things to do on Chiloé Island
Related Posts: Argentinean Patagonia
How to spend 3 days in El Chaltén, Argentina’s trekking mecca
Hiking the Loma del Pliegue Tumbado for the best view in El Chaltén
Trekking in Bariloche: Top 5 day hikes
Bariloche’s best day hike: Frey por el Filo
Similar Posts

Sri Lanka Itinerary: The Best Places to Visit on Your First Trip

Where to stay in Taipei: Best neighborhoods and cost of living

An Alicante itinerary for 1, 2, or 3 days: Heart of the Costa Blanca

Similan Islands diving: A fantastic first liveaboard experience

Irun to San Sebastián: Hiking over Mt. Jaizkibel on the Camino del Norte

How to spend 4 days in Buenos Aires: A first-time itinerary
The ultimate guide to the Torres del Paine W Trek in Chile

The W Trek in Chile is one of the hardest things I’ve ever done. And that’s coming from someone who thought it would be a good idea to cycle across the entire country of Jordan.
Now that we’ve got that out of the way, let me tell you why hiking in Torres del Paine National Park is also one of the most rewarding travel experiences I’ve had.

It’s rare to find an adventure that pushes your physical limits every single day, has you cursing under your breath more times than you can count as you face yet another sloshy water crossing or steep incline with a fully loaded pack on your back, and leaves you with aches, sore muscles and a few bruises on account of the inevitable stumbles over rogue rocks.
Yet, at the end of this multi-day grind, the feeling of accomplishment is unmatched. You just trekked through freaking Patagonia, one of the most remote and picturesque places on the planet!
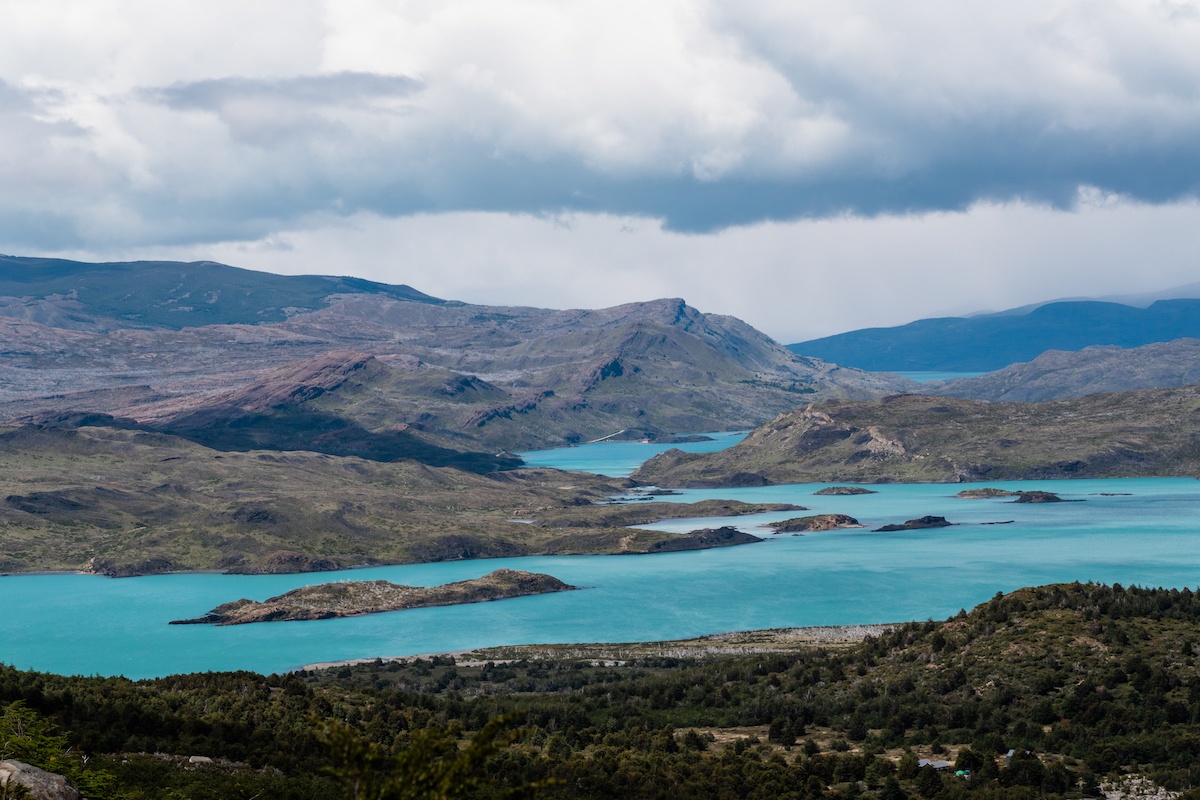
The scenery is stunning, the logistics and conditions are challenging, and your body is pushed to exhaustion with very little rest time.
Not only will you learn how capable your mind and body really are, but there’s the added bonus of not feeling guilty at all when indulging in a slice of chocolate cake and glass of Carmenere at a refugio at the end of each day. Because my god will you ever burn a lot of calories.
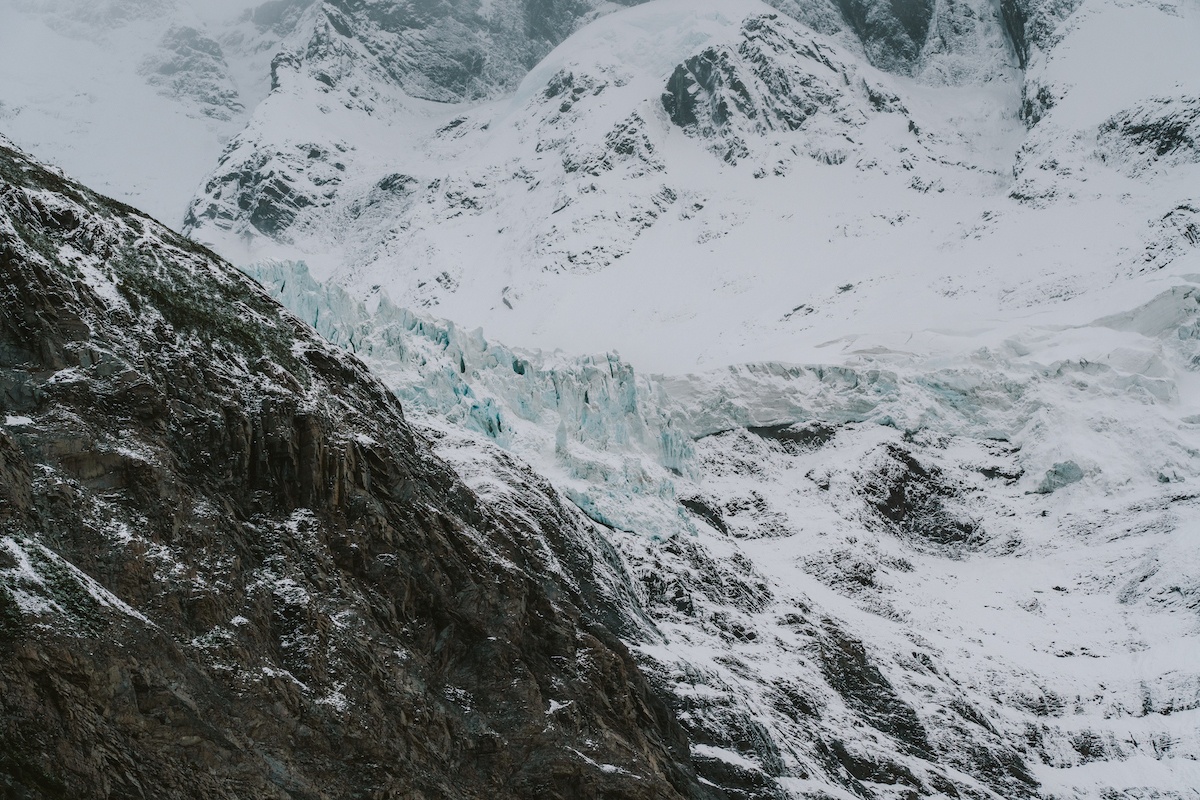
Is this trip for everyone? No.
Is it epic and unforgettable? Absolutely.
Here’s everything you need to know if you’re thinking about tackling the Torres del Paine W Trek in Chile.
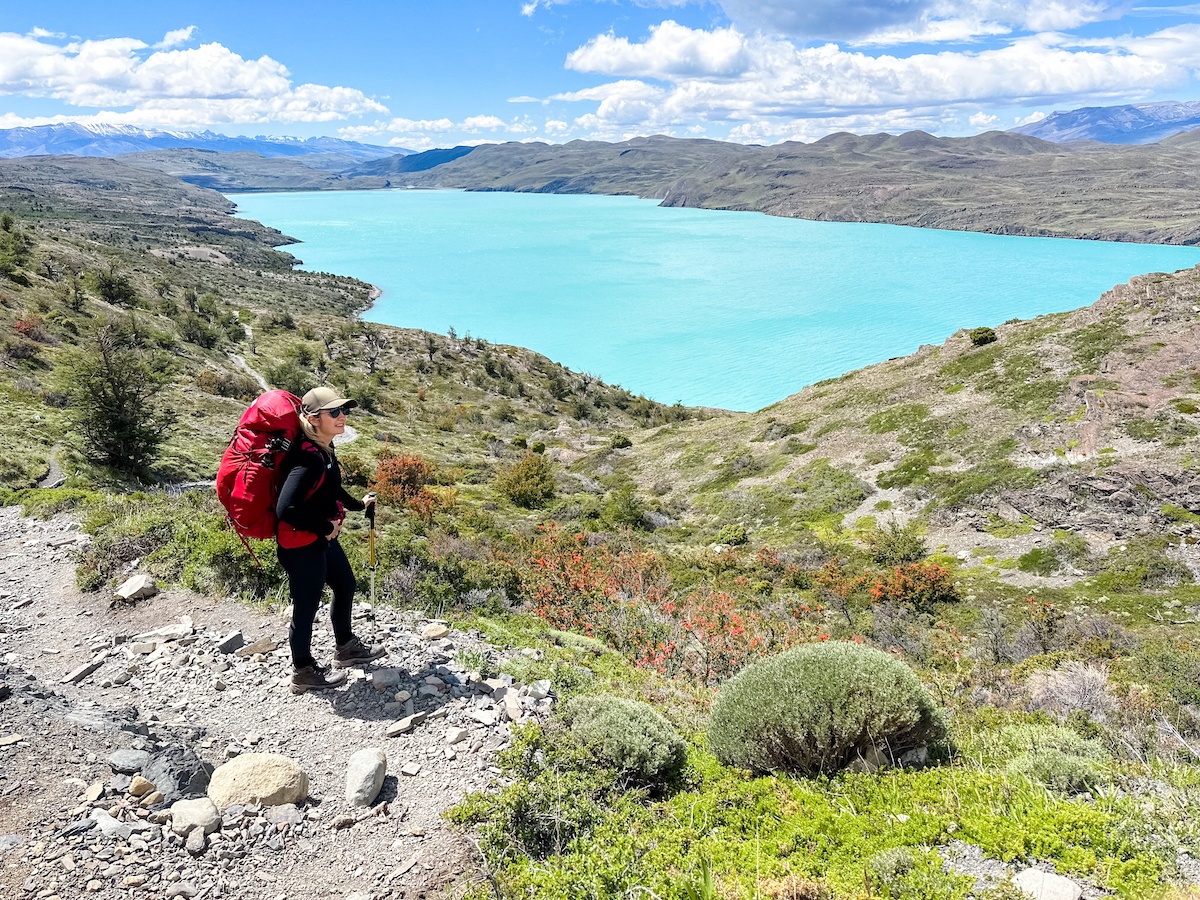
The Patagonia W Trek route
The W Trek takes four days to complete, and while its exact length seems to change depending on who you ask or which map you look at, the general consensus is that the trail is about 64 kilometers (40 miles) long.
Expect anywhere from six to 12 hours of hiking each day, more than 100,000 steps (my Apple Watch logged 125,458 to be exact) and of course countless photo-ops.
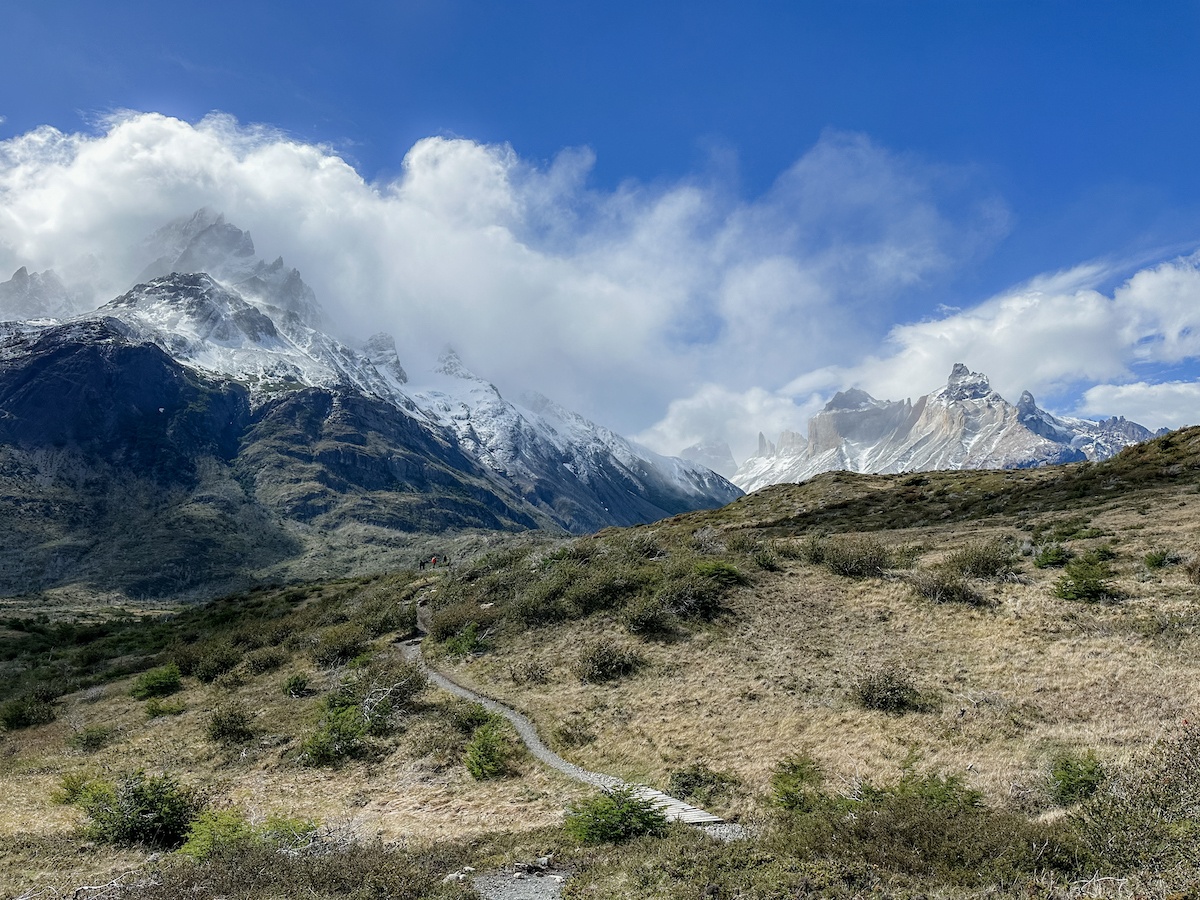
This is the most popular way to hike Patagonia, and those who are up for even more of a challenge can continue along the O Circuit which takes about nine days to complete the 122 kilometer, counter-clockwise loop.
This W Trek map outlines the exact route:
The W Trek in Torres del Paine can be done in either direction, starting from either the Torres del Paine Welcome Center on the east side or Lago Grey on the west which requires a boat ride over.
Deciding which side to start from simply comes down to preference and logistics, with the availability of refugios (the campsites that hikers stay at each night) being the most important to account for.
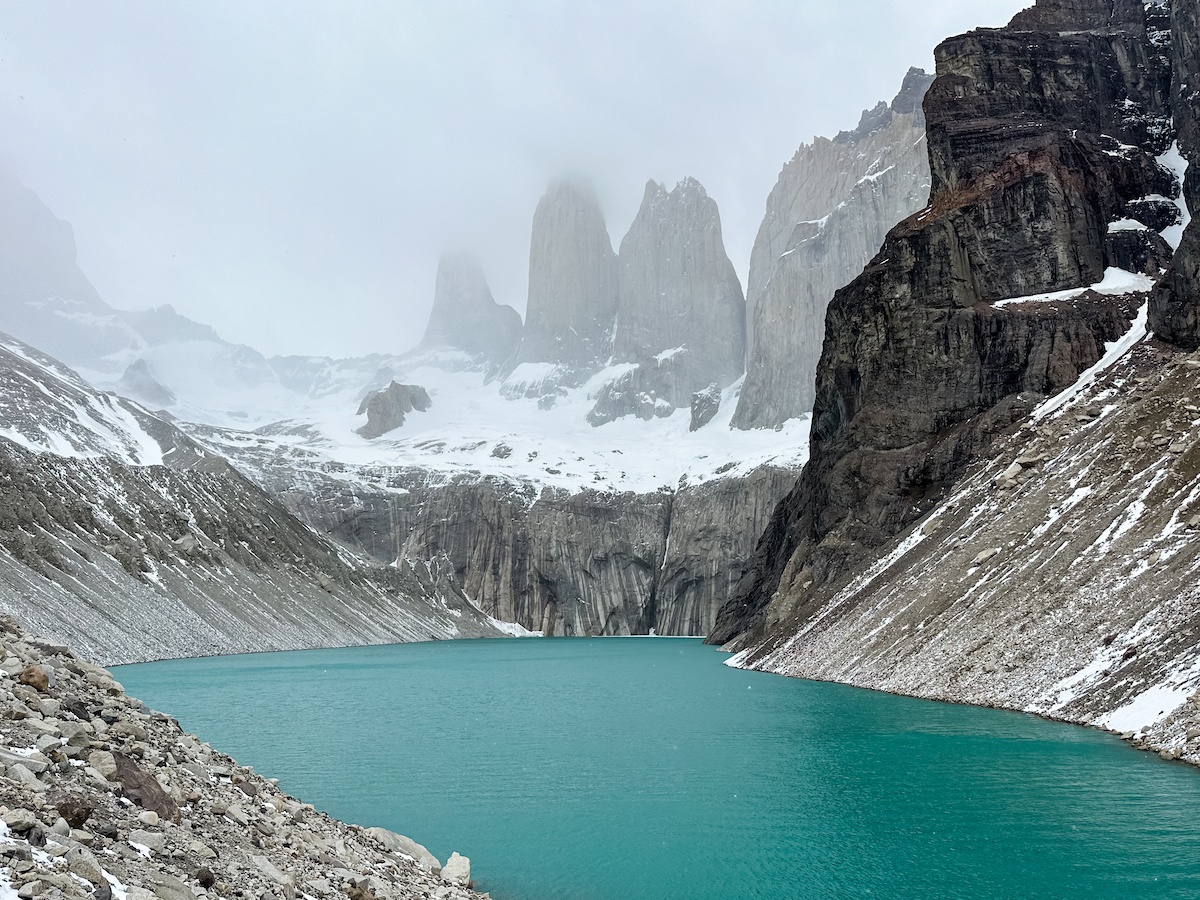
Another factor is when you want to take on the Mirador Base de Las Torres hike: this is the view you’ll see on pretty much every single postcard and basically the entire reason most people come all the way to Patagonia.
Thing is, it’s a very steep eight hour round trip hike, and the most challenging day of the W Circuit. So, some like to get it out of the way on day one while their legs are fresh, while others opt to start from the other side and save it for the last day of the hike as a culmination of their efforts.
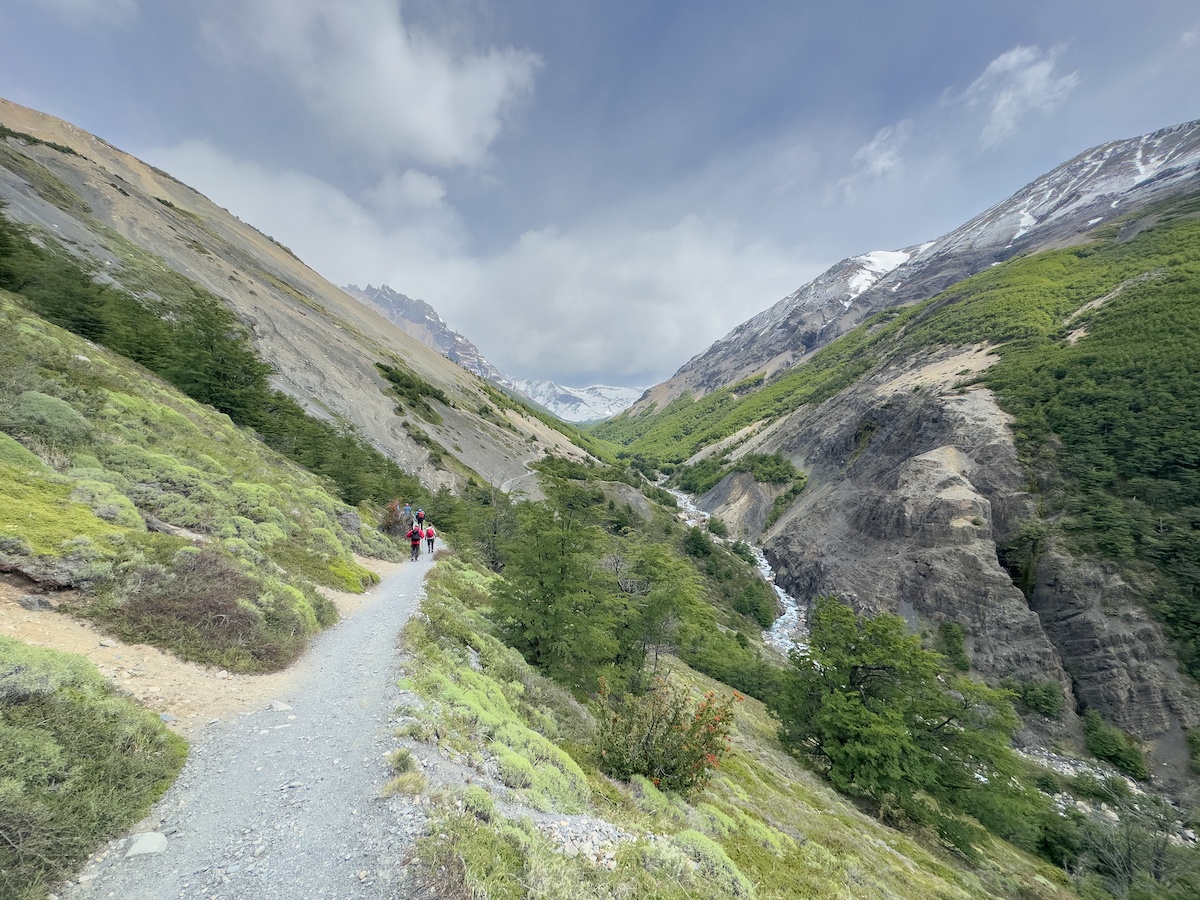
We did it on the first day, and there are pros and cons to both. I can’t imagine how much harder it would have been after already hiking for three full days and feeling worn down from camping and cold showers; that said, going full throttle on the first day wasn’t the best warmup as someone who doesn’t do intense hikes on a regular basis, and my legs were basically jelly the whole rest of the trip.
One perk of going from west to east is you can stay at Refugio Chileno the night before summiting Mirador Las Torres. That saves about 90 minutes of hiking compared to starting from Centro on the other side–a huge advantage for those wanting to make it up for sunrise or try and beat the crowds.
When I asked my guide who’s done the trek hundreds of times which direction he prefers, he said he likes to do it on day one to get it over with. So there you have it.
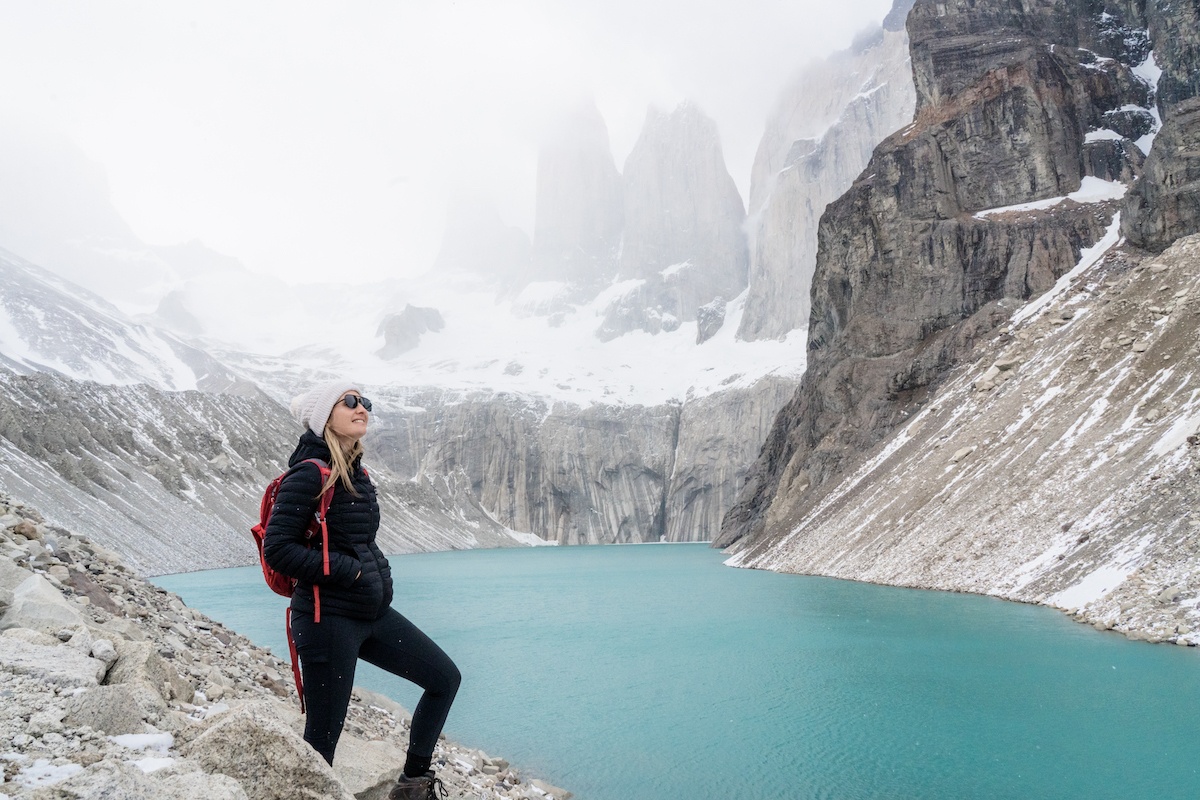
How to book a W Trek itinerary
As you might have noticed already, there are a stupid amount of logistics involved with trekking in Torres del Paine–and in true Chilean fashion, they don’t make it easy.
Some of the things you’ll need to book and consider are:
- Transportation to and from the park gates and to/from the welcome centre (yup, these are separate buses)
- Refugios for each night of the trek
- Food (either carry your own or book meals at each stop)
- Sleeping bag and mat rentals (if not carrying your own)
- Permits/entrance fees
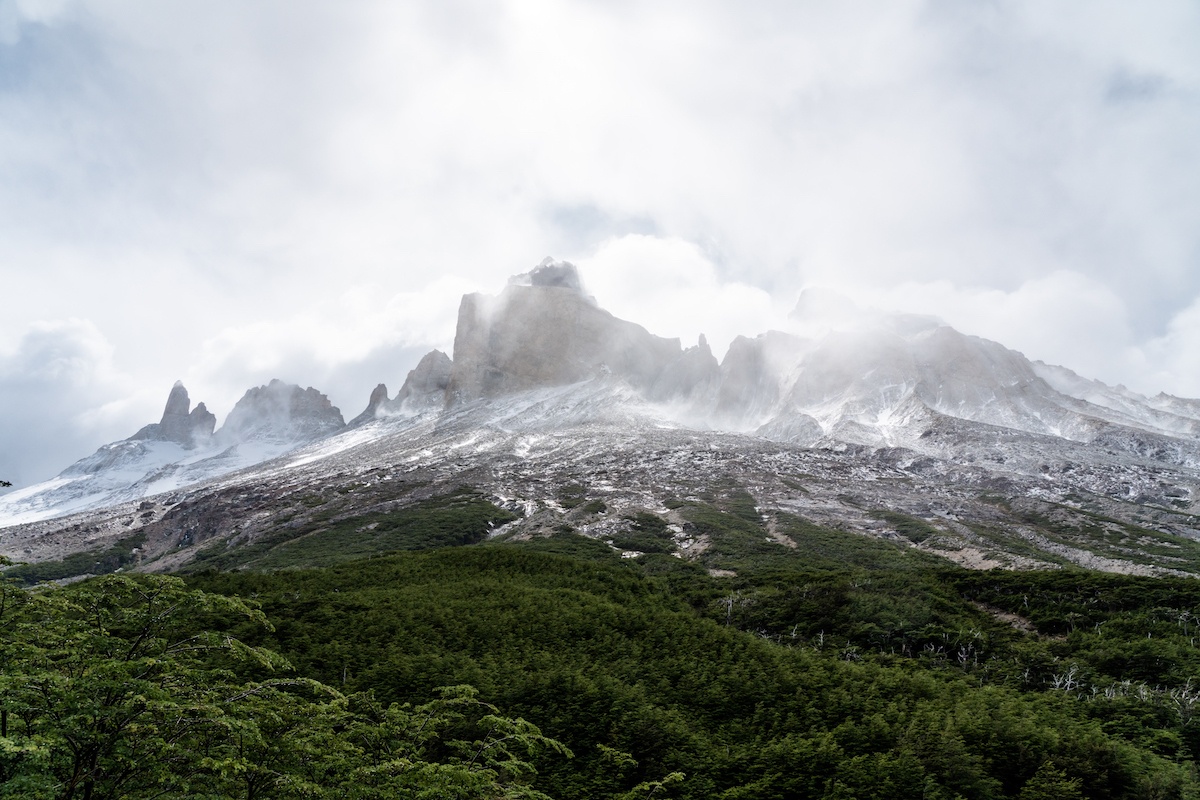
The problem is that tour operators secure a lot of the spots ahead of time, so there are a limited amount left for those planning self-guided trips. You’ll also have to ensure you book each night you need in the correct order of the route, and since two different companies ( Vertice and Fantástico Sur ) operate the refugios you’ll need to coordinate this on separate websites.
Fun, right?
Globe Guide tip: Some hikers have had success contacting the companies directly via e-mail or WhatsApp in advance to secure bookings.
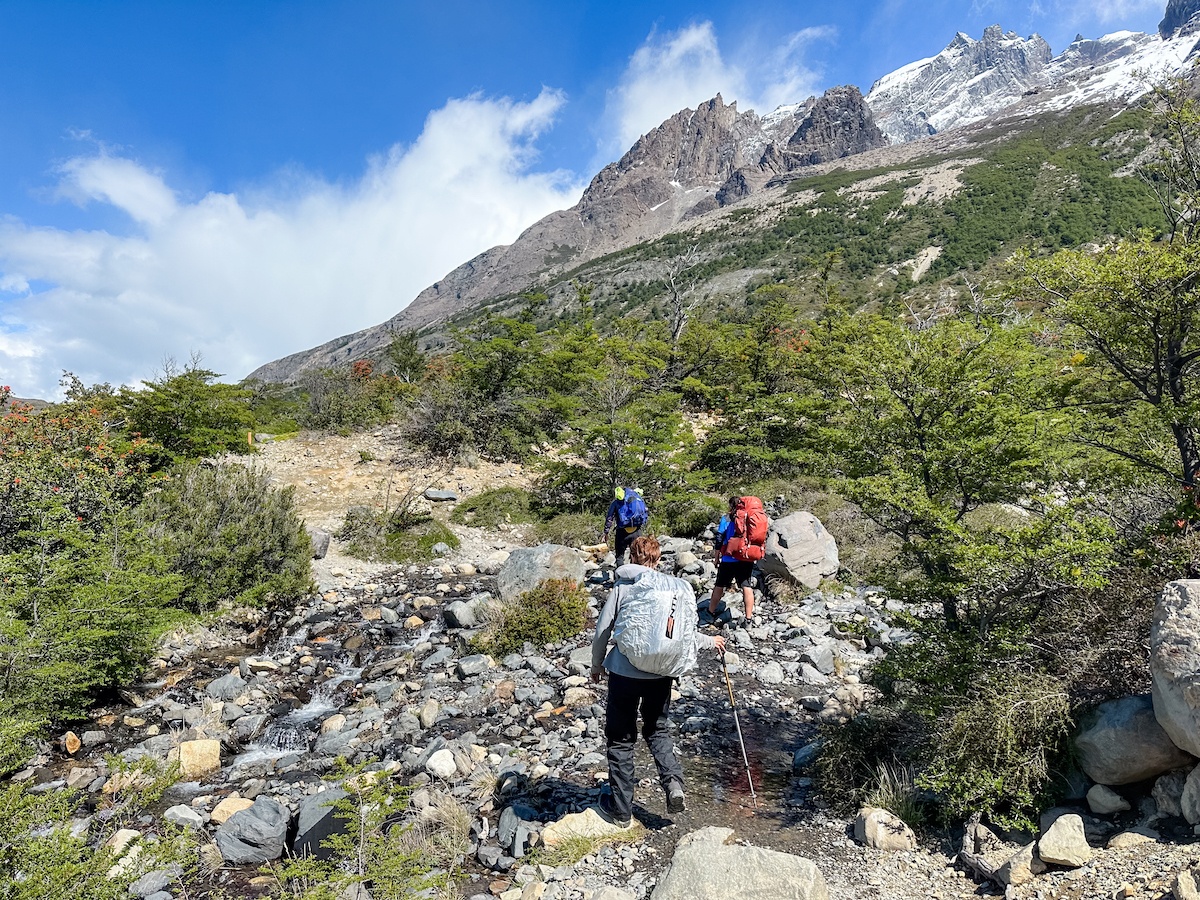
My recommendation: save yourself a lot of time and stress, and book through a small group tour operator instead.
I went with Traverse Journeys , which offers both self-guided and group trip options, as well as (optional) stops in the Strait of Magellan to see the famous penguins, horseback riding, wine tasting among the Casablanca vineyards and city sightseeing in Valparaiso and Santiago.
Traverse handles every single detail right down to what’s in your lunch bag, and donates a portion of the proceeds from each trip to support a local community partner. We saw this firsthand by learning about the efforts the Torres del Paine Legacy Fund is spearheading to conserve the fragile environment and ensure a safer experience for visitors, and even passed some of their volunteers working on the trail.
Globe Guide readers get $200 off of any booking with Traverse Journeys by entering code GLOBEGUIDE200 at checkout!
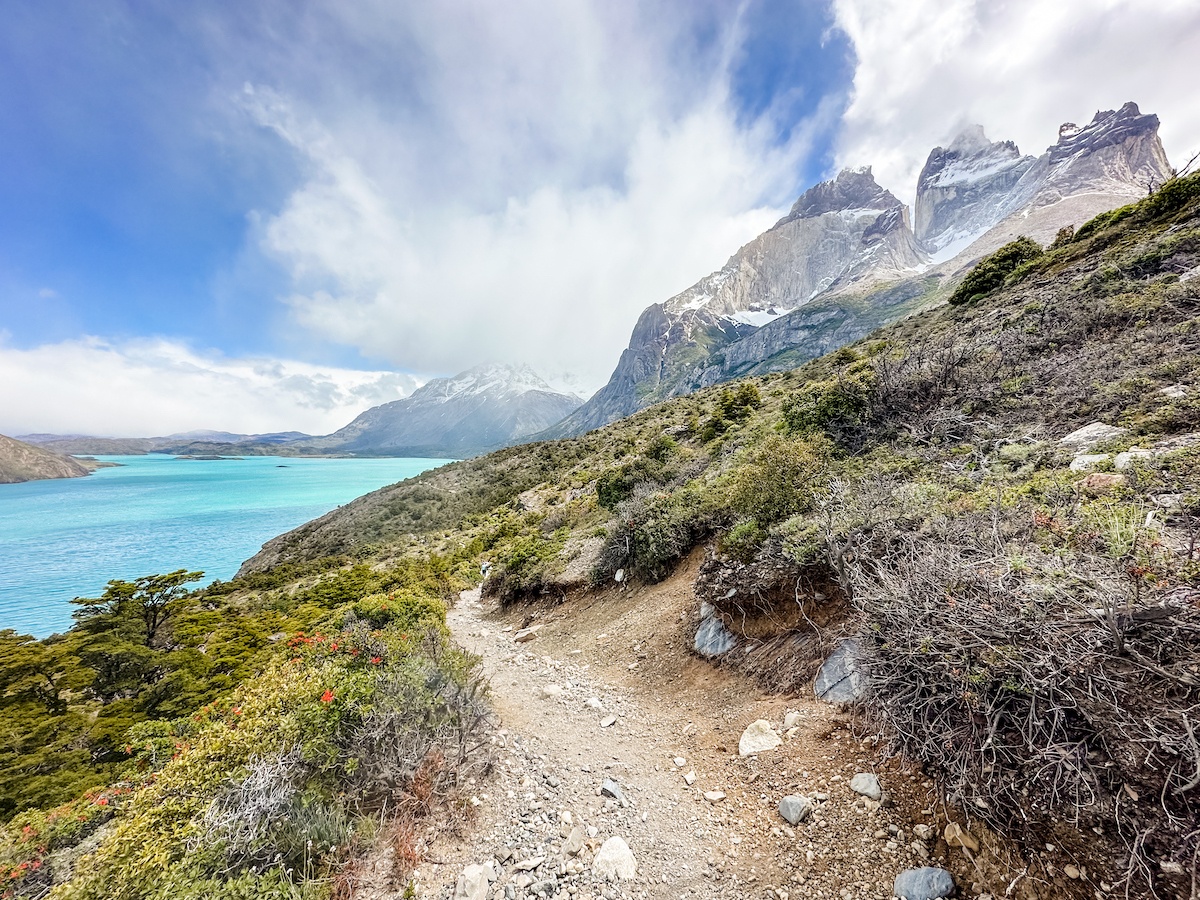
Getting to and from the entrances for trekking Torres del Paine National Park
The cute town of Puerto Natales is like basecamp for Torres del Paine National Park, despite being a scenic 90 minute drive away.
This is where the closest airport is, along with lots of great restaurants and accommodations, grocery stores for stocking up on food or snacks, and gear outfitters for any last minute purchases.

Buses depart from the main depot around 7 AM for both entrances to the park. If you’re starting on the east side like we did or doing the day hike up to Mirador Base Torres, you’ll present a QR code with your permit then hop on another bus (3,000 pesos) to get to the Torres del Paine Welcome Center.
Those starting from the west will head to Lago Grey and take a catamaran over. In theory this means all the way up to the glacier for incredible views, but if the weather is bad a ferry crosses Pehoe Lake to the Paine Grande refugio instead.
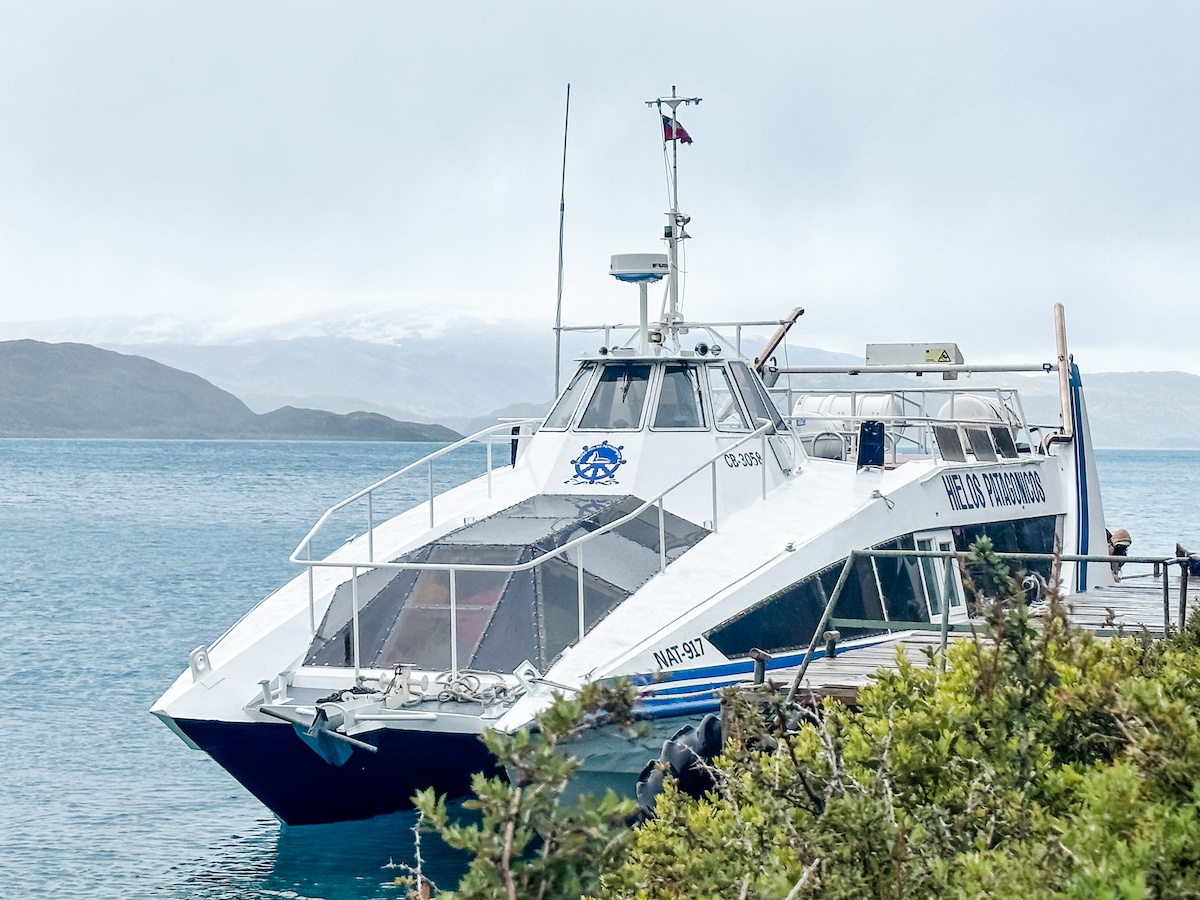
In this case, you’ll have to do an out-and-back to see the glacier on foot, before taking the ferry across Pehoe Lake. This website has more information on prices and schedules.
Globe Guide note: If neither of the boats are operating which happens on occasion due to weather or maintenance issues, it adds an extra 6-7 hours of walking to get to the pickup/dropoff spot.
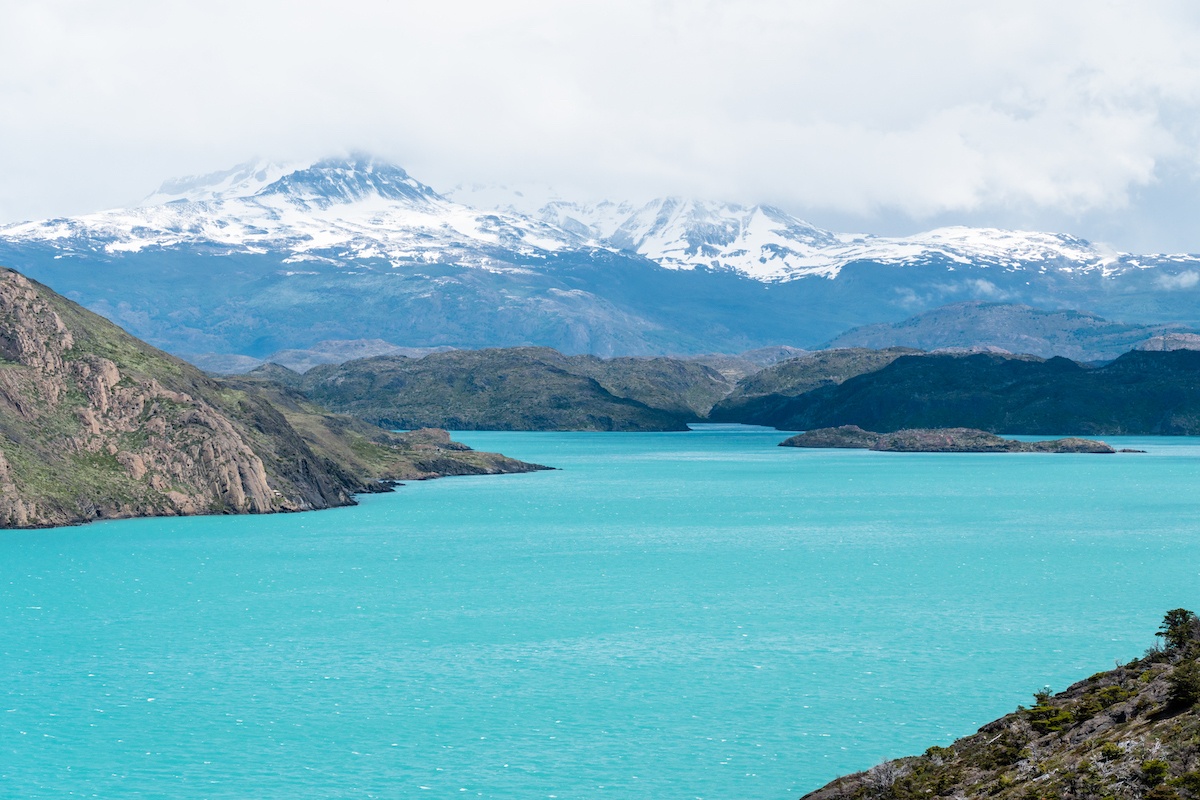
W Trek refugios
Refugios are a key part of the experience, and not all are created equally.
At the very least you can expect a communal eating area, shared bathrooms with (sometimes) warm sinks and showers, a canteen, bar and outdoor hangout area. Camping options are either elevated tents or tents on low platforms (both with sleeping pads), or sites for pitching your own tent.
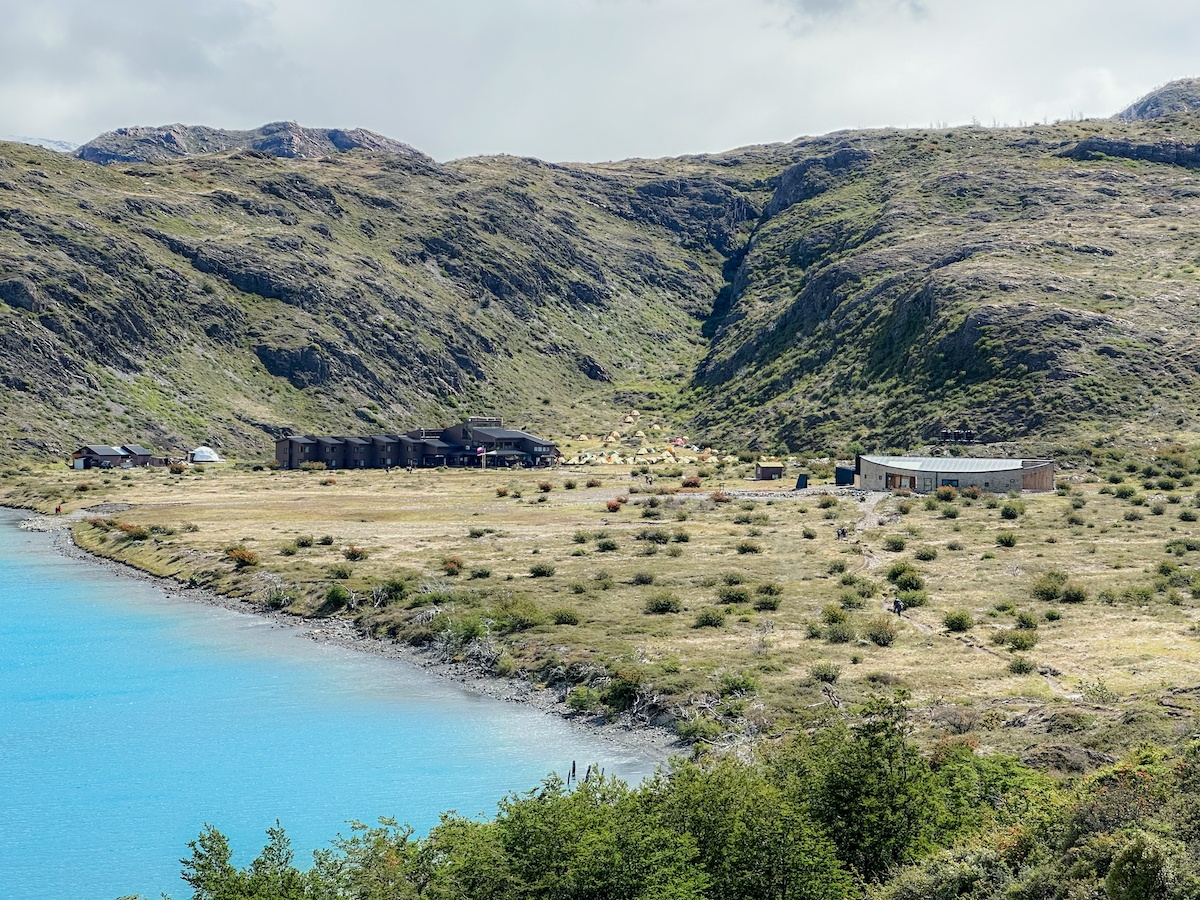
Some refugios also offer dorm-style rooms that sleep about six to eight people in bunk beds, private rooms for couples in the main lodge, and even unique accommodation options like domes and tiny houses.
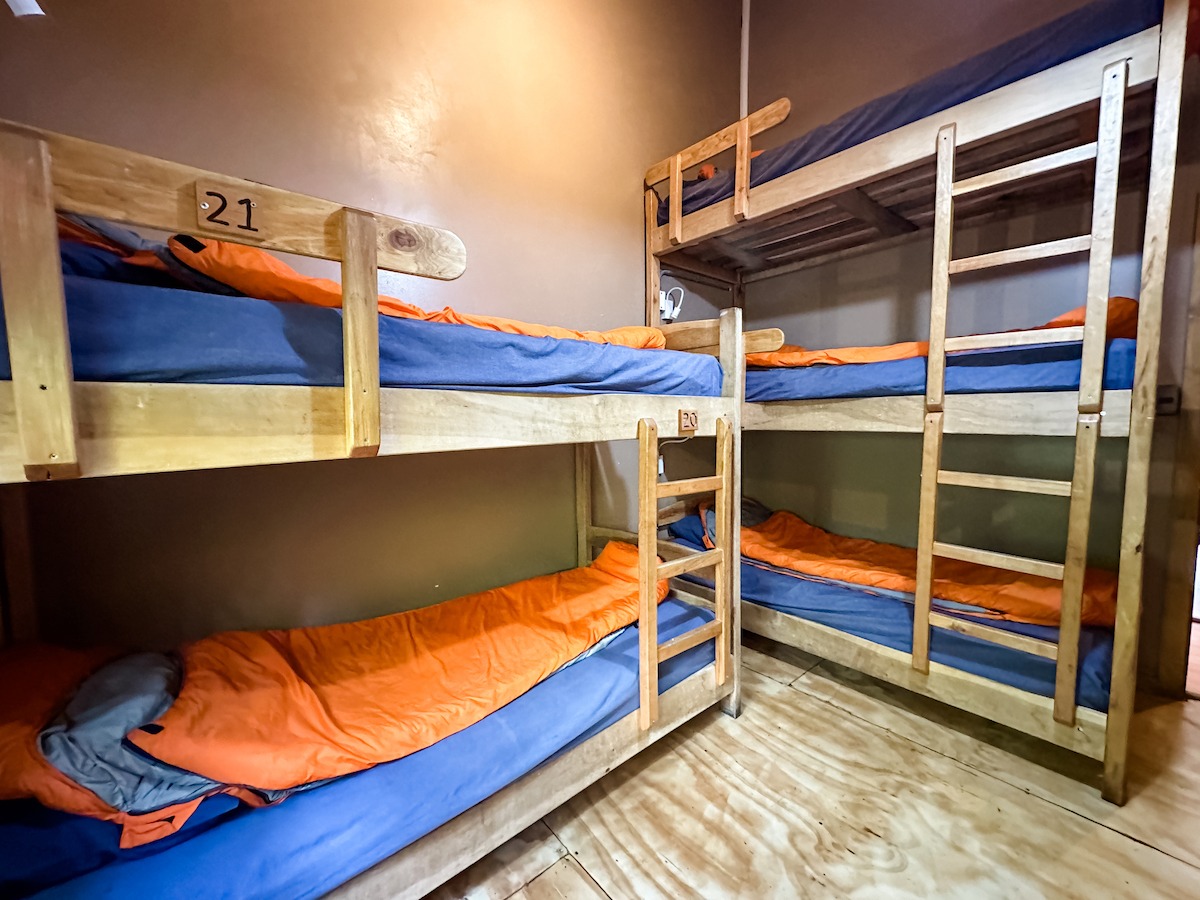
We didn’t get to stay at Refugio Los Cuernos, but absolutely loved the vibe of it from the short time we spent there on a lunch break. It has lovely views from the patio, a warm hangout space and some very cool accommodation options.
Paine Grande has a great feel with lots of communal spaces and a second-floor bar, and Centro has a cozy wood-stove fireplace and large dining area (though we didn’t love how far we had to trek to get to our tent–it felt like climbing another soggy mountain!).
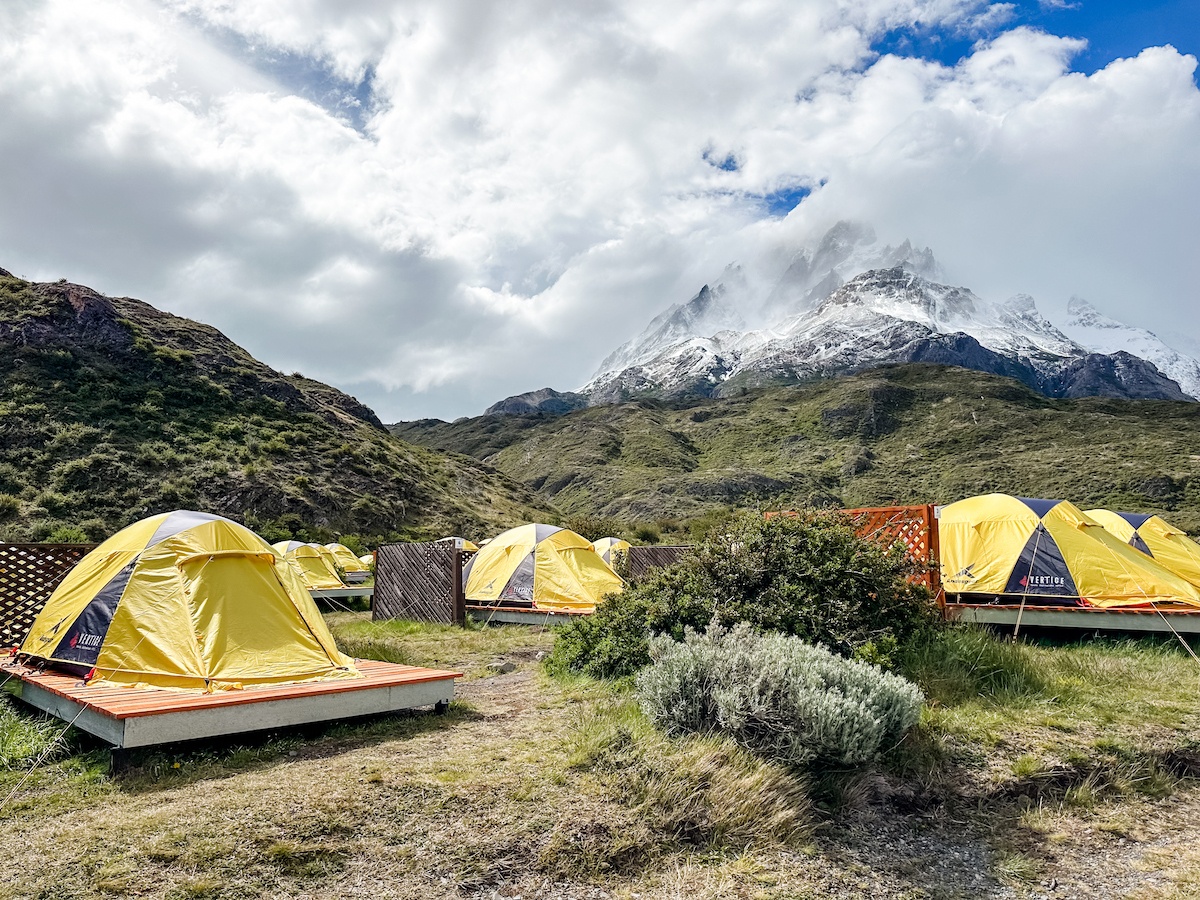
Frances was a total bust and we couldn’t wait to get out of there.
The layout is awful, with all the tents at the top of a hill and the restaurant at the very bottom and not well marked—not fun to deal with going up and down after a full day of hiking. To add insult to injury, dinner seatings start early and there’s no other warm place to sit or enjoy a drink, so you’re literally stuck out in the cold waiting to get in.
The bathrooms were filthy (to be fair, they aren’t very clean at most refugios ) and even though there were limited hours for hot water it still ran out before the time was up. My top tip would be to stay at Los Cuernos instead of Frances if possible.
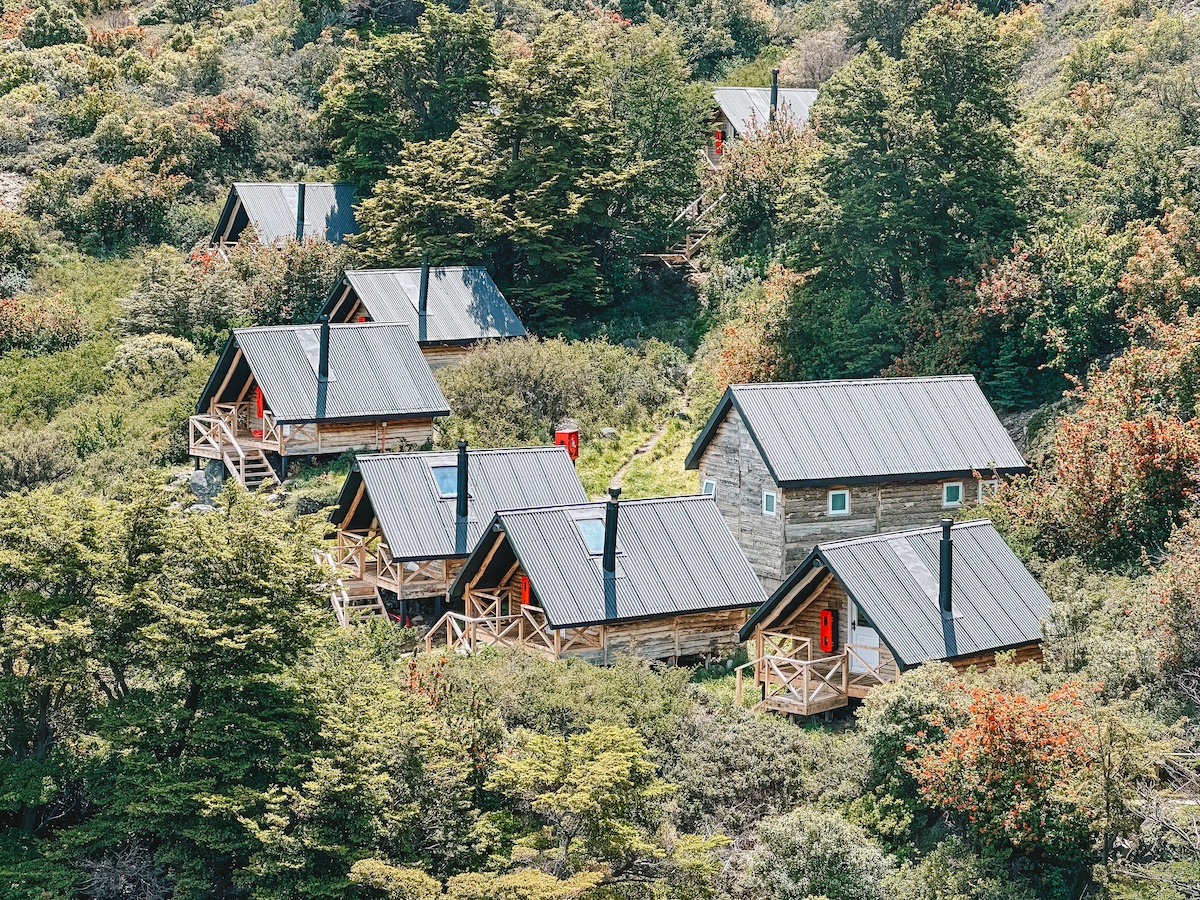
Prices differ by refugio , but expect to shell out about (per night, in USD):
- $13 for a campsite
- $40 for a tent
- $25 sleeping bag rental
- $12 mat rental
- $65 per bunk in bunk bed (comforter extra)
- $100+ for private accommodations like domes
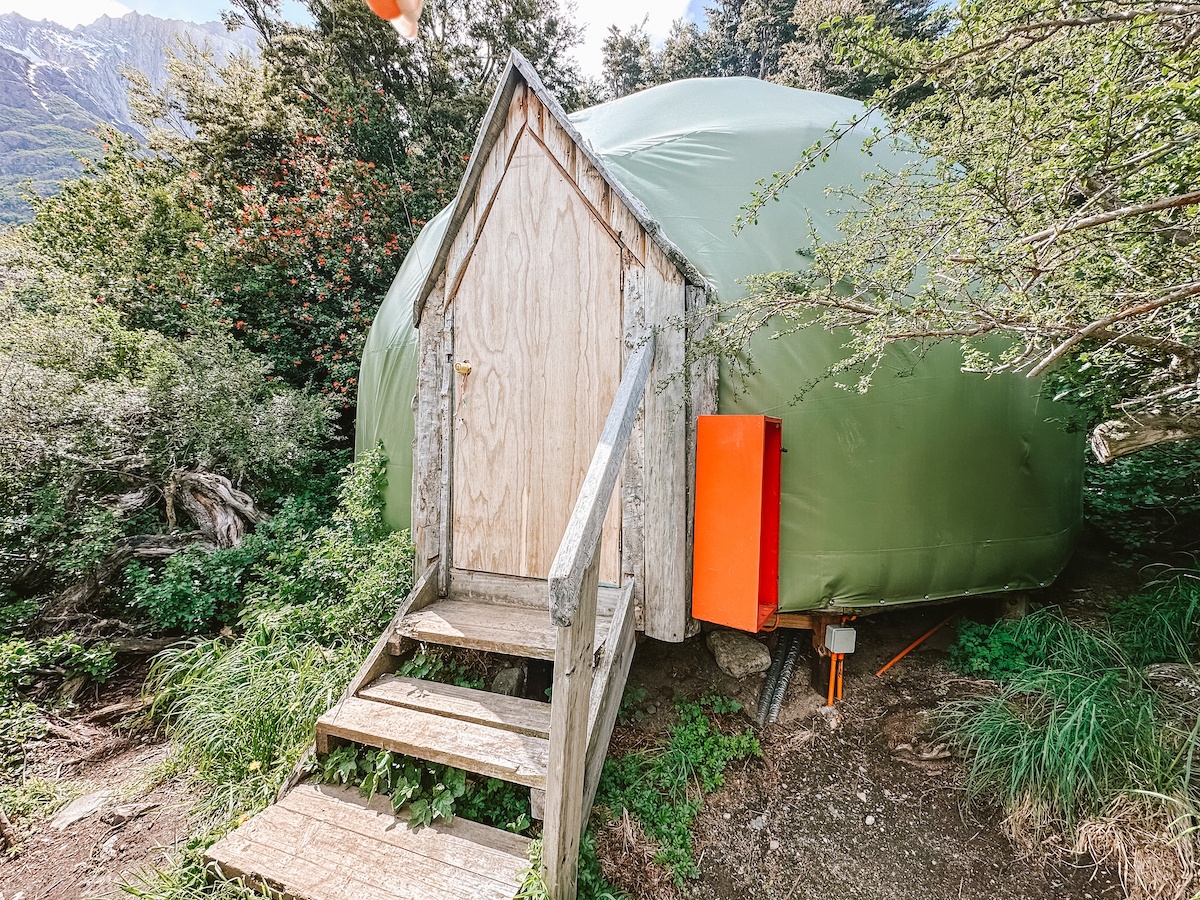
Hikers can bring their own food, or opt for a meal plan with breakfast (usually just bread and a small portion of scrambled eggs), boxed lunch and a hearty family-style dinner (timed seatings).
You’ll get a lot more out of the experience if you embrace being off-the-grid during the trek; however, those who need to connect can pay for minutes at the WiFi stations inside most refugios .
There are also outlets in the refugios for charging devices, but they can be in-demand so I recommend bringing a lightweight portable charger instead.
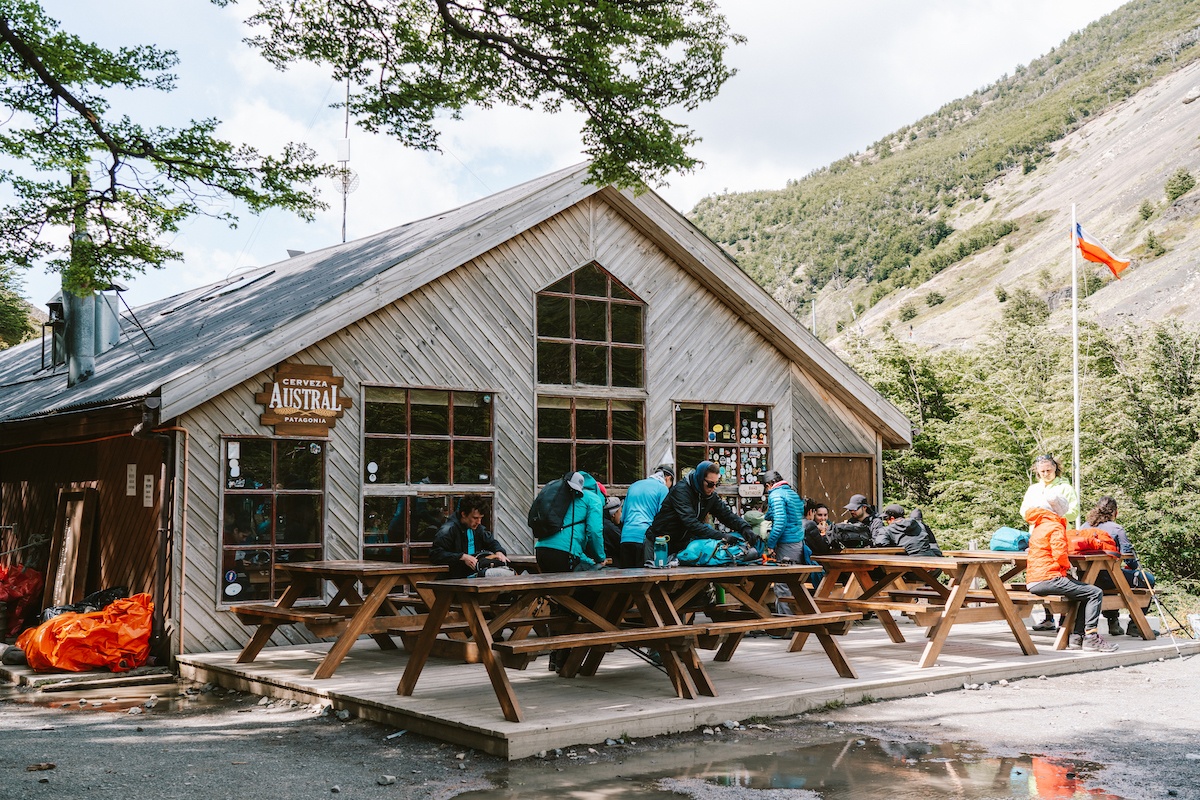
Life on the trail during the Torres del Paine W Trek
There’s a huge sense of camaraderie on the trails that feels like the good ol’ backpacking days. You’ll see the same people over and over, since there are only two potential routes and a handful of refugios.
You’ll spend anywhere from six to twelve hours walking per day (depending which part of the route you’re on), and likely only see a few dozen hikers until you get to a refugio.
The exception is the Mirador del Torres hike, which is absolutely packed with people. It sees about 1000 people per day since it’s the area’s most famous trail and can easily be done by day trippers from Puerto Natales.
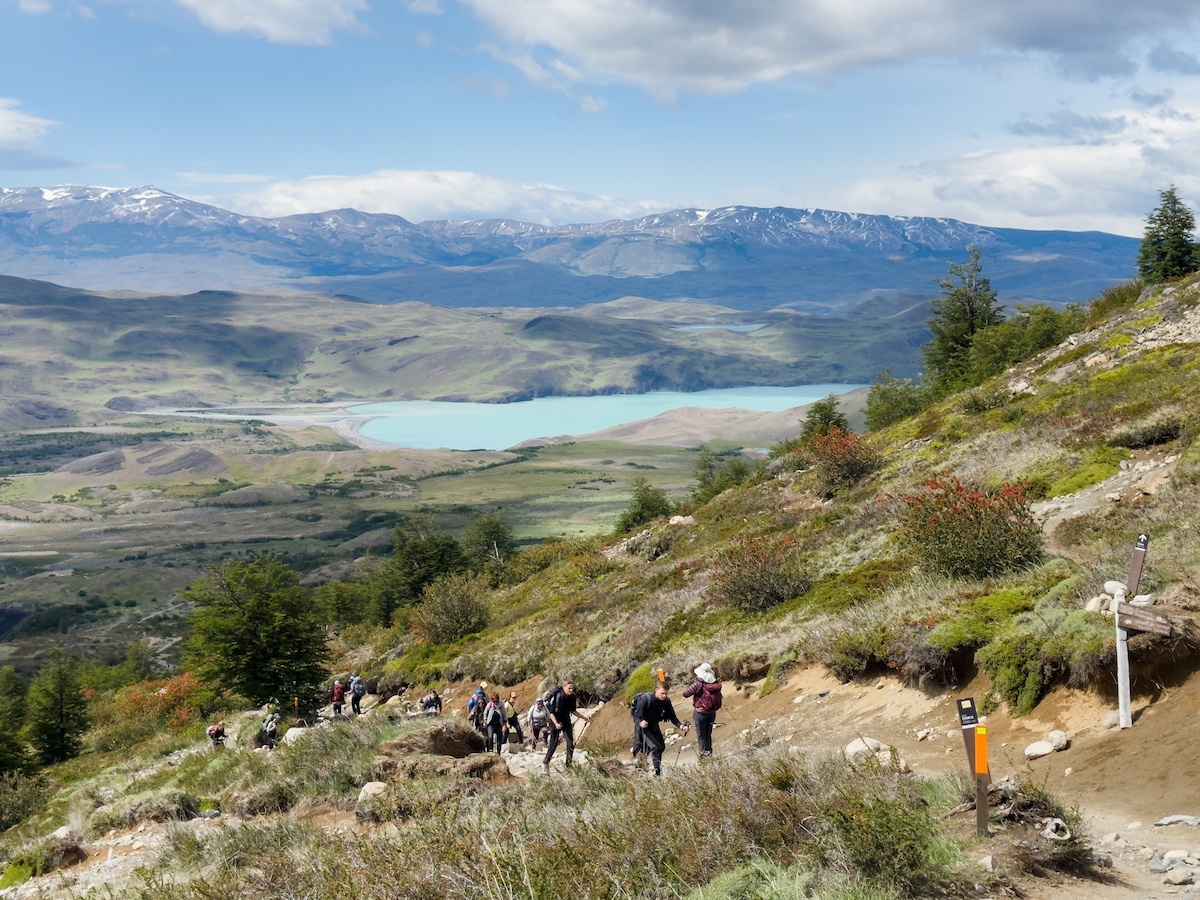
In terms of the age range, hikers seemed to be anywhere from in their early 20s to late 60s. My mom did it, and she’s turning 70 this year! I only saw one child the entire time, so the W Trek doesn’t seem to be popular with families.
It’s definitely a good idea to have hiking experience (and make sure you break in your shoes and test your outdoor gear ahead of time, obvs). That said, a couple people in our group aren’t regular hikers and managed alright, as it’s not a super technically challenging trail.
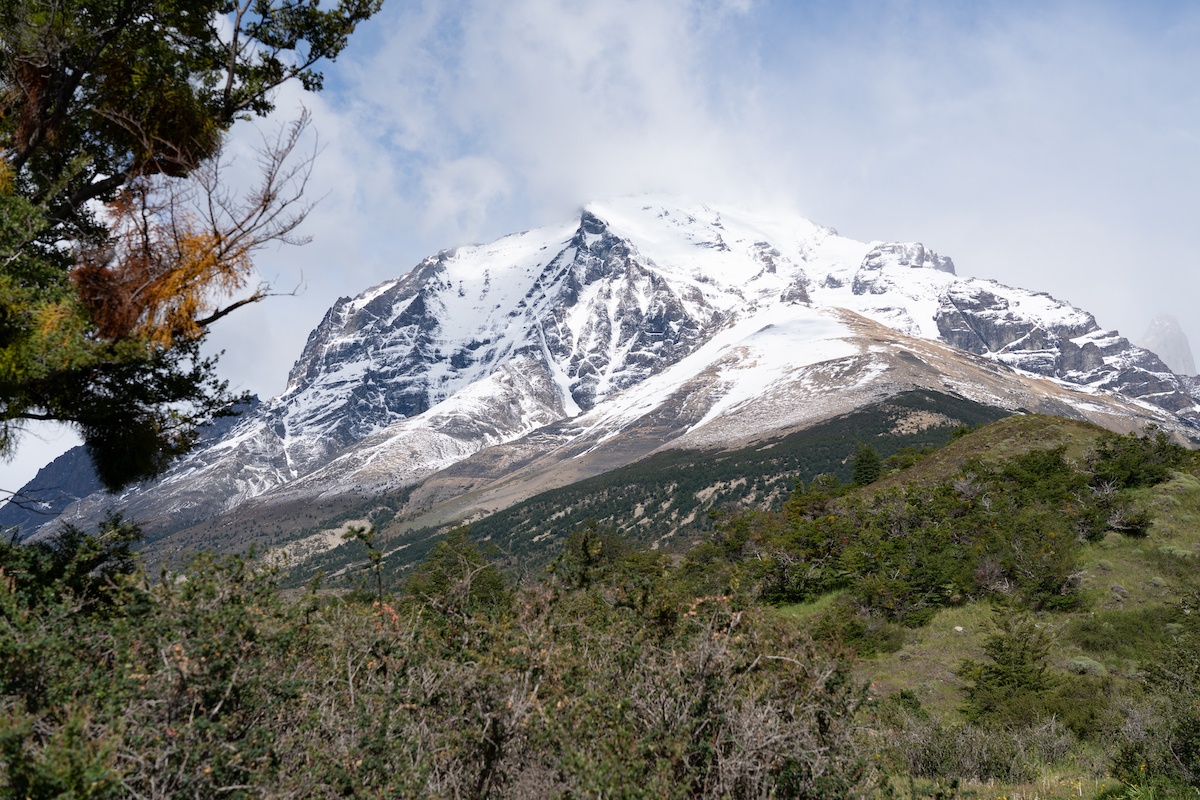
The main challenge for me was how long each day is, with very little time to rest before doing it all over again the next day. And let’s be honest, tents aren’t that comfortable. 10/10 would recommend upgrading to a bed if budget allows.
Completing the W Trek is definitely a mental and physical challenge–luckily, the feeling of accomplishment coupled with jaw-dropping scenery like soaring peaks shrouded in mist, calving glaciers and gem-toned lakes makes it all worth it.
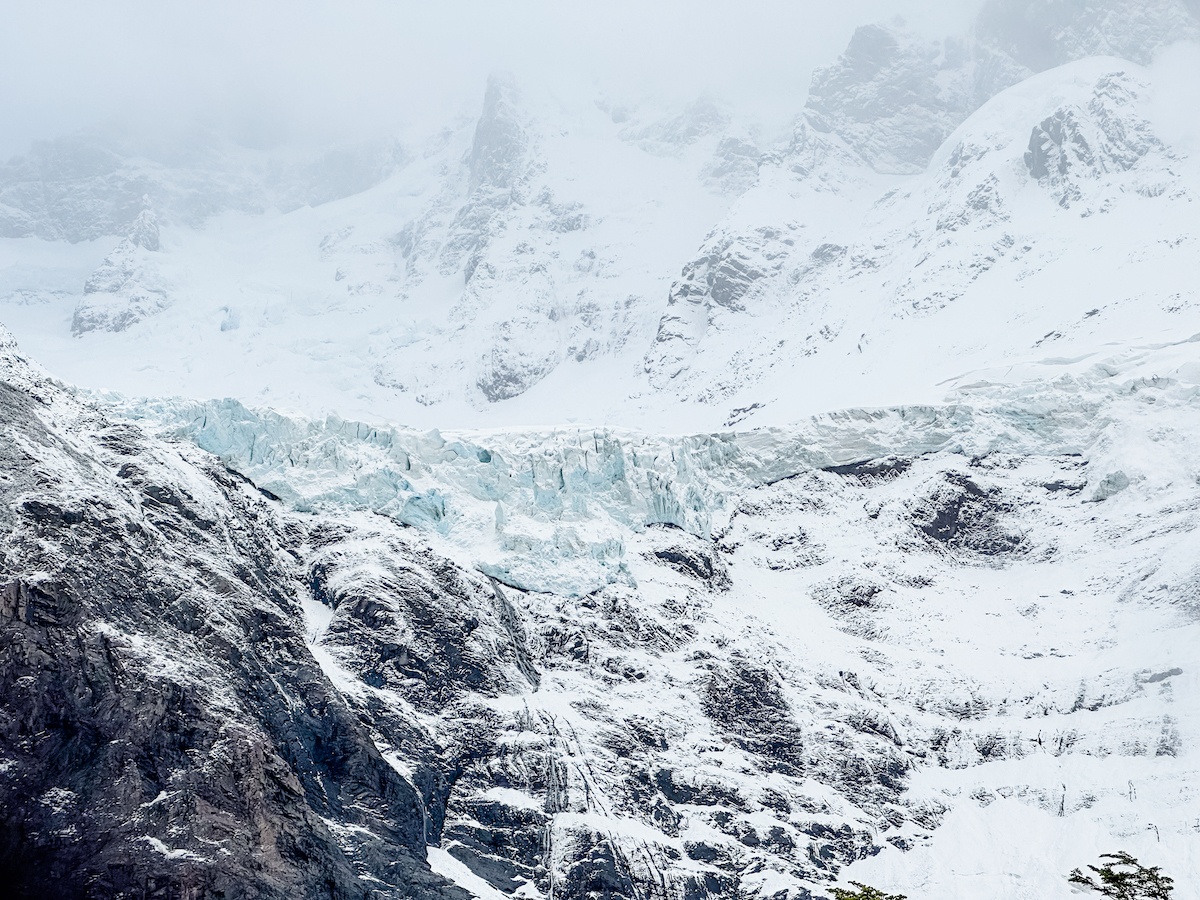
Patagonia packing list: The essentials
It’s not uncommon to experience all four seasons in a single hour in these parts, so preparation is key when planning your packing list for Patagonia.
Unless you hire a porter you’ll be carrying all of your belongings in a large trekking pack for at least two full days, and will also need to bring a lightweight sleeping bag, mat and travel pillow unless you rent them at each refugio.
READ MORE: Patagonia packing list for the Torres del Paine W Trek
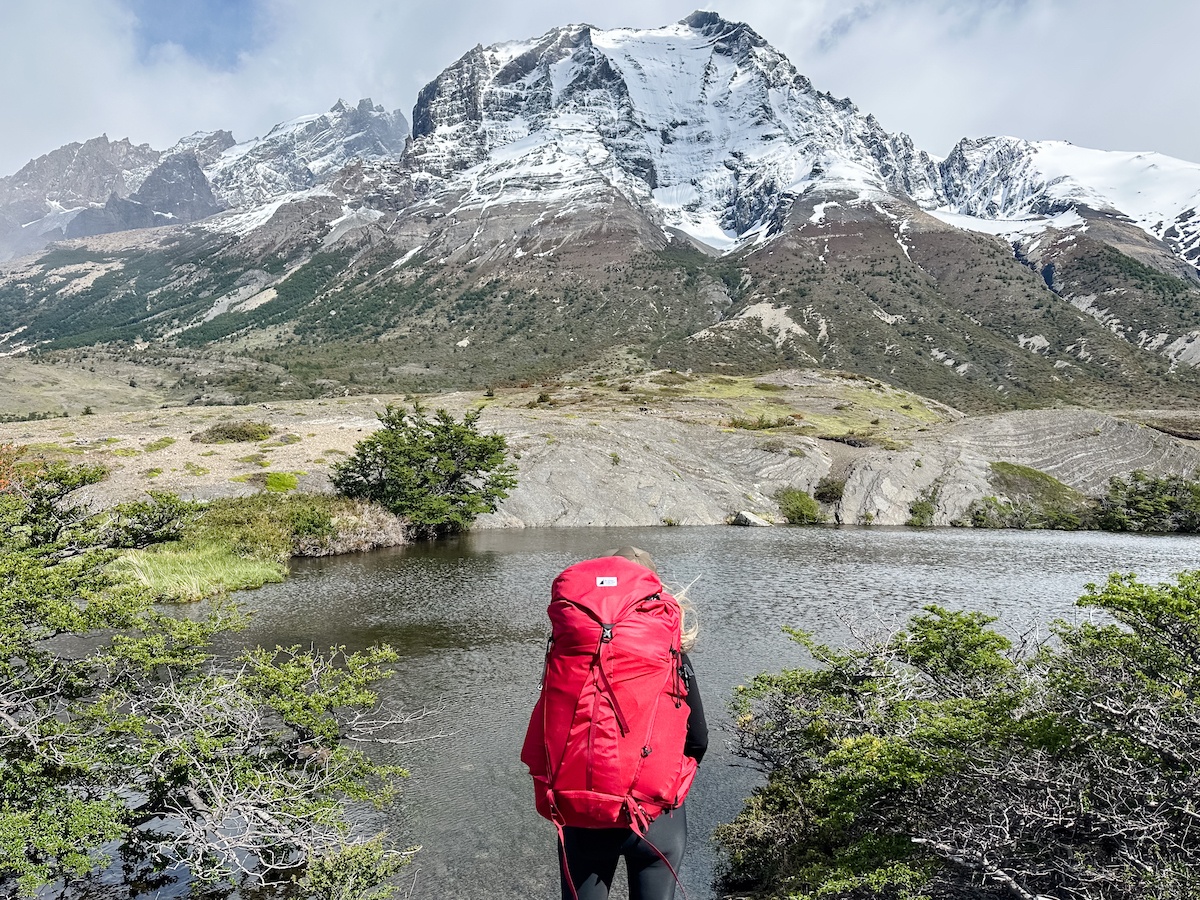
This W Trek packing list outlines every single item you’ll want to bring and a few you might not have thought of– you’ll definitely want a lightweight portable charger , collapsible hiking poles , a quick dry towel and Chilean pesos in case there’s a connectivity issue with using credit cards at the refugios .
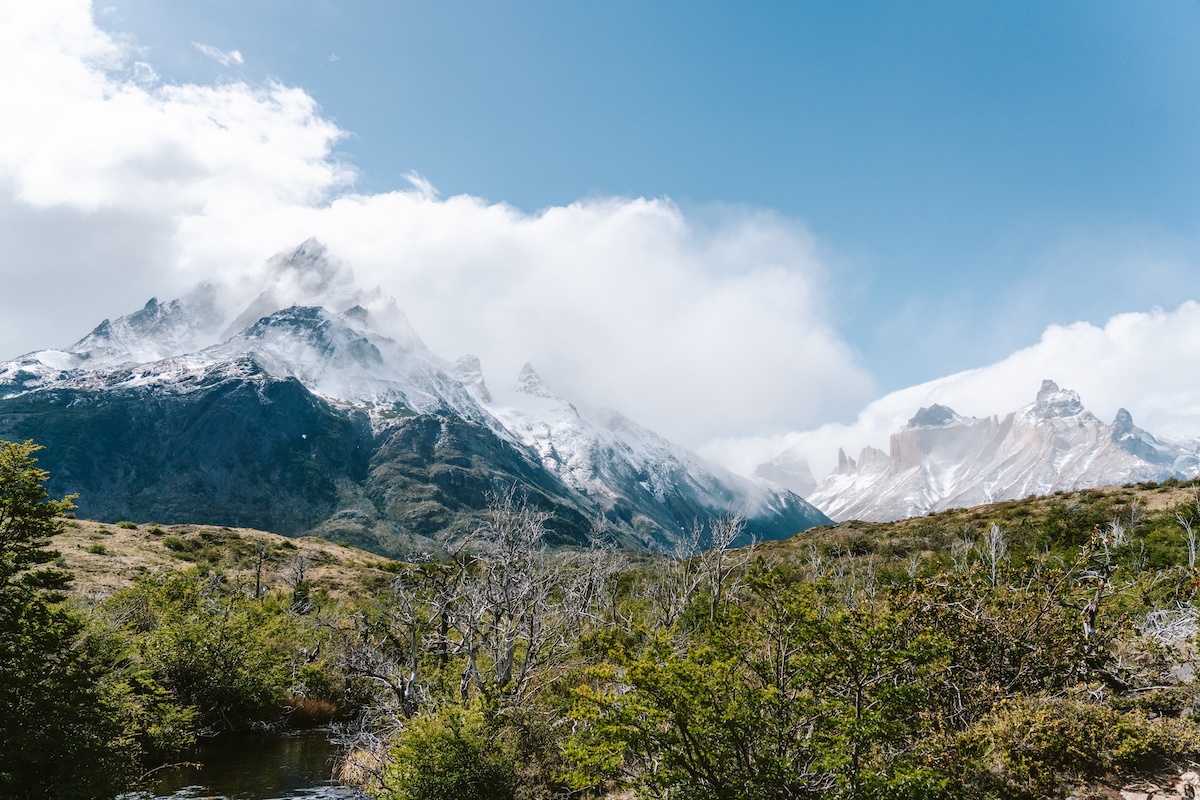
Insider tips for the W Circuit, Torres del Paine
- The Patagonia W Trek can be done all year round, but the best time is from November to March. Chile is in the southern hemisphere, so this is spring/summer when temperatures are warmer and there’s usually less rain and snow.
- If you’re planning to hike Torres del Paine without a guide, it’s critical to download a GPS map ahead of time. While the trail is generally well marked, one wrong step away from the path can get you lost in a hurry since the terrain is so untouched. Unfortunately this happened to me near Glacier Grey and resulted in a frantic 20 minutes of running up and down ravines and ridges, yelling ‘help!’ in hopes fellow hikers would hear me over the wind–luckily, a couple did. Man, was I ever thankful to see them (side note: stick with your hiking buddies!).
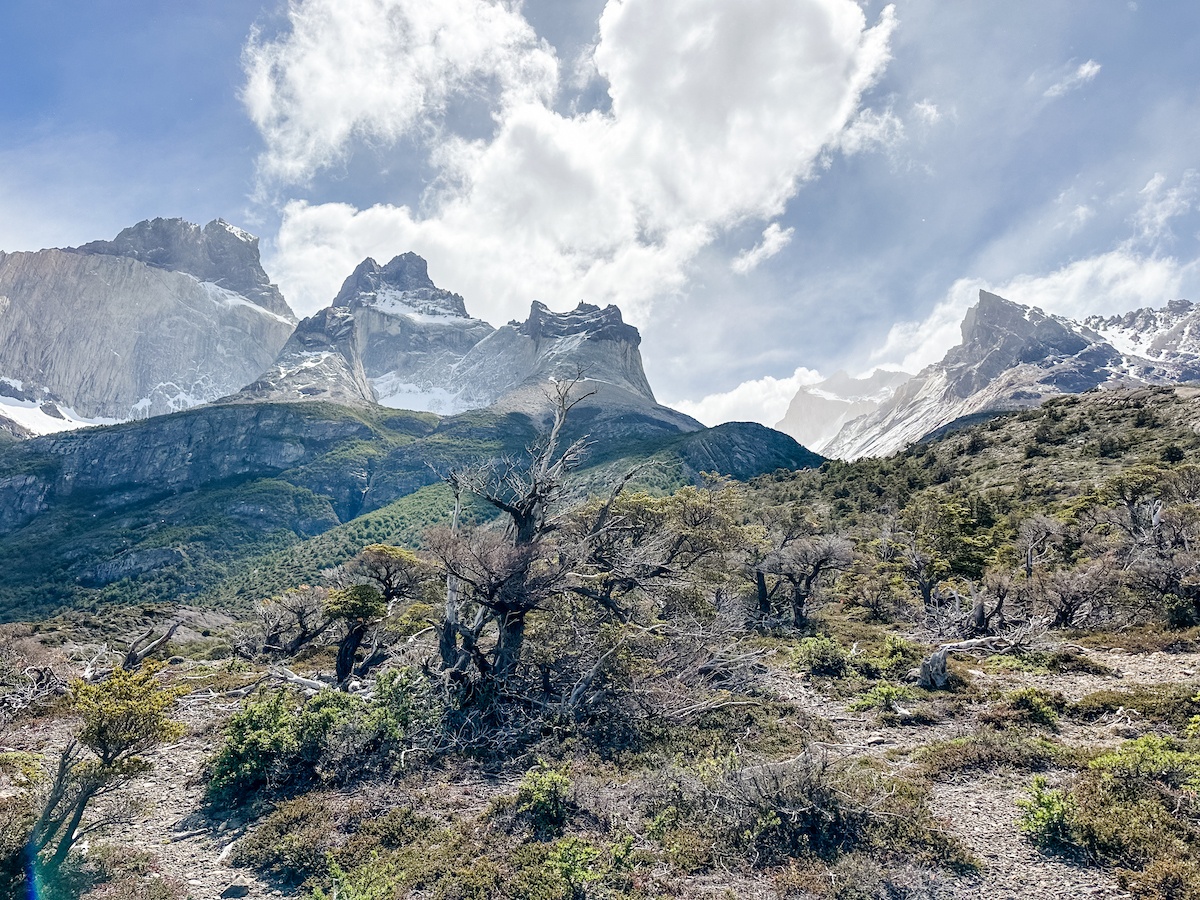
- While most people complete the W Circuit in four days straight, another option is to spend an extra day at Los Cuernos. Not only is it one of the nicest refugios with spectacular views, but that way you’ll be able to either spend the day resting up, or do the hike up to the French Valley and back to save several hours the day after by walking straight to Paine Grande.
- It’s not uncommon for refugios to ‘lose’ reservations, so bring a printed or screenshot confirmation of your booking with you on the Torres del Paine W Trek.
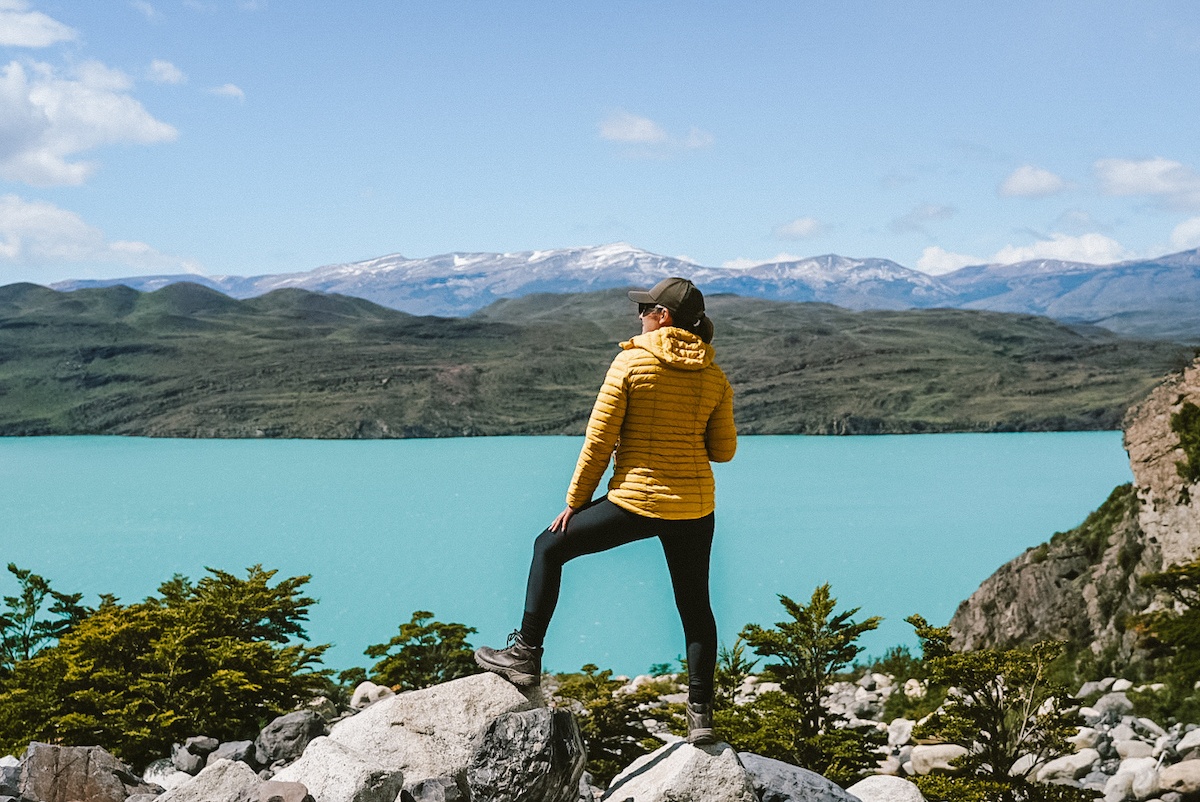
YOU MIGHT ALSO ENJOY:
- Patagonia itinerary: How to spend one week exploring southern Argentina
- 5 reasons to go backpacking in South America
- Epic hiking spots you need to add to your bucket list right now
SHARE THE PINSPIRATION! CLICK THE IMAGES BELOW TO PIN:
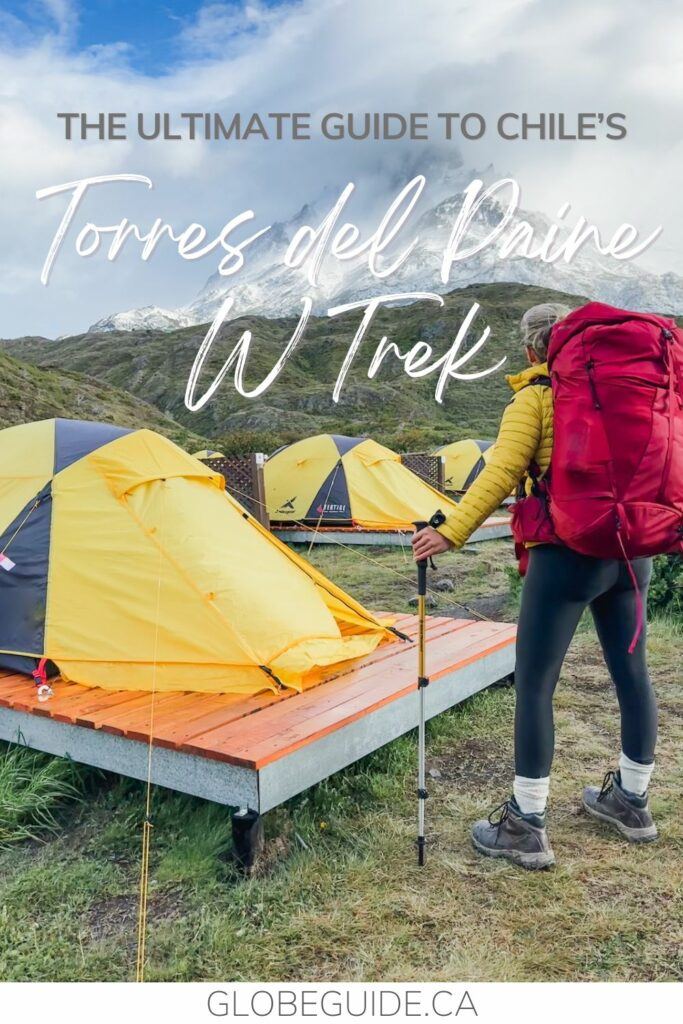
This post may contain affiliate links, which Globe Guide receives compensation for at no additional cost to you.
About The Author

Tamara Elliott
Leave a comment cancel reply.
Your email address will not be published. Required fields are marked *
Save my name, email, and website in this browser for the next time I comment.
The Ultimate Guide to Hiking the ‘W’ Trek in Torres del Paine Without A Tour
By Author Steph Dyson
Posted on Last updated: 12th December 2023
Hiking the W in Chilean Patagonia’s Torres del Paine National Park is one of the absolute highlights of a visit to Patagonia – I should know, I’ve done it twice!
Back in March 2016, I walked the Torres del Paine W trek as part of a tour around Patagonia and was so struck by the park that I returned in March 2017 to hike the Full O Circuit .
In September 2022, I returned on a third occasion, this time to explore the other attractions of Torres del Paine National Park beyond these two, multi-day hikes.
It’s fair to say that on all occasions I have fallen head over heels in love with this part of Chilean Patagonia.
The problem is, the first time I hiked the W trek in Patagonia, I did so as part of a guided tour. We were dropped off at the Pudeto ferry port on Lake Pehoé and from that point onwards barely even had to think for ourselves.
We hiked the W during the day led along the one path by our guides and arrived at night to pre-pitched tents and pre-paid food.
However, it didn’t take more than five minutes of being in the park to realize that a tour was utterly unnecessary and that trekking in Torres del Paine solo and self-guided is easy and will also save you a whole stash of money.
Click to navigate this article:

Know-before-you-go facts about the Torres del Paine W Trek
- How long is the W trek in Torres del Paine? It’s an 80-kilometer (50-mile) hike that most do over four or five days.
- When can you hike the W trek? The park is open year-round, however, for self-guided trekking, you can only hike between October and the end of April. If you want to hike during the winter months (May through September), you’ll need to arrange a guide. Our local partner, Chile Nativo, lead winter tours of the W trek and offer a 5% discount to Worldly Adventurer readers (use “Worldly Adventurer” in the referral discount box when you book!).
- Do you need to reserve camping spots/dormitory accommodation in advance of hiking the W? Yes, you must have reservations at each of the campgrounds or dormitories in which you plan to stay during the hike. You might be required to show your reservations when you enter the park, too.
- What about food? You can reserve full board at the campgrounds, which will include an evening meal, breakfast the day after your stay, and a packed lunch for you to take to the next campground. This typically needs to be booked in advance, although if you get to the campground early enough, you can sometimes do it on the day. Some campgrounds offer buffet dining (Grey and Paine Grande), so can be a good place to stock up on some snacks for the following day.
- Are reservations open for the campgrounds and dormitories along the W trek for the 2023/2024 season? Yes, reservations opened in July.
- How fit do you need to be to hike the W trek? While previous backpacking experience is not necessary, you do need a reasonable level of fitness to be able to climb up into the Frances Valley and up to the towers themselves. It’s helpful to have done a couple of practice walks, with a backpack weighing around 10 kilograms (22 pounds), in preparation for the trail.
- Do you need to book your park entrance ticket in advance? You must book online as they are no longer accept payments at the park entrance. Book your ticket online here . You need to download the QR code in Puerto Natales while you have internet (there is no signal in the park) and may need to show a copy of your passport to prove you do not live in Chile.
- How much does it cost to enter Torres del Paine National Park? The cost of entering the park varies according to how long you plan on staying. For up to three days in the national park, it costs $31,200 CLP ($34 USD) for adults and $16,000 CLP ($17 USD) for children aged 12 to 17. For over three days in the park, the cost is $44,500 CLP ($48 USD) for both adults and children.
- What is the altitude of Torres del Paine National Park? The highest point in the park is the John Gardner Pass at an altitude of 1,200 meters (3,900 feet) above sea level. However, only those trekking the O Circuit are required to reach this height; all of the W trek is at altitudes below this.
Firstly though, what actually is the W? The W is a four- or five-day hike in Chilean Patagonia’s Torres del Paine National Park. It’s named the W because it follows a W-shaped route and can be hiked either from west to east (my preferred route) or from east to west.
Along the way, you stay overnight in official campgrounds, which also have indoor dormitories, covered cooking areas for campers, and restaurants where you can eat pre-ordered meals.
Is the W worth it, though? It’s one of Patagonia’s easiest multi-day hikes and, while hiking for five days might not be at the top of everyone’s to-do list, the scenery in Torres del Paine National Park makes up for the hard work! Every day has spellbinding views: whether of Grey Glacier on day one, the French Valley on day two or three, or the eponymous towers on the final day of the hike.
You’ll finish tired but truly fulfilled by the experience – and proud of yourself for having completed it! Bear in mind that the W trek is a moderately challenging hike. If you’re able to walk up to 18 kilometers (11 miles) per day (and feel like you would be able to do that over multiple days), then you will find this hike perfectly doable.
That said, the hike up to the towers on the final day of the W (or the first, if you’re hiking east to west), is classed as a difficult hike due to the elevation gain of 900 meters (2,956 ft).
Bear in mind that you will be trekking with a backpack; the contents will depend on whether you’re carrying your tent and meals or planning on renting camping equipment and paying for meals at the campgrounds en route. Before hiking up the French Valley and up to the towers, you can also leave your backpacks at the rangers’ station or campsite, which means you won’t have to carry them up much elevation.
I highly recommend that, before heading to Patagonia, you go on a couple of hikes of around 18 kilometers (11 miles) with a backpack that will mimic the weight you’ll be carrying in the park – this will also help you to break in any hiking boots you might have bought for the trek and find out if they give you blisters!
How much does it cost to hike the W?
I’ve hiked the W twice: once as part of a tour and another time independently as part of hiking the O Circuit (which is a nine- or ten-day hike circumnavigating the national park and whose final five days are the W).
On my second visit to the national park, it became clear that I really didn’t need to hike the trails using a tour company. Not only is it expensive (it costs from $1,500 USD per person), but it’s unnecessary; all of the trails are clearly marked and busy with people and it’s easy enough to make camping reservations yourself.

Hiking the W independently costs $157,000 CLP per person ($173 USD – check here for the most up-to-date conversion), plus the cost of food .
Camping and Transport cost breakdown*
- Return bus from Puerto Natales to Torres del Paine National Park: $13.323 CLP ($15 USD)
- Adult entrance fee into the park: $44,000 CLP ($49 USD)
- One-way ferry from Pudeto de Paine Grande Ranger Station: $30,000 CLP ($40 USD)
- Grey Campsite: $11,000 CLP (per person) ($12 USD)
- Paine Grande Campsite: $11,000 CLP (per person) ($12 USD)
- Francés Campsite: $31,000 CLP (per person) ($35 USD)**
- El Chileno Campsite: $31,000 CLP (per person) ($35 USD)***
* these figures are all updated for the 2023/2024 season.
**based on two people sharing a tent
***Torres Ranger Station (the free camping closest to the towers) is closed for the foreseeable future.
Food breakdown
- When we hiked the Full Circuit, we paid $68,620 CLP ($95 USD) between four people for all of our food. That’s $17,155 CLP ($20,5 USD) per person. No kidding.
- So for your food budget, expect to spend no more than $10,000 CLP ($12 USD) (read this full outline of exactly what we took with us in terms of food when we walked the Circuit)
If you want to save time, the website Torres Hike can show you the availability of accommodation and allows you to book it directly through them , rather than having to go via the Vertice Patagonia and Las Torres (previously known as Fantastico Sur) websites. All you need to do is plug in your dates and it’ll show you which campgrounds and refugios are available – saving you LOTS of time. You can then book directly with them, rather than having to try and book through the other websites!
How do you make campsite and refugio bookings for Torres del Paine?
The system for making refugio and camping reservations has changed dramatically over the past couple of years and a lot of the information you find online about the subject is out of date.
I also put together this epic, 5,000-word post about securing camping reservations in Torres del Paine that literally walks you through the process. However, I highly recommend just using Torres Hike . Yes, they charge you a small fee, but it honestly saves you so much time.
The reason it’s so challenging to make reservations independently is because there are two different companies who offer campgrounds and dorms in the park and you will have to reserve some campgrounds with one on their website and some with another on their website; trust me, it’s a painful process. Save yourself the stress and hassle of doing this by using Torres Hike instead.
Reservations are now open for the 2023/2024 season. If you’re struggling to find spots for the coming season, you should also read my article about alternative ways to hike the W if you can’t get camping reservations .
You can also check out this ultimate guide to Torres del Paine National Park , covering everything from the best time to visit, to where to stay and what to do beyond the W trek.
If you’re completely baffled by the process and just want someone else to deal with it, you can book with my partner in the region, Chile Nativo , who organise, guided, self-guided and fast-track (three-day) W treks. They give a 5% discount to Worldly Adventurer readers (use “Worldly Adventurer” in the referral discount box when you book!).
What equipment do you need to hike the W without a tour?
To pay as little as possible trekking Torres del Paine solo, it does require that you have the following pieces of equipment:
- A tent: I strongly recommend the lightweight Big Agnes Copper Spur HV UL2 tent ( REI | Backcountry | Amazon ), the North Face Stormbreak 2 (buy it on REI | Amazon ), or, for more room, the North Face Stormbreak 3 (buy it on ( REI ).
- A sleeping bag: I recommend the Nemo Disco 15 for women (buy it on REI ) and for men (buy it on REI ).
- A sleeping pad: Get a cheap foam pad ( REI | Backcountry | Amazon ) or a more comfortable Therm-a-rest Prolite (buy it on REI | Backcountry | Amazon ).
- A headlamp : Useful for midnight toilet visits and the hike up to the towers (buy one on REI | Black Diamond | Backcountry ).
- A cooking stove and gas: The affordable MSR PocketRocket 2 (buy it on REI | Backcountry | Amazon ) is great value for those on more of a budget, and is super lightweight.
- Cooking pots: I recommend the MSR pots set (buy them on Backcountry | Amazon ) as they’re good quality and food will stick less, which will make them easier to clean.
- Plates, a mug, and cutlery : A collapsible bowl is a great space saver (check out Sea to Summit on REI | Backcountry | Amazon ); I recommend a reasonably cheap, plastic mug (buy it on REI | Backcountry | Amazon ) and for cutlery, a multipurpose spork is a good choice (check them out on REI | Backcountry | Amazon ).

I’ve detailed exactly the items that I packed for the O Circuit in Torres del Paine (and which are still relevant to the W trek) and also what I pack in my rucksack on a trip to Patagonia in this packing checklist . Both have a free packing checklist download, too.
I recommend you take a look if you’re thinking of investing in camping equipment before you head over to Patagonia (something I would strongly advise if you plan on doing any other hikes or wild camping or if you’re looking at exploring the Carretera Austral ).
Planning Your Trip to Patagonia?
Save time, stress & money with a customized travel itinerary planned for you by a Patagonia expert
What previous clients have said:
Steph’s help laying out an itinerary for Chile was huge toward us having a great trip. She listened to our interests and compiled a framework that we could follow to make our plans. She included many practical tips as well as numerous options. She truly saved us many, many hours of research.
If you’re already traveling around Patagonia, what can you do to get your hands on this camping equipment for Torres del Paine?
You have three options:
Buy equipment in Punta Arenas or Puerto Natales
There is a wide range of hiking and camping equipment shops in these two towns. Punta Arenas is a tax-free zone so prices here are cheaper than you will find in Puerto Natales, although Calle Manuel Bulnes in the latter has some gear shops.
I actually found a pair of waterproof trousers for only $15,000 CLP ($18 USD) in one of the shops there, which is a lot cheaper than I thought they would be.
If you’re looking to buy equipment for camping and hiking in Torres del Paine National Park, you should be able to find everything that you need in these shops, but you will pay an elevated price for good-quality gear.
Estimated additional cost: $360,000 CLP+ ($400 USD+) per person
Rent equipment from Puerto Natales
Your second option is to rent all of your camping and cooking equipment from Puerto Natales. Yaghan House (O’Higgins 584; contact them here to reserve; they also have a 12pm daily talk about the park) and Lili Patagonico’s (Arturo Prat 479; you can book online here ) have cheap, good-quality rental gear. Rental Natales (you can book online) has more stock but is very expensive.
Remember to check the equipment thoroughly before committing as it does get a lot of wear and tear on the trail and you want something without holes and with zips that close to keep you warm and dry!
Estimated additional cost: $147,000 CLP ($162 USD) per person (based on two sharing) for five days’ rental
Rent equipment at each campsite in Torres del Paine National Park
Your final option is by far the most expensive. Each of the main camping grounds in Torres del Paine rents out tents, sleeping bags, and sleeping mats – but at a very high cost.
For example, in Grey campground, you can hire a two-man tent for $29,000 CLP ($32 USD), a sleeping bag for $21,000 CLP ($23 USD), and a sleeping mat for $8,000 CLP ($9 USD), bringing up your overnight cost (including the cost of the camping site) to $53,000 CLP ($58 USD) per person per night (based on two sharing).
Bear in mind, this doesn’t include the cost of hiring cooking equipment (which you can’t do at the campsites), so you will also need to pay for meals at each – an additional cost of between $55,000 CLP ($61 USD) and $80,000 CLP ($88 USD).
Estimated additional cost: $232,000 CLP ($256 USD) per person for equipment and $256,000 CLP ($282 USD) per person for full board for five days hiking the W circuit (based on two sharing).
How do you get from Torres del Paine National Park to Puerto Natales ?
It’s easy enough to get to Torres del Paine National Park with public transport.
Four companies travel from Puerto Natales to Torres del Paine each morning and all cost around $22,000 CLP ($25 USD) for a return ticket (which can be used on any of the company’s buses back from the park).
You can buy tickets online for Bus Sur (who have lots of departures); other companies do run this route, however you need to buy tickets from their offices, which are inside the Terminal Rodoviario (Av. España 1455) in Puerto Natales.
If there are a few of you, consider negotiating a group price like we did, which got us a few thousand pesos off per ticket.
It’s advisable to book your bus ticket at least a week in advance when visiting the park in high season (December through February).
Timetables for buses from Puerto Natales to Torres del Paine (east to south: Laguna Amarga, Pudeto and Administración)*
Conventionally, buses have departed from Puerto Natales and entered the park via the northeastern entrance at Laguna Amarga (for the minibus to the eastern starting point for the W), before continuing to Pudeto (for the catamaran to the western starting point for the W) and finally to Administración (not a destination along the W trek).
These now continue along to Hotel Lago Grey and stop at Camping Pehoé en route, too.
These bus timetables are below and can be booked online in advance via Bus Sur’s website:
Pre-pandemic, the following companies also offered services. However, their websites are no longer active and I can’t find them on any local booking sites.
That doesn’t mean they don’t have buses, however; if you can’t get a reservation with Bus Sur then it’s still worth going to the bus terminal in Puerto Natales as some will likely still be in operation and with similar departure times:
- Transport Maria José (tel. 61/2410 951)
- Buses Gómez (tel. 61/2415700)
- JB Buses Patagonia (tel. 61/2410 242)
- Buses Juan Ojeda (tel. 9/8943 7808)
*Service available November through April
Timetables for buses from Torres del Paine to Puerto Natales (Administración, Pudeto, Laguna Amarga)*
The following timetables are when buses can return you to Puerto Natales from the four different stops in the park. They can also be booked online and in advance via Bus Sur’s website.
Note that you have to return with the same bus company you entered the park with – you won’t be allowed on a different company’s buses. You don’t have to book a particular bus time; you will be able to turn up and get onto whichever bus you choose.
As above, there should be other companies offering buses to and from Puerto Natales into the park; visit the Terminal Rodovario in Puerto Natales to find out if you can’t make a reservation with Bus Sur.
Where do you buy your Torres del Paine entrance ticket?
The cost of entering the park varies according to how long you plan on staying. For up to three days in the park, it costs $31,200 CLP ($34 USD) for adults and $16,000 CLP ($17 USD) for children aged 12 to 17. For over three days in the park, the cost is $44,500 CLP ($48 USD) for both adults and children.
It’s no longer possible to buy your ticket at the Laguna Amarga entrance to the national park (the first stop on the bus if entering via that entrance) or at the Administración entrance (if entering via that entrance).

You must buy it in advance online here . You must download the QR code to your phone before you enter the park (as you won’t have signal when you get there!) and bring your passport to show that you’re not a Chilean resident.
Torres del Paine W trek itineraries
Hiking in Torres del Paine National Park is significantly cheaper if you go self-guided.
There is also absolutely no chance that you’ll get lost. Believe me, the W trek is now so busy that (unfortunately) you see people all the time.
If you want to trek Torres del Paine solo, you can either hike from west to east (my preference, as I’ll go into below) or east to west.
When you enter the park and pay your fee, you will be provided with a Torres del Paine W trek map to be used when you’re walking.
Unfortunately, the map that you get from CONAF doesn’t include distances. I would strongly recommend you download Maps.me, a free app that has all the trails marked and you can use it to work out distances if required.
Itinerary one: W trek in five days with sunrise at Mirador Las Torres (west to east route)
Why hike this route:
- This trail builds up to the most exciting part of the trek, the Mirador Las Torres viewpoint on the final day.
- It also starts with a short first day, giving you time to get into your stride.
Want to know how to book the campsites mentioned in this itinerary? Head over to this comprehensive article about booking Torres del Paine camping or hostel accommodation .

Day One: Puerto Natales to Grey
- Distance: 11 kilometers (6.8 miles)
- Duration: 3-4 hours hiking
6:50am Take a bus from Puerto Natales to the Pudeto (the catamaran ferry stop). You will stop at the park entrance when you first get into Torres del Paine to show your entrance ticket.
You must have bought this in advance online here and downloaded the QR code to your phone (there isn’t internet cell service at Laguna Amarga!).
9:50am Arrive at Pudeto. Queue up for the catamaran ferry across the lake.
10:30am Take the ferry across to Paine Grande*. This service is operated by Hielos Patagonicos ($25,000 ($30 USD) single, cash only). Tickets cannot be reserved in advance; you buy them at the ferry port.
Ferry schedules do sometimes change; you can check up-to-date ones here .
11:40am Arrive at Paine Grande and trek to Grey. The trail starts to go uphill but soon levels off and has great views of Lago Grey to keep your spirits up!
16:00pm The hike from Paine Grande takes between three and four hours so expect to arrive late afternoon at Grey to pitch your tent, meet some other hikers, and cook dinner.
Day Two: Grey to Paine Grande
- Distance: 18 kilometers (11 miles)
- Duration: 6-7 hours hiking
8:00am Wake up and have breakfast.
9:00am Leave your stuff at the campsite and return a few hours later to pack everything up. From the campsite, an additional one kilometre north through the forest brings you go two viewpoints lying over a kilometre from the glacier’s snout. From here, look out for enormous chunks of ice in the water.
Continue a further 2.5 kilometres (around a one-hour hike) along the path along the edge of the glacier to reach a series of two rope bridges hanging over ravines.
From here you get the best views of the glacier and, if you’re lucky and it’s a clear day, the Southern Patagonian Ice Field beyond.
Return to Grey along the same path and back to Paine Grande.
16:00pm You’ll arrive at Paine Grande at around 4pm, which is where you’ll spend the night. The facilities are great here, with a covered dining area for campers.

Day Three: Paine Grande to Francés
- Distance: 11.5 kilometers (6.8 miles) plus 9 kilometers (5.6 miles) for the extension to Mirador Británico)
- Duration: 4 hours hiking (7.5 hours with extension to Mirador Británico)
8:00am Get up, have breakfast and pack up your tent.
9:00am Today begins with a flattish trek around Lake Nordernskjold to Guardería Italiano. You can leave your bags here with the ranger before hiking up into the Francés Valley.
Note that there’s a new trail that begins about one km (15 mins) after you leave Paine Grande. It’s a little longer – 9 km (5.6 miles) rather than 7 km (4.3 miles) – and so takes around 30 minutes longer, but it has fewer hikers on it and is really pretty.
11:00am The hike up the Francés Valley may be long or painfully short – all depending on the weather. Both times I’ve walked Torres del Paine W hike I’ve experienced dreadful weather in the Francés Valley.
This part of the hike marks the central section of the W and it’s all uphill. After an hour’s steep gradient up a rocky, slippery trail to Mirador Francés, look for Glaciar Francés as it clings to the mountainside in the west.
If you’re feeling energetic, and the weather’s playing fair, you can continue climbing to Mirador Británico (an additional 3.5 km (2 miles) each way; around three hours’ return), where you’ll view a ring of toothy granite peaks, including the park’s second most famous landmark, the three-horned Cuernos del Paine.
It’s one of the park’s most stunning viewpoints—when the sky is clear. You may even see an endangered Southern Andean huemul (a type of deer) around here.
Luckily, the hike back is downhill to return to Campamento Italiano, where you pick up your rucksack and hike the 30 minutes to reach Francés.
13:00pm-16:00pm Arrive at Francés*, pitch up and enjoy the views across the lake.
*If there is no availability at Francés when you go to make your refugio or campsite reservations , you can instead book to stay at Los Cuernos, which is a further 3.5 kilometers (one hour) from Francés.
Day Four: Francés to El Chileno*
- Distance: 17 kilometers (10.5 miles)
- Duration: 4-5 hours hiking
9:00am Leave the campsite and begin the trek to El Chileno, situated about two hours from the bottom of the towers.
This trek meanders alongside the lake, gaining and losing altitude as it goes, until you reach the start of the valley where it becomes all uphill. The views are incredible but if it’s sunny, it will be hot!
16:00pm Arrive at El Chileno* and pitch your tent. Get everything organised for the morning as you’ll be leaving early. Check with the staff what time sunrise will be the next morning.
*For the 2023-2024 season, and for the foreseeable future, Torres Ranger Station is not open to the public. It’s no longer as easy to get to the towers for dawn as the distance is now around four kilometres, rather than one kilometre; however, it is still possible to do it.
If you can’t get a pitch at Chileno, it is possible to hike from Torres Central/Norte ($25 USD camping pitch per person). Although you’re not officially supposed to hike from here up to the towers, you can: leave four hours ahead of sunrise. It’s an additional one-hour 45 minutes if starting from Torres Central/Norte to reach the towers.

Day Five: El Chileno* to Laguna Amarga and Puerto Natales
- Distance: 13 kilometers (8 miles) plus 8 kilometers (5 miles) for the hike from the Centro de Bienvenida to Laguna Amarga)
- Duration: 6 hours hiking (add an extra 1.5-2 hours for the hike to Laguna Amarga)
4:30am Wake up and take a small bag (including warm clothes and a snack) to see the torres at dawn. Don’t forget your torch as the route is over rocks and can be treacherous.
4:45am Start hiking up to the torres . For us at the very start of March, dawn was at about 7:15am.
8:00am Leave the torres and return to the campsite. Pack up, have breakfast start the long walk down.
12.30pm When you get to Las Torres Hotel car park, there is a shop selling ice creams. To get the shuttle minibus to take you to Laguna Amarga, you need to hike one kilometre down the road towards Torres Central/Norte to reach the Centro de Bienvenida /Welcome Centre.
Shuttles ($4,000 CLP ($6 USD) – you must pay in cash at the shuttle) leave throughout the day to take you to Laguna Amarga. Departures leave the Welcome Centre at 8am, 2pm, 4pm and 7pm daily , and take about 30 mins.
If you can face the walk, it’s about another one and a half hours to the Laguna Amarga Ranger Station where buses are waiting to pick you up.
Hiking there, you can get good views of the towers as they rise out of the Cordillera Paine if the weather is clear.
14:30pm Take the bus from Laguna Amarga back to Puerto Natales.
17:00pm Arrive in Puerto Natales bus station and go and enjoy a pint at Cerveza Baguales on the Plaza de Armas to celebrate!
If time allows, consider spending a night in Puerto Natales to explore all the town has to offer before your onward journey. Our guide to the best hotels in Puerto Natales caters for all budgets, styles and preferences.
*If you can’t get a pitch at Chileno, it is possible to hike from Torres Central/Norte ($21 USD camping pitch per person). Although you’re not officially supposed to hike from here up to the towers, you can: leave four hours ahead of sunrise. It’s an additional one-hour 45 minutes if starting from Torres Central/Norte to reach the towers.
Make sure you bring a headtorch for climbing in the dark (it will get lighter as you reach the more difficult stretch of hiking just below the towers), plus warm clothing (even including a sleeping bag) to use at the top and keep you cozy as you enjoy the sunrise.
Itinerary two: Torres del Paine W trek in four days with sunrise at Mirador Las Torres (west to east route)
Why hike this route?
- It’s a good option if you don’t have much time

Day Zero – Puerto Natales to Paine Grande
- Distance: nil
- Duration: nil
2.30pm Catch the Bus Sur bus from Puerto Natales.
You will stop at the park entrance at Laguna Amarga when you first get into Torres del Paine to pay your entrance fee.
You must have paid for your ticket in advance online here AND downloaded the QR code; you will not find cell service or WIFI at the entrance.

5.15pm Arrive at Pudeto take the ferry across to Paine Grande at 6pm. This service is operated by Hielos Patagonicos ($25,000 ($30 USD) single, cash only).
Tickets cannot be reserved in advance; you buy them at the ferry port. Ferry schedules and prices do sometimes change; you can check up-to-date ones here and the 9am ferry only runs November through the end of March.
6.30pm Pitch up at Paine Grande, have some dinner and then have an early night in preparation for a long day’s hiking tomorrow.
Day One – Paine Grande to Paine Grande
- Distance: 22 kilometers (14 miles) plus 7 kilometers (4.3 miles) if you hike to the last viewpoint)
- Duration: 7-9 hours hiking
7:00am Get up, have breakfast, and pack up your tent.
08:00am Take the trail towards Grey; it starts uphill but soon levels off and has great views of Lago Grey to keep your spirits up!
If you’re fit, you can hike an additional one kilometre north through the forest brings you go two viewpoints lying over a kilometre from the glacier’s snout. From here, look out for enormous chunks of ice in the water.
Turn back and return the way you came, past Grey and then back to Paine Grande.
17:00pm Arrive late afternoon back at Paine Grande to meet some other hikers and cook dinner.
Day Two – Paine Grande to Frances
9:00am Hike to the ranger station, Guardaria Italiano (around two hours), where you leave your rucksack with the ranger. You’ll pick it up on your way back down from the Francés Valley.
The hike up the Francés Valley may be long or painfully short – all depending on the weather. Both times I’ve walked Torres del Paine W hike I’ve experienced dreadful weather in the Francés Valley.
If you’re feeling energetic, and the weather’s playing fair, you can continue climbing to Mirador Británico (an additional 3.5 km each way; around three hours’ return), where you’ll view a ring of toothy granite peaks, including the park’s second most famous landmark, the three-horned Cuernos del Paine.
Luckily, the hike back is downhill to return to Italiano, where you pick up your rucksack and hike the 30 minutes to reach Francés.
*If there is no availability at Francés when you go to make your refugio or campsite reservations , you can instead book to stay at Los Cuernos, which is a further 3.5 kilometres (one hour) from Francés.

Day Three: Francés to El Chileno*
9:00am Leave the campsite and begin the trek to El Chileno, situated about two hours from the bottom of the towers. This trek meanders alongside the lake, gaining and losing altitude as it goes, until you reach the start of the valley where it becomes all uphill.
The views are incredible but if it’s sunny, it will be hot!
*For the 2023-2024 season and for the foreseeable future, Campamento Torres, the campground just below the towers, is not open to the public. It’s no longer as easy to get to the towers for dawn as the distance is now around four kilometres, rather than one kilometre; however, it is still possible to do it.
Day Four: El Chileno* to Laguna Amarga and Puerto Natales
Shuttles ($4,000 CLP ($6 USD) – you must pay with cash in the shuttle) leave throughout the day to take you to Laguna Amarga. Departures are at 8am, 2pm, 4pm, 7pm and takes about 30 minutes.

*If you can’t get a pitch at El Chileno, it is possible to hike from Torres Central/Norte ($25 USD camping pitch per person). Although you’re not officially supposed to hike from here up to the towers, you can: leave four hours ahead of sunrise.
Make sure you bring a headtorch for climbing in the dark (it will get lighter as you reach the more difficult stretch of hiking just below the towers), plus warm clothing (even including a sleeping bag) to use at the top and keep you cosy as you enjoy the sunrise.
Itinerary three: Torres del Paine W hike in five days (east to west route)
Why hike this route:
- Not only do you get to complete the W, it gives you time for a bonus extra hike to the Los Cuernos or Salto Grande viewpoints.
Want to know how to book the campsites mentioned in this itinerary? Head over to this comprehensive article about booking Torres del Paine camping or hostel accommodation .

Day One: Puerto Natales to Mirador Las Torres & Torres Central/Norte
- Distance: 18.4 kilometers (11.4 miles)
- Duration: 6-7 hours hiking
6:45am Take a bus from Puerto Natales to Laguna Amarga. You can book tickets online with Bus Sur or go to the bus station in Puerto Natales the day before you start hiking and book with them or one of the other companies there.
8:45am Arrive at Laguna Amarga. Show your entrance ticket at the ranger’s station.
9:00am To get to the start of the W, you need to take a shuttle bus ($4,000 CLP ($6 USD) – you must pay in cash at the shuttle) to the Centro de Bienvenida (Welcome Centre).
Departures theoretically leave from Laguna Amarga at 9am, 3pm, 5pm and 8pm daily , and take about 30 mins. However, Las Torres (who run the shuttle service) have assured me that the shuttle bus awaits the arrival of the bus from Puerto Natales and will take all passengers that are waiting to board – sending for a second shuttle if there are more passengers than seats.
9.30am You’ll be staying overnight at the Torres Central/Norte campground, so check in and leave your big bags and take warm layers, food, and plenty of water for the hike up to the towers.
Start hiking up to the torres . It’s all uphill and it can be quite steep at points, but it’s worth the effort! All in all, you gain around 800m (2,620 feet).

Take your time, drink plenty of water, and relax when you get to the top.
13:30pm Arrive at Mirador Las Torres and enjoy the views.
15.00pm Start hiking back to the campsite; you’re trekking back the way you came.
17.00pm Pitch your tent, have dinner, and relax!
Day Two: Torres Central/Norte to Francés
- Distance: 14.5 kilometers (9 miles)
- Duration: 5.5 hours hiking
9:00am Get up, have breakfast and pack up your tent.
10:00am You leave Torres Central heading west and reach Lago Nordernskjold. The trail meanders alongside the lake, gaining and losing altitude as it goes. The views are incredible but if it’s sunny, it will be hot!
15:30pm Reach Francés campground, where you’ll stay tonight. Pitch up and enjoy views across the lake. Bear in mind that check-in at Francés doesn’t start until 2.30pm and hot showers aren’t available until 5pm, so take your time on the hike.
Day Three: Francés to Mirador Británico & Paine Grande
- Distance: 14 kilometers (8.6 miles) from Francés to Mirador Británico and 7 kilometers (4.3 miles) from Guardería Italiano to Paine Grande
- Duration: 5.5 hours hiking from Francés to Mirador Británico and 2.5 hours from Guardería Italiano to Paine Grande
9:00am If the weather is good, today is going to be a long day as you climb up into the Francés Valley. Both times I’ve walked Torres del Paine W hike I’ve experienced dreadful weather in the Francés Valley.
From Francés, head west along the path beside the lake to reach Guardería Italiano, a rangers’ station and former (now defunct) campground. Here, you can drop your big rucksacks; just take warm clothing and food for the hike up to the Mirador Británico* (British Viewpoint). This part of the hike marks the central section of the W and it’s all uphill. After an hour’s steep gradient up a rocky, slippery trail to Mirador Francés, look for Glaciar Francés as it clings to the mountainside in the west.

Luckily, the hike back is downhill to return to Guardería Italiano. Pick up your bags and take the new trail that begins just after the rangers’ station; take the lefthand fork that follows closer along the lake. It’s a little longer – 9 kilometers (5.6 miles) rather than 7 kilometers (4.3 miles) – and so takes around 30 minutes longer, but it has fewer hikers on it and is really pretty.
18:30pm Arrive at Paine Grande, pitch your tent and enjoy a hot shower!
*You’re only allowed to start hiking up to the viewpoint until midday, so don’t delay getting to the rangers’ station – although this rule isn’t always enforced!
Day Four: Paine Grande to Grey & Puerto Natales
- Distance: 11 kilometers (6.8 miles) plus six kilometers (3.7 miles) to reach rope bridges
- Duration: 4 hours hiking plus 1.5 hours to reach rope bridges
10:00am Take the trail heading north to Grey. It starts by going uphill but soon levels off and has great views of Lago Grey to keep your spirits up! It takes between three and four hours.
14:00pm Arrive at Grey, where you can leave your big bags. From the campsite, an additional one kilometre north through the forest brings you to two viewpoints lying over a kilometre from the glacier’s snout. From here, look out for enormous chunks of ice in the water.

From here you get the best views of the glacier and, if you’re lucky and it’s a clear day, the Southern Patagonian Ice Field beyond. Return back to Grey.
16:00pm Arrive at Grey, pitch up and relax – you’ve almost finished the hike!
Day Five: Grey to Paine Grande and Puerto Natales
- Distance: 11 kilometers (6.8 miles) plus 2.3 kilometers (1.4 miles) to the Cuernos Viewpoint
- Duration: 4 hours hiking
7:00am Get up, pack up your tent, and have breakfast. Return to Paine Grande along the same path.
10:30am Join the queue for the ferry to Pudeto.
11:00am Take the ferry to Pudeto. This service is operated by Hielos Patagonicos ($25,000 ($30 USD) single, cash only). Tickets cannot be reserved in advance; you buy them at the ferry port.
11:30am Arrive at Pudeto. From here, you can either have lunch in the tiny cafeteria at the ferry dock or you can hike from Pudeto to the Cuernos Viewpoint, a 2.3-kilometer (1.4-mile) one-way hike from the ferry dock; it should take you around an hour each way and grants you incredible views west and east along the Paine Massif range.
A shorter option is the 600-meter (0.3-mile) trail to the Salto Grande Waterfall, which has stunning views of Los Cuernos behind it.,
2:30pm Take the bus from Pudeto back to Puerto Natales. You should arrive around 5.05pm.
Itinerary four: W trek in five days with sunrise at Mirador Las Torres (east to west route)
- You get to see the sunrise at Mirador Las Torres and hiking to it on your first day means your legs won’t be as tired.

Day Zero: Puerto Natales to El Chileno
- Distance: 5 kilometers (3miles)
- Duration: 2 hours hiking
12:00pm Take a bus from Puerto Natales to Laguna Amarga.
2.00pm Arrive at Laguna Amarga. Show your entrance ticket at the ranger’s station.
2.30pm To get to the start of the W, you need to take the shuttle bus ($4,000 CLP ($6 USD) – you must pay in cash at the shuttle) to the Centro de Bienvenida (Welcome Centre).

3pm Start hiking up to El Chileno, the closest campground to Mirador Las Torres, the famed viewpoint of the towers. This is the smallest campground, so sells out fast.
If you can’t get a spot here, you’ll need to camp at Torres Norte/Central and hike four hours tomorrow to reach the viewpoint.
5pm Arrive at El Chileno. Set up your tent, have dinner and relax.
Day One: El Chileno to Mirador Las Torres and then Los Cuernos
- Distance: 19.4 kilometers (12 miles)
- Duration: 6.5 hours hiking
4:30am Wake up and take a small bag (including warm clothes, a sleeping bag, and a snack) to see the torres at dawn. Don’t forget your torch as the route is over rocks and can be treacherous.
8:00am Leave the mirador and return to the campsite. Pack up, have breakfast start the walk down. When the trail splits, you’ll need to take the righthand path that goes alongside Lago Nordenskjöld.

This trek meanders alongside the lake, gaining and losing altitude as it goes. The views are incredible but if it’s sunny, it will be hot!
3:00pm Arrive at Los Cuernos*, pitch up and relax.
*If there is no availability at Los Cuernos, when you go to make your refugio or campsite reservations , you can instead book to stay at Francés, which is a further 3.5 kilometers (one hour) beyond Los Cuernos.
Day Two: Los Cuernos to Paine Grande
- Distance: 17.5 kilometers (10.8 miles) from Los Cuernos to Mirador Británico and 7 kilometers (4.3 miles) from Guardería Italiano to Paine Grande
- Duration: 6.5 hours hiking from Francés to Mirador Británico and 2.5 hours from Guardería Italiano to Paine Grande
7:00am Get up, have breakfast and pack up your tent.
8:00am Today begins with the path alongside Lake Nordernskjold to Guardería Italiano. You can leave your bags here with the ranger before hiking up into the Francés Valley to Mirador Británico*.
10:30am The hike up the Francés Valley may be long or painfully short – all depending on the weather. Both times I’ve walked Torres del Paine W hike I’ve experienced dreadful weather in the Francés Valley.

Luckily, the hike back is downhill to return to Campamento Italiano. From there, pick up your rucksack and hike the two remaining hours to reach Paine Grande.
Note that there’s a new trail that begins just after Campamento Italiano; take the lefthand fork that follows closer along the lake. It’s a little longer – 9 km (5.6 miles) rather than 7 km (4.3 miles) – and so takes around 30 minutes longer, but it has fewer hikers on it and is really pretty.
17:00pm-18:00pm Arrive at Paine Grande, pitch up and enjoy the views across the lake.
Day Three: Paine Grande to Grey and back to Paine Grande
9:00am Hike from Paine Grande to Grey; you can leave everything in your tent, except the items you need for today. The trail starts to go uphill but soon levels off and has great views of Lago Grey to keep your spirits up!
13:00pm Arrive at Grey. From the campsite, an additional one kilometre north through the forest brings you to two viewpoints lying over a kilometre from the glacier’s snout. From here, look out for enormous chunks of ice in the water.
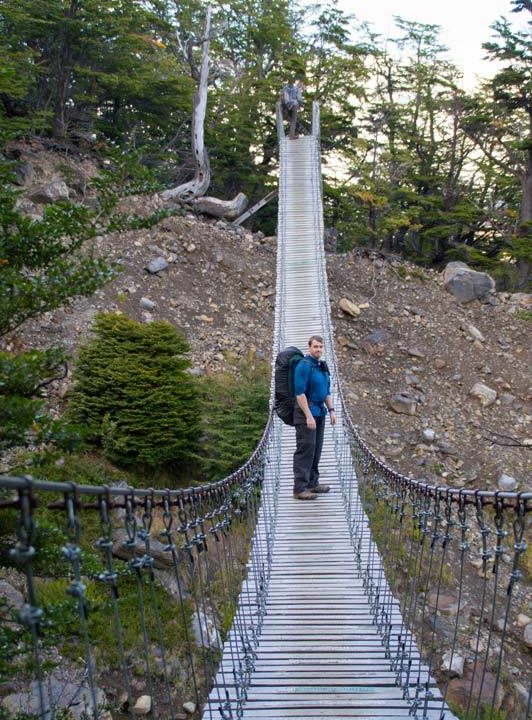
15:00pm Return to Grey along the same path and back to Paine Grande.
19:00pm Arrive at the campground, relax, have dinner and enjoy the feeling of finishing the trek!
Day Four: Paine Grande to Puerto Natales
- Distance: N/A
- Duration: N/A
9.00am Join the queue for the ferry to Pudeto.
9:30am Take the ferry to Pudeto. This service is operated by Hielos Patagonicos ($25,000 ($30 USD) single, cash only). Tickets cannot be reserved in advance; you buy them at the ferry port.
10:00am Arrive at Pudeto.
10.30am Take the bus from Pudeto to Puerto Natales and celebrate your successful completion of the W!
Top tips for hiking the Torres del Paine W Trek self-guided

Having now been hiking in Torres del Paine National Park twice, I’ve learned a few important tips that have kept me happy, sane and comfortable en route :
Top equipment tips
- Camping in Torres del Paine at Francés, Los Cuernos, and El Chileno is on wooden platforms. If you plan to stay at any of these campsites, you will need extra cord or string to help you attach your tent without using pegs.
- Bring a range of warm and wet weather clothing. Check out my packing list for hiking the Circuit in Torres del Paine for the full guide to the clothing that I packed for the trip (and which is also a good guide to what to pack for the W). It also includes a free, downloadable checklist.
- Bring a book or some cards for the evenings as you tend to finish hiking quite early and if it’s cold and wet, you’ll want to retire to the shelters with something to do.
- Having a lightweight tent really does make a difference camping on this trek. Have a look at my review of the Big Agnes HVUL2 , the really lightweight backpacking tent that we used for the O Circuit.
- If you’re carrying all of your own equipment, a 60-litre rucksack should be big enough.
- Pack all of your clothes into dry bags (better than a bin bag which can easily rip). The weather changes rapidly and on days when it’s pissing it down, you’ll welcome the fact that your sleeping bag and clothes are dry. I recommend the Sea to Summit dry bags (buy them on REI | Amazon ).
- Bring a rucksack cover. I’ve heard mixed advice on this one, but a rucksack cover kept our bags dry (and so lighter) when we were hiking in Torres del Paine National Park and no, they didn’t blow away in the wind. If your rucksack doesn’t come with its own, you can find them in various sizes on | Osprey | Amazon (make sure it’s the correct size for your bag – otherwise it will blow away!).
Top food tips
- There is a much wider (and cheaper) selection of food in the supermarkets in Punta Arenas than in the one Unimarc supermarket in Puerto Natales. I recommend doing your food shop there before you take the bus to Puerto Natales. We left the stuff we didn’t need in our hostel in Punta Arenas.
- You can also buy trekking food and bring it with you , but it’s heavier and far more expensive than organising your food when you get to Puerto Natales.
- Pack everything into zip-lock plastic bags and bin all the original packaging that you can to save on carrying any extra weight. Also, don’t bring the full pack of rice if you’re only going to eat half of it – every bit of weight counts!
- You can buy basic staples (pasta, biscuits, tomato puree etc.) from the shops at Paine Grande, Grey, Francés and El Chileno to stock up on supplies. It’s pretty expensive, but totally worth it. They also all stock beer – an additional expense that I didn’t include in the costings for the W trek!
- You don’t need to bring water with you as it’s available from all the glacier meltwater streams that you’ll run into along the W and is drinkable from the taps at each of the campsites. If you’re nervous about drinking the water, you can also bring a Steripen (read my review of the Steripen Adventurer or buy one from Amazon or buy a newer Steripen UV Ultra from REI ) to zap anything that might be nasty or a Grayl ( REI | Backcountry | Amazon ) – find out why I recommend these water filters for South American travel .
- My dad is a pro at packing food for multi-day treks. Read what food we took with us for the O Circuit (and which you can use as a guide for the W too).
- You will need Chilean pesos on you for the park as nowhere accepts cards. You’ll need $25,000 CLP ($35 USD) for the catamaran ferry and then extras for additional food, beer, and anything else you want to buy.

Camping in Torres del Paine
The following summarises some of the main points about booking campsites and refugios in Torres del Paine for the W trek, but you can get a full overview of how to book campsites in Torres del Paine with this article updated for the 2023/2024 season.
Reservations with Las Torres and Vertice Patagonia
You will need to book your campsites in Torres del Paine in advance. For example, in August 2022, many of the campsites and refugios were fully booked for December through February 2023, which just shows how far in advance it gets booked up.
Before you start panicking, what happens each year is that reservations free up again in September/October, probably due to the fact that tour agencies in Puerto Natales make mass reservations for the high season, and then cancel them when they don’t fill the bookings.
If you need anything planned well in advance, then this isn’t going to suit your plans. If your plans are a little more open and you can wait until closer until the time (and keep checking back to see if any spots have opened up), then you should still be able to hike the W during these months.
My recommendation would be to hike outside of these months anyway (November or March) to avoid the crowds as much as possible, but either way, you still MUST SECURE YOUR RESERVATIONS with Las Torres (Francés, Los Cuernos, El Chileno) and Vertice Patagonia (Paine Grande and Grey).
If you’re trying to get a space last-minute, you can always pop into either of their offices in Puerto Natales and see if they can book you in. I’ve heard of people having success with this with only a day or two’s notice.
Reservations with CONAF
For the 2023/2024 season, and for the foreseeable future, all of the CONAF campsites remain closed.
Upgrade your solo Torres del Paine W trek, Patagonia with these changes
If you’re not so bothered about hiking the W in Torres del Paine National Park on a complete budget, consider making the following small tweaks to your itinerary.

Stay overnight at Los Cuernos ($80,000 CLP ($88 USD) per person full board) instead of Francés
Again, this is only really possible if you stay overnight on Day Two in Paine Grande. When we hiked the Full Circuit, we decided to treat ourselves to an all-inclusive night at Los Cuernos.
This meant we still pitched our own tent on a wooden platform, but we had a three-course dinner, breakfast, and packed lunch for the next morning, which reduced the amount we had to pack in our rucksacks for the hike.
The food from Las Torres (previously known as Fantastico Sur) is much better than Vertigo Patagonia too, so I would recommend this instead of eating in the big canteen at Paine Grande.
Los Cuernos now offers camping sites without full board (previously you had to pay for full board at this campsite).
This means that for $25 USD per person you can pitch up your own tent here. They also offer half-board options priced at $62 USD per person, which include dinner and breakfast.
Book full board and a tent or bed at each campsite
You can rent gear and get food at all campgrounds, so if you don’t want to carry anything, then you can also book this way!
Bear in mind that full board at Los Cuernos comes in at $158 USD per person for a fully-equipped tent and full board – so it certainly won’t come cheap!
Did you find this guide to the Torres del Paine W hike useful? Pin it!

Helen Turner
Sunday 4th of February 2024
Excellent article. Plenty of food for thought. Thankyou
Steph Dyson
Friday 9th of February 2024
Thanks Helen! Steph
Sunday 26th of November 2023
We were hoping to hike to Refugio Grey, then take the Navigation boat toward Hotel Grey, then take a shuttle to our car at Pudeto. But I'm not sure how the timing works out. If we take the 14:00 navigation from Refugio Grey, is there time to make the last shuttle from Hotel Grey?
Tuesday 28th of November 2023
Hi Karen, I'm not sure. You would need to go off the timings on the Hotel Grey website or reach out to them directly. Steph
Jonny Collins
Tuesday 24th of October 2023
Thank you for your brilliant blog posts on all things South America - they're perfect for someone like me that loves knowing the logistics of our upcoming trips! My wife and I were meant to visit Patagonia for the first time in 2020 as part of a wider trip that was cut short due to COVID - we read your blog posts at the time whilst planning. We're finally planning to visit in 2024!
Unfortunately due to work commitments we are not able to take more than two weeks off and it is making our itinerary from the UK quite tight (we want to get to El Calafete and El Chalten in the same trip).
Whilst I appreciate you recommend doing the W Trek in 4 or 5 days, we are considering doing it in 3 days (we are experienced hikers and have done multi day hikes before). We had always planned hiking West to East. For the most even split on distance it seems that staying at Paine Grande and Los Cuernos would work best. We're really keen to see the towers at sunrise but appreciate that staying at Paine Grande and Torre Norte to do this would result in a very big second day. We have thought of two alternatives:
Option 1 (West to East): Night 1: Campo Italiano Night 2: Torre Norte
Option 2 (East to West): Night 1: Refugio Chileno Night 2: Campo Italiano
We've not considered yet if these options work with bus and ferry timetables. Do you think either of the above options are feasible to do the hike in 3 days and get to see the towers at sunrise? If not is there an alternative that might work, or if we do the trek in 3 days do we need to accept that we would not be able to see the towers at sunrise?
Any advice on the 'best' way to do the W trek in 3 days would be much appreciated. Apologies if anyone has asked this before! Thanks in advance :)
Sunday 28th of January 2024
Hi Steph, Thank you for your reply. In the end we decided to find an extra day from elsewhere in the trip so that we could do the W Trek and not miss out on anything! Thanks again for your help and for keeping this brilliant blog post up to date!
Thursday 23rd of November 2023
Hi Jonny, Italiano isn't open any more unfortunately. I would recommend just doing day hikes rather than the W. That way, you can actually enjoy your day hikes and not worrying about trying to cover the ground quickly. Steph
Tuesday 10th of October 2023
Great post, thank you! A group of five of us is heading to TDP to do the W-trek in January 2024. Very excited! We're flying from Santiago (SCL); is Puerto Natales a great option to fly into? I heard the drive to TDP from P. Natales is shorter than when coming from P. Arenas? It seems SKY airline has some flights during our time frame. Any great spot to hang out or visit at in P. Natales?
Hi LuAnn, yes you can fly directly into Puerto Natales. Steph
Wednesday 22nd of March 2023
Hi Steph! Can you please provide link where it is stated that a guide is required for hiking in May in Torres del Paine? I had not come across this requirement yet. Thank you!
Thursday 23rd of March 2023
Hi Megan, it's something I was told in a conversation with CONAF, the national parks office. You can reach out to them https://www.conaf.cl/parques/parque-nacional-torres-del-paine/ Steph
The Stunning Torres del Paine W Trek (2023/2024 Circuit Overview)
By: Author Charles
Posted on October 25, 2023

If you are looking to take part of one of the world’s most beautiful multi day hikes, then look no further than the W Trek of Torres del Paine National Park in Chilean Patagonia.
What usually is a one way 5 day trek that can be completed in either direction, the W Trek offers hikers the opportunity to admire some surreal Patagonia landscape. Whether is is rivers, lakes, mountains, valleys, or glaciers, the W Circuit will have something for you.
This guide is here to give you a complete overview of what the W Trek is all about and how to prepare yourself for your time out on the trail.
* Affiliate Disclosure : This post may contain affiliate links, which means I may receive a commission if you make a purchase through the links provided, at no additional cost to you. Thanks for supporting the work I put into TripTins!
1) What is the W Trek
Within Torres del Paine National Park, you will come across two main multi day hikes to decide between. There is the W Trek (which we will focus on in this guide), a 4-5 day one way hike, and the O Trek, an 8 day counter clockwise loop trail that also heads to the backside of the park.
The reason they are called the “W” and the “O”, is because the routes themselves are shaped like the letters W and O.
It is important to note that the O Trek includes the entirety of the W Trek. So, if you head on the O Trek, you are also completing the W Trek (in addition to a few extra days on the trail).
All along the W though, you will find some of the best overall landscapes that Patagonia has to offer .
Whether it is a viewpoint over the Grey Glacier, taking in the Cuernos del Paine from Paine Grande, visiting the French Valley, or seeing the famous Mirador Las Torres. The W has it all, and is sure to be one of the top trekking circuits that you will take part of in your life.
For the W Trek, you will have a few different options to consider when deciding on your hiking accommodations.
You can choose from ready-made campsites, cozy refugios, or you can bring your own camping gear and do it all on your own .
Depending on availability and what you are most interested in will help determine what your accommodation will be on a nightly basis. Many people (including myself) mix and match these options to get a little bit of everything out on the trail.
Another great part about trekking in Torres del Paine, is that you can also find breakfast, lunch and dinner served at these refugios & campsites. If you choose to take advantage of these offerings, then you won’t necessarily need to bring along too much additional food weight on the hike.
Overall, the W Trek of Torres del Paine has a vast array of options to align with trekkers’ desires .
On one hand, you can decide to go about it completely self-supported bringing along your own tent and food. While on the other hand, you can simply take advantage of the refugios/ready-made campsites & food offerings.
However you decide to take part, you are sure to enjoy this once in a lifetime type of trek.
If you are spending more time in Patagonia, be sure to check out the various hikes in El Chalten , like the multi day Huemul Circuit & the Laguna de Los Tres day hike

2) Hiking Map & Route
To start, lets lay out the W Trek map so you can get a better understanding of the trail itself. On the map you will find the route, campsites/refugios, and other points of interest.
Learn More : Check out this Patagonia Itinerary that can better help you put together a complete trip to the region.
3) Patagonia W Trek Itinerary
The W Trek offers the opportunity to take part of the hike in either direction – either west to east or east to west. Below I will layout both of those options and give some insight on what my recommendation would be.
In general, the standard W Trek is completed in 5 days , and that is what I will be talking through in this overview. There are ways to cut it down to 4 (or even 3) days, but you would either need to have some very long days or cut some highlights out altogether.
For the most part, you will just have one campsite/refugio (also may be called “sectors”) to choose from for each night on the route. However, there are a couple nights, where you could consider alternate campsites if one or another is sold out.
So, with that said, below is how you should plan a Patagonia W Trek itinerary:
West to East
Day 1 : Bus to Pudeto | Catamaran to Paine Grande | Hike to Grey Day 2 : Hike from Grey to Glacier Grey Suspension Bridges & Back to Paine Grande Day 3 : Hike from Paine Grande to Frances (or Cuernos) via Valle del Frances Day 4 : Hike from Frances to Chileno (or Central or Las Torres Hotel) Day 5 : Hike to Mirador Base de Las Torres & Hike Back to Welcome Center | Van to Amarga | Bus to Puerto Natales
Day 1 : Bus to Laguna Amarga | Van to Welcome Center | Hike to Mirador Base Las Torres | Hike to Chileno (or Central or Las Torres Hotel) Day 2 : Hike from Chileno to Frances (or Cuernos) Day 3 : Hike from Frances to Paine Grande via Valle del Frances Day 4 : Hike from Paine Grande to Grey & Hike to Glacier Grey Suspension Bridges Day 5 : Hike from Grey to Paine Grande | Catamaran to Pudeto | Bus to Puerto Natales

Which Direction to Choose?
If I were to choose between these two routes, my recommendation would be to take part of the circuit from west to east . This is primarily due to some reasons regarding the famous viewpoint of Mirador Las Torres (the panorama of the three famous peaks with the lagoon in the foreground – see below!).
By taking part of the hike from east to west, the viewpoint would be your first day out on the trail (and it is going to be a long one – 9 miles & 3,500 feet of elevation gain). Personally, I would rather ease into a circuit like this and have a shorter first day (Paine Grande to Grey)
Alternatively, if you do the hike west to east, you get to save the top highlight of the trek for the final day .
This not only lets you have an easier day 1, but it also gives you the chance to hike to Mirador Las Torres for sunrise on day 5.
What better way to end the W Trek than seeing this famous view at sunrise with few other people all around. I can tell you that if you visit the viewpoint on day 1, you will more than likely have an overcrowded trail and viewpoint area (mostly due to day trekkers).
At the end of the day though, you can’t go wrong. Depending on availabilities and preference, you can make the choice that is best for you.

Hiking Resources & Checklist Before heading out for the trails, be sure to read up on some of the hiking resources up on the site. These are here to better prepare you for all types of outdoor adventure. Gear : Hiking Packing List Weather : How to Prepare for Hiking Weather Navigation : Hiking GPS & Navigation Tips : 20+ Hiking Tips & Tricks for the Trail Accommodation : Book Your Hotel Today Rental Car : Book Your Car Rental Today
4) How Long is the Trek
The W Trek comes in just around 47.5 miles / 76.4 km in total length over the course of 5 days. That means on average you should be comfortable with hiking 9.5 miles / 15.3 km per day.
Based on the west to east itinerary mentioned above, here is a breakdown of the mileage to expect on a daily basis:
- Day 1 : Paine Grande to Grey: 6.6 miles / 10.6 km
- Day 2 : Grey to Grey Suspension Bridge to Paine Grande: 10.6 miles / 17.1 km
- Day 3 : Paine Grande to Frances via Valle del Frances: 12.0 miles / 19.3 km
- Day 4 : Frances to Chileno: 9.6 miles / 15.4 km
- Day 5 : Chileno to Mirador Base La Torres to Welcome Center: 8.6 miles / 13.8 km

5) Is the Trek Difficult
While the W Trek comes in at 5 days, 48 miles, and over 12,000 feet of elevation gain (~3,700 meters), I would not consider this a difficult hike from a technical standpoint.
The trail is easy to navigate, without many technical aspects to it (although you will find some hiking up the Valle del Frances and to Mirador Las Torres). With that said though, there are certainly some longer days out on the trail.
One of the most important questions to ask yourself when deciding about the W Trek, is whether or not you are in the physical state to be on your feet hiking for 5 days straight (some of which may be in less than ideal weather conditions with less than ideal sleeping situations).
You will also need to think about how you will take part of the trek in general. If you are carrying all your own gear and food, it will be much more difficult than if you are staying in refugios and have all meals taken care of for you.
In my opinion, if you are comfortable with being on your feet for five days and hiking around 10 miles per day, then you will find the W Trek to be quite rewarding. While there are some tougher days spread throughout, I did find the W Trek to be just a moderate trekking experience altogether.

6) Refugios & Campsites
Now that you have a better idea of what the itinerary for the W Trek will look like, let’s talk a bit more about the Torres del Paine refugios and campsites that you will find out on the trail.
While all of these refugios and campsites are located within Torres del Paine National Park, they are not all operated by the same company. Instead you will find 3 different companies operating within the National Park. These include Vertice, Las Torres (formerly Fantastico Sur), and CONAF.
Note that the nights refer to the itinerary if going west to east.
Vertice runs 2 of the campsites on the W Circuit – Paine Grande & Grey. They also run two additional campsites on the O Circuit (Dickson and Los Perros), but you will not need to worry about those.
- Grey (night 1) -> campsites & refugio
- Paine Grande (night 2) -> campsites & refugio
Las Torres (formerly Fantastico Sur)
Las Torres runs the other 5 campsites in Torres Del Paine. For the W Trek, you will utilize them on nights 3 & 4 (choosing between a couple options for each). They also run the Seron campsite that is located on the O.
- Frances (night 3) -> campsites & refugio
- Cuernos (night 3 alternative) -> campsites, refugio, & mountain cabin
- Chileno (night 4) -> campsites & refugio
- Central (night 4 alternative) -> campsites & refugio
CONAF runs two free campsites in TDP National Park, however these are closed for the time being and booking them has always been a bit of an issue.
While the Paso camp is not used on the W, the Italiano camp can be used on night 3. For the purpose of this guide I will not be really mentioning these as options.
- Paso (not needed for W) -> campsites only
- Italiano (night 3 alternative) -> campsites only
With all that said, you are most likely looking at booking 2 nights with Vertice (1 & 2) and 2 nights with Las Torres (3 & 4), when taking part of the W Trek.

7) Campsite & Refugio Pricing
Each one of the sectors offers various options for visitors, with some offering more or less than others. Below you can find accommodation & food options along with the relevant prices.
As you go through some of the options and prices below, do note a few important details:
Options : For those that opt for the campsites, you will essentially have two main options to consider:
- If hiking with all the appropriate gear (tent, sleeping bags, etc), you will just need to pay an individual camping site fee.
- However, if you are coming without any gear, then you will need to pay the camping site fee + the rental fee for the tent, mat and sleeping bag. Note, that you can rent these items individually if you happen to bring along one or more of them already.
Sheet Discount : Some refugios offer discounts if you don’t want sheets. Rather you would be bringing your own sleeping bag. This option may be best for those who may be camping on their own but want a night in a refugio here or there.
Booking Meals : If you want to eat at the refugios, I would recommend buying meals when you are booking. With that said, at some refugios (such as Grey), you will have the chance to buy meals a la carte. Snacks are also available at some campsites/refugios.
Meal Hours : Meals are only served during certain hours of the day. For example, don’t expect to show up at 4PM for lunch or 10PM or dinner. Each sector has their specific hours, which match up with standard hiking times.
Note that these prices are for the 2023/2024 season in USD. I will be updating this yearly to reflect the latest.
Vertice Pricing
Below are the accommodation and food options for Vertice (Grey & Paine Grande)
Accommodation
- Individual Camping Fee per Person : $11 ($13 at Paine Grande)
- Campsite Equipment Rental : Tent $40, Sleeping Bag $25, Mat $12
- Simple Bunk Bed in Shared Room : $100 (with bedding kit) | $43 without bedding ($65 at Paine Grande)
- Full Board : $80
- Breakfast : $25
- Lunch / Box Lunch : $25
- Dinner : $40
Las Torres Pricing
Below are the accommodation and food options for Las Torres (Frances, Cuernos, Chileno, Central)
- Campsite (single/double) : $56 / $70
- Campsite Equipment Rental : Tent $46 / Sleeping Bag $30 / Mat $10
- Premium Campsite (single/double) : $190 / $220
- Mountain Hostel Bed (refugio) : $144
- Mountain Cabin (single/double) : $430 / $460 (Cuernos Sector Only)
- Full Board : $100
- Breakfast : $28
- Lunch / Box Lunch : $50 / $30
- Dinner : $50

8) How To Book the Trek
Now that you have a better idea about the overall route and the refugios, campsites, & meals, let’s talk through how to book the W Trek.
The overall booking process is pretty simple as Vertice and Las Torres have online booking systems to utilize. The tougher part is making sure there is availability between the two for the exact dates you are looking for.
I would not recommend making a booking for either until you have both websites open and have confirmed that the refugios/campsites are available for the appropriate nights.
However, there now seems to be a solution to that problem:
Booking Patagonia
Recently a new site called Booking Patagonia offers the opportunity to book both Vertice & Las Torres through a single site . Prices seem to be in line with the two companies, so that may be an easier option moving forward.
I gave it a try, and the site offers a very friendly interface, where you can build your route as you go. In addition to purchasing the food and accommodation, you can also purchase bus tickets and entrance tickets to the park (more on both of those soon).
So, instead of booking through 4 separate website (Vertice, Las Torres, bus tickets, entrance tickets), you can do it all through a single site. They also have a live customer support in case you have questions or changes to your booking.

If you do want to still book directly with the providers, below is how you would go about it.
Vertice Booking
Below are the steps to go about booking with Vertice on nights 2, 3, 4, & 5.
- Step 1 : Go to the Vertice website
- Step 2 : Choose the number of people, your nationality, & currency
- Step 3 : Choose the W or O Circuit (Paine Massif)
- Step 4 : Choose your starting point (Dickson or Los Perros)
- Step 5 : Continue choosing your next nights
- Step 6 : Once complete, click the red button “Yes, I want to choose my date”
- Step 7 : Choose your starting date (the rest will fill out automatically)
- Step 8 : Once you choose your accommodation and additional services (food, rental gear) for each night, click Continue. From there you will be shown your booking summary and you will have 25 minutes to then put in your personal details and pay for the reservation.

Las Torres Booking
Below are the steps to go about booking with Las Torres on nights 3 & 4 (west to east).
- Step 1 : Go to the Las Torres website
- Step 2 : You will be taken directly to the booking page where you will find the five campsites/refugios to choose from with check in / check out dates (change these initially before continuing to the next step).
- Step 3 : By clicking the magnifying glass icon on the right hand side of each sector, you will be shown booking options for that sector.
- Step 4 : Choose your accommodation and food options for each of the two nights needed
- Step 5 : Click the “Book Here” button, and follow the instructions to fill in your personal details & pay for the reservation.

Additional Booking Notes
All Inclusive : On the Vertice & Las Torres sites, you can also choose “W Trek”, which puts together a total package for you. This seems to be an all inclusive type of deal, where you can’t pick and choose what you want each night. Because of this, the price will be on the higher end.
Third Party Websites : You may also come across third party websites that offer W Trek packages . This companies usually buy allotments of spots at campsites/refugios and then upsell them as packages. I would say the main reason to book through a third party is if your dates are sold out through Vertice/Las Torres, but the third party company happens to have openings.
Last Minute Openings : Going off of that last note – don’t be surprised if you see any last minute openings for Torres del Paine. These third parties seem to give back any unused nights a couple weeks prior. I met several people, who were able to make reservations just days in advance due to these cancellations.
Torres Del Paine Entrance Fee
While you will need to pay for your accommodation, food, and transport to Torres Del Paine, you will also need to pay for entrance tickets.
I would recommend simply purchasing your tickets online through the official website . Scroll down to Torres Del Paine and complete the forms on the following pages to make your purchase.
Since you will be taking part of the W Trek, you will want to purchase the 3+ Day ticket at $49 . Once you stay over three days, there is no additional cost per day.

9) How to Get to Torres del Paine
Getting to Torres del Paine National Park will be the next set of logistics to figure out when taking part of the W Trek. Busses, catamarans, & shuttles will all come into play when getting yourself back and forth to TDP.
Before getting to Torres del Paine itself, you first must make your way to Puerto Natales – the closest major town to the National Park. While you can make your way from other places, Puerto Natales will be the most convenient of options.
Getting to Puerto Natales
I would recommend spending one night there prior to the trek, and then one night after finishing up with the trek (depending on your overall itinerary).
Puerto Natales has its own airport (PNT), located just 10 minutes outside of the city center. Currently, the only direct flights to Puerto Natales are through Santiago and Puerto Montt.
While flying in and out of Puerto Natales is one option, you can also take a bus there from other places in Patagonia. The main two closest hub cities would be El Calafate, Argentina (3.5 hours) and Punta Arenas, Chile (3 hours).
If visiting El Calafate be sure to check out the Perito Moreno Glacier , Cerro Frias , and a Todo Glaciares Boat Tour
Once in Puerto Natales, it is time to then make the journey to the Torres del Paine National Park.
If you are looking for hotels in Puerto Natales, check out Hotel Vendaval and Vinnhaus – two highly rated & recommended hotels downtown.
On the other hand, you can also decide to stay at one of the top Torres del Paine hotels !

W Trek Starting & Ending Point
Since this is a one way hike, the starting & ending point of the W Trek will be at two different locations. This will also depend on which way you go about the circuit in general:
Starting Point : Paine Grande Ending Point : Torres del Paine Welcome Center
East to West
Starting Point : Torres del Paine Welcome Center Ending Point : Paine Grande
W Trek – West to East Logistics
If taking part of the W from west to east, you will be starting your hike at Paine Grande and ending your hike at the Torres del Paine Welcome Center.
Start: Puerto Natales To Paine Grande
Getting yourself from Puerto Natales to Paine Grande will involve a bus ride to Pudeto, followed by a catamaran to Paine Grande.
Step 1: Puerto Natales to Pudeto Bus
The first part of the day will entail taking an early bus ride from Puerto Natales to the Pudeto entrance of the National Park. Bus Sur runs busses throughout the season from Puerto Natales, with the earliest one at 6:45AM (be sure to always check latest schedules and to book in advance).
The bus will first stop at the Amarga park entrance, before continuing onto Pudeto. The total length of the bus ride should be just around 3 hours (arriving closer to 10:00AM).
Step 2: Pudeto to Paine Grande Catamaran
Once you arrive in Pudeto, you can then take a ~30 minute catamaran across Lake Pehoe that will drop you off right at the starting point of Paine Grande.
The first catamaran leaves at 9:00AM (not possible to make it with the bus) and the second at 10:30AM (times up perfectly with the bus). The cost is $30 USD one way and can be paid on arrival.
Note that catamaran schedules change throughout the year. Please be sure to check out Hipsur and this Torres del Paine website for latest departure times for the catamarans.
Finish: Torres del Paine Welcome Center to Puerto Natales
After completing the hike, you will end up at the Torres del Paine Welcome Center on the eastern side of the park. Getting back to Puerto Natales will involve a quick shuttle & then a bus ride.
Step 1: Torres del Paine Welcome Center to Amarga Shuttle
Since the busses do not pick up/drop off directly at the welcome center, you will just need to take a quick 10 minute shared van to the Amarga TDP entrance. Shuttles will be timed up with the bus schedule and cost around $5 USD.
Step 2: Amarga to Puerto Natales Bus
Just like you began the journey, you will end the journey with a bus ride back to Puerto Natales. This time though, you will be departing from Amarga. I would recommend booking a later afternoon bus (most likely 3:00PM – but be sure to check the latest schedules).
W Trek – East to West Logistics
If taking part of the W from east to west, you will be starting your hike at the Torres del Paine Welcome Center and ending your hike at Paine Grande. Logistics will be similar to above but just in the reverse direction.
Start: Puerto Natales To Torres del Paine Welcome Center
Step 1: Puerto Natales to Amarga Bus
The first part of the day will be taking an early bus ride from Puerto Natales to the Amarga entrance of the National Park (the same bus that then heads to Pudeto).
Bus Sur runs busses throughout the season from Puerto Natales, with the earliest one at 6:45AM (be sure to always check latest schedules and book in advance).
Step 2: Amarga to Torres del Paine Welcome Center Shuttle
Since the busses do not pick up/drop off directly at the welcome center, you will just need to take a quick 10 minute shared van to the TDP Welcome Center from Amarga. Shuttles will be timed up with the bus schedule and cost around $5 USD.
Finish: From Paine Grande to Puerto Natales
Step 1: Paine Grande to Pudeto Catamaran
Once you finish up your final hike on day 5, you will then make your way back to Paine Grande, and catch the catamaran to Pudeto. Catamaran schedules change throughout the year (be sure to check out schedules linked above for the latest).
However, during peak season (December to February), there are boats to Pudeto at 9:35AM, 11:05AM, 5:00PM and 6:35PM
Step 2: Pudeto to Puerto Natales Bus
The final part of your day will be taking a bus back from Pudeto to Puerto Natales. Again, please check the Bus Sur website for the latest schedules. Currently the last busses leave Pudeto between 7:00PM – 8:00PM.

10) Best Time to Hike
While the W Trek certainly offers some of the world’s best landscapes, it also offers some of the world’s most unpredictable weather. Hiking for 5 days in Patagonia can offer a little bit of everything from a weather standpoint – both on a day to day basis and on an hourly basis.
It is a popular saying that you will experience 4 seasons of weather in a single day. Sun, rain, wind, clouds, snow, and more will be coming and going throughout your time on the trail.
With that said though, the best time to hike the W Circuit in general will be during the summer months of the region between December and February. During this time, you have the best chance for the most stable of weather with less rain and overcast skies.
A trip during the shoulder months of November and March are also potential options for you. During this time you will have a quieter park altogether, and may be just as lucky with the weather.
This also holds true if you are visiting places like Ushuaia, home to Tierra del Fuego National Park , which has plenty of top Ushuaia hikes to choose from, and the chance to walk with penguins .
Opening Times
When it comes to the W Trek, you will only be able to complete it during the times that the refugios and campsites are open.
To simplify things, that means the W Trek is only possible between September 1 2023 and April 2024 .
Below you can find the latest (I will update this each year):
- Central Sector : September 1 – April 30
- Chileno Sector : September 15 – April 30
- Frances Sector : September 1 – April 30
- Grey Sector : September 1 – April 30
- Paine Grande Sector : September 1 – April 30
- Cuernos Sector : November 1 – March 30

11) Packing List
Perhaps the most important aspect of the W Trek will be the gear that you bring along with you. Since this is 5 days out in Patagonia, you simply will need to be prepared for it all.
If you would like more detail, check out the Torres del Paine packing list I put together that deep dives into all of the below.
Below is my recommended packing list for all hikers that you can put into your hiking backpack ( Hyperlite Southwest recommended)
From a clothing perspective, you will want to bring along what is needed for five days on the trail. I am usually a bit more lightweight here as I use the same layers on a day to day basis.
Note that the weather can change quickly, so you will want to be prepared with the appropriate layers (all outlined below). Also, be sure to have moisture wicking materials for your clothing items.
- Hiking Boxers (2-3)
- Hiking Socks (2-3)
- Hiking Pants (1)
- Hiking Shorts (1)
- Long Sleeve Sun Hoodie (1)
- Short Sleeve Hiking Shirt (2)
- Puff Jacket (1)
- Hard Shell Jacket (1)
- Baseball Hat
- Quick Dry Towel
- Packing Cubes & Laundry Bag
Hiking Shoes
A hike like the W Circuit must be done with the appropriate footwear. Be sure to invest in quality hiking shoes for your time on the trail. Some of my recommended shoes include:
- Keen (Targhee Series)
- Merrill (Moab Series)
- North Face (Ultra Series)
- Salomon (X Ultra Series)
Electronics
Most of my electronics were used for photography and navigation purposes, so each person may be a bit different here (note you can recharge your electronics at campsites).
- iPhone & USB Cable
- Headlamp | Petzl Actik Core
- Portable Charger | Anker Portable Charger 10,000 mAH
Action Camera
- GoPro Stick
- Extra GoPro Batteries
Mirrorless Camera
- Extra Battery
- 256GB SD Card
- Mini Tripod
Satellite Communicator | Garmin inReach 2 Mini
While there are many people along the trails of the W Circuit, having a satellite device like the Garmin inReach is always going to be a good idea. This small device gives you the chance to communicate with family, track your route, and call for SOS in case of emergency.
Food & Drink
Remember, you will also need to bring all food for five days out on the trail if you do not want to purchase food along the way. There are also supermarkets in Puerto Natales where you can stock up on certain items. If you want to come prepared with food that you prefer, then check out my usual food purchases below (high calorie / low weight).
Lunch/Snacks
- Variety of Bars including PROBAR Bars , Honey Stinger Bars , Clif Builder Protein Bars
- Fruit & Nut Mixes
- Variety of dehydrated meals including Peak Refuel , Outdoor Herbivore , and GOOD TO-GO
Note that you will easily be able to fill up your water bottle consistently throughout the trek. Along most of the hike you will find rivers and streams, where you can get some fresh Patagonian water.
During my time on the circuit, I just filled up directly from these without any filtration. However, if you do want to play it safe, you can get a filtered water bottle like the Katadyn BeFree water bottle. I also brought along some Liquid IV hydration packets to keep hydrated at the beginning of the day.
Cooking Gear
- Cooking Stove : Jetboil Micromo
- Spork : TiTo titanium spork
- Cooking Gas (purchase in Puerto Natales)
This last section of the packing list will be toiletries. Each person will also be different here, but below are the main items I brought along with me.
- Deodorizing Body Wipes | Alcala Bamboo Deodorizing Body Wipes
- Body Deodorant
- Toothbrush / Toothpaste
- Contact Lenses / Solution
- Travel Shampoo & Soap
- Moisturizer
- Personal Creams & Medications
- Bandaids
- Nail Clipper
- Small Mirror
- Toilet Paper
Camping Gear
Now if you plan to bring your own sleeping gear on the trek, you will need to account for those items as well. Below is a list of the hiking & camping gear essentials for your time on the trail. Note that much of these can be rented or bought in Puerto Natales if you do not have everything already.
- 3-Season Tent | Big Agnes Copper Spur HV UL
- Sleeping Bag (20 F – 40 F) | Thermarest Questar 20 ; Thermarest Hyperion 32
- Sleeping Bag Liner | Sea to Summit Liner
- Sleeping Pad | Thermarest NeoAir Xlite
- Camping Pillow | Thermarest Camping Pillow
- Hiking Poles | Black Diamond Distance Carbon FLZ Trekking Poles
12) Patagonia Travel Insurance
Considering travel insurance for the W Circuit? World Nomads offers coverage for more than 150 adventure activities as well as emergency medical, lost luggage, trip cancellation and more (making it an option for those taking on the W Trek in Torres del Paine). For years, World Nomads has been protecting, connecting & inspiring independent travelers, offering travel insurance & safety advice to help you travel confidently. Their mission is to support and encourage travelers to explore their boundaries . World Nomads has simple and flexible travel insurance that has been designed by travelers for travelers. Even if you leave home without travel insurance or your policy runs out, you can buy or extend out on the road. Get a quote for a World Nomads travel insurance policy today!
13) Torres del Paine Tips & Things to Know
I did want to layout a few helpful tips and things to know as you go about your time in Torres del Paine.
WiFi: You will find WiFi throughout the trek at most sectors that you have to pay for on an hourly basis. If you just wanted to get a weather forecast, the folks checking you in will be able to give you some insight.
Closing Times : Be very aware of closing times around the National Park for certain trails. For example, during my time there, the Britanico Mirador closed at 1:00PM and the Mirador Base Torres closed at 4:30PM. These times seem to change, so be sure to keep an eye out at the campsites and ranger stations for the latest.
Bookings : Remember, there is no open camping or entering the park for overnights without accommodations reserved. Be sure to come prepared with your bookings prior to your arrival.
Cooking : For those cooking your own food, camping stoves are allowed in authorized areas at campsites. There are no open fires allowed whatsoever.
Forecasts : If checking weather prior to and along your hike (using the WiFi), I would recommend using Windguru or Meteoblue. This can give you a better idea if certain parts of the day may be better or worse than others (although you can never really trust the weather in Patagonia).
Showers : Hot showers can be found at all campsites on the W. As I mentioned in the packing list section, be sure to bring a small quick dry towel with you.
Food : If you are bringing your own food, you do have the option to purchase some in Puerto Natales. There are supermarkets there, so that should not cause too much trouble. You will also find gear shops if you need to rent or purchase any last minute essentials for the hike.
GPS : Lastly, I would highly recommend downloading the W Trek route onto you phone for navigation purposes. Apps like AllTrails or Maps.me would work here. While the route is easy to follow, the apps also give you a heads up when you are approaching viewpoints and other highlights.

14) Hiking Checklist
In the following section I will dive into the day by overview of the W Trek. However, before doing so I did want to put together a “W Trek Checklist”. I know we covered a lot already, so this is a good spot for a quick recap.
1) West to East or East to West
One of the first decisions you will need to make is whether to go about the circuit from west to east or east to west. This may come down to accommodation availabilities or just personal choice. Since I love the idea of ending with Mirador Las Torres, west to east is my overall preference.
2) Campsite vs Refugios
When going about booking your accommodation, you will need to decide between (1) bringing all of your own camping gear, (2) sleeping at ready made campsites, or (3) staying at the refugios. Note you can always mix and match as you see fit too!
3) Purchase Meals vs Cooking
Going hand in hand with booking accommodation will be meal choice as well. Do you want to bring your own meals and cook yourself? Or do you want to purchase breakfast, lunch and dinner from the refugios? This is another place where you can mix and match to your preferences.
4) Bus Tickets
Logistically, the only transport you will need to book in advance are round trip bus tickets to Torres del Paine (in addition to getting to Puerto Natales in the first place). The catamaran and shuttle bus don’t require reservations.
5) TDP Entrance Tickets
Don’t forget to purchase Torres del Paine entrance tickets prior to arriving. They offer the 3+ day option, which can be used for the full W Trek.
6) Packing List
A packing list may change based on whether or not you bring your own camping gear and food. However, the rest of the packing list holds true. Be sure to come prepared with all the essentials, so you are ready to hit the trail when you arrive.
7) Hotels in Puerto Natales
Lastly, booking hotels in Puerto Natales will be important for before and after your trek. You can book for a night on either end (or even extend your stay if you would like).

15) W Trek Torres del Paine Day by Day
For the purposes of this day by day breakdown, I will be going about the route from west to east (starting in Paine Grande and ending at the Welcome Center) . This should still be plenty helpful if you decide to go about the route in the opposite direction.
Day 1 – Paine Grande to Grey
Starting Point : Sector Paine Grande Ending Point : Sector Grey Distance : 6.6 miles / 10.6 km Elevation Gain : 1,430 feet / 435 meters Duration : 3-4 hours
After leaving Puerto Natales by bus and arriving in Pudeto, you will take a pleasant catamaran ride across Lake Pehoe to Paine Grande.
At Paine Grande you will find a refugio and campsite (which you will be staying at the following night). Once all set it is time to begin the first day of hiking. Altogether this is going to be one of the easier days out on the trail, and a great way to ease into the hiking experience.
From the starting point, the trail will ascend for the first half of the hike. This is where most of the elevation gain for the day will come into play. As you continue up, you will have the massive Cerro Paine Grande hovering up above with other mountains filling out the landscape.
You will soon reach a small lake – Laguna Los Patos, before the views start to get better and better out in front of you. One of the highlights of the W Trek is the Grey Glacier , which feeds Lago Grey.
The glacier will start coming into views and throughout much of the hike, you will now be able to enjoy the views from a far. There will be an “official” lookout point as well, but overall you won’t be disappointed with what the first day entails.
Soon enough, you will reach the high point for the day and then descend further down towards the first campsite. Continue to enjoy those views before easing right into the Grey campsite and refugio.

After checking in and getting all settled, I would recommend taking a late afternoon walk to the Mirador Grey.
This lookout point is located just nearby the campsite and gives you a great view of the glacier with large icebergs floating in the lake right besides you.
Once all done there, enjoy your first night on the W Trek, before getting ready for day 2.

Day 2 – Grey to Grey Glacier Suspension Bridges to Paine Grande
Starting Point : Sector Grey Highlight : Grey Glacier Suspension Bridges & Lookouts Ending Point : Sector Paine Grande Distance : 10.6 miles / 17.1 km Elevation Gain : 2,400 feet / 730 meters Duration : 6-7 hours
On day two of the W Trek, you will get to head further along the Grey Glacier and take in some views, before turning back around to Paine Grande. You can really split this day into two main parts.
For the first portion of your day, you can leave you bags behind and just take a day pack. This hike will entail an out & back route heading to some more viewpoints and a couple famous suspension bridges overlooking the Grey Glacier.
Most people opt to head to what is known as the second suspension bridge – a 2 mile (4 mile round trip) uphill hike from the Grey campsite. Throughout this out and back trail, you will get continuous beautiful views of the glacier out in front of you, and eventually right beside you.
While you can head even further up the trail past this second suspension bridge, remember that you will need to make it all the way back to Paine Grande at day’s end. Due to this, many just opt for this second suspension bridge lookout.
If you do have the energy and fitness to get it done, feel free to continue all the way up to the Paso campsite (4 mile one way / 8 mile round trip).

Once back at the Grey campsite, it is time for the second portion of the day. You can pack up your bags, and retrace the same route from the prior day to Paine Grande.
Similarly, you will leave the campsite, gain elevation and take in some views (with many views behind you now). After reaching the high point, you will descend down into Paine Grande after a successful day out on the trail.
While it would be a pretty long day already, there is more to explore if you have it in you. Feel free to walk the pathway along Lake Pehoe, where you can get some surreal views of the lake, Cuernos del Paine, and Cerro Paine Grande all in one shot.
Be sure to then get a good night’s rest since day 3 is going to be a big one!

Day 3 – Paine Grande to Frances via Valle del Frances
Starting Point : Sector Paine Grande Highlight : Valle del Frances (French Valley) Ending Point : Sector Frances Distance : 12.0 miles / 19.3 km Elevation Gain : 2,995 feet / 913 meters Duration : 8 hours
Up next on the W Trek of Torres del Paine is the hike from Paine Grande to Frances. Along the way though you will have the chance to head up the Valle del Frances (French Valley). During this day you will be completing the “middle line of the W”.
This is also one of those nights where you have more than one accommodation option to choose from – either Sector Frances or Sector Cuernos (another 2 miles further).
Most of the first portion of the day will entail hiking through the surrounding greenery with the Cuernos del Paine out in the distance. Your aim is to hike to the base of the mountainside before exploring the Valle del Frances.

You will pass by some beautiful lake views as you slowly get closer and closer the valley itself. Once you reach the valley turnoff, you can head up to the two viewpoints – Mirador Frances and Mirador Britanico.
Now, you do not need to go to both viewpoints, but they are both well worth the effort if you have it in you.
The hike through the valley will be one of the more technical parts of the W Trek. Instead of a nice easy pathway all the way through, the tail can get rockier and steeper at times. Be sure to just consistently watch your step along the way through.
The first viewpoint of Mirador Frances will offer views of Cerro Paine Grande and the Frances Glacier. Further up the valley, you will find Mirador Britanico.
Here you have views of a whole array of Torres del Paine mountains out in front, as well as the Cuernos del Paine up above.
Once you have enjoyed one or both viewpoints, it is then back down the same way you came, until you reach the Valle del Frances turnoff.
It is then another 20 minutes walk until you reach the Frances sector (or another hour or so if you opt for the Cuernos sector).

Day 4 – Frances to Chileno
Starting Point : Sector Frances Ending Point : Sector Chileno Distance : 9.6 miles / 15.4 km Elevation Gain : 2,810 feet / 856 meters Duration : 5 hours
On the fourth day of the W Trek, the circuit takes you from Frances to Sector Chileno. This will be a beautiful route as you get to walk right alongside the Nordenskjöld Lake for much of the day.
I ended up waking up early and I opted to just get started hiking around sunrise. This in turn led me to experience some beautiful colors lighting up Torres del Paine. If you have it in you for one (or more) days of the trek, I would recommend a sunrise at some point.
After walking along and above the lake, there is an intersection. To the right is a trail that heads towards the Welcome Center, and to the left is Sector Chileno. Take that left hand turn, and start hiking through the Ascencio Valley.

From here you will begin the hike up the valley along the pathway etched into the hillside. Down below will be the winding Ascencio River and further in the distance will be more alpine peaks.
After hiking above the river, the trail descends towards Chileno, where you can check in and get ready for the final day of the hike.
This is another day in which you can choose to opt for alternate accommodation. However, I would highly recommend going with Chileno for your first choice. If it is sold out, then you could end up going with Sector Central or even the Hotel Las Torres.

Day 5 – Chileno to Mirador Las Torres to TDP Welcome Center
Starting Point : Sector Chileno Highlight : Mirador Las Torres Ending Point : TDP Welcome Center Distance : 8.6 miles / 13.8 km Elevation Gain : 2,665 feet / 82 meters Duration : 5 hours
It is now time for the final day of the W Trek as you make your way from Chileno to the famed Mirador Las Torres viewpoint (one of the best hikes in Torres del Paine ).
At the viewpoint you will have a beautiful turquoise lake in the foreground with the three granite peaks of Torre Sur, Torre Central, and Torre Norte hovering up above.
Most people opt for a sunrise at the lake. This means you will need to wake up in the middle of the night and hike in the dark.
During my times in the park, it was pouring rain when I woke up. While some people did opt to hike in the wet darkness, most people waited it out a couple of hours. I am sure glad that I did because, the weather ending up clearing and the remainder of the morning was a memorable one.
Taking part of a sunrise hike though at Mirador Las Torres is still in my eyes one of the best overall highlights of the W Trek. I would highly recommend it if you are up for the early wake up.

This is also going to be one of the more technical days out on the trail, as there is a good portion of the hike that is on uneven, rocky, and steep terrain.
You will first make your way through the forest portion as you continue to gain elevation. Once out of the forest, the tougher section begins as you head up the rocky and steep hillside to get to the lake itself.
As you arrive at the lake, you can expect some surreal views of your surroundings (on a clear day at least).

Be sure to remember throughout this day that you will need to catch a bus out later in the afternoon. Pay attention to your timing, so you can get back to Chileno and to the Welcome Center in time.
After enjoying the views though, make your way back down to Chileno, where you can pack up your belongings. It is then retracing your steps along the river and out of the valley, where you can then follow the path to the Torres del Paine Welcome Center.
Once there, hop in one of the shared shuttle vans to the Amarga park entrance, where you can then get onto your bus back to Puerto Natales.
All said and done, while there are some logistics to a hike like this, the W Trek will be well worth the planning and effort.

16) Torres del Paine W Trek Cost
From a cost perspective, the W Trek of Torres del Paine can cover a wide array of budgets.
On one side, you have the chance to bring all your own gear and food, and simply just pay for campsites (and transport). On the other end, you have refugio rooms and full board to choose from.
Obviously, the budgets for these two trips can be vastly different. And while those are the two ends of the spectrum, many people fall right in between (mix between campsites/refugios & bringing some food but not all).
From a high level perspective, below is what you should expect the Torres del Paine W Circuit to cost from a few different standpoints (note all currency in USD).
Low Cost Option
- Accommodation : bring all of you own gear = ~$130 (campsite fees)
- Food : bring all of you own food = ~$75 (can vary greatly based on food choice)
High Cost Option
- Accommodation : refugios only = ~$500
- Food : full board = ~$360
Mid Cost Option
During my time out on the trail, I brought most of my food with me, and ending up buying a couple meals along the way (not guaranteed everywhere). For accommodations, I split up my time between refugios and ready made campsites.
You can expect this to fall right in between the low and high cost options.
In addition to the food and accommodation, your other cost considerations should be:
• Puerto Natales Hotel (before/after): varies • Round Trip Bus Tickets: ~$25 • Pudeto Catamaran: $30 • Laguna Amarga Van: $5 • Torres Del Paine Entrance Tickets: $49

17) Self Guided vs Guided
Many people ask can you do the W Trek without a guide? The answer to that question is certainly yes. In general, I would imagine most people who hike the W Trek do so unguided.
For the vast majority of the hike, the trail is obvious with trail markers sprinkled throughout. Getting from campsite to campsite should not be an issue given the trail (and having a navigation app just in case).
I would say a guided W Trek can be valuable for those with less hiking experience.
If you are someone who has just not completed multi day hikes and are not comfortable doing something like this on your own, then a guide can be very valuable to help lead the way (and help you out with some tips).
In general, if you are not one of those people, then a self guided hike is going to be more than doable. This also gives you the chance to be on your own schedule, and not worry as much about the larger group.
18) W vs O Trek Patagonia
While the W Trek is certainly a bucket list worthy type of hike, you may be asking yourself whether you should do the O Trek instead.
At the end of the day, this will just be based on the amount of time you have and whether or not you actually want to hike for an additional three days.
Remember, the W is part of the O. So if you complete the O, you are completing the W. With the O Circuit you get to hike the backside of Torres del Paine during your extra three days in the park. This section is much quieter than the W side of the park.
From a duration perspective, you will need just 5 days to complete the W (or maybe even less) but 8 days to complete the O .
You will need to ask yourself whether you even want to hike for 8 days in a row. That can be a lot of hiking for most people. Since the W may be hiked in as few as 4 days, some people may be more than happy with that amount of hiking.
Another consideration in general will be your overall fitness. While the O Trek is 70+ miles, the W Trek is just about 45 miles . So, that is another 25+ miles your body will need to make its way through (including the toughest part of Torres del Paine up the John Gardner Pass).
Lastly, you will also want to take your budget into consideration . By doing the W, you are sure to save on accommodation and food within the park. While on the O, you are going to spend more based on the longer duration.
While those are just some of the main questions to ask yourself, if you can answer those, you should have a better sense of which option is best for you.
Learn more about Torres del Paine O Trek to get a better idea of what it is all about .

I hope you enjoyed this extensive overview about the W Trek of Torres del Paine National Park in Patagonia. If you do happen to have any additional questions or concerns, feel free to add them in below.
Also, be sure to check out the other Patagonia itineraries and guides up on the site. Have fun out there and safe travels!

Related posts:

Sharing is caring!
Saturday 25th of March 2023
Great write up, this is really helpful! Any idea if bookings are open for 2023/2024 season or when to expect them to open? I'm looking at booking for December 2023 and none of the websites work for any of those dates, but I dont think it would be completely full already. How far in advance would you recommend booking?
Monday 27th of March 2023
Hi Kirsten - I would guess bookings will open up soon (in the next month or two). The current season is almost at its end and I am guessing they will have the bookings open soon enough. December can be quite busy depending on if you are heading for holiday season. If that is the case I would honestly advise to book as soon as you are able to. Any other question feel free to reach out.
The W Trek in Torres del Paine National Park- How to Do the W Trek as Day Hikes
Purchases made through links earn us a small commission, at no extra cost to you.
Torres del Paine National Park, in Chilean Patagonia, is an incredible destination for day hiking and overnight treks. One of the park’s most famous routes is the W Trek, a 4-5 day hike that visits three stunning valleys with overnight stays in refugios or campsites.

If a multi-day backpacking trip doesn’t appeal to you, the good news is that you can do most of the W Trek as day hikes and still see all the main highlights.

Why Do the Torres del Paine W Trek as Day Hikes?
The main reasons to do the W Trek as day hikes is to save time, save money on a tour, and avoid some of the headaches that come with planning and embarking on a multi-day trek, namely having to carry more gear and figure out trail accommodations in advance.

We really wanted to hike the W in Torres del Paine, but I quickly realized during the planning phase that the classic route wasn’t going to work for us.
First of all, we didn’t have 4 or 5 days to dedicate to the hike since we wanted to visit other places during our Patagonia trip . By doing day hikes in Torres del Paine National Park, we could explore all the arms of the W and one of the connecting trails in 3 days.

Second, to do a self-guided W Trek we would need to carry more gear, plus reserve all our campsites or shelters months in advance. These were logistics I just didn’t want to deal with.

Our last option was to book a guided tour, but we didn’t have the budget for that since we had just returned from a cruise to Antarctica and South Georgia .
So as an alternative, I figured out a way to experience all the best parts of the W Trek on day hikes, returning to our accommodations at the southern edge of the park each night.

About the W Trek- The Classic Route vs Day Hikes
Just like the name suggests, the W Trek forms a round-bottomed W when looking at the route on a map.

The eastern arm of the W is formed by a trail that leads through the Ascencio Valley to Mirador Base de las Torres, a lookout at the park’s iconic granite peaks. This segment is an out and back hike regardless if you’re doing the full W Trek or the day hike option.

The trail that connects to the middle arm of the W follows along the shoreline of Lago Nordenskjold until it reaches the entrance to the French Valley. On the classic W Trek this segment is a one-way hike, but if you’re doing the W Trek day hikes it would be a very long out and back to go the full length of the trail (at least 11- 12 hours).
Since we only had 3 days to do day hikes in Torres del Paine National Park, and the Lago Nordenskjold trail didn’t offer anything unique that we couldn’t experience on the other legs of the W, we cut out this section entirely.

The middle arm of the W consists of the French Valley and offers great views of the French Glacier on route to Mirador Britanico. On the classic W Trek you would have enough time to hike the whole out and back trail to Mirador Britanico, but if doing the W Trek day hikes you will have to turn around at the glacier.

The trail that connects the French Valley to the western arm of the W runs alongside Lago Skottsberg. On the W Trek this is a one-way hike, but for a day trip it would be an out and back. Since the W is typically hiked from east to west, the best views of Cuernos del Paine (Paine Horns) would be at your back during this section, but on the day trip this distinctive mountain is in your line of sight.

The western arm of the W leads from Lago Pehoe to Grey Glacier, roughly following the shoreline of Lago Grey. On the self-guided W Trek this is commonly done as an out and back route, but on guided hikes/tour packages it’s usually a one-way journey (returning via ferry on Lago Grey). For the day hike option, it’s best done as an out and back due to a lack of public transportation from the Lago Grey ferry to the hike’s starting point.

How to Do the W Trek as Day Hikes- 3 Amazing Day Hikes in Torres Del Paine National Park
We did 3 day hikes in Torres del Paine National Park that visited all the most iconic landmarks of the W Trek.

In order to accomplish this, you have to be staying in or near the park and have a vehicle. A lot of people travel to Torres del Paine by bus from Puerto Natales, but this adds 2-3 hours of travel time each way and you wouldn’t catch the first ferry across Lago Pehoe, which takes you to the trailhead for two of the hikes. Without getting on that first ferry, completing the full hikes in time for the last return ferry would be very challenging, if not impossible.

Since the W Trek is normally walked from east to west, we did our day hikes the same way. Starting with the eastern arm of the W means you’ll do the most difficult hike of the trek first. However, you’ll want to keep weather in mind when deciding the order of your day hikes. Definitely plan to hike to Mirador Base de las Torres on a clear day otherwise you might not get a complete view of the famous towers.

Here’s a brief description of the segments of the W Trek we did as day hikes, our recorded distances, and links to our more detailed trail guides/trip reports.

Day Hike #1: The Towers
Distance : 20.7 km/12.86 mi
Time Required : 8- 10 hrs
Trail Guide: Mirador las Torres- Hiking to the Base of the Towers in Torres del Paine National Park
The hike to Mirador Base de las Torres is the most popular hike in Torres del Paine National Park and most grueling leg of the W Trek.
The hike starts at the Torres del Paine Welcome Centre and follows a trail through a valley and up some very steep terrain to a teal coloured lake at the base of Torres del Paine, the towers from which the park takes its name.

After leaving the Welcome Centre and passing by Hotel Las Torres, the trail descends towards a river then begins climbing into the scenic Ascencio Valley. During the hike through the valley you’re surrounded by mountains and overlooking the Ascencio River.

At the bottom of the valley you’ll reach refugio Chileno where you can take a break, fill up with water, and use the toilets.
The trail then proceeds through the forest before arriving at a steep pile of boulders that you have to climb to reach the lookout.

This last section can be very windy and hazardous because of the rocky trail you have to navigate.

Once you reach the top of the rock pile you’ll see the three distinctive towers overlooking a small, mountain-framed lake. Take some time to relax and enjoy the views from the boulder-covered shoreline before returning the way you came.

Day Hike #2: The French Valley
Distance : 18.5 km/11.5 mi
Time Required : 7- 8 hrs
Trail Guide: French Valley Day Hike- Hiking to Mirador Frances in Torres del Paine National Park
The hike to the French Valley was our favourite leg of the W Trek because it’s packed with beautiful scenery and is only moderately difficult.
The trail begins at the Paine Grande refugio and passes by two pretty lakes on route to the French Valley, where it then ascends to a viewpoint across from the French Glacier.

To reach the French Valley on a day hike, you first have to take a ferry across Lago Pehoe from Cafeteria Pudeto to the Paine Grande refugio.
After leaving the refugio, the trail follows alongside the shoreline of Lago Pehoe then changes course to traverse an area of shrub-covered rolling hills. Once you reach Lago Skottsberg there’s a nice viewpoint overlooking the lake where you can admire Cuernos del Paine.

The trail continues beside Lago Skottsberg then eventually arrives at a small suspension bridge crossing Rio Frances. On the other side of the bridge is the Italian Camp at the entrance to the French Valley.
The last part of the hike follows a rocky trail to Mirador Glaciar del Frances then climbs through the forest to Mirador Frances, across from the French Glacier.

Both the lower and upper lookouts offer stunning views of the French Glacier, so even if you only hike to the first viewpoint you’ll still get to experience the beauty of the glacier.

In order to catch the last return ferry of the day, you won’t be able to hike to the end of the trail at Mirador Britanico. Instead, turn around at Mirador Frances and retrace your steps back to the trailhead at Lago Pehoe.

Day Hike #3: Grey Glacier
Distance : 22.9 km/14.2 mi
Trail Guide: Grey Glacier Day Hike- Hiking to Grey Glacier in Torres del Paine National Park
The hike to Grey Glacier is the least trafficked trail by day hikers, perhaps because it’s the most ambitious, in terms of distance, of the W Trek day hikes.
The hike starts at the Paine Grande refugio and follows a trail through a valley to Lago Grey, then Grey Glacier at the far end of the lake.

To reach the trailhead, you again have to take the Lago Pehoe ferry from Pudeto to the Paine Grande refugio.
The first portion of this hike passes through a valley, gradually gaining elevation until the trail arrives at Laguna Los Patos. The path then follows the lakeshore before travelling through an open area of land that overlooks Lago Grey. You’ll be able to see small icebergs floating in the lake below.

Continuing to hike above the lake, the trail eventually starts climbing up towards Mirador Lago Grey. The top of the hill is a great place to stop and rest because there’s a wonderful view of Grey Glacier in the distance. This is also the point where you need to assess if you’ll have enough time and energy to get to the end of the trail and back in time for the last ferry to Pudeto.

Beyond the viewpoint the trail makes a long, steep descent towards the glacier. After some time hiking in the trees, you’ll pass by Refugio Grey and then arrive at a viewpoint near Grey Glacier. After enjoying the scenery, head back on the same trail to return to the ferry dock.

Final Thoughts About the Torres del Paine W Trek Day Hikes
We loved day hiking in Torres del Paine National Park and didn’t feel like we missed out on anything by not doing the full W Trek. Since we were more interested in the hiking and sights than the camping or hostel experience, the way we chose to explore the W gave us the adventure we were hoping for.

By doing the W Trek as day hikes, we got to see all the most significant landmarks without having to carry a huge pack. Every time I passed a tired looking backpacker I was thankful we weren’t burdened by a lot of gear. The only stress we had was making sure not to miss the last ferry of the day, which was really only a concern on the hike to Grey Glacier.

The one downside to doing the W Trek as day hikes was that the Lago Pehoe ferry tickets were expensive. We each had to buy 4 tickets (2 per day x 2 days), and at $35 US or $23,000 CLP a ticket, it added up!
Regardless of the ferry price, we still had an unforgettable experience and wouldn’t change a thing. There’s no doubt that the W is made up of three of the best day hikes in Torres del Paine National Park!

Tips for Doing the W Trek Day Hikes in Torres del Paine National Park
Time Required and Distance: To do the W Trek as day hikes you need at least 3 days to visit each arm of the W and see all the most iconic sites- Torres del Paine (the towers), Cuernos del Paine (the horns), the French Glacier, and Grey Glacier.
- The total distance for the three day hikes, as recorded by my GPS, was 62.1 km/38.6 mi. We could have walked a little closer to Grey Glacier, but were worried about not having enough time to get back to the ferry.
- If you have a fourth day, you could complete all sections of the W by adding in a day hike along Lago Nordenskjold (leaving from the Torres del Paine Welcome Centre near Hotel Las Torres).
Best Time to Hike: The best time to hike in Torres del Paine National Park is in summer (December to February) because of the warmer temperatures and long daylight hours.
Park Pass: You must have a park pass to go hiking in Torres del Paine National Park and there are ranger stations where you could be asked to show it. Buy your park pass at one of the park gates and bring it with you on your hikes.
Facilities: Along the trail there are shelters/refugios where you can buy food and drinks and use the washrooms (some you have to pay). At the campsites there are outhouses.
Gear/What to Bring: Wear supportive, sturdy hiking shoes and bring hiking poles. Dress in layers because the weather can change quickly. The park is known for its strong winds, so keep that in mind when deciding what clothing to bring.
Lago Pehoe Ferry: The ferry ride across Lago Pehoe takes 30 minutes. The boat leaves from the dock behind Cafeteria Pudeto. The ferry schedule changes throughout the year and an up to date itinerary and rates can be found here. Plan to catch the earliest ferry leaving Pudeto in the morning (9:00 am in high season) and the latest one leaving Paine Grande in the evening (6:35 pm in high season).
- Ferry tickets are paid for with cash once you’re on the boat. The ferry’s website gives prices in U.S. dollars for foreigners but we were able to pay in Chilean pesos. I suggest bringing both currencies, just in case.
- The first and last ferries of the day are the most popular and people start lining up before the departure time, so it’s best to arrive early.
Information was correct at the time of publishing, but can change without notice. Please confirm directly with service providers.

Accommodations in Torres del Paine National Park
For your convenience, here is a list of HOTELS IN TORRES DEL PAINE NATIONAL PARK and PUERTO NATALES . Please consider booking your accommodations through the included link. It costs nothing extra and helps support this website. Thank you!
More Patagonia Destinations and Travel Guides
- MOUNT FITZ ROY HIKE- HIKING TO FITZ ROY AND LAGUNA DE LOS TRES IN EL CHALTEN
- Visiting Perito Moreno Glacier- A Spectacular Glacier in Los Glaciares National Park
- HIKING IN TIERRA DEL FUEGO NATIONAL PARK- HOW TO SEE THE PARK ON FOOT
Follow Us On Social Media
Facebook | Instagram | X | Pinterest
Join the Facebook Group
- Testimonials
- T’s & C’s
Torres Del Paine W Trek
East to West
Torres del Paine W Trek East to West
Torres del paine w trek east to west introduction.
Hiking the Torres Del Paine W Trek East to West means that you are starting at the trail head located close to Hotel Las Torres. Also in this sector is the Eco Camp and Refugios Central and Norte. In addition, the Torres del Paine Welcome Centre is also located in this area.
Typically, a person will start their trek from the above-mentioned area and hike 2hrs up to the Refugio Chileno. Basically, Refugio Chileno is the place to stay for your first night on the W Trek, if there is space. Above all, the trek from Refugio Chileno is only 2hrs to the iconic Torres Base, which is where the lagoon is located at the base of the three tower spires, after which the Park gets its name “Torres”, meaning “Towers” of Paine.
Direct W Trek Request Email: [email protected]
After the torres base.
Following a visit to the Torres Base and a night at Refugio Chileno the trail comes back down to a point where it will fork right and lead to where Refugio, Cabins and Serviced Camping Cuernos is located. This is a main stop off for people trekking the W. Alternatively, there is an option to walk a further 1hr and stay the night at Domos Frances. Moreover, staying at Domos Frances means that you will be one hour closer to the entrance to the French Valley.
After Cuernos, trekkers have the option to go into the stunning French Valley and back out, or cut it entirely and hike on to Refugio Paine Grande.
Refugio Paine Grande is a large refugio and also the start, or drop off point, for the catamaran that operates between Paine Grande and Pudeto. Some people terminate their Trek here, whilst others prefer to do the “full W Trek” and continue on to Refugio Grey, located at the far western arm of the trail, close to Glacier Grey. The trail will pass beside the Grey Lake and at one point, on a clear day, there is a spectacular view of the lake and Grey Glacier at the end, coming down from the Southern Ice Field of the Andes.
Advantages to Trekking East to West
Many of our clients ask the question: Which is the best direction to hike the W Trek Trial? Our answer is always, “in reality is does not matter”. As long as you stop regularly to admire the views, you will get the same views. However, if the prevailing wind is blowing, hiking East to West will mean that you are headed IN TO the wind.
Our Suggestion
Here at ExperienceChile.Org we have developed thousands of Torres del Paine W Trek itineraries. The reality is that the first thing we do is to get you the accommodation. Without the accommodation nailed you cannot do the trek, therefore this is the first base reality.
Once we have the accommodation confirmed we then look at all the other logistics connected to your wider travel itinerary. For these reasons, should we take care of all your requirements in an, and around Patagonia, you will have a lot of hassle taken off your mind!
Our East to West Sector Breakdown is over on our W Trek Description Page – See Link Below

Please Send Us Your Enquiry
For the best service please supply us with as much information as you can. For example, where you want to go, what you want to do, what you want to experience and how much money you want to spend (or do not want to spend!). How many people, what type of beds (matrimonial, twin, single etc.)
In the event that you are a VIP in any of the fields such as celebrity and/or political and/or business, and you need “special attention”. For example, privacy and/or security for your trip please use an alias in the enquiry but mention that you are VIP and one of the directors will handle your request and keep your real name and details confidential.
Ask us to handle ALL of your South America, or Chile trip and we WILL include some items for free or at special lower-than-public rates. How much we can offer you depends on how much we can arrange and book for you. [email protected]
Remember, our specialty is to create a travel itinerary custom-built to your needs.

The W Trek in Torres del Paine

ACTIVITY LEVEL
Moderate/ advanced, santiago, chile.
Download our W Trek itinerary:
W Trek Adventure in Patagonia
J oin the explorer’s passage on the adventure of a lifetime to the world-renowned region of patagonia the w trek zigzags through the heart of chile’s iconic torres del paine national park, a captivating land where the mountain peaks form stunning granite towers and the glacier-fed lakes glisten turquoise blue. this hike in patagonia is named after the w-shape it forms on a map, running along the base of the iconic mountains before doubling back into the valle francés (‘french valley’) at the very heart of the natural reserve. this wild patagonian region will draw you in and undoubtedly make it very hard for you to have to go back home at the conclusion of your trip, explore patagonia with tep, customizable itineraries.

P refer an extra day on the W Circuit, so you can have more time to absorb all that Patagonia has to offer? Want to split your time between locations in Argentina and Chile? Perhaps you would also like to add a private guided tour of colorful Valparaíso, or experience a dark sky astronomical tour in the Atacama Desert, or even hike a glacier or kayak in Torres del Paine? No problem. We can weave your interests and your timeframe into our existing itineraries so that every detail of your extraordinary trip unfolds just the way you want it to.
We take care of everything.

W e go above and beyond our competitors in handling every aspect of your W Trek trip, so that you can focus exclusively on experiencing all that Chile and Patagonia have to offer. Our trips are all-inclusive, crafted with the intent of providing you with an unforgettable adventure travel experience. All you have to do is show up at the airport in Chile!
Responsible travel.

T he Explorer’s Passage is a member of Sustainable Travel International, a partner/supporter of the Leave No Trace Center for Outdoor Ethics, as well as a supporter of the Center for Responsible Travel (CREST). We very proudly incorporate the principles of these organizations throughout your Torres del Paine adventure.
Let’s plan your trip today:.

Click below to download our Sample W Trek Itinerary
Trip Highlights
- Explore Santiago on a private guided tour , and experience the sights, sounds, and tastes of one of South America’s most impressive capital cities;
- Journey deep into the Torres del Paine National Park as you hike the W Trek , one of the greatest multi-day hikes in the Western Hemisphere, and find yourself surrounded by the majesty of the soaring peaks of the Andes, the peaceful woodlands, the mammoth glaciers, the unique wildlife, and the rushing streams of Patagonia;
- Ride a boat through the Strait of Magellan to Magdalena & Marta Islands, where you can spot Magellanic penguins, sea lions, and even dolphins;
- Relax in the comfort and luxury of 4 and 5 Star accommodations before and after the trek – featuring some of the best hotels in Chile (note: 3.5 – 4 Star hotel package is also available).
From $2,350 per person
*More info. on pricing
Pricing starts at $2,350 USD
Single Supplement Hotels: from $495 USD
Single Supplement Tents: from $550 USD
More questions? Read more about pricing here
START DATES
Custom dates available to hike the W Trek all year round.
To inquire on a custom date, please contact us !
Starts at 6 Days / 5 Nights (minimum hiking in Torres del Paine is 4 full days / 3 nights)
ACCOMMODATIONS
Various Options*
In cities/towns, choose between 3.5 – 4 Star or 4.5 – 5 Star hotel options. While hiking in Torres del Paine National Park, choose between mountain huts, camping tents, hotel or geodesic domes (hotel/domes in Central Sector only), and/or cabins (in Cuernos Sector only).
*Read about your Accommodations in Chile
MAX. GROUP SIZE
All Private Groups
(no minimum or maximum)
Moderate/Advanced* Activities: multi-day hiking on the W Trek route (total trekking distance: ~88 kms / ~55 miles)
*Please refer to our Trip Activity Level Guide for more information
Please Note – the Trip Activity Level Guide is for guidance only and provides a general sense of what you should expect on our trips. Actual times, distances, and elevation can be outside the ranges outlined below.
Trips designated “easy” are perfect for first-timers, or travelers looking for a mild physical challenge. hikes, treks, and horseback rides are short and terrain is typically flat, at an elevation not exceeding 5,000 feet. on paddling trips, river currents move swiftly, thus minimal paddling is required..

“Moderate” trips are more active and require a bit more endurance. Hikes, treks, and horseback rides includes occasional steep ascents. Elevation can occassionaly reach up to 15,000 feet. River currents are moderate and some stretches include Class 1-2 rapids.

Trips marked “Advanced” require strong physical stamina, as we’re often active for 8+ hours per day. Hikes, treks, and horseback rides include traversing more rugged and mountainous terrain, at elevations that can reach up to 15,000 feet. Rivers currents are moderate to swift and often include paddling white water through Class 1-3 rapids.

TEP’s most physically demanding trips fall into the “Explorer” category. Expect 8+ hours of activity per day. These trips are demanding, yet attainable for those seeking the challenge. Hike, trek, and horseback ride on rugged and mountainous terrain with frequent steep ascents. Elevation may exceed 15,000 feet. Rivers currents are moderate to swift and often include navigating white water through Class 1-3 rapids.

More Questions? Speak to one of our Adventure Consultants at 855-208-6800 to determine if this is the right trip for you OR Read more about the Trip Activity Level Guide

(note: this map only corresponds with the itinerary’s 4 full days of hiking the W Trek in Torres del Paine National Park. The 5 day trekking option is very similar, except that it splits the final day [Paine Grande to Grey and back] in half, into two days of equivalent distance)
Sample trip itinerary, 11 day / 10 night trip daily overview, day 1: arrival in santiago.
Bienvenidos a Chile! Once you arrive at Santiago International Airport, you will be greeted by a member of our team. Experience the scenery and history in the beautiful capital city of Santiago while you are transported to your hotel. Later this evening, you will have free time to explore this extraordinary city and enjoy one of its best restaurants.
Day 2: Santiago Tour
Day 2: tour of santiago.
Today, on a private half-day tour, you will be able to truly experience the sights and sounds of one of South America’s most impressive capital cities. The tour is flexible but will take you to visit the heart of the city and its emblematic sites such as the Plaza de Armas, the Cathedral, Santiago’s historic Central Postal Office, and more. We will also visit the Moneda Palace, which is the government’s headquarters as well as the traditional neighborhoods of the historic city center. Later, for lunch and dinner, you will be able to explore the gastronomy of the city at your leisure, at restaurants of your choosing.
Day 3: Santiago to Punta Arenas
This morning you will be heading south to Punta Arenas! Upon arrival we will provide you with a 2.5 hour guided private tour of this southernmost city, which has been shaped by a multitude of cultures – leaving a valuable historical and cultural legacy that still endures to this day. The city’s population descends mainly from Croatian, Spanish, Italian, German, as well as English immigrants.
The tour begins with a visit to Cerro Mirador, where you get a panoramic view of the city and the Strait of Magellan. You will explore main streets and avenues, various monuments, as well as the Maggiorino Borgatello Museum. This museum features a unique ethnological and natural history exhibit with a collection of flora and fauna specimens from Chile’s Magallanes Region, in addition to handicrafts and artifacts from the region’s indigenous Yaganes, Onas, and Alacalufes people, and information on the history and lives of the first European settlers. Later, the tour concludes in the Muñoz Gamero main square.
Day 4: Magdalena & Marta Islands, then Puerto Natales
Day 4: tour magdalena & marta islands, then go to puerto natales.
Early this morning you will be heading to Magdalena Island with a guide so that you can spend an hour with South America’s largest colony of Magellanic penguins! Afterwards, you will continue through the Strait of Magellan to Isla Marta to see sea lions, imperial cormorants, and hundreds of southern gulls. While there, you may even spot some dolphins! Later, after you return to Punta Arenas, you will board a bu s nort h to Puerto Natales. You are one step closer to your journey to Torres del Paine National Park! Then in the evening, feel free to explore the town’s variety of restaurant options for dinner.
Day 5: Puerto Natales to Torres del Paine National Park
Following breakfast at your hotel in Puerto Natales, you will have the morning to explore the town a bit more. Later, you will travel by bus to Torres del Paine National Park. Enjoy dinner in the Central Sector as the excitement undoubtedly builds for your W Trek adventure ahead, where you will have the rare privilege of exploring one of the planet’s most striking national parks!
Day 6: First Day of W Trek (to Las Torres Lookout)
Today, you will start early in order to begin your hike of the W Trek – one of South America’s most famous trails. Today’s destination during your Patagonia hike is the iconic Las Torres Lookout Point! During the first stretch, you will walk through the pampa, cross the Ascencio River, and then hike up to Los Vientos Mountain Pass, where you will enjoy amazing views of the valley and lakes. You will continue your journey to the Chileno Mountain Refuge, and then go deep into a lenga beech forest up to La Morrena, where the hardest part of the day’s hike begins. From there, you will be following a rock trail to the spectacular Las Torres Base Lookout Point. Later, you will return to the Central Sector to have dinner and rest.
Daily trekking distance: approximately 21.5 kilometers / 13.5 miles
Day 7: Second Day of W Trek (Nordenskjöld Lake & Francés Sector)
Another beautiful day in Chile – today is your 2nd full day of hiking the W Trek! You will walk along the shores of Nordenskjöld Lake, below the peaks of Almirante Nieto as well as the striking Cuernos del Paine. During the hike, you will enjoy magnificent views of Los Cuernos, hanging glaciers, lakes, and the abundant vegetation and wildlife. Later, you will have dinner and sleep in the Francés Sector.
Daily trekking distance: approximately 18.5 kilometers / 11.5 miles
Day 8: Third Day of W Trek (French Valley)
This day features one of the most memorable portions of the W Trek: the undeniably beautiful Valle Francés. Once you are packed and ready to start, you will begin early with a light hike to the Italiano Campsite. At this point, you will progress through the woods up the Francés River Valley. You will eventually reach the Francés Lookout Point, where you will enjoy one of the most breathtaking views in all of Torres del Paine National Park: the view of the valley framed by the Paine Grande, Catedral, Hoja, Máscara, Espada, Aleta de Tiburón, and Cuerno del Norte mountains. The landscape will undoubtedly leave you speechless! Later, you will begin the descent to the Paine Grande Sector for the evening.
Daily trekking distance: approximately 24 kilometers / 15 miles
Day 9: Fourth Day of W Trek (Grey Glacier & Pehoé Lake)
Day 9: fourth day of w trek (grey glacier and lake pehoé).
Later on this day, you will reach the third major milestone of the W Circuit: the incredible Grey Glacier. The trail goes around the Paine Grande, the highest peak in the mountain range (3,050 m), with particularly impressive views of its hanging glaciers. Walking amidst Antarctic beech trees (ñirre), Dombey’s beech (coigüe), and Chilean firebush (notro), you will eventually reach the first lookout point of Grey Lake, where you will spot floating pieces of glacier. You will then continue hiking north towards the imposing view of Grey Glacier to reach the Grey Mountain Refuge. Later, after fully taking in the sights of the massive glacier, you will return to the Paine Grande Sector and board the catamaran that will take you across Pehoé Lake to Pudeto station. You will then take the bus from Torres del Paine National Park back to Puerto Natales.
Notes: we can also arrange optional add-on excursions in the Grey Glacier area if you are interested: kayaking (~3 hour activity, ages 16-65, 225 lbs. weight limit) and/or ice hiking (~5 hour activity, ages 16-65). These activities will require more time on your itinerary, and potentially also an additional overnight in the park. Please contact us for more details.
Day 10: Return to Santiago (by way of Punta Arenas)
Day 10: return to santiago (via punta arenas).
Today you will transfer from Puerto Natales to Punta Arenas, then fly from Punta Arenas to Santiago.
Day 11: Santiago (Final Day in Chile)
Today, you will have breakfast at your hotel and enjoy a few more hours in this stunning capital city, before departing Chile.
Please contact us for a complete detailed itinerary.
Ready to Book? Call Us
Learn more below, client testimonials, read what our clients are saying about this once-in-a-lifetime experience:, “i cannot recommend the explorer’s passage enough”, “everything went beyond smooth. it felt like there was a guardian angel over our shoulder the whole time. trip of a lifetime”.

Trip Accommodations
For the nights before and after the w trek, you can relax in the comfort and luxury of 5+ star premium accommodations – featuring some of the finest hotels in chile. alternatively, a 3.5 – 4 star or 4 – 5 star hotel package can be reserved instead:, 5+ star accommodations, la yegua loca | punta arenas, chile.
La Yegua Loca Boutique Hotel is a charming gem in Punta Arenas, located just below the iconic Cerro de la Cruz city viewpoint, which offers panoramas of the Strait of Magellan and the city. Situated in a lovingly-restored 1920s house, the hotel is a tribute to the rich heritage of Patagonia; through their design and decor, the 15 themed rooms pay homage to the region’s traditions. Each room features central heating, private bathrooms, king or twin beds, Wi-Fi, and modern amenities. La Yegua Loca also hosts La Cocina de la Nonna Restaurant, which serves a blend of Croatian-influenced and regional Patagonian dishes. The hotel’s bar is a perfect spot to relax and enjoy signature drinks, such as a Potro Sour or a Ruibarbito.
Hotel website
The Singular Patagonia | Puerto Natales, Chile
What really sets this hotel apart are its facilities’ historical significance, situated on the grounds of the former Puerto Bories Cold Storage Plant, a National Monument since 1996 and one of Patagonia’s most important agricultural and industrial facilities. Guests can explore the plant’s preserved antique machinery on a guided tour, delving into the rich story of the Sociedad Explotadora de Tierra del Fuego and the role it played in shaping the region’s history and culture.
4 - 5 Star Accommodations
★ ★ ★ ★ – ★★★★★, 4 – 5 star accommodations, hotel w | santiago, chile.

Against a panoramic backdrop of the snow-capped Andes, the W Santiago reinvents style and sophistication. The city’s most fashionable enclave is a fascinating universe of urban innovation amid cobblestone streets and glitzy skyscrapers. Each luxurious room in this 5-star hotel offers wi-fi and TVs and features intriguing modern design elements, signature W beds, floor-to-ceiling windows, and Whatever/Whenever® service. The hotel has several on-site dining options including Karai (a Japanese-Peruvian fusion restaurant), NoSo (a French restaurant), Terraza (a Chilean bistro), and the W Lounge. There is also an upscale rooftop bar, a full gym/wellness center, and a rooftop pool with impressive city views.
Hotel Cabo de Hornos | Punta Arenas, Chile

Remota | Puerto Natales, Chile

Remota is a world-class refuge overlooking the Última Esperanza Sound, just a few minutes north of Puerto Natales. The lodge is designed very deliberately to connect with the nature around it – not to compete with it – and offers excellent views of Chilean Patagonia. Its 72 contemporary rooms are remarkably spacious and showcase natural features such as rustic wood beams. The hotel features a pool, sauna, bar, wi-fi enabled common areas, as well as an on-site restaurant that serves fine meals crafted with local products. Remota is an excellent starting point from which to begin your W Trek adventure!
3.5 - 4 Star Accommodations
★ ★ ★½ – ★★★★, 3.5 – 4 star accommodations, hotel pullman el bosque | santiago, chile.

Nestled in the upscale Las Condes area of Santiago, Hotel Pullman El Bosque features modern, bright rooms with streamlined wood furnishings. Each room offers free wi-fi and TVs, and room service is also available. The hotel has an on-site swimming pool, a 24-hour fitness room, a business center, an airy restaurant/bar with a terrace, and a full buffet breakfast is included.
Hotel Diego de Almagro Punta Arenas | Punta Arenas, Chile

Hotel Natalino | Puerto Natales, Chile

Natalino is a contemporary hotel in Puerto Natales, with some of the most striking designs of any hotels. It is an excellent launching point before heading into Torres del Paine National Park! The hotel has a terrace, indoor pool, fitness center, and guests can also enjoy a drink at the bar. Breakfast and wi-fi are included for all rooms.
Accommodations in Torres del Paine National Park
While experiencing the w trek in torres del paine, you can choose to stay in mountain huts or camping tents (or, hotel las torres or geodesic domes in the central sector). these accommodation sites feature bathroom facilities with showers, personal lockers (*in huts only), and some even have pay-as-you-go internet available in common areas. drinks (including beer and wine) and snacks are available for purchase at these sites along the trail. see below for more information:, mountain huts | torres del paine national park, chile.

Huts on the W-Trek route offer communal dorm-style accommodation with bunk beds, comparable to many other mountain huts or lodges in other parts of the world. These huts can be rustic but comfortable (especially after long days of trekking!), though the best part are the warm communal dining areas where you can meet and mingle with other fellow adventurers.
Camping Tents | Torres del Paine National Park, Chile

W Trek Extra Support
Personal attention before your w circuit trip.
There is no other operator in the travel industry that will provide the same level of personal attention to you before your adventure in Patagonia. We get very involved with our travelers before each trip by offering a series of pre-planning calls in the months and weeks before departure. This provides you with an opportunity to hear directly from us on preparation, trip experience, and training. It also gives you the platform to ask questions about any aspect of the trip.
Staff Support
Our knowledgeable support staff take care of the details of your in-country transportation, lodging, meals, tours, Torres del Paine park fees, and activities. We’ve even scheduled in a bit of free time for you to explore, relax, shop, or eat on your own.
Ready to Book? Contact Us
W trek photos.

More Trip Inspiration
Annapurna Circuit Trek
Annapurna Follow an ancient trade route through the Himalayas on this challenging trek EXPLORE Nepal | Days: 18 | From: $4,295
Arctic Cruise
Arctic Cruise Discover glaciers and wildlife on an icy arctic voyage EXPLORE Norway | Days: 6+ | From: $5,959

Everest Base Camp
Everest Base Camp Trek the Himalayas on one of the planet's most extraordinary journeys EXPLORE Nepal | Days: 14 or 18 | From: $4,295

The Ultimate Guide to Hiking the W Trek in Patagonia: Full Itinerary, How to Self Book, Cost Breakdown & More!
March 28, 2023.
Hiking the W Trek in Torres Del Paine National Park is an incredible experience that will reward you with endless views and memories that will last a lifetime. You will see jagged mountain peaks, aqua blue lakes, waterfalls, glaciers and more as you take the journey. If you’re lucky, you’ll also see giant condor birds and make new friends as you stay at the inns along the way.
I found the W Trek to be incredibly rewarding and definitely worth the effort, planning and costs. The trek is also perfect for those who are newer to backpacking but are experienced day hikers. Trekking during the day with inns to stay overnight is the perfect combination!
This blog includes a W Trek itinerary and covers everything you need to know to book the W Trek self guided, pack for the W Trek and be prepared. This is based on my experience visiting over New Year’s in December 2022 and January 2023.
Table of Contents
Overview of the w trek, when to hike the w trek, hiking the w trek self guided vs with a guide, how to book the lodging for the w trek, booking an entry ticket to torres del paine national park, booking transportation between puerto natales and torres del paine national park, w trek planning checklist (for self booking), tips and important things to know before hiking the w trek, day one of the w trek, day two of the w trek, day three of the w trek, day four of the w trek, how should you end the w trek, ways to save money on the w trek, what to pack for the w trek, other ways to see torres del paine national park, faqs about the w trek, final thoughts.
- Located in Torres Del Paine National Park, Chile
- 50 miles/80 km
- Typically done in 4 Nights, 5 Days
- The highest elevation is at the Base of Towers, 2,788 feet above sea level
The W Trek refers to a multi-day hike that is shaped like the letter W. This area is unique because there are several inns along the trek where you can spend the night. You can choose between hostel-style lodging, have them provide you a tent at the campgrounds or bring your own tent. Each inn serves food, has restrooms and showers and even offers wifi for an additional fee.
The W Trek is about 50 miles and is typically done in 5 days and 4 nights. There are very few technically challenging sections of the trail, but there are long days with steep climbs. If you have experience hiking 10+ miles in a day in mountainous areas and feel that you can do that for a few days in a row, then you will be set up for success.
Because of the amenities offered, this is a great trip to do if you’re new to backpacking or if you just prefer to stay in a bed instead of a tent. If you stay in the refugios and purchase their full room and board package, you will not have to carry all of your food, water and sleeping equipment. The lighter you can pack for the trek, the more comfortable you’ll be.
While the hike itself is not overly difficult, dealing with the unpredictable weather is the toughest part. I experienced really high winds during my trek. Bad wind is common and it’s not uncommon to experience heavy rain, fog or even snow. You’ll want to make sure you’re prepared with the good layers and keep your expectations low in case it’s too foggy to see some of the best views along the trail.

For a shorter version of this blog, check out my top 30 tips for hiking the W trek!
You will most likely hike the W Trek in the summertime for the Southern Hemisphere (winter in the Northern Hemisphere). The W Trek is typically open to hiking self-guided from October to the end of April, and you’ll likely have the best weather from November to March. I hiked the trek over New Years (December and January), which was really special!
If you would like to hike in the park during the winter months, you can do so with a guide.
There are several companies that offer guides if you’re not comfortable hiking the W Trek on your own. This can be a great option for some!
However, I think a guide is unnecessary, as the trail is well marked and easy to follow. It all depends on your comfort level, abilities and budget.
If you are looking for a guide, some companies that offer services include Swoop Patagonia, Tangol Tours, Chile Nativo and many more.
How to Self Book the W Trek
Many people assume you have to go through a third party company to book the W Trek. A third party would certainly be a little bit easier, but if you prefer to do it all yourself, I’m going to tell you exactly how!
Two separate companies own the various lodges in Torres Del Paine National Park: Vertice Travel and Las Torres Patagonia (previously called Fantastico Sur).
For this itinerary, you will book with Las Torres Patagonia for the first two nights at Los Cuernos and El Chileno, and Vertice Travel for the second two nights at Paine Grande and Refugio Grey.
You can book directly with each company on their websites.

To book El Chileno and Los Cuernos, start on the Las Torres website . Choose to book the ‘shelters’ and then make reservations at the Central Refuge and the Chilean Refuge. Upon booking, you can select to add on full room and board (breakfast, packed lunch and dinner) or any combination of only dinners, only breakfast, etc.
To book Paine Grande and Refuio Gray, start on the Vertice Travel website. Under accommodations, make reservations at ‘Refuge & Camping Paine Grande’ and ‘Shelter & Camping Gray.’ When you book, you will select that you’re doing the W Circuit and be able to book both lodges at once, along with the full room and board.
If you have any dietary restrictions, be sure to request that when booking. If you don’t see the option, send an email to their customer service to confirm. I am a vegetarian and all of the inns were very accommodating!
I booked my trip for December/January in May and June. In 2022, the reservations for Las Torres went on sale well before the reservations for Vertice Travel. So, I booked half of the trek and then waited until the Vertice released their openings. Keep an eye on their social media platforms and/or send an email to their customer service to stay up to date.
After your lodging and transportation is squared away, it is very important to book an entry ticket into the national park. I did this a week or two ahead of time.
To buy your ticket, go to aspticket.cl and select ‘buy or reserve.’ You will then select the correct park, which is listed as ‘Parque Nacional Torres del Paine (Venta)’ in Spanish. From there, you will input your entry and exit dates in and out of the park.
You will then need to fill out a variety of information, such as your birthdate and passport number, where you are staying each night of the trek, if you are traveling with a guide and more.
When you complete the form, you will pay the fee ($49 USD per person at this writing) and receive an email with a QR code. Make sure you have this QR code saved offline (and/or printed) for when you arrive at the park! The rangers will scan it upon arrival and there is not reliable cell reception.
The cheapest and easiest way to get between Puerto Natales and Torres Del Paine National Park is by bus! There are a few different bus companies that run multiple daily trips between the city and the park.
I booked my tickets a week or two in advance with Bus-Sur, and I used busbud.com for easy booking. For the beginning of the trek, I recommend leaving Puerto Natales as early as you can (mine left at 6:45AM).
Keep in mind that you will be starting and ending at different places inside the national park.
For the beginning of the W Trek, book a ticket from Puerto Natales (Rodoviario) to Terminal Laguna Amarga . For the ending of the W Trek, book a ticket from Pudeto (Catamaran Paine Grande) to Puerto Natales (Rodoviario). I recommend an afternoon or evening time for the end of the trek, my bus left Pudeto at 2PM.
The bus rides will take about two hours and there are some great views along the way. Be sure to print out your bus tickets ahead of time and arrive a little early.
If you’re booking everything yourself, here is a quick checklist to make sure you have everything you need before setting out!
- Los Cuernos
- Paine Grande
- Refugio Grey
- National Park Entrance Ticket
- A morning ride from Puerto Natales to Laguna Amarga to start the trek
- An afternoon or evening ride from Pudeto to Puerto Natales to end the trek
- (Optional) A glacier trek or glacier kayaking from Refugio Grey (book with Bigfoot Patagonia)
- (Optional) The catamaran ride on Grey Lake

- Expect all kinds of weather, especially high winds. Wind is very common in the area and can be really intense. Also know that it’s possible fog will sock in some of the most epic views. Keep your expectations low just in case.
- You can drop off your heaviest gear at parts of the trail! Bring a day pack and drop your packs at El Chileno and Camp Italiano before ascending up the most difficult parts of the trail.
- The towers will be crowded but the rest of the trails won't be. But overall, the W trek is not the best for solitude and you will often see other people around. It’s a good social hike because you can meet people every night at the inns.
- The elevation of this region is relatively low (2,788 feet is the highest point on the W Trek), so you shouldn’t have an issue adjusting to the altitude.
- Each inn on the trek has drinking water, food and alcohol for sale, plus wifi for purchase and more. You will not exactly be roughing it on this journey! That being said, you should bring a water filter just in case you’re sensitive to the water or want to make sure you can fill up at streams on the way.
- Download the map of the trail on All Trails to follow along with your progress throughout the trail.
For a full list of tips for hiking the W Trek, check out my top 30 W Trek tips !
W Trek Itinerary: East to West
I hiked the W Trek from East to West. You can also hike it in the opposite direction, but hiking it east to west tends to be more common. I liked hiking it from east to west because I got the most difficult portions out of the way early. It was also fun to end the trek with a gorgeous catamaran ride across Lake Pehoe!
Below is my full itinerary for hiking the W Circuit! I hiked 50 miles over 4 nights and 5 days total.
- Take the bus from Puerto Natales, hike to the Base of the Towers, stay at El Chileno
- 9.9 miles, 3,000 feet of elevation gain
The best way to get to Torres Del Paine National Park is by taking a bus from Puerto Natales. The bus ride will take about 2 hours to reach the main entrance of the park (Laguna Amarga), which is where you’ll be exiting the bus for this itinerary.
When you arrive, you will need to exit the bus and have a ranger scan your entry ticket. You should have your ticket saved offline ahead of time and ready to show from your phone.
There was a bit of a language barrier for us here, as none of the instructions were given in English. How it worked was that everyone got off to get their ticket scanned here, whether you were getting off here or not. After they scanned our tickets, we went back to the bus to collect our backpacks.
From there, you will take a smaller shuttle bus to get to the start of the W Trek. This bus costs an extra fee of 4000 Chilean pesos per person in cash. It was a quick, 10 minute bus ride to reach the Torres Del Paine Welcome Center, where you will officially begin your trek! The welcome center has packed lunches, hiking poles and other items if you have forgotten something.
I calculated the day one milage to be 9.9 miles with just over 3000 feet of elevation gain. In terms of steepness, it was definitely the hardest day of the trek for me.

As you begin the trail, you’ll start with a short and flat walk back to Hotel Las Torres Patagonia. This is where most people stay to do a day hike up the Towers, and some people stay here for the first night of the W trek. It’s an option, but I definitely recommend staying in El Chileno instead if possible!
The trail is flat at first but you will quickly begin to gain elevation. A little under 2 miles from Hotel Las Torres, you’ll come to the first fork in the trail. Stay to the right as you continue up into the Windy Pass.
This portion of the trail gets a bit steep and there is a chance you’ll experience high winds. Luckily, there are some amazing views whenever you stop to take a break. Two miles from the hotel, you’ll reach a high point and then need to descend to reach El Chileno. El Chileno is located right next to the river and the perfect place to stop for lunch.
You can use the cubbies inside of El Chileno to drop off your heaviest gear before continuing up to the Towers. Depending on the time of day, I don’t recommend spending too long on a break at El Chileno. At some point in the afternoon, the park rangers will stop letting anyone hike up to the Towers, so be sure to stay on schedule.

Since you will be staying at El Chileno tonight, go ahead and check in when you pass through. Your room will probably not be ready, but you can let them know you're there and be assigned a time for dinner.
The hike to the Towers gets quite steep for the last 0.7 miles. There is a bit of rock scrambling and a lot of dusty areas if conditions are dry. Be sure to watch your step and take your time. This is also a popular day hike so you’ll likely encounter crowds and need to spend a lot of time stepping aside for other hikers.
But the crowds and steep scrambling are worth it. At the top, you’ll be rewarded with an incredible view face to face with Lago Torres and the three Towers. The towers; Torres d'Agostini, Torres Central and Torres Monzino, are the most iconic sight in Torres Del Paine National Park, and certainly could be considered among the best views in the world. On a clear day, the towers stand tall as a backdrop to the bright turquoise lake below.

After enjoying the towers, make your way down to El Chileno for your first dinner of the trek. While El Chileno had my least favorite food of the W trek inns, I loved the atmosphere. Before or after dinner, you can hang out outside where there are picnic tables overlooking the river. Dinner at El Chileno is served at long tables and offers a great chance to get to know fellow hikers.
The rooms inside El Chileno were pretty basic. My room slept 6 people over 3 bunk beds (but there were only 4 of us for this night). There were shared bathrooms divided by gender down the hall. Overall, El Chileno is nothing fancy but I had no complaints.
- Hike from El Chileno to Los Cuernos
- 8.2 miles, 1,174 feet of elevation gain
On day two of the W trek, you’ll hike from El Chileno to Los Cuernos. In this itinerary, this day is tied for the easiest. The day will begin uphill as you hike out of the valley where El Chileno sits, but then it will be mostly downhill the rest of the day.
This trail includes many fantastic views of Nordenskjöld Lake. The lake is a brilliant aqua green color and there are some beautiful viewpoints.

This is the day where I saw a large hoard of condor birds flying up above and sitting on nearby cliffs. Condor birds are the largest flying birds in the world and they’re fascinating to watch!
Los Cuernos is owned by the same company as El Chileno and has a similar vibe. I actually was here on New Year’s Eve, so we were served a special meal. They also threw a NYE party for the staff (that we were invited to as well). I’m not sure what it’s like on other nights, but the atmosphere was lively and celebratory. This meant it was loud and hard to sleep, so you may want to bring along ear plugs.
Los Cuernos also offers private cabins that sleep 2 people, so try to book one of these if you prefer things a bit quieter.
- Hike from Los Cuernos to Paine Grande and into the French Valley on the way
- 16.4 miles, 3,102 feet of elevation gain
Day three is the longest day of the W Trek. You will hike up into the French Valley, the center of the ‘W,’ to reach Mirador Britannica. Then you will continue onto the third inn of the trip, Paine Grande.
If you do the entire trail, it will be about 16.4 miles and 3,102 feet of elevation gain. I turned back early due to high winds and fog on this day, so I only went about 13 miles.
The trail starts out relatively flat and easy until you reach Camp Italiano. If you have a very windy day like I did, watch out for the beach areas. The beaches are very exposed and the wind almost knocked us over at one point.

When you reach Camp Italiano, there are some outdoor shelves where you can drop off your heaviest gear. There was also a whiteboard here that had information on what time the viewpoints would close for the day and a warning about the high winds.
The hike up into the French Valley is steep at times, but felt more gradual than the hike to the Towers. You will go in and out of forest areas and viewpoints. Even if you just go part of the way, there are some fantastic views where you can admire the surrounding mountains and look for waterfalls, avalanches and glaciers in the distance.
There are four main viewpoints along the way. When I reached the second one, Mirador Valle de Frances, the wind was extremely strong, so many people turned around here. We went a little bit further, but decided to turn around before making it to the third.

After returning to Camp Italiano to pick up your gear, it will be about 5 more miles to reach your inn for the night. It’s mostly downhill and relatively easy. However, the wind was very intense for me and made the miles feel quite long.
There was one suspension bridge crossing that felt particularly daunting, as the wind was shaking the bridge all over the place while we crossed over a river canyon.
You will also pass an area of wildfire damage. Unfortunately, there have been multiple cases of fires started from the mistake of tourists in the park, so please make sure to follow the rules. Open fires are strictly prohibited and camp stoves are only allowed to be used in designated areas.
After this long day, it’s a great feeling to reach Paine Grande. This inn feels nicer than the first two inns, as it’s newer and larger. However, what you gain in newness means that there is less of the great community feeling you get from the smaller inns.
The rooms here are equipped with two bunk beds and more comfortable bedding than Los Cuernos and El Chileno. They also have real lockers if you want to lock up any valuables. Dinner is served buffet style and there is a bar upstairs as well.
- Hike from Paine Grande to Refugio Grey. Optionally, hike up to the suspension bridges and a view of Grey Glacier.
- 6.9 miles, 1,319 feet of elevation gain
- Second hike is 5 miles with 1,014 feet of elevation gain
On day four, you’ll hike to the final inn of the trip, Refugio Grey. You also have the option to hike an additional few miles to see some suspension bridges and close up views of the Grey Glacier, which I highly recommend doing.
The first trail between the two inns is 6.9 miles with 1,319 feet of elevation gain. While it isn’t difficult, this was the windiest area of my trek. The wind made it difficult to move forward at times and definitely slowed us down.

However, the trail has some fantastic views of Grey Lake and about halfway through you’ll start to see the Grey Glacier in the distance. The trail has multiple ups and downs, so you’ll have a nice variety.
At one point about 2 miles from the inn, there is a short portion of the trail where you’ll have to climb down a rock scramble that can be slick. It’s very doable if you have some hiking experience, but I found this to be one of the most technical portions of the entire W Trek.

When you reach the Refugio Grey, there are a few excursions and additional trails you can choose from if you’re up to it. First, you have the option to kayak next to the glacier or go on a guided glacier trek. These activities cost extra and you should reserve them in advance if possible. We reserved the kayaking excursion, but unfortunately it was too windy for us to go out. It had been too windy to kayak for a couple weeks, so keep in mind that this cancellation is very common.
Additionally, you can take a hike up to see some incredible suspension bridges and a view of the Gray Glacier. This trail is about 5 miles with a little over 1,000 feet of elevation gain. It is part of the O Circuit, so you’ll likely see hikers on the O coming the other way.

There are three suspension bridges you can hike to, but I only went to the first two.
The second bridge is especially magnificent. It is quite long and dangles 100’s of feet in the air over a large valley. On one side, you get a fantastic view of the glacier. On the opposite side, you can see a tall waterfall coming down from the mountains. I don’t recommend this if you’re afraid of heights, but it’s a really neat experience if heights don’t bother you.
If you aren’t up for the longer trail, there is also a viewpoint very close to the Grey Inn (a half mile) where you can get a nice view of the glacier.
After an additional hike, an excursion or some rest, enjoy your final dinner of the W Trek. I thought that Refugio Gray had some of the best food for dinner on the trip!
Day Five of the W Trek
- Hike from Refugio Grey to Paine Grande, take the catamaran across Pehoe Lake, take a bus back to Puerto Natales.
- 6.9 miles, 1,208 feet of elevation gain
On your final day on the W Circuit, hike back to Paine Grande to catch the Grande Catamaran. This is the same trail that you did on day four in the opposite direction, but you’ll have about 100 less feet of elevation gain. When you reach Paine Grande, line up to take the catamaran to Peduto.
There are actually catamarans from both Refugio Grey and Paine Grande, and they go different places. I was confused about this, so I’m going to explain the difference and the pros and cons of each.

For the least amount of hiking, you can end your trek from Refugio Gray and take the catamaran across Lago Grey. This journey will take about an hour and costs $75 one way. It will take you to Hotel Lago Grey.
Pros of the Lago Grey Catamaran
- Less hiking! You get to leave from your final lodge via a beautiful boat ride.
Cons of the Lago Grey Catamaran
- It’s about 3 times the cost of the Lake Pehoe Catamaran.
- We were told that this boat is much more susceptible to delays and cancellations due to wind.
- It will bring you to the Lago Grey Hotel, which has fewer transportation options to get you back to Puerto Natales. You may need to stay at the hotel and arrange private transportation.
- This boat is not first come first serve like the Lake Pehoe Catamaran. You should make a reservation before your trek because it is likely to sell out.
For the reasons listed above, most hikers return from the trek via the Lake Pehoe Catamaran. The boat ride takes about 25 minutes and runs a few times a day. Check for the most up to date schedule at Paine Grande.

You cannot make a reservation for the Lake Pehoe boat. You’ll need to wait in line by the dock and board first come, first served. You also need to make sure you have cash - the boat requires $30 USD or $25 Chilean pesos per person, each way. During peak season, they take cash in US dollars or Euros as an alternative to Chilean Pesos.
The boat is quite large so you shouldn’t worry if there is a long line to board. Also note that even though there is a schedule, the boats do not always run on time.
The boat also has stunning views! If it’s a clear day, you’ll get a new perspective of the park and see incredible mountain peaks as you ride through turquoise colored water.
When you reach Pudeto, take a bus ride back to Puerto Natales to end your time in Torres Del Paine National park. There is a small cafe to wait in before your bus ride. You should make sure that you have reserved a bus ticket ahead of time.
I took the second ferry of the day back from Paine Grande (it was scheduled for 11 but ended up being closer to 12) and then waited about 2 hours in the cafe for my 2 PM bus ride. The cafe sold lunch items, coffee, beer and more. There is also a one mile waterfall trail you can enjoy if you have the energy!
When you reach Puerto Natales, celebrate your hard work with a delicious meal, a pisco sour and a nice hotel stay. I loved eating at Cafe Artimana, Cafe Kaiken and La Guanaca Pizza.
How Much Does it Cost to Hike the W Trek?
In December/January 2022/2023, we paid $872 per person to hike the W Trek. This included 4 nights of lodging, full room and board, the bus tickets to and from the park, the ferry at the end and the entry ticket into the national park. We had to pay about $37 extra for a special New Year’s Eve Dinner, so you can subtract that if you’re not going over Christmas or New Years!
Here is the cost breakdown:
Night 1: El Chileno - $125 per person for the bed with sheets, $88 per person for the food
Night 2: Los Cuernos - $125 per person for the bed with sheets, $124 per person for the food (This was New Years Eve so the food cost extra - they did something special!)
Night 3: Paine Grande - $92 per person for the bed with sheets, $61 per person for the food
Night 4: Gray - $92 per person for the bed with sheets, $61 per person for the food
Ferry to return from Paine Grande and end the trek: $30 per person (cash only)
Bus Tickets on Bus Sur between Puerto Natales and the national park: $10 per person each way. There is also a shuttle between the entry to the park to the actual start of the trek that cost $5 per person (chilean pesos only)
Entry ticket into Torres Del Paine National Park: $49 per person
You also have the option to pay extra for wifi, alcohol or extra food at all of the inns. They all take credit cards.
Prices are subject to change, these were the prices for the 2022 - 2023 season.
This does not include flights into Puerto Natales to start and end your trip. This can vary a lot based on where you’re flying from! Note that it is very likely to need to connect through Santiago first.
There are definitely ways to cut out some of the costs!
- You can camp instead of staying inside the inns. The inns all offer options to rent out tents so you don’t have to carry your own. Or you will pay the least if you carry your own.
- You can bring your own food instead of paying for full room and board. I would recommend bringing your own breakfast and lunch items and only paying for dinner if this is something you’re considering. I did not love the breakfast service because on some days, I wanted to leave earlier than breakfast was being offered.

- A backpack that will fit your needs for carrying your things for 5 days and 4 nights. I carried a 40L backpack and thought it was the perfect size.
- A small day pack to carry the essentials for the times you can leave your bigger pack behind.
- A water bladder or water bottle.
- A water filter (We only filled up on water from the inns, which have drinkable water. But it’s good to have a water filter just in case. It depends on your comfort level and sensitivity.)
- Snacks! I did not need any extra food than what was provided from the full room and board, but it’s always good to have some options if there are items in the packed lunches that you don’t like.
- Hiking essentials including a first aid kit , knife, emergency shelter, headlamp and sun protection.
- Your passport, printed out tickets and confirmations, cash and credit card.
- Rain gear. Rain is common on the trek, make sure you have a good rain coat and a rain cover for your backpack.
- Layers. It might get cold, so I recommend bringing a warm hat and gloves.
- Sturdy hiking boots .
- Hiking socks and the clothing you’ll need for 5 days and 4 nights. Avoid cotton and bring items that are moisture wicking.
- Small towel for showering .
- Toiletries such as soap, moisturizer, toothbrush and whatever else you need.
- A second, lightweight pair of shoes to wear around the inns.
- A phone charger and portable battery.
- A buff to help protect against the dust on windy days.
- Insect repellent . I did not encounter mosquitoes, but I’ve heard during certain times of year they can be bad.
- A kula cloth to use instead of toilet paper.
- Trekking poles .
- Ear plugs if noise would bother you in the inns.
For a more detailed packing list for the W Trek, check out my W Trek packing guide !

There are certainly many other things to do in Torres Del Paine National Park besides the W Trek!
If you’re up for a more challenging adventure, consider the O-Trek, which is approximately 68 miles and takes 6-10 days.
If hiking for 5 or more days isn’t your thing (or you have less time) but you want to see some of the park, consider some day hikes.
Day Hike Options Include:
- Mirador Las Torres, the most iconic view in the park, is often done as a day hike. Stay at the Hotel Las Torres and the trail will be about 12.5 miles.
- Take the catamaran from Hotel Grey and hike up to the suspension bridges for a view of Glacier Gray. The hike from Refugio Grey is about 5 miles.
- Hike to the Salto Grande from Pudeto, the trail is 0.9 miles.
- Hike to the Rio Pingo waterfall from Hotel Grey, the trail is 5.3 miles.
There are many more day hike options, these are just a few! You can also go horseback riding, fly fishing or biking or a variety of other activities.

How difficult is the W Trek?
The trail itself is not difficult on the W Trek. It is well marked and there are just a couple areas of rock scrambling. However, the difficult part is hiking a long distance every day and carrying heavy packs. You should be used to hiking 10+ miles on a day hike and carrying a heavy bag.
Can you hike the W Trek solo?
While I did not hike the W Trek solo, I would be very comfortable doing so. I thought that the trail was well marked and felt very safe. With the shared dorms and communal dinners, it’s really easy to meet other hikers and make friends along the way.
Would you recommend the W Trek or doing day hikes?
My experience on the W Trek was one I will never forget and I think it is very much worth doing! If you have the time, I highly recommend doing the entire W trek instead of just day hikes.
Is the water safe to drink in Torres Del Paine National Park?
The water tends to be safe to drink from the water sources at the inns. Some hikers also drink water directly from streams, but I’ve heard mixed reviews and that is not something I would recommend. I recommend bringing a water filter just in case, but it all depends on your comfort level and sensitivity.
Are there mosquitoes on the W Trek?
I did not encounter mosquitoes on the W trek, but I’ve heard that others have during certain months when it is rainy and warm. Bring insect repellent just in case.
What is the hardest part of the W Trek?
I thought the hike to the Base of the Towers was the hardest part of the trek. It’s a long day with a steep climb.
What kind of wildlife will you see on the W Trek?
I saw very little wildlife on the trek, but I did see several condor birds! There are gauchos (llamas) in Torres Del Paine National Park, but it’s rare to see them on this trail. You will likely see them along the roads driving in and out of the parks instead.
Other animals that live in the park but are rare to see are pumas, huemul deer and foxes. There are no bears in Torres Del Paine, so there is no need to carry bear spray.
If you have dreamed about a trip to Patagonia, I hope this guide will help you make it a reality! The W trek and a visit to Torres Del Paine National Park a bucket list experience that you’ll remember for years to come.
If you’re flying all the way to Patagonia, I recommend more adventures than just the W Trek. After the trek, I drove into Argentina to continue my trip. Check out my 2 week Patagonia itinerary and my guide to renting a car in Patagonia to continue planning!
For more Patagonia guides, check out these blogs:
- The Ultimate 2 Week Itinerary for a Patagonia Road Trip
- A Guide to Renting a Car and Driving in Patagonia
- 30 Tips for Hiking the W Trek
- A Detailed Packing List for the W Trek
Thanks for Reading!
Save to Pinterest!

The Best Things To Do in the White Mountains, NH in the Fall
Where to Stay in Yellowstone (Comparing 3 Lodges in the Park)
Let's stay in touch!
Join the Lost with Lydia email list to get monthly travel guides and tips!
You also may like

30 Tips for Hiking the W Trek in Patagonia (Self-Guided)

A Detailed W Trek Packing List: The Ultimate Patagonia Hike
Screen Rant
When star trek: discovery takes place in star trek's timeline (every season).

Your changes have been saved
Email Is sent
Please verify your email address.
You’ve reached your account maximum for followed topics.
Star Trek: Discovery Season 4 Ending Explained (In Detail)
Star trek: discovery season 5 returning cast & new character guide, star trek: discovery makes lower decks' renaissance faire planet live-action canon.
- Star Trek: Discovery takes place in two different eras of the Star Trek timeline: seasons 1 and 2 are prequels set in the mid-23rd century, while seasons 3, 4, and 5 take place in the 32nd century.
- Star Trek: Discovery faced controversy and creative changes but ultimately became the vanguard of Star Trek's distant future.
- Star Trek's 32nd century will be continued after Discovery season 5 by Star Trek: Starfleet Academy.
Star Trek: Discovery takes place in two different eras of the Star Trek timeline. Premiering in 2017, Discovery was the first new Star Trek TV series in 12 years, since Star Trek: Enterprise 's 2005 cancelation. Discovery helped launch the CBS All Access streaming service, which was rebranded as Paramount+. Controversial since its inception, Discovery was nonetheless successful enough to spin off multiple Star Trek series on Paramount+. Discovery is also the first Star Trek series to run for five seasons since Star Trek: Voyager , although the upcoming Star Trek: Discovery s eason 5 is also the show's last.
Created by Bryan Fuller, Star Trek: Discovery was originally conceived as an anthology that would take place in different eras with different characters. Behind-the-scenes creative conflicts saw Fuller leave the series before Star Trek: Discovery premiered, and season 1's showrunners were also replaced by Alex Kurtzman and Michelle Paradise for season 2, with Paradise later becoming sole showrunner. Star Trek: Discovery is canonically part of Star Trek 's Prime Timeline , although the show's visual style and story created doubt in some fans' minds. Star Trek: Discovery has deep roots in the era of Star Trek: The Original Series, but Discovery is now the vanguard charting the farthest point of Star Trek 's distant future.
Star Trek: Discovery's season 4 finale saw Captain Burnham face Species 10-C and save the galaxy, setting up a brighter season 5 of exploration.
When Star Trek: Discovery Season 1 & 2 Take Place
Discovery began as a prequel to star trek: the original series.
Star Trek: Discovery seasons 1 and 2 are prequels set in the mid-23rd century, approximately a decade before the five-year mission of the Starship Enterprise commanded by Captain James T. Kirk (William Shatner). Star Trek: Discovery season 1 takes place in 2256 and 2257, depicting a devastating war between the Klingon Empire and the United Federation of Planets that was partly instigated by Commander Michael Burnham, the adopted daughter of Vulcan Ambassador Sarek (James Frain). Discovery season 1 covers the beginning of the Klingon War into its conclusion, with a spectacular multi-episode detour into the Mirror Universe that brought Emperor Philippa Georgiou (Michelle Yeoh) into Star Trek 's Prime Timeline.
Star Trek: Discovery season 2 was better received than its debut season , thanks to the introduction of Captain Christopher Pike (Anson Mount), Spock (Ethan Peck), and Number One (Rebecca Romijn). Pike left his post on the USS Enterprise to Captain the USS Discovery on a mission to uncover the Red Angel and save the galaxy from Section 31's genocidal A.I. called Control. Star Trek: Discovery season 2 ended with the shocking exit of the USS Discovery and Michael Burnham from the 23rd century as they permanently traveled 930 years into the future. Meanwhile, Pike, Spock, and Number One proved so popular that they received their own spinoff, Star Trek: Strange New Worlds .
Star Trek: Strange New Worlds season 1 picks up in 2259, a few months after Michael Burnham and the USS Discovery's one-way journey to the 32nd century.
When Star Trek: Discovery Season 3, 4 & 5 Take Place
Discovery traveled to the uncharted, distant future.
Star Trek: Discovery seasons 3, 4, and 5 take place in the 32nd century, which is the farthest known point in Star Trek 's Prime Timeline . Commander Burnham arrived before her starship in 3188 and waited a year until she was joined by the USS Discovery. In Star Trek: Discovery season 3 , Burnham and the Discovery found the 32nd century Federation shattered by a galactic cataclysm called The Burn that eliminated warp drive from the galaxy. Burnham and her crew solved the mystery of The Burn and returned warp travel to the Federation.
In Star Trek: Discovery season 4, which takes place in 3190 , Captain Michael Burnham and her starship faced the Dark Matter Anomaly, a planet-killing entity that threatened the Federation. Cleveland Booker (David Ajala), seeking revenge for the DMA destroying his home planet of Kwejian, teamed up with mad scientist Dr. Ruon Tarka (Shawn Doyle) to destroy the DMA's creators, Species 10-C. The USS Discovery ultimately crossed the Galactic Barrier into another galaxy to make peaceful First Contact with Species 10-C, with Book coming to his senses and helping Captain Burnham and Discovery.
Star Trek: Discovery season 5 takes place in 3191 and centers on the USS Discovery's Red Directive mission to locate the ancient technology of the Progenitors. Introduced in the Star Trek: The Next Generation season 6 episode "The Chase", the Progenitors are the ancient humanoids who seeded life throughout the galaxy. Captain Burnham and the USS Discovery followed clues to the Progenitors' life-creating technology , which also must be safeguarded from the Breen.
Star Trek: Discovery season 5 wasn't produced as the final season, and the cast and crew found out after the season finished filming that Paramount+ canceled the series.
Why Star Trek: Discovery Changed Timelines
Discovery soft-rebooted itself in season 3.
Star Trek: Discovery 's series trajectory is perhaps the most unusual of any Star Trek series, which are historically each based in one particular era, be it the 22nd, 23rd, 24th, or 25th centuries. While Star Trek: Discovery season 1 found plenty of fans, there was a hostile pushback from longtime Trekkers because of the series' irreconcilable anachronisms and technology, like the USS Discovery's game-changing spore displacement hub drive . Ultimately , the bold decision was made to change Discovery 's place in Star Trek' s timeline , which ended complaints about the series violating the 23rd-century Star Trek canon.
The 23rd-century prequel era was turned over to Star Trek: Strange New Worlds, which has been far better received overall than Discovery was in that same timeline.
Jumping 900 years forward into the 32nd century gave Star Trek: Discovery a renewed status as the first Star Trek series of an expanding universe on Paramount+. Discovery was the flagship of Star Trek on Paramount+, and setting up shop in the 32nd century gave Captain Burnham and Discovery the honor of charting Star Trek 's future . Star Trek: Discovery doesn't end where or when it began, but Captain Michael Burnham is now an anchor of two opposite points in Star Trek 's vast timeline.
Star Trek: Starfleet Academy Continues The 32nd Century After Star Trek: Discovery Ends
The next star trek series picks up where discovery leaves off.
Star Trek: Starfleet Academy is the next Star Trek series on Paramount+. Star Trek: Discovery set up Starfleet Academy, even shifting Lt. Sylvia Tilly (Mary Wiseman) to become an instructor at the reopened school. Starfleet Academy is confirmed to continue Star Trek: Discovery 's 32nd century , and the setting will reportedly return to San Francisco on Earth.
Tawny Newsome, who plays Lt. Beckett Mariner on Star Trek: Lower Decks , is one of the writers of Star Trek: Starfleet Academy.
Starfleet Academy' s showrunners are Alex Kurtzman and Noga Landau, and the series will film on the largest sets ever constructed for Star Trek . Some familiar faces from Star Trek: Discovery may appear in Starfleet Academy . With production slated to kick off in fall 2024, Star Trek: Starfleet Academy may not premiere on Paramount+ until 2026.
As Burnham seeks the universe's greatest treasure in Star Trek: Discovery season 5, she'll need help from a host of new and returning characters.
Will Star Trek: Discovery Season 6 Or Star Trek: Discovery Movies Happen?
There could still be the possibility of more discovery.
There has been no indication that Star Trek: Discovery will return for season 6 . Paramount is in talks about a pending sale of the studio, which will impact future Star Trek productions. This is likely a factor in the cancelation of Star Trek: Discover y and the decision to also end Star Trek: Lower Decks . However, along with the potential for Star Trek: Discovery characters to appear in Star Trek: Starfleet Academy , there is a possibility that Star Trek: Discovery could receive its own streaming movie on Paramount+.
Star Trek: Strange New Worlds is completing production on season 3 and received an early season 4 renewal from Paramount+.
The first Star Trek movie made-for-streaming on Paramount+ is Star Trek: Section 31 starring Academy Award-winner Michelle Yeoh. Section 31 is a spinoff of Star Trek: Discovery , with Yeoh reprising her role as Emperor Philippa Georgiou. Paramount+ is reportedly pleased with Section 31 's production and is considering the future of Star Trek streaming movies . Perhaps Star Trek: Discovery 's cast could reunite for a 2-hour movie on Paramount+.
Star Trek: Discovery is streaming on Paramount+
Who is Barron Trump? What to know about Donald Trump's son graduating high school

Former President Donald Trump and First Lady Melania Trump's youngest son, Barron Trump, will graduate high school on Friday, but what's next for him?
What to know about Oxbridge Academy
Barron is set to graduate from Oxbridge Academy in Palm Beach, Florida, an elite preparatory school for grades six through 12. The school prides itself on its annual 100% college acceptance rate, with half of the graduates attending a top 100 U.S. university or a top 50 liberal arts college
More: Oxbridge asks media, onlookers to stay away from graduation for Barron Trump, other seniors
Who is Barron Trump?
18-year-old Barron is the youngest and sole child of Donald and Melania.
Prep for the polls: See who is running for president and compare where they stand on key issues in our Voter Guide
Where is Barron Trump's graduation?
The graduation is being held at Oxbridge Academy but is "private, by invitation only," as reported by The Palm Beach Post.
Where is Barron Trump's college plan?
No official statement has yet been issued, but Donald and three of his older children, including Donald Jr., Ivanka, and Tiffany, all attended the University of Pennsylvania.
More: Barron Trump "declined" delegate invite to GOP convention, Melania Trump said in statement
Is Donald Trump's son involved in politics?
Although Barron is old enough to vote for his father in November, he won't be casting a ballot as a delegate at this summer's Republican National Convention, as was previously announced.
The Palm Beach Post reported that Melania issued a statement through her office saying that while the 18-year-old was "honored" to have been offered the opportunity, he declined the offer. The statement cited Barron's "prior commitments" for the decision but did not elaborate.

Advertisement
Caitlin Clark drops first WNBA game: Scores 20 points with 10 turnovers in Indiana Fever's 92-71 loss to Connecticut Sun
Caitlin Clark loses first game in WNBA debut for Fever
The Connecticut Sun showed why they were one of the best teams in the league last season on Tuesday night, defeating the Fever 92-71 to spoil Caitlin Clark 's WNBA debut. Clark finished with a team-high 20 points, but she also had 10 turnovers, the most-ever in WNBA history for a player's first game.
Sun forward Alyssa Thomas recorded a 13-point, 13-assist, 10-rebound triple-double (the 12th of her career), and Connecticut's DeWanna Bonner added 20 points and moved into fifth all-time on the WNBA's career points list.
Clark, the No. 1 pick in last month's draft, averaged 16.5 points, 5.5 rebounds and 4 assists per game in two preseason games. She and Aliyah Boston , the No. 1 pick in last year's draft, will lead the Fever against a Sun team projected to be in the WNBA's upper echelon.
Required reading
- WNBA 2024 expert debate: How far can Caitlin Clark take the Indiana Fever?
- How have top WNBA draft picks fared in their debuts?
- WNBA preseason power rankings: Can anyone catch the Las Vegas Aces?
Find the best deals on tickets to see your favorite teams.

Court conversion
Here's how it looked as Indiana's court converted from the Pacers to the Fever.

3 takeaways from Clark's debut
Playing in front of a packed and loud crowd was nothing new for Caitlin Clark, who made her WNBA debut in a 92-71 loss to the Connecticut Sun at Mohegan Sun Arena on Tuesday.
The competition, however, was another story.
Clark re-entered the game in the fourth quarter, with her Indiana Fever trailing by double digits. If the first three periods hadn’t been trying enough, a new challenge awaited Clark: five-time WNBA All-Defensive selection Alyssa Thomas was about to pick her up on the perimeter.

What we learned in Caitlin Clark’s WNBA debut: 3 takeaways
On the bright side ...
Despite some of Clark's struggles in her debut, she joined elite company in other ways.
Home opener next for Fever
The Fever will host the New York Liberty on Thursday for Clark's home debut. The Liberty, who played in last season's WNBA Finals, is another tough opponent.
Strong opener for NaLyssa Smith
Smith was one point away from a double-double.

Turnovers plague Clark
Clark is up to double-digit turnovers in her first WNBA game. Her 10 turnovers are the most in a game in Fever history and are a record for the most in a career-debut, according to ESPN Stats and Information. She recorded 10 or more turnovers only three times throughout her college career.
Alyssa Thomas notches triple-double
Sun's Alyssa Thomas just grabbed a defensive rebound and now has a triple-double. That's the 12th of her WNBA career, including playoffs, continuing to stretch her record for most in league history.
Clark up to 20 points
Caitlin Clark has reached the 20-point mark in her first career WNBA game. She also has nine turnovers, and is only 5-of-12 from the field, but she certainly is still able to score in bunches.
A deep 3-pointer from Clark
Clark hit her fourth 3-pointer and is up to 18 points. She's 5 of 7 after starting 0-for-4 shooting.
Tough defender on Clark
Alyssa Thomas is now guarding Caitlin Clark. That's a real Welcome to the WNBA matchup for the rookie guard.
Can the Fever come back?
Indiana is staying within striking distance entering the fourth quarter, which should be a familiar sight for those who followed the Fever during the 2023 season. They played more clutch minutes than any team in the WNBA (defined as being within 5 points in the final five minutes), going 10-16 in those clutch games.
Carrington to locker room with possible cramps
DiJonai Carrington, who has 16 points for the Sun, headed to the locker room with what appears to be a leg cramp.
Bonner moves up scoring ladder
With her last basket, DeWanna Bonner just moved into fifth all-time in WNBA career points. The sellout crowd here just showered her with an ovation and she made a heart out of her two hands to acknowledge them. Moments before fans gave Bonner a moment of appreciation, she let out a roar after Fever coach Christie Sides called timeout. Indiana had cut Connecticut's lead to 6, but the Sun responded to get it back to 12.
Clark up to 8 turnovers
Here's a part of the box score people probably didn't predict heading into the night: With 5:29 to play in the third quarter, Clark has as many turnovers (8) as shot attempts (8). She just picked up a third foul, as well.
Clark with 6 turnovers but Fever hanging in
Connecticut coach Stephanie White has called an early timeout, less than three minutes into the third quarter. Erica Wheeler just hit a 3-pointer to slash the Sun's lead to nine points. Clark is up to 6 turnovers, but the Fever are doing a good job hanging in.
A look at Clark's 3
Clark hit her first 3-pointer.
Sun lead Fever 48-32 at half
Halftime here in Mohegan Sun Arena. The Sun lead the Fever 49-39. Indiana looks like a team that is playing in its first game of the season, and it's first game together. They have 8 turnovers, have struggled to convert fastbreak opportunities and are shooting only 40 percent from the field.
It took Clark until midway through the second quarter to finally get on the scoresheet, but she ended the half with seven points on 2-of-7 shooting from the field. She assisted Aliyah Boston on Indiana's first offensive trip of the game, but hasn't recorded an assist since. Clark also has a game-high 5 turnovers.
Clark hits first WNBA 3-pointer
Clark has hit her first career 3-pointer, and of course it came on the left wing. She made more 3-pointers from the left wing last season at Iowa than any other location. She's now up to 7 points.
DiJonai Carrington making case for extension
With all eyes on Clark for her debut, this game is a potentially lucrative opportunity for her primary defender, DiJonai Carrington. Carrington is currently eligible for an extension on her rookie contract, but only until tomorrow, May 15. This is a prime spotlight for Carrington to make her case for a raise on her next deal.
- SI SWIMSUIT
- SI SPORTSBOOK
Backup NFL Quarterbacks Who Could Win on the 49ers
Grant cohn | may 17, 2024.
 throws the ball")
- San Francisco 49ers
The current backup quarterback for the Rams, Jimmy Garoppolo, had a 38-17 record with the 49ers before he crashed and burned as the Raiders starting quarterback.
How many other backup NFL quarterbacks could win if they were the starter for the 49ers? Let's go through all 32 backups and find out.
Desmond Ridder, Arizona Cardinals. He went 6-7 with the Falcons last season, so yeah, he probably could win on the 49ers.
Sam Howell, Seattle Seahawks. He led the league in interceptions and sacks last season while losing 13 games for Washington, so there's no indication he could anywhere.
Jimmy Garoppolo, Los Angeles Rams. We know he can win with the 49ers because he did so aleady.
Joshua Dobbs, San Francisco 49ers. He went 2-2 last season with the Vikings, so yeah, he probably can win with the 49ers, at least for a few weeks.
Michael Penix Jr., Atlanta Falcons. He's just a rookie, but he threw nearly 1,700 passes in college and he's good in the pocket, so yeah, he probably could win on the 49ers.
Kyle Trask, Tampa Bay Buccaneers. He has thrown 10 passes in his career and completed just 3 of them, so no, he probably couldn't win on the 49ers.
Jake Haener, New Orleans Saints. He never has thrown a pass in his professional career, but he completed more than 68 percent of his passes in college, so yeah, he probably could win on the 49ers.
Andy Dalton, Carolina Panthers. He'll be 37 in October and he hasn't had a winning season since he was 29, so no, he probably couldn't win on the 49ers at this stage of his career.
Hendon Hooker, Detroit Lions. He threw 80 TD passes and just 12 interceptions in college, plus he beat Alabama, so yeah, he probably could win on the 49ers.
Sean Clifford, Green Bay Packers. He wasn't even good in college, so no, he probably couldn't win on the 49ers.
Tyson Bagent, Chicago Bears. He was 2-2 on the Bears last season, so yeah, he probably could win on the 49ers.
J.J. McCarthy, Minnesota Vikings. He went undefeated while playing in Jim Harbaugh's pro-style system at Michigan last season, so yeah, he probably could win on the 49ers.
Drew Lock, New York Giants. He's 9-14 in his career on bad teams, so yeah, he probably could win on the 49ers.
Cooper Rush, Dallas Cowboys. He's 5-1 in his career, so yeah, he probably could win on the 49ers.
Kenny Pickett, Philadelphia Eagles. He's 14-10 in his career, so yeah, he probably could win on the 49ers.
Marcus Mariota, Washington Commanders. He beat the 49ers two seasons ago, so yeah, he probably could win on the 49ers.
Carson Wentz, Kansas City Chiefs. He's 4-1 in his career against the 49ers, so yeah, he probably could win on the 49ers.
Easton Stick, Los Angeles Chargers. He's 0-4 in his career, so no, he probably couldn't win on the 49ers.
Zach Wilson, Denver Broncos. He's freaking terrible, so no, he probably couldn't win on the 49ers or anywhere.
Gardner Minshew, Las Vegas Raiders. He was 7-6 last season with the Colts, so yeah, he probably could win on the 49ers.
Case Keenum, Houston Texans. He's 30-36 in his career and he has been to an NFC Championship game, so yeah, he probably could win on the 49ers.
Mac Jones, Jacksonville Jaguars. He was 18-24 on a bad Patriots team, so yeah, he probably could win on the 49ers.
Joe Flacco, Indianapolis Colts. He was 4-1 last season with the Browns, so yeah, he probably could win on the 49ers.
Mason Rudolph, Tennessee Titans. He's 8-4-1 in his career, so yeah, he probably could win on the 49ers.
Josh Johnson, Baltimore Ravens. He's 1-8 in his career and he was terrible with the 49ers in the NFC Championship Game, so no, he probably couldn't win on the 49ers.
Jake Browning, Cincinnati Bengals. He led the NFL in completion percentage last season, so yeah, he probably could win on the 49ers.
Jameis Winston, Cleveland Browns. He was 6-4 the past few seasons with the Saints, so yeah, he probably could win on the 49ers.
Justin Fields, Pittsburgh Steelers. He's 10-28 in his career and he doesn't process coverages quicky, so no, he probably couldn't win on the 49ers.
Mitchell Trubisky, Buffalo Bills. He's 31-26 in his career, so yeah, he probably could win on the 49ers.
Mike White, Miami Dolphins. He's 29 and has won only two games in the NFL, so no, he probably couldn't win on the 49ers.
Tyrod Taylor, New York Jets . He's 28-28-1 in his career, so yeah, he probably could win on the 49ers.
Drake Maye, New England Patriots. He's a rookie who's a project, so no, he probably couldn't win on the 49ers, at least not right away.
By my count, 21 of the 32 backup quarterbacks in the NFL could win on the 49ers, as well as 31 of 32 starters .
Good to know.
Grant Cohn has covered the San Francisco 49ers daily since 2011. He spent the first nine years of his career with the Santa Rosa Press Democrat where he wrote the Inside the 49ers blog and covered famous coaches and athletes such as Jim Harbaugh, Colin Kaepernick and Patrick Willis. In 2012, Inside the 49ers won Sports Blog of the Year from the Peninsula Press Club. In 2020, Cohn joined FanNation and began writing All49ers. In addition, he created a YouTube channel which has become the go-to place on YouTube to consume 49ers content. Cohn's channel typically generates roughly 3.5 million viewers per month, while the 49ers' official YouTube channel generates roughly 1.5 million viewers per month. Cohn live streams almost every day and posts videos hourly during the football season. Cohn is committed to asking the questions that 49ers fans want answered, and providing the most honest and interactive coverage in the country. His loyalty is to the reader and the viewer, not the team or any player or coach. Cohn is a new-age multimedia journalist with an old-school mentality, because his father is Lowell Cohn, the legendary sports columnist for the San Francisco Chronicle from 1979 to 1993. The two have a live podcast every Tuesday. Grant Cohn grew up in Oakland and studied English Literature at UCLA from 2006 to 2010. He currently lives in Oakland with his wife.
Follow grantcohn
IMAGES
VIDEO
COMMENTS
W trek in Torres del Paine - a 4-day itinerary. If for some reason your time in Torres del Paine is limited you can walk the W trek in 4 days. Day 1. Paine Grande campsite - Grey campsite - Paine Grande campsite, 22 km/13,6 mi. Bus Puerto Natales Torres del Paine (Pudeto); ferry Pudeto - Paine Grande, 3-4 hours.
The most popular trek in Patagonia, the Torres Del Paine W Trek is fast becoming one of the most well-respected short hikes in the world due to the trail's stunning scenery. Guanaco in Torres Del Paine. Located in the amazing Torres del Paine National Park which was made a World Biosphere Reserve by UNESCO in 1978.
The W Trek ends with the walk back down Valle Ascencio to Hotel Las Torres (2 hours; 5.5km). From here, you can either catch 2pm shuttlebus (CH$5000) to Laguna Armarga in order to board the 2.30pm bus back to Puerto Natales or walk the extra 1.5 hours to Laguna Amarga Ranger Station yourself just make sure you arrive in time to get one of the ...
Start/Finish point: Puerto Natales/Central Sector - Paine Grande/Puerto Natales; The W Trek is one of South America's best hiking routes. Nestled deep in Chilean Patagonia in the south of this remarkable, lengthy country, the iconic views on the route range from the jagged peaks which give Torres del Paine National Park its name to the ...
The W Trek in Patagonia is a moderately difficult hike covering 46 miles (76km) and typically takes 4-5 days to complete. It includes mainly gentle terrain with some challenging climbs of up to 800m. Be sure to come prepared for varying weather conditions.
The red line is the Torres del Paine W Trek. You can see it forms a W on the map. Length: 80 km (50 mi) Elevation gain: 2,730 m (8,956 ft) Route type: Point to point Difficulty: Moderate The Torres del Paine W Trek is part of the complete circuit around the national park called the "O Circut" or "Big Circut".
But that walking can be spread out between three and seven days, making it a manageable trip for those new to trekking. We decided to take four days but needed another day of travel to reach the hike's launch point at Glacier Grey. The W-Trek is normally walked east to west, starting at Refugio Las Torres and ending at Refugio Paine Grande.
1 Travel Guide to Hiking the W Trek in Patagonia. 1.1 Hiking the W Trek Basics. 1.2 Accommodation on the W Trek. 1.3 When to Tackle the W Trek. 2 Getting Started: Where to Fly Into and How to Get There. 2.1 Puerto Natales - The Gateway to Torres del Paine National Park.
Booking Camping and Accommodation on the W Trail. Bus tickets to and from Torres del Paine. Packing for the W Trek. Our Self-guided itinerary for hiking the W Trail. Day 1 - Puerto Natales to Chileno via Las Torres. Day 2 - Chileno to Francés. Day 3 - Francés to Paine Grande via Francés Valley. Day 4 - Paine Grande to Grey.
Getting to Puerto Natales: To reach the starting point of the W Trek, you'll likely fly into Santiago and then take a flight to Teniente Julio Gallardo Airport (PNT) in Puerto Natales. A 10-minute taxi ride will transport you from the airport to the downtown area, where most accommodations are situated.
Hiking the W trek requires a ton of advanced planning. All of the campsites are run by different operators and fill up from 6 months to even a year in advance. Getting your desired dates and sites can be difficult. If you hike the W Trek with a tour, you can be more spontaneous with your travel plans since the campsite reservations are made for ...
Once in Puerto Natales, buses to Torres del Paine leave several times a day, with at least one morning and one afternoon departure. If you plan to hike the W trek in 4-5 days, you definitely need to catch a morning bus. Check updated timetables at the bus station when you arrive, as schedules can and do change.
The W Trek in Torres del Paine can be done in either direction, starting from either the Torres del Paine Welcome Center on the east side or Lago Grey on the west which requires a boat ride over. Deciding which side to start from simply comes down to preference and logistics, with the availability of refugios (the campsites that hikers stay at ...
Ascent: 2956 ft of elevation gain. Time: 7 - 9 hours. The first day of this 4 day W trek itinerary in Patagonia will cover a lot of ground. You'll kick off the day bright and early departing from Puerto Natales. A 2-hour drive delivers you to the Laguna Amarga entrance gate of Torres del Paine National Park.
W TREK ITINERARY. By far the most popular trek in the park, most people complete the W hike in 3-5 days. You can complete the W trek in either direction, either starting at Paine Grande/Glacier Grey or at the Torres. We recommend starting at Paine Grande and saving the best for last, but that is merely our opinion. Below is the itinerary for ...
Distance: 13 kilometers (8 miles) plus 8 kilometers (5 miles) for the hike from the Centro de Bienvenida to Laguna Amarga) Duration: 6 hours hiking (add an extra 1.5-2 hours for the hike to Laguna Amarga) 4:30am Wake up and take a small bag (including warm clothes and a snack) to see the torres at dawn.
Rental Camping Gear Prices. Here's a rundown of the usual rental camping gear costs for the Torres del Paine W Trek in Patagonia. In total, by renting gear for three nights, costs should be around $60,000CLP ($70USD) for two people. Usually, a $30,000CLP ($35USD) deposit is also required.
Starting Point: Sector Paine Grande Highlight: Valle del Frances (French Valley) Ending Point: Sector Frances Distance: 12.0 miles / 19.3 km Elevation Gain: 2,995 feet / 913 meters Duration: 8 hours. Up next on the W Trek of Torres del Paine is the hike from Paine Grande to Frances.
On the self-guided W Trek this is commonly done as an out and back route, but on guided hikes/tour packages it's usually a one-way journey (returning via ferry on Lago Grey). For the day hike option, it's best done as an out and back due to a lack of public transportation from the Lago Grey ferry to the hike's starting point.
Just one of the many tongues of frozen water that cascade down from the great Southern Patagonia Ice Field, Grey Glacier is either the grand finale or the starting point of the W Trek. It's everything you imagine of a South American ice cap, sporting 98-foot high (30-meter) walls that rise suddenly from the turquoise waters of Lake Grey.
Refugio Paine Grande is a large refugio and also the start, or drop off point, for the catamaran that operates between Paine Grande and Pudeto. Some people terminate their Trek here, whilst others prefer to do the "full W Trek" and continue on to Refugio Grey, located at the far western arm of the trail, close to Glacier Grey.
Day 8: Third Day of W Trek (French Valley) This day features one of the most memorable portions of the W Trek: the undeniably beautiful Valle Francés. Once you are packed and ready to start, you will begin early with a light hike to the Italiano Campsite. At this point, you will progress through the woods up the Francés River Valley.
The elevation of this region is relatively low (2,788 feet is the highest point on the W Trek), so you shouldn't have an issue adjusting to the altitude. ... From there, you will take a smaller shuttle bus to get to the start of the W Trek. This bus costs an extra fee of 4000 Chilean pesos per person in cash. It was a quick, 10 minute bus ...
Star Trek: Discovery seasons 3, 4, and 5 take place in the 32nd century, which is the farthest known point in Star Trek's Prime Timeline.Commander Burnham arrived before her starship in 3188 and waited a year until she was joined by the USS Discovery. In Star Trek: Discovery season 3, Burnham and the Discovery found the 32nd century Federation shattered by a galactic cataclysm called The Burn ...
Barron is set to graduate from Oxbridge Academy in Palm Beach, Florida, an elite preparatory school for grades six through 12. The school prides itself on its annual 100% college acceptance rate ...
Sun forward Alyssa Thomas recorded a 13-point, 13-assist, 10-rebound triple-double (the 12th of her career), and Connecticut's DeWanna Bonner added 20 points and moved into fifth all-time on the ...
Jake Browning, Cincinnati Bengals. He led the NFL in completion percentage last season, so yeah, he probably could win on the 49ers. Jameis Winston, Cleveland Browns. He was 6-4 the past few ...